
Popular categories
Looking for a yarn?


Comments / Questions (49)
![]() Anne wrote:
Anne wrote:
Prima, vielen Dank 😊
28.01.2026 - 21:03
![]() Anne wrote:
Anne wrote:
Ich möchte diesen Pullover gerne mit Drops Lima stricken, LL 100m/50g, hier ist er in Drops Sky LL 190m/50g gestrickt. Beides ist Garngruppe B. Wie kann ich das umrechnen, wenn ich die Wolle bestelle, denn das ist ja fast doppelte Lauflänge...
27.01.2026 - 16:44DROPS Design answered:
Liebe Anne, am besten verwenden Sie den Garnumrechner, den Link dazu finden Sie im unteren Bereich des Kopfes der Anleitung (in dem Block unter der Maschenprobe). Dort können Sie die Garnmenge des Ursprungsgarns eingeben und sich dann die benötigte Garnmenge für Garne der gleichen Garngruppe anzeigen lassen. Viel Spaß beim Stricken!
28.01.2026 - 20:03
![]() Lena Maria wrote:
Lena Maria wrote:
Hallo, ich habe eine Frage zu Folgendem: Nach dem ersten Wechsel zu Ndl.St. 4 heißt es: „Glatt rechts in Runden stricken. Bei einer Länge von 4 cm im Muster wie folgt stricken:…“ . Bedeutet dies, dass ich das Muster A1 über 4cm lang stricke? Oder 4cm glatt rechts stricke und dann erst mit dem Muster A1 starte? Ich verstehe nicht, wie lang ich das Muster Stricken soll. Es heißt: „wenn A.1 in der Höhe zu Ende gestrickt wurde...“ Sind hier die o.g. 4 cm gemeint? Vielen Dank.
01.01.2026 - 12:16
![]() Caro wrote:
Caro wrote:
Ja, SUPER! Vielen Dank für den Link zu diesem Video :-) DAS war genau DAS was ich brauche und wissen wollte :-) Nun komme ich weiter. Freundliche Anregung: Vielleicht mögen Sie diesen Link in der Anleitung ergänzen, da hier in den F&Q einige danach fragten. Beste Grüße Caro
14.08.2025 - 16:16
![]() Caro wrote:
Caro wrote:
Es geht um diesen Passus: "Bei einer Länge des Rippenmusters von 18 cm die Arbeit von innen nach außen wenden, sodass die Innenseite nun also zur Außenseite wird. Dies erfolgt, damit das Rippenmuster nicht versetzt erscheint, wenn es später umgeschlagen wird." Und meine ursprünglichen Fragen dazu. Hoffnungsvolle Grüße und besten Dank vorab.
12.08.2025 - 20:15DROPS Design answered:
Liebe Caro, in diesem Video zeigen wir, wie man die Arbeit von innen nach außen wendet, und dann strickt man weiter in Bündchen wie zuvor: 1 Masche rechts verschränkt, 1 Masche links bis die Arbeit 24 cm misst. Habe ich dieses Mal richtig verstanden?
13.08.2025 - 07:55
![]() Caro wrote:
Caro wrote:
Sorry, meine Frage wurde NICHT beantwortet 😐 Es geht um den Umschlag bei 18cm und nicht um den Übergang zur Passe. Bitte beantworten Sie meine Frage möglichst detailliert und konkret. Wie in den Q&A ersichtlich haben schon einige sich diese Frage gestellt. Danke
11.08.2025 - 11:02DROPS Design answered:
Liebe Caro, meinen Sie die 18 Maschen in XL, die man regelmäßig verteilt (Absatzt GRÖSSE S, M, L, XL und XXL:
zunehmen muss? Diese werden mit einem Umschlag gestrickt, bei der nächsten Runde stricken Sie diese Umschläge rechts verschränkt - siehe
![]() Caro wrote:
Caro wrote:
Wie und was genau nach dem Umschlag weiter gestrickt werden soll, geht aus der Anleitung nicht eindeutig hervor. Soll hier über 2-3 R eine s.g. Knickkante eingearbeitet werden oder soll man 1 x die Richtung wechseln, um den Effekt zu erzielen? Wie in den Q&A mit verkürzten Reihen stehen nicht in der Anleitung und möchte ich auch nicht oder gibt es ein "richtiges" Video für nach dem Umschlag? Besten Dank vorab.
08.08.2025 - 18:44DROPS Design answered:
Libe Caro, wenn man am Anfang in das Bündchen zunimmt werden die Umschläge links verschränkt gestrickt so wird das Rippenmuster mit ( 1 Masche recht verschränkt, 2 M links) weitergestrickt (zuerst in jeder 2. links Parti, dann in jeder 1 M links Parti, so wird das Bündchen (1 Masche rechts verschränkt, 2 Maschen links), wenn man die Diagramme A.1/A.2 strickt, werden die Umschläge bei der nächsten Runde (hier strickt man keine verkürzten Reihen) rechts verschränkt, siehe hier wie man so eine Zunahme strickt. Viel Spaß beim Stricken!
11.08.2025 - 07:19
![]() Mary wrote:
Mary wrote:
Hello again! Following my previous question, after turning the work inside out , according to your video , I should slip the first stitch and then start the knitting to avoid a hole at the starting point. If that's the case , should I start with a purl or a twisted knit ? And at the final stitch ( the one I’ve slipped) according to the video I should knit it together with a second stitch that I ‘ve picked up next to it?
30.12.2024 - 12:31DROPS Design answered:
Dear Mary, the best way to change directions in the middle of a piece is by working German short rows as in the following video: https://www.garnstudio.com/video.php?id=1796&lang=en. Slip the 1st stitch from the left needle as if to purl, have the thread at the front towards you, place the thread over the right needle and tighten the thread well before purling the next stitch = the first stitch on the right needle has now become a double stitch (with a stitch and a thread). On the next round: knit the double stitch so that the thread that was placed over the needle and the stitch is knitted together = 1 stitch. Happy knitting!
31.12.2024 - 01:08
![]() Mary wrote:
Mary wrote:
Hi! When I turn the piece inside out after 18cm the yarn is at the left side instead of the right. Should I continue knitting like this starting with a knit 1 twisted ( over the wrong side of a purl stitch) ? Thank you and happy new year!
28.12.2024 - 00:08DROPS Design answered:
Dear Mary, yes, continue like this. Happy knitting!
30.12.2024 - 01:04
![]() Lydie wrote:
Lydie wrote:
Na 18cm van de hals moet je het werk keren zodat de goede kant de verkeerde kant wordt. Is daar een filmpje van? Ik weet niet goed hoe dit moet. Alvast bedankt en fijne kerst.
25.12.2024 - 12:01DROPS Design answered:
Dag Lydie,
Voor zover ik weet is naar geen filmpje van, maar je keert het werk binnenste buiten om vervolgens weer de andere kant op te breien. Als je dan begint met breien zit je breidraad aan de eerste steek op de linker naald.
02.01.2025 - 20:51
|
|||||||
Silver Touch#silvertouchsweater |
|||||||
 |
 |
||||||
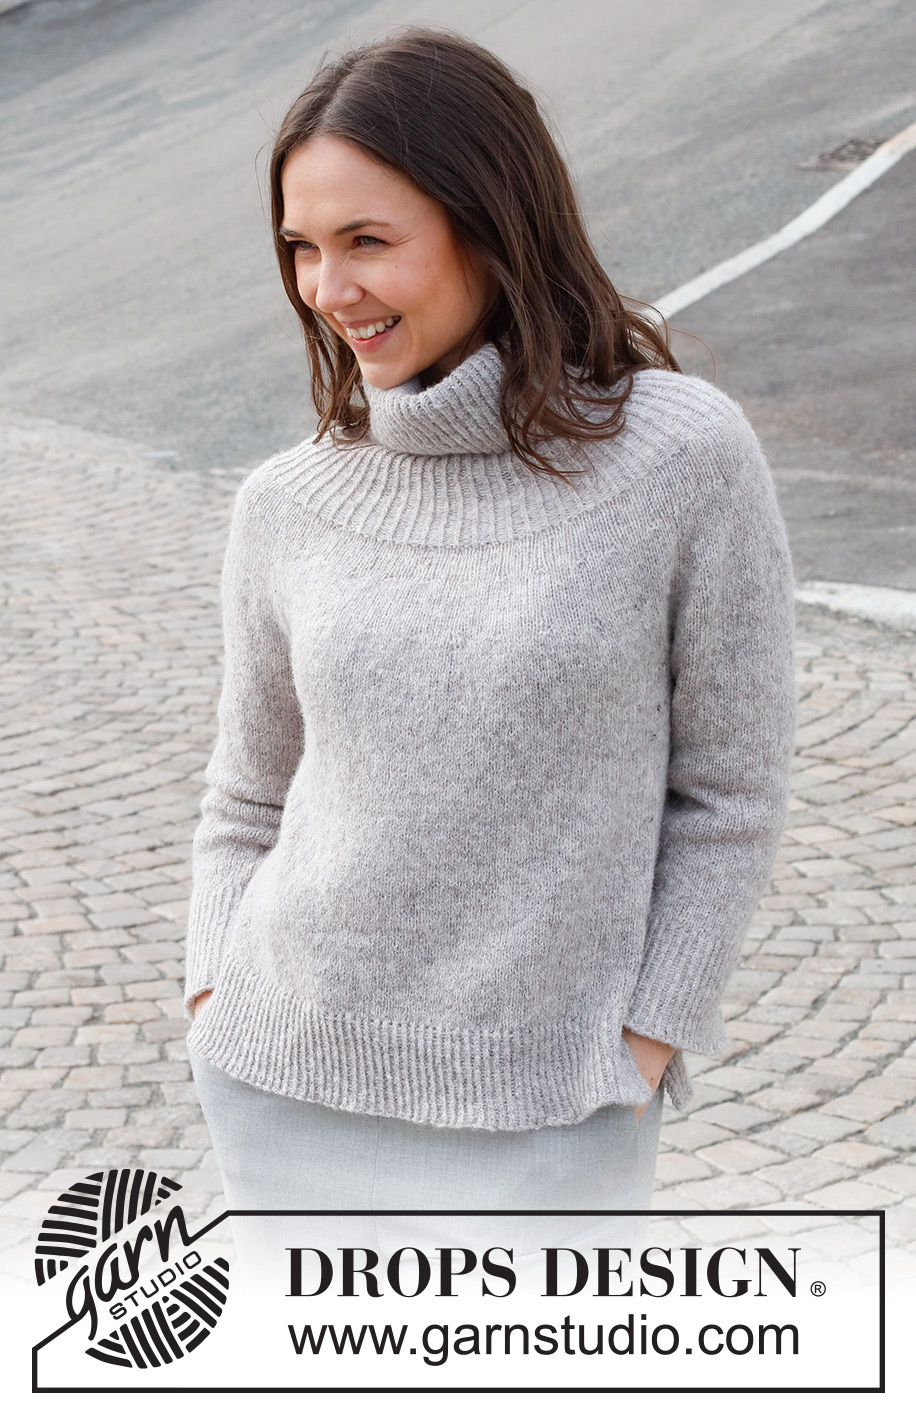
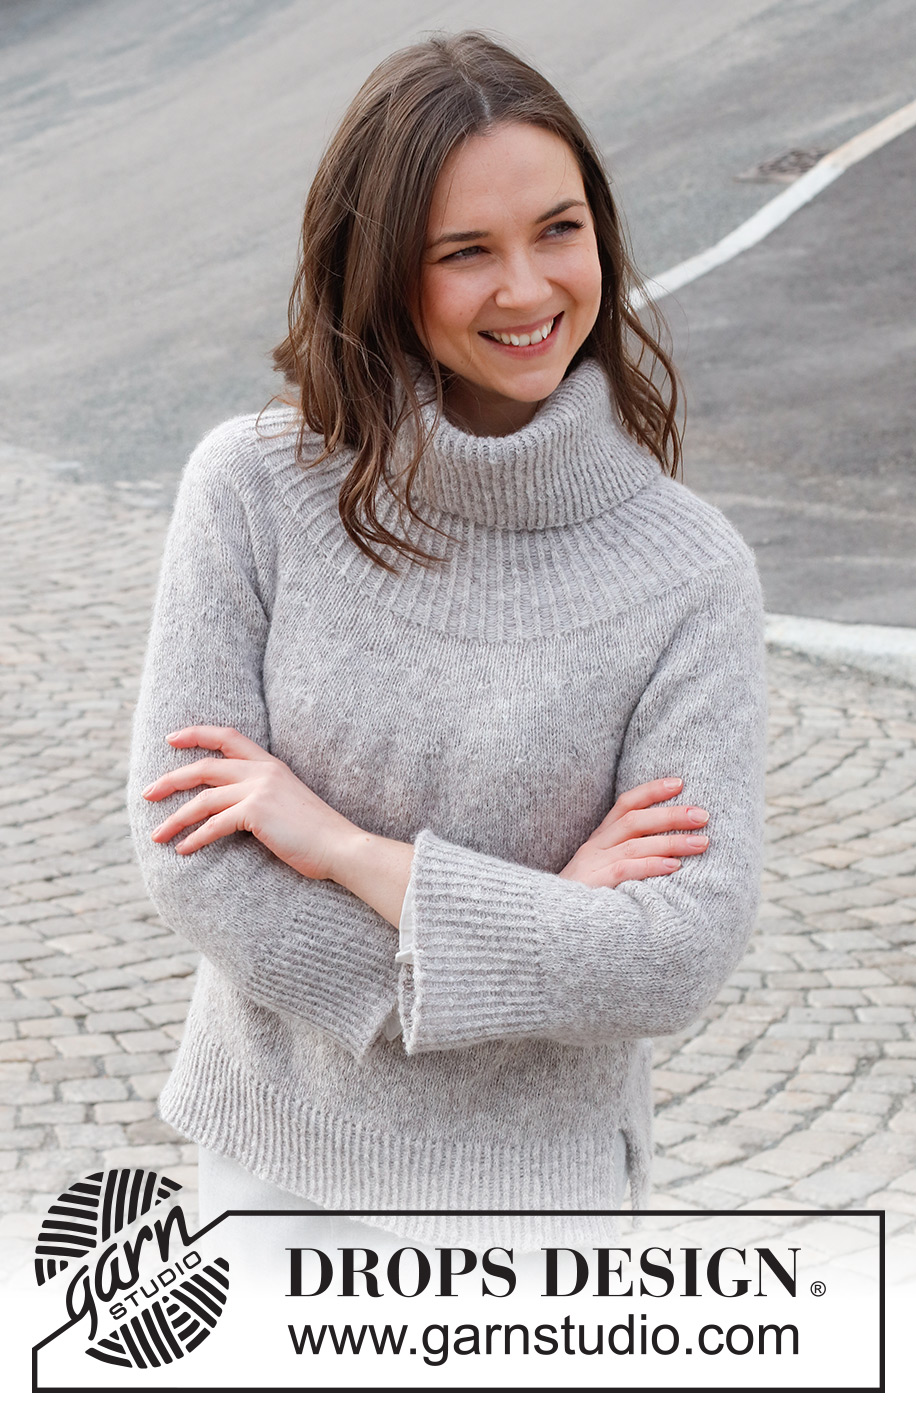
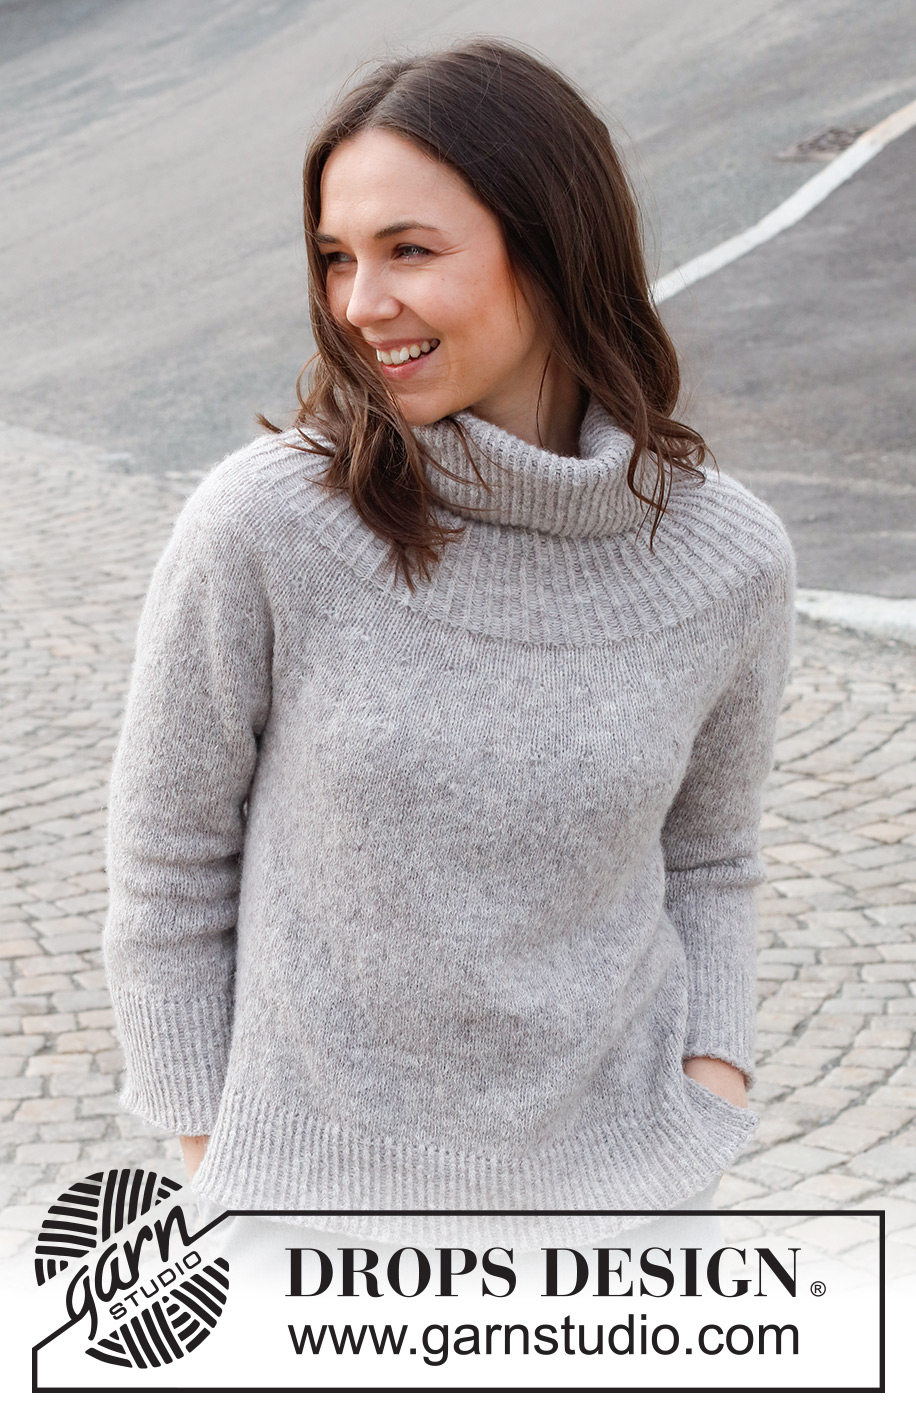
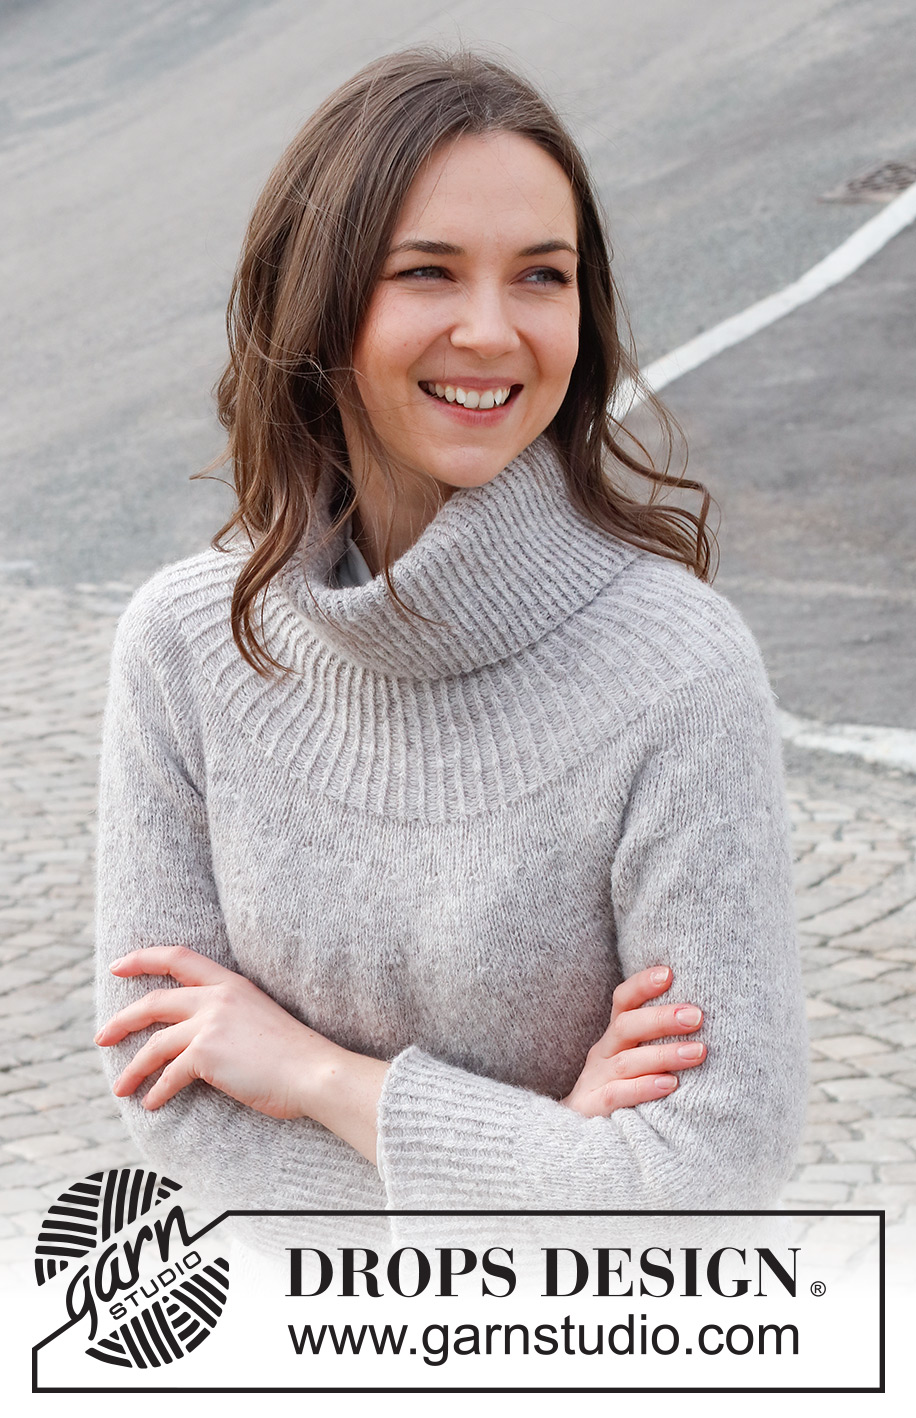
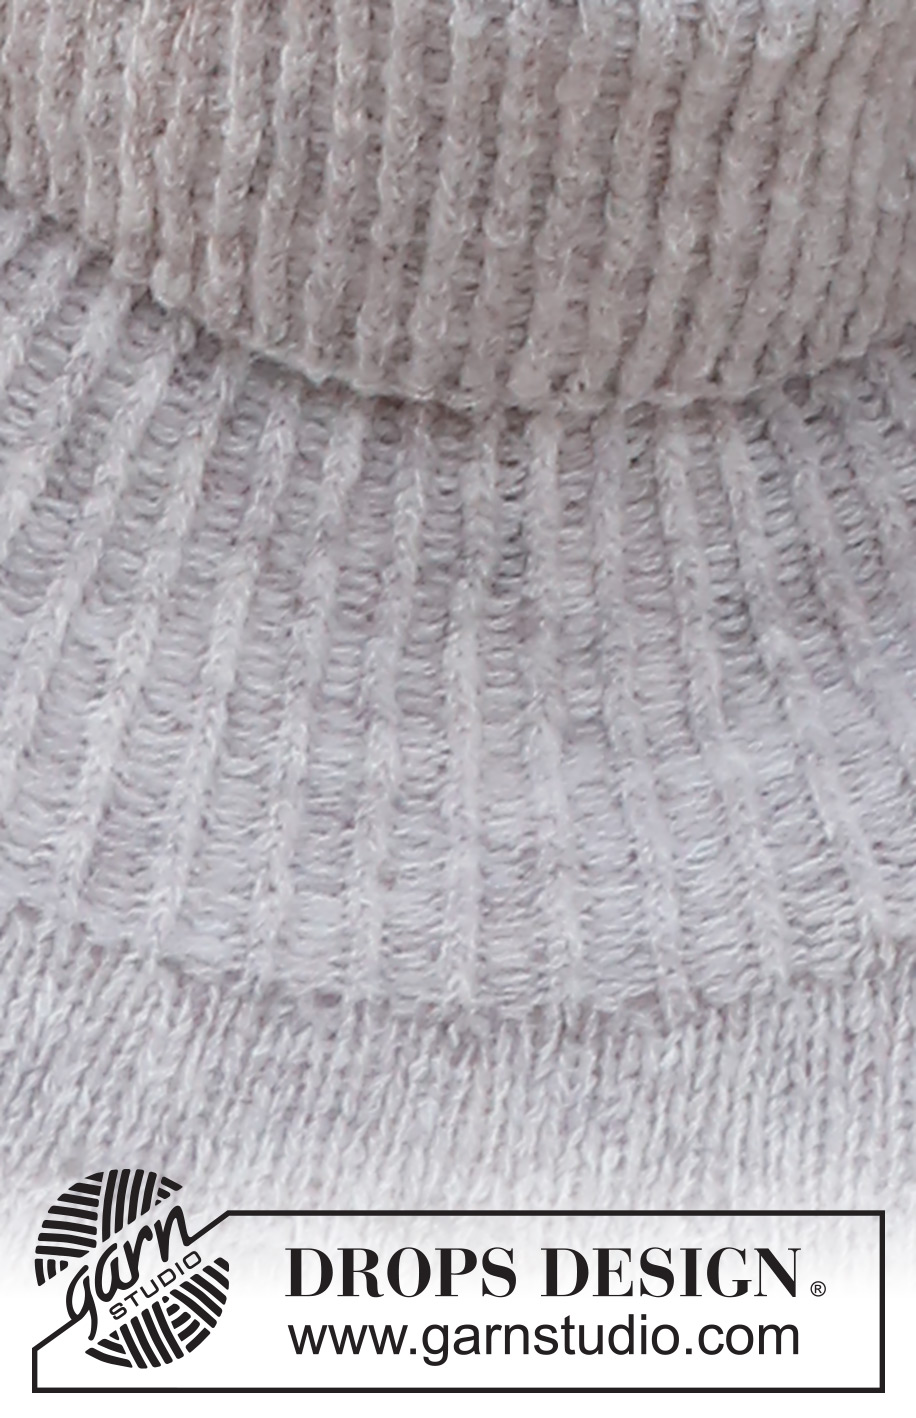
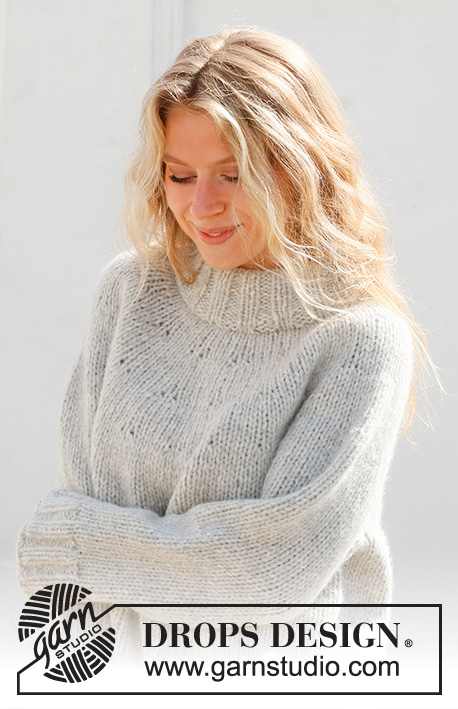
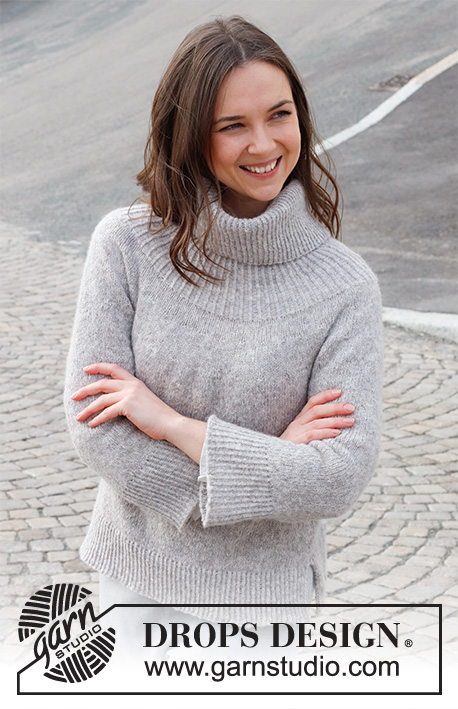
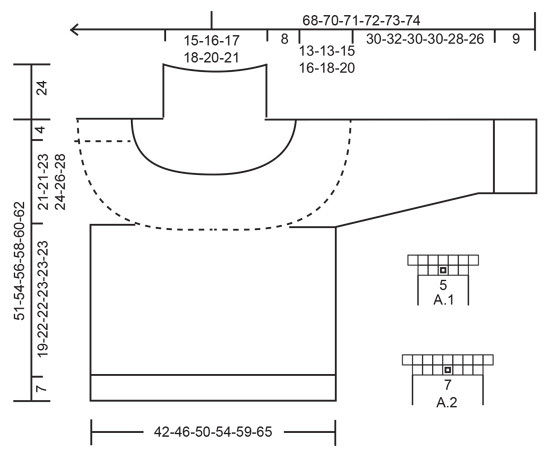
Knitted sweater in DROPS Sky. The piece is worked top down with round yoke, high neck, ribbed edges and split in the sides. Sizes XS - XXL.
DROPS 228-44 |
|||||||
|
------------------------------------------------------- EXPLANATIONS FOR THE PATTERN: ------------------------------------------------------- RIDGE/GARTER STITCH (worked back and forth): Knit all rows. 1 ridge = knit 2 rows. PATTERN: See diagrams A 1 and A.2. INCREASE TIP: All increases are worked from the right side! Increase 1 stitch by making 1 yarn over after each purled section. On the next round purl the yarn overs twisted to avoid holes. INCREASE/DECREASE TIP (evenly spaced): To work out how to increase/decrease evenly, count the total number of stitches on needle (e.g. 168 stitches), and divide by the number of increases/decreases to be made (e.g. 2) = 84. In this example, increase by making 1 yarn over after each 84th stitch. On the next round work the yarn overs twisted to avoid holes. When decreasing, knit together each 83rd stitch and 84th stitch. DECREASE TIP (for sleeves): Decrease 1 stitch on either side of the marker thread as follows: Work until there are 3 stitches left before the marker thread, knit 2 together, knit 2 (marker thread sits between these 2 stitches), slip 1 stitch as if to knit, knit 1 and pass the slipped stitch over the knitted stitch (2 stitches decreased). BINDING-OFF TIP: To avoid the bind-off edge being tight you can bind off with a larger size needle. If the edge is still tight, make 1 yarn over after approx. each 6th stitch at the same time as binding off; the yarn overs are bind off as normal stitches. ------------------------------------------------------- START THE PIECE HERE: ------------------------------------------------------- SWEATER – SHORT OVERVIEW OF THE PIECE: The neck and yoke are worked in the round with circular needle, from mid back and top down. The yoke is divided for body and sleeves and the body is continued in the round with circular needle as far as the split, then finished each piece separately back and forth. The sleeves are worked in the round with double pointed needles/short circular needle, top down. HIGH NECK: Cast on 108-112-120-124-132-136 stitches with circular needle size 4 MM = US 6 and DROPS Sky Purl 1 round. Change to circular needle size 3 MM = US 2.5. Work rib in the round (knit 1 twisted, purl 1) for 18 cm = 7". Turn the piece so the right side is now the wrong side. This is so the neck will be right side out when folded down later. Continue rib in the round (knit 1 twisted, purl 1) until the neck measures 24 cm = 9½". YOKE: Insert a marker. THE PIECE IS MEASURED FROM HERE. Now increase every second purl-1 to purl-2 – read INCREASE TIP = 135-140-150-155-165-170 stitches. When the piece measures 4 cm = 1½" from the marker, increase the remaining purl-1 sections to purl-2 = 162-168-180-186-198-204 stitches. When the rib measures 8 cm = 3⅛" from the marker, work the different sizes as follows: SIZE XS: Knit 1 round where you decrease 4 stitches evenly spaced – read INCREASE/DECREASE TIP = 158 stitches. SIZES S, M, L, XL AND XXL: Knit 1 round where you increase 2-10-12-18-30 stitches evenly spaced – read INCREASE/DECREASE TIP = 170-190-198-216-234 stitches. ALL SIZES: Move the marker here. THE PIECE IS MEASURED FROM HERE. Change to circular needle size 4 MM = US 6. Work stockinette stitch for 4 cm = 1½", then work pattern as follows: Knit 2-0-3-2-3-2, work A.1 until there are 1-0-2-1-3-2 stitches left (= 31-34-37-39-42-46 repeats of 5 stitches), knit 1-0-2-1-3-2. When A.1 has been completed in height there are 220-238-264-276-300-326 stitches on the round. Continue with stockinette stitch. When the piece measures 9-9-10-11-12-13 cm = 3½"-3½"-4"-4⅜"-4¾"-5⅛", work pattern as follows: Knit 2-0-3-2-3-2, work A.2 until there are 1-0-2-1-3-2 stitches left (= 31-34-37-39-42-46 repeats of 7 stitches), knit 1-0-2-1-3-2. When A.2 has been completed in height there are 282-306-338-354-384-418 stitches. Continue with stockinette stitch until the piece measures 13-13-15-16-18-20 cm = 5⅛"-5⅛"-6"-6¼"-7"-8". Now divide for the body and sleeves as follows: Work the first 40-43-47-50-56-62 stitches (= half back piece), place the next 60-66-74-76-80-84 stitches on a thread for the sleeve, cast on 8-10-10-12-12-12 stitches (= in side under sleeve), work the next 81-87-95-101-112-125 stitches (= front piece), place the next 60-66-74-76-80-84 stitches on a thread for the sleeve, cast on 8-10-10-12-12-12 stitches (= in side under sleeve), work the last 41-44-48-51-56-63 stitches (= half back piece). The body and sleeves are finished separately. THE PIECE IS NOW MEASURED FROM HERE! BODY: = 178-194-210-226-248-274 stitches. Continue with stockinette stitch in the round until the piece measures 19-22-22-23-23-23 cm = 7½"-8¾"-8¾"-9"-9"-9" from the division. Try the sweater on and work to desired length; there is approx. 7 cm = 2¾" left to finished length. Now divide the piece, with 89-97-105-113-124-137 stitches on the front and back pieces. Finish each piece separately, back and forth. BACK PIECE: Knit 1 row from the right side where you increase 12-14-16-16-17-20 stitches evenly spaced (do not increase over 2 edge stitches on each side) = 101-111-121-129-141-157 stitches. Change to circular needle size 3 MM = US 2.5 and work rib as follows: ROW 1 (= wrong side): 2 edge stitches in garter stitch, * purl 1 twisted, knit 1 *, work from *-* until there are 3 stitches left, purl 1 twisted, 2 edge stitches in garter stitch. ROW 2 (right side): 2 edge stitches in garter stitch, * knit 1 twisted, purl 1 *, work from *-* until there are 3 stitches left, knit 1 twisted, 2 edge stitches in garter stitch. Repeat these 2 rows for 7 cm = 2¾". Bind off with knit over knit and purl over purl – read BINDING-OFF TIP. The sweater measures approx. 51-54-56-58-60-62 cm = 20"-21¼"-22"-22¾"-23⅝"-24⅜" from the shoulder down. FRONT PIECE: Work in the same way as the back piece. SLEEVES: Place the 60-66-74-76-80-84 stitches from the thread on the one side of the piece on short circular needle/double pointed needles size 4 MM = US 6 and knit up 1 stitch in each of the 8-10-10-12-12-12 new stitches under the sleeve = 68-76-84-88-92-96 stitches. Insert a marker thread in the middle of the new stitches (= 4-5-5-6-6-6 stitches on each side of the thread). Allow the thread to follow your work onwards; it is used when decreasing later. Work stockinette stitch in the round for 4 cm = 1½". Now decrease 2 stitches under the sleeve – read DECREASE TIP. Decrease like this every 3½-2½-1½-1½-1½-1 cm = 1¼"-1"-½"-½"-½"-⅜" a total of 7-10-13-14-15-16 times = 54-56-58-60-62-64 stitches. Continue working until the sleeve measures 30-32-30-30-28-26 cm = 11¾"-12½"-11¾"-11¾"-11"-10¼" (shorter measurements in larger sizes due to wider neck and longer yoke). Try the sweater on and work to desired length; there is approx. 9 cm = 3½" left to finished length. Knit 1 round where you increase 8-8-10-10-10-10 stitches evenly spaced = 62-64-68-70-72-74 stitches. Change to double pointed needles size 3 MM = US 2.5 and work rib (knit 1 twisted, purl 1) for 9 cm = 3½". Bind off with knit over knit and purl over purl – remember BINDING-OFF TIP. The sleeve measures 39-41-39-39-37-35 cm = 15¼"-16⅛"-15¼"-15¼"-14½"-13¾". Work the other sleeve in the same way. |
|||||||
Diagram explanations |
|||||||
|
|||||||
 |
|||||||
Have you finished this pattern?Tag your pictures with #dropspattern #silvertouchsweater or submit them to the #dropsfan gallery. Do you need help with this pattern?You'll find 32 tutorial videos, a Comments/Questions area and more by visiting the pattern on garnstudio.com. © 1982-2026 DROPS Design A/S. We reserve all rights. This document, including all its sub-sections, has copyrights. Read more about what you can do with our patterns at the bottom of each pattern on our site. |
|||||||


With over 40 years in knitting and crochet design, DROPS Design offers one of the most extensive collections of free patterns on the internet - translated to 17 languages. As of today we count 325 catalogs and 12298 patterns - 12288 of which are translated into English (US/in).
We work hard to bring you the best knitting and crochet have to offer, inspiration and advice as well as great quality yarns at incredible prices! Would you like to use our patterns for other than personal use? You can read what you are allowed to do in the Copyright text at the bottom of all our patterns. Happy crafting!
Post a comment to pattern DROPS 228-44
We would love to hear what you have to say about this pattern!
If you want to leave a question, please make sure you select the correct category in the form below, to speed up the answering process. Required fields are marked *.