
Popular categories
Looking for a yarn?


Comments / Questions (121)
![]() Pia wrote:
Pia wrote:
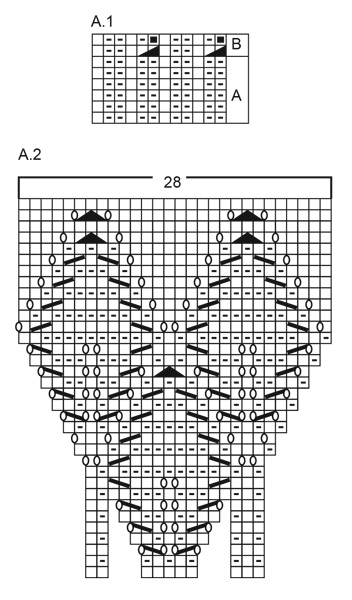
Jeg strikker str. L. I halskanten (som selvfølgelig strikkes først) tages der ud fra 72 til 96 Derefter bærestykke A.1 hvor der tages ind til 80 masker? Så strikkes A2 . Jeg kan ikke se hvor man tager ud i diagrammet så mønstret passer?
16.06.2025 - 10:34DROPS Design answered:
Hei Pia. Du har 96 masker (A.1A består av 12 masker og strikker 8 ganger = 12 x 8 = 96 masker). A.1A strikkes i 4 cm, deretter strikkes A.1B og da felles det masker. Se i høyre side til diagram A.1, du starter med A og avslutter med B. Det felles 2 masker hver gang A.1B strikkes = 2 x 8 = 16 felte masker. 96 - 16 = 80 masker pinnen før det byttes til pinne 5,5. mvh DROPS Design
16.06.2025 - 13:32
![]() Evelyne LEGRY BILLOIR wrote:
Evelyne LEGRY BILLOIR wrote:
Bonjour, La fonction "imprimante" n'apparaît plus sur la fiche tricot. Est-ce normal ? Cordialement,
19.05.2025 - 14:24DROPS Design answered:
Bonjour Mme Legry Billoir, vous trouverez l'icône "imprimante" en haut à droite de la page, à gauche du cœur pour ajouter le modèle à vos favoris et de la flèche pour partager le modèle sur les différents réseaux. Bon tricot!
19.05.2025 - 16:01
![]() Leonor PERIANE wrote:
Leonor PERIANE wrote:
Je ne comprends pas le schéma A2. Les cases non dessinées sont elles des mailles endroit ?
19.04.2025 - 18:01
![]() Leonor PERIANE wrote:
Leonor PERIANE wrote:
Je ne comprends pas le schéma A2. Les cases non dessinées sont elles des mailles endroit ?
19.04.2025 - 17:59DROPS Design answered:
Bonjour Mme Periane, les cases non dessinées ne sont pas des mailles = le diagramme A.2 commence sur 10 mailles, et, on va augmenter dès le 3ème tour d'abord après les 3 premières mailles de A.2 et avant les 2 dernières mailles de A.2, puis au début/à la fin de A.2 jusqu'à ce qu'il y ait 28 mailles au total. Lorsque vous tricotez les premiers rangs, sautez les espaces comme s'ils n'existaient pas, autrement dit, au 1er rang = 10 m end, au 2ème rang (1 m env, 1 m end, 2 m env, 1 m end, 1 m env, 1 m end, 2 m env, 1 m end). Bon tricot!
22.04.2025 - 14:49
![]() Mevr,:wielzen wrote:
Mevr,:wielzen wrote:
Heeft u kleur 80/Dylot 43108 nog op voorraad?
15.04.2025 - 16:02DROPS Design answered:
Dag Mevr. Wielzen,
Voor vragen over kleurnummers en verfbaden kun je het beste terecht bij je verkooppunt. Zij kunnen je wellicht verder helpen om het juiste kleurbad en/of kleurnummer te vinden.
15.04.2025 - 19:13
![]() Wielzen wrote:
Wielzen wrote:
Heeft u kleur 80 Dyelot 43108 nog op voorraad?
15.04.2025 - 15:56
![]() JULIE C CHILTON wrote:
JULIE C CHILTON wrote:
That chart makes no sense to me. Do you have a written version of the pattern? I bought the yarn and really want to make this, but cannot follow the chart. Thank you.
07.04.2025 - 20:51DROPS Design answered:
Dear Mrs Chilton, there are only diagrams for this pattern, but this lesson will help you understanding how to read diagrams. Happy knitting!
08.04.2025 - 09:30
![]() Giulia wrote:
Giulia wrote:
Buongiorno! Ma nello schema A.2 dove non ci sono i quadrati come va lavorato?
24.03.2025 - 10:46DROPS Design answered:
Buonasera Giulia, come può vedere dalla legenda, non ci sono maglie in quel punto. Buon lavoro!
28.03.2025 - 23:51
![]() MME MICHELE PEREZ wrote:
MME MICHELE PEREZ wrote:
Bjr. Comment interpréter l'explication du jeté " 0=aire 1 jeté entre deux mailles; " et obtenir le bon nombre de mailles (10 pour le rang n°3) ou 12 mailles pour le range n°5) par exemple. doit faire un tour sur l'aiguille PUIS prendre le brin précédent du tricot ? On voit les 2 trous cote à cote, mais je pense que l'on a une maille tricotée entre les deux. Merci pour vos conseils
07.02.2025 - 19:44DROPS Design answered:
Bonjour Mme Perez, faites simplement le jeté entre les 2 mailles du diagramme, autrement dit, au 3ème rang, vous allez tricoter ainsi: 3 m end, 1 jeté, 1 diminution, 1 jeté, 1 m endroit, 1 jeté, 1 diminution, 1 jeté, 2 m end = vous avez maintenant 12 mailles. Bon tricot!
10.02.2025 - 09:08
![]() Carla wrote:
Carla wrote:
Hoi, hoe moet je het patroon lezen? Van boven naar beneden en van links naar rechts of juist andersom?
09.01.2025 - 22:23DROPS Design answered:
Dag Carla,
De telpatronen worden altijd van onder naar boven gelezen en van rechts naar links aan de goede kant en van links naar rechts aan de verkeerde kant. In dit geval brei je in de rondte, dus lees je alle rijen steeds van rechts naar links.
11.01.2025 - 11:47
|
|||||||||||||||||||||||||
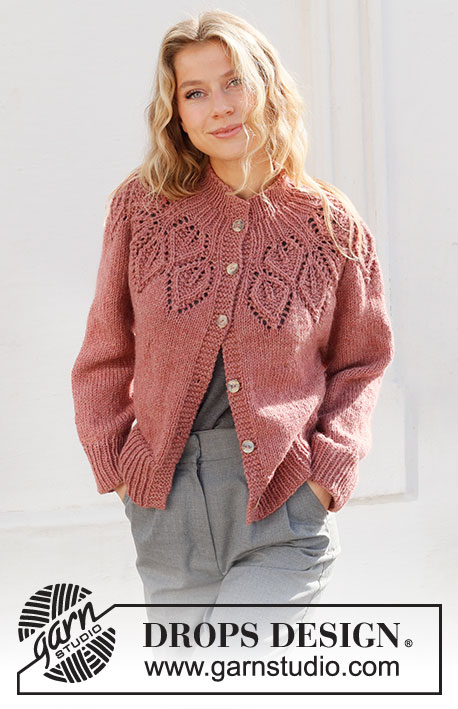
Autumn Wreath#autumnwreathsweater |
|||||||||||||||||||||||||
 |
 |
||||||||||||||||||||||||
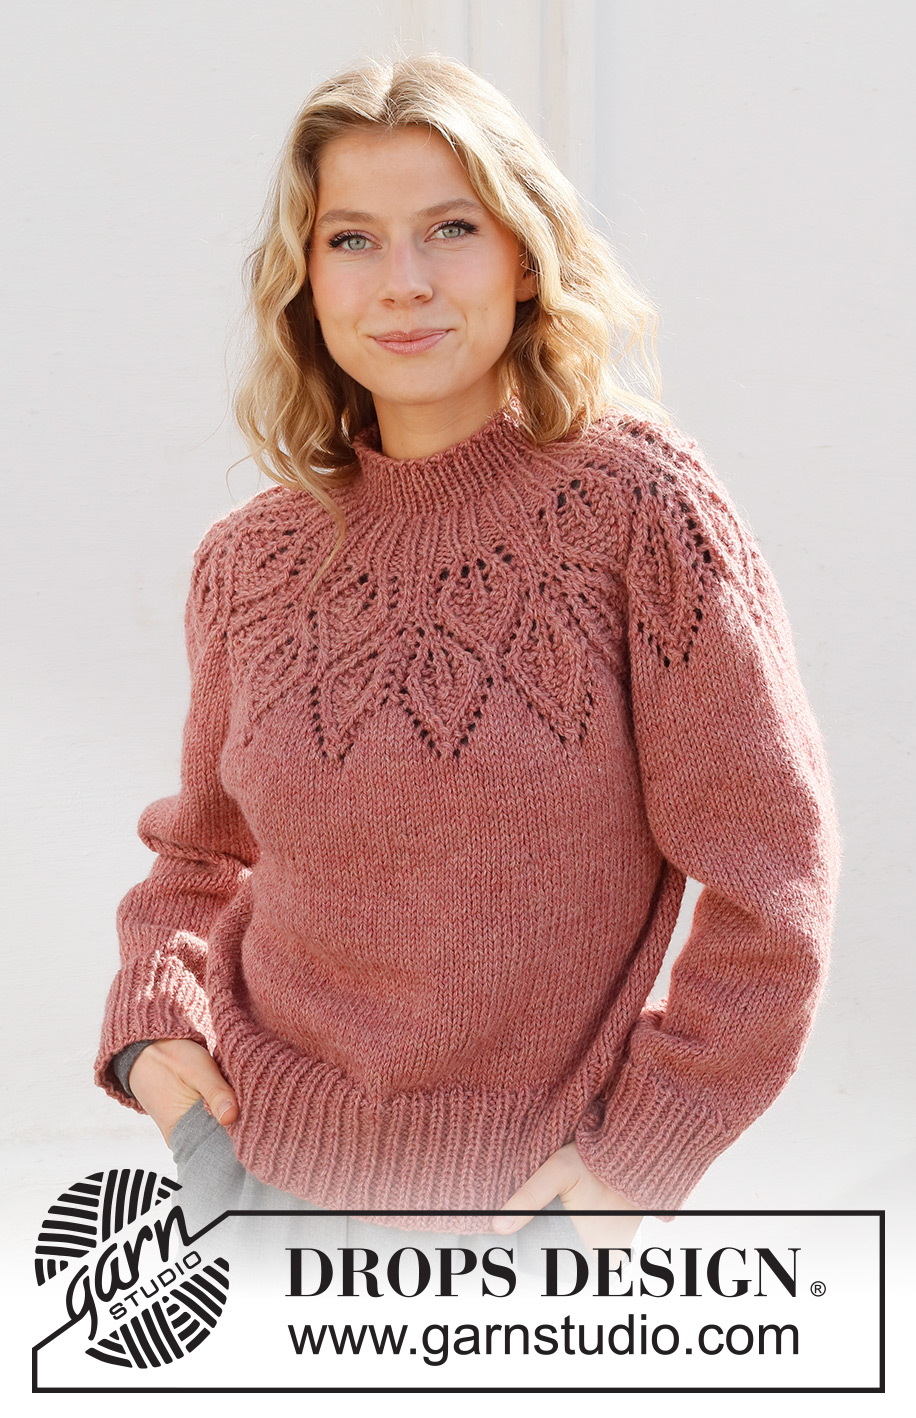
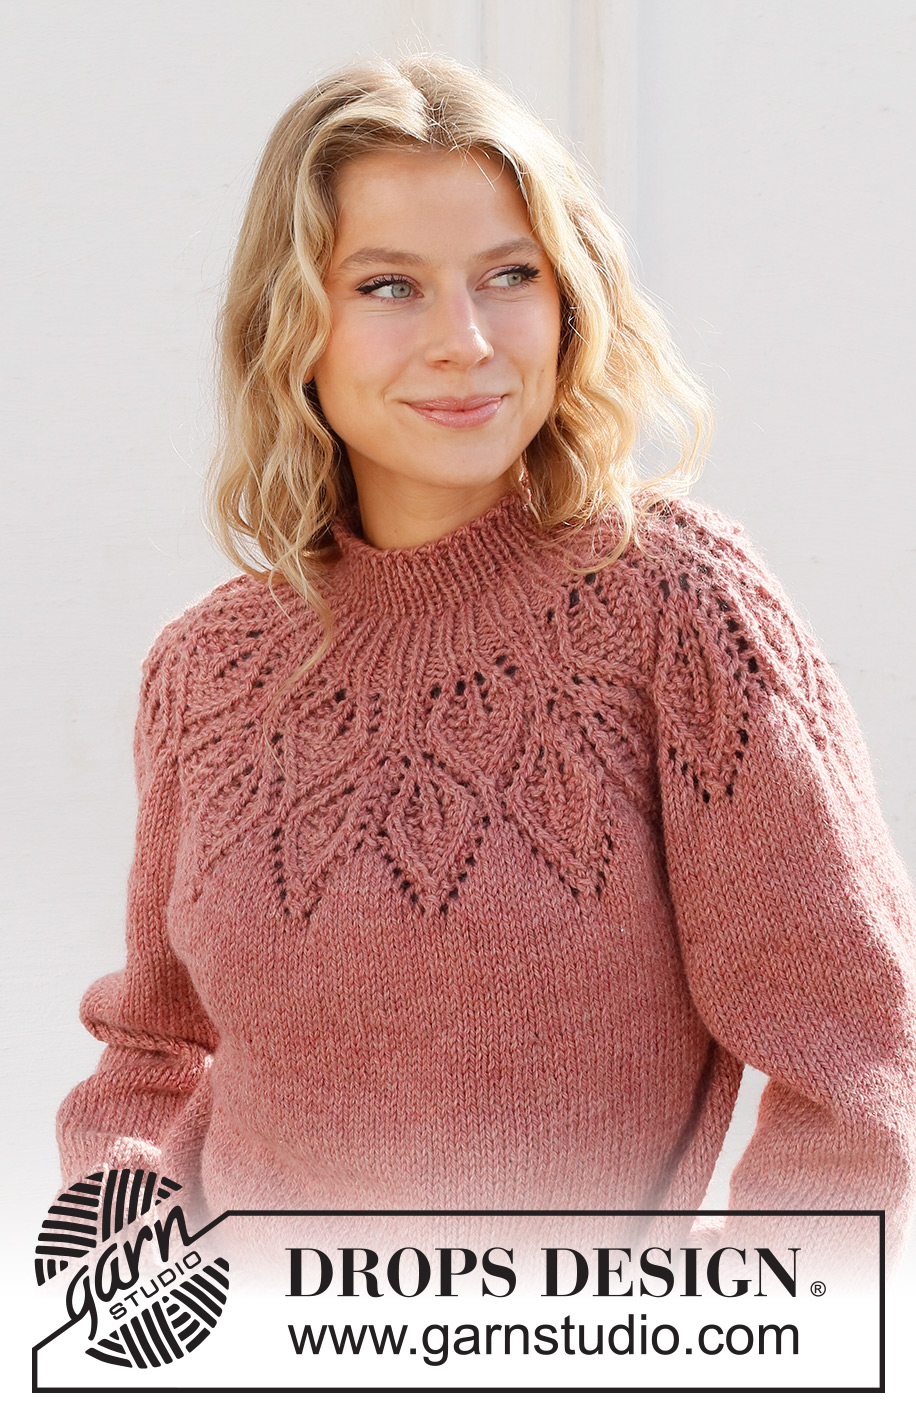
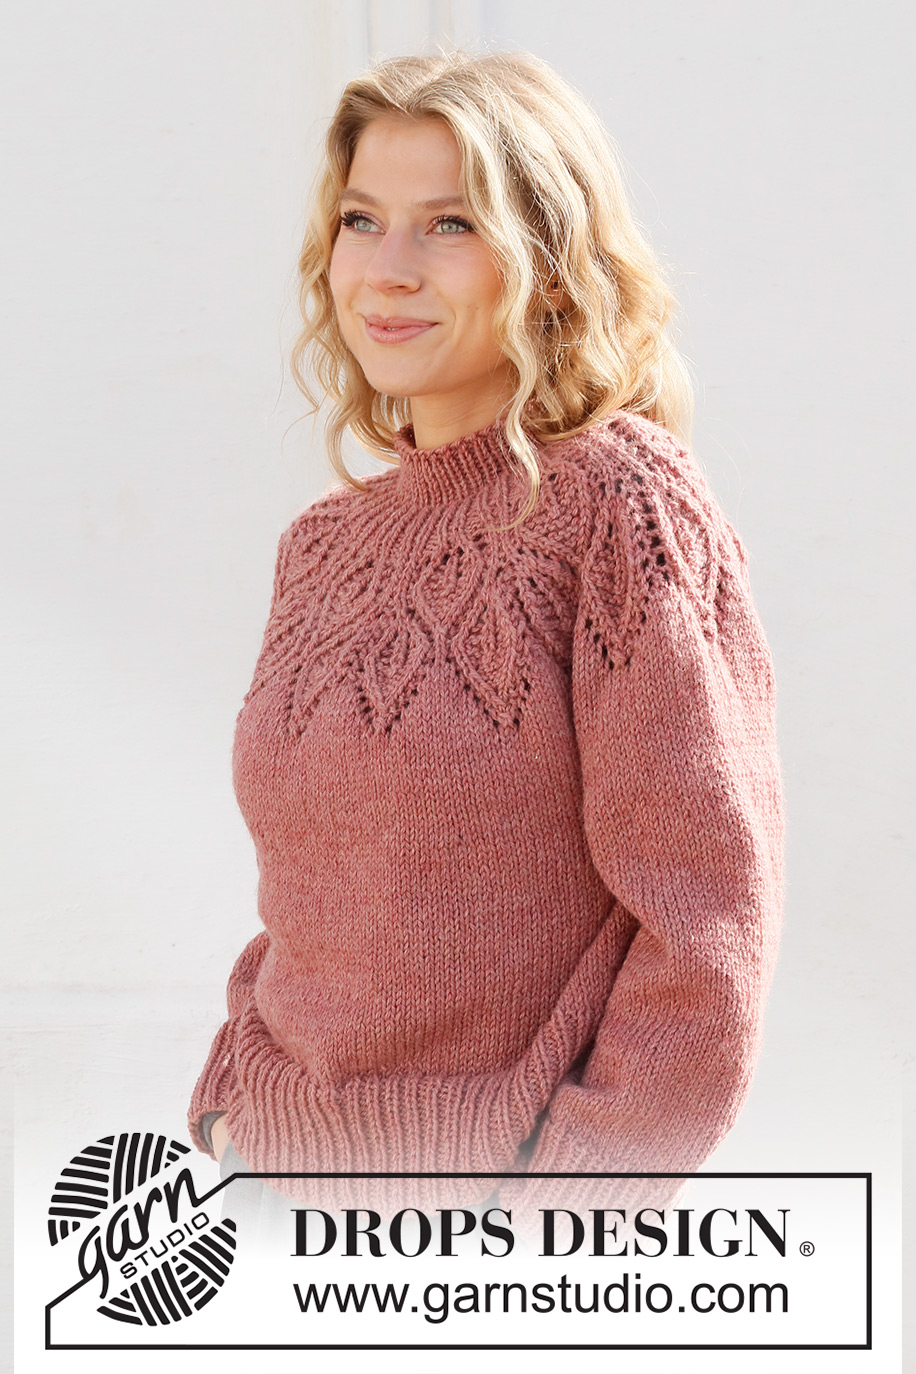
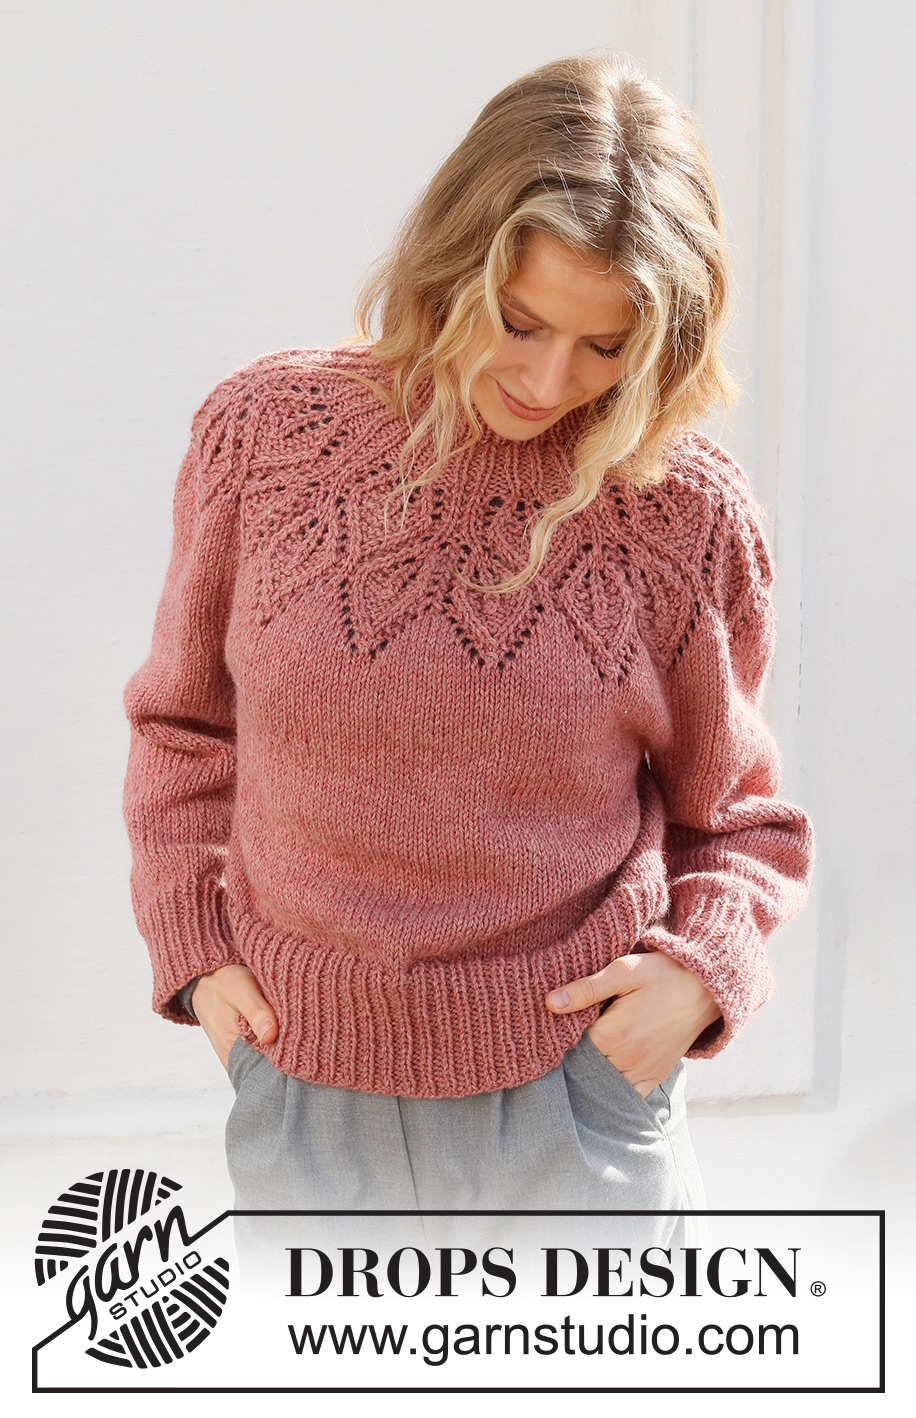
Knitted sweater in DROPS Nepal. The piece is worked top down, with round yoke and leaf pattern. Sizes S - XXXL.
DROPS 228-1 |
|||||||||||||||||||||||||
|
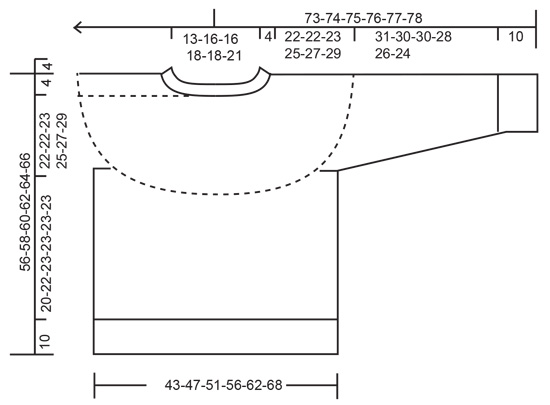
EXPLANATIONS FOR THE PATTERN: ------------------------------------------------------- PATTERN: See diagrams A.1 and A.2. INCREASE TIP (evenly spaced): To work out how to increase evenly, count the total number of stitches on the needle (e.g. 64 stitches) and divide by the number of increases to be made (e.g. 20) = 3.2. In this example, increase by making 1 yarn over after approx. each 3rd stitch. DECREASE TIP (for sleeves): Decrease 1 stitch on either side of the marker thread as follows: Work until there are 3 stitches left before the marker thread, knit 2 together, knit 2 (marker thread sits between these 2 stitches), slip 1 stitch as if to knit, knit 1 and pass the slipped stitch over the knitted stitch (2 stitches decreased). BINDING-OFF TIP: To avoid the bind-off edge being tight you can bind off with a larger size needle. If the edge is still tight, make 1 yarn over after approx. each 6th stitch at the same time as binding off; the yarn overs are bind off as normal stitches. ------------------------------------------------------- START THE PIECE HERE: ------------------------------------------------------- SWEATER – SHORT OVERVIEW OF THE PIECE: The neck and yoke are worked in the round with circular needle, from mid back and top down. The yoke is divided for body and sleeves and the body is continued in the round with circular needle. The sleeves are worked in the round with double pointed needles/short circular needle, top down. NECK: Cast on 64-68-72-76-80-84 stitches with short circular needle size 4.5 MM = US 7 and DROPS Nepal. Knit 1 round, then work rib (knit 1, purl 1) for 4 cm = 1½". Knit 1 round where you increase 20-28-24-32-28-36 stitches evenly spaced – read INCREASE TIP = 84-96-96-108-108-120 stitches. Insert 1 marker in the round; the yoke is measured from this marker. YOKE: Work A.1A over all stitches (= 7-8-8-9-9-10 repeats of 12 stitches) for 4 cm = 1½", then work A.1B (= 2 rounds). There are now 70-80-80-90-90-100 stitches. Change to circular needle size 5.5 MM = US 9. Now work A.2 over A.1 (= 7-8-8-9-9-10 repeats of 10 stitches). REMEMBER THE KNITTING GAUGE! When A.2 has been completed in height there are 196-224-224-252-252-280 stitches and the piece measures approx. 20 cm = 8" from the marker. Knit 1 round where you increase 18-11-27-27-47-42 stitches evenly spaced = 214-235-251-279-299-322 stitches. Continue with stockinette stitch until the piece measures 22-22-23-25-27-29 cm = 8¾"-8¾"-9"-9¾"-10⅝"-11⅜". Now divide for the body and sleeves on the next round as follows: Work the first 30-33-35-39-43-48 stitches (= half back piece), place the next 46-50-54-60-62-64 stitches on a thread for the sleeve, cast on 8-8-10-10-12-12 stitches (= in side under sleeve), work the next 62-69-73-81-89-98 stitches (= front piece), place the next 46-50-54-60-62-64 stitches on a thread for the sleeve, cast on 8-8-10-10-12-12 stitches (= in side under sleeve), work the last 30-33-35-39-43-48 stitches (= half back piece). The body and sleeves are finished separately. THE PIECE IS NOW MEASURED FROM HERE. BODY: = 138-151-163-179-199-218 stitches. Continue with stockinette stitch in the round until the piece measures 20-22-23-23-23-23 cm = 8"-8¾"-9"-9"-9"-9". There is approx. 10 cm = 4" left to finished length; try the sweater on and work to desired length. To avoid the following rib being tight, knit 1 round where you increase 24-26-29-31-35-37 stitches evenly spaced = 162-177-192-210-234-255 stitches. Change to circular needle size 4.5 MM = US 7 and work rib (knit 1, purl 2) for 10 cm = 4". Bind off with knit over knit and purl over purl - read BINDING-OFF TIP. The sweater measures approx. 56-58-60-62-64-66 cm = 22"-22¾"-23⅝"-24⅜"-25¼"-26" from the shoulder down. SLEEVES: Place the 46-50-54-60-62-64 stitches from the thread on the one side of the piece on double pointed needles/short circular needle size 5.5 MM = US 9 and knit up 1 stitch in each of the 8-8-10-10-12-12 stitches cast on under the sleeve = 54-58-64-70-74-76 stitches. Insert a marker thread in the middle of the new stitches under the sleeve and start the round at the marker thread. Work stockinette stitch in the round for 4 cm = 1½" then decrease 1 stitch on each side of the marker thread – read DECREASE TIP. Decrease like this every 3½-3-2-1½-1½-1 cm = 1¼"-1⅛"-¾"-½"-½"-⅜" a total of 8-9-11-13-15-15 times = 38-40-42-44-44-46 stitches. Continue with stockinette stitch until the sleeve measures 31-30-30-28-26-24 cm = 12¼"-11¾"-11¾"-11"-10¼"-9½". NOTE: Shorter measurements in larger sizes due to wider neck and longer yoke. Increase 4-5-6-7-7-8 stitches evenly spaced = 42-45-48-51-51-54 stitches. Change to double pointed needles size 4.5 MM = US 7 and work rib (knit 1, purl 2) for 10 cm = 4". Bind off with knit over knit and purl over purl - remember BINDING-OFF TIP. The sleeve measures approx. 41-40-40-38-36-34 cm = 16⅛"-15¾"-15¾"-15"-14¼"-13⅜" from the division. Work the other sleeve in the same way. |
|||||||||||||||||||||||||
Diagram explanations |
|||||||||||||||||||||||||
|
|||||||||||||||||||||||||
 |
|||||||||||||||||||||||||
 |
|||||||||||||||||||||||||
Have you finished this pattern?Tag your pictures with #dropspattern #autumnwreathsweater or submit them to the #dropsfan gallery. Do you need help with this pattern?You'll find 27 tutorial videos, a Comments/Questions area and more by visiting the pattern on garnstudio.com. © 1982-2026 DROPS Design A/S. We reserve all rights. This document, including all its sub-sections, has copyrights. Read more about what you can do with our patterns at the bottom of each pattern on our site. |
|||||||||||||||||||||||||


With over 40 years in knitting and crochet design, DROPS Design offers one of the most extensive collections of free patterns on the internet - translated to 17 languages. As of today we count 324 catalogs and 12290 patterns - 12280 of which are translated into English (US/in).
We work hard to bring you the best knitting and crochet have to offer, inspiration and advice as well as great quality yarns at incredible prices! Would you like to use our patterns for other than personal use? You can read what you are allowed to do in the Copyright text at the bottom of all our patterns. Happy crafting!
Post a comment to pattern DROPS 228-1
We would love to hear what you have to say about this pattern!
If you want to leave a question, please make sure you select the correct category in the form below, to speed up the answering process. Required fields are marked *.