
Popular categories
Looking for a yarn?


Comments / Questions (50)
![]() Danuta wrote:
Danuta wrote:
Dzien dobry. Mam pytanie odnosnie wykonczenia dekoltu.Czy konieczne jest wykonczenie podwojne czy mozna zrobic pojedynczy np5cm.Dziekuje.
21.04.2026 - 16:37DROPS Design answered:
Witaj Danuto, oczywiście możesz wykonać pojedynczy ściągacz o dł. 5 cm. Pozdrawiamy!
22.04.2026 - 10:08
![]() Nancy wrote:
Nancy wrote:
Thank you for the prompt reply. The yoke directions say to insert 8 markers, and it wasn’t clear to me exactly which sections were sleeves. I’m sure I just misunderstood. I’ve ripped it out and will try again. Or not.
21.04.2026 - 13:04
![]() Nancy Eckel wrote:
Nancy Eckel wrote:
I have done many raglans… but this one doesn’t make sense to me. Usually you use four markers and increase before and after each one. This one uses eight markers and only increases before each one. That will give eight separate diagonal increases, won’t it? Are there two increase seams at the shoulders? This is new to me. Also, is there a translate button I’m missing? I would love to read the comments. Thank you!
20.04.2026 - 23:39DROPS Design answered:
Dear Mrs Eckel, there is no markers inserted here but feel free to add some on either side of each A.1 = raglan stitches, this might help you seeing where you should increase before each A.1 = before the marker and after each A.1 after the marker; not sure what you mean with increase seams at the shoulders, the jumper is worked in the round top down without seams. To read the comments and questions/answers below you can try using any online translator, this might help. Or just continue asking here :) Happy knitting!
21.04.2026 - 09:33
![]() Yvonne wrote:
Yvonne wrote:
Ska man sticka vartannat varv räta bara det syns inte på bilden
17.12.2025 - 16:39DROPS Design answered:
Hej Yvonne. Ja det stämmer, när du stickar mönster (diagram) stickar du vartannat varv med bara räta maskor och vartannat varv med varannan rät/varannan avig.
18.12.2025 - 10:48
![]() Julia wrote:
Julia wrote:
Buenas tardes, quisiera saber para una talla m larga( altura 1,9), cuántos ovillos necesito y cuanto tarda el pedido, gracias
22.08.2025 - 14:52DROPS Design answered:
Hola Julia, nosotros no hacemos patrones personalizados. Para una talla M necesitarías 250gr de Blanco y 150gr de Azul Denim, que son 5 ovillos de Blanco y 3 de Azul Denim. Según cuánto quieras alargar la prenda tendrás que calcular el número de ovillos necesarios. En cuánto al pedido esta página solo se dedica a los patrones; para encargar las lanas tendrás que contactar con tu tienda DROPS más cercana. Puedes consultar aquí la lista de tiendas DROPS que venden en España o envían a España.
25.08.2025 - 02:04
![]() Cf wrote:
Cf wrote:
2 précisions qui me sembleraient utiles concernant les augmentations en début d'ouvrage : - les jetés sont à faire de part et d'autre des marqueurs des 5 mailles du raglan (1 jeté, un marqueur, motif A1, un marqueur, 1 jeté) - les jetés viennent "décaler" le motif A2 : pour le respecter, il faut veiller à commencer après le jeté par une maille dans le même sens que la maille correspondante du précédent rang en point fantaisie (pas forcément maille envers).
06.08.2025 - 13:34DROPS Design answered:
Bonjour Cf. Les augmentations des raglans se tricotent de part et d'autre de chaque A.1 (= les 5 mailles de chacun des raglans), et se tricotent en A.2. Pour que le motif A.2 ne soit pas décalé, tricotez la 1ère augmentation comme la 2ème maille de A.2 après A.1 pour la 1ère augm. et comme la 1ère m de A.2 avant le A.1 suivant et ainsi de suite, A.2 va ainsi s'élargir et pas se décaler. Bon tricot!
06.08.2025 - 16:21
![]() CF wrote:
CF wrote:
Bonjour Une fois les augmentations terminées, doit-on continuer à faire le motif A1 sur les mailles de raglan ou tricote-t-on le tour complet en A2 jusqu'à la division pour les manches ? Merci
01.08.2025 - 19:44DROPS Design answered:
Bonjour CF, lorsque toutes les augmentations du raglan, vous tricotez le point fantaisie comme avant: A.1 et A.2, il doit normalement tomber juste tout le tour, autrement dit, c'est comme si vous tricotiez A.2 tout le tour. Bon tricot!
04.08.2025 - 07:58
![]() Anke wrote:
Anke wrote:
Sorry maar ik kom er niet uit A1 = 1 r, 1 av, 1r,1a , 1r dan omslag A2 = na de omslag 1 av ?? HOE de omslag maken ? daarna vervolg 1r , 1a enz MOEILIJK voor mij
27.05.2025 - 21:51DROPS Design answered:
Dag Anke,
Om een averechte steek te maken na een omslag, haal je de draad weer naar voren.
28.05.2025 - 20:35
![]() Anke Van Drempt wrote:
Anke Van Drempt wrote:
M ; 100 st Na de hals - 8 = 92 st dan 8x meerderen 100 steken . Dan komt mijn probleem …. Al die omslagen … daar ga ik verkeerd meerderen en krijg te veel steken. Help !!
27.05.2025 - 19:40DROPS Design answered:
Dag Anke,
Voor maat M meerder je in totaal 28 keer 8 steken, dus 224 meerderingen. Plus 92 steken = 316.
28.05.2025 - 21:26
![]() Anke Van Drempt wrote:
Anke Van Drempt wrote:
Maat M in de pas heb ik veel meer steken dan in het patroon staat. Midden op de schouder moet ik ook meerderen maar dat is denk ik niet goed . Dus uithalen ….
27.05.2025 - 17:54DROPS Design answered:
Dag Anke,
Helaas is me niet duidelijk hoeveel steken je te veel hebt en waar het precies mis is gegaan. Meerder je om de naald? Dus de ene naald wel en de andere naald niet?
28.05.2025 - 21:20
|
|||||||
Sjøbris#sjoebrissweater |
|||||||
 |
 |
||||||
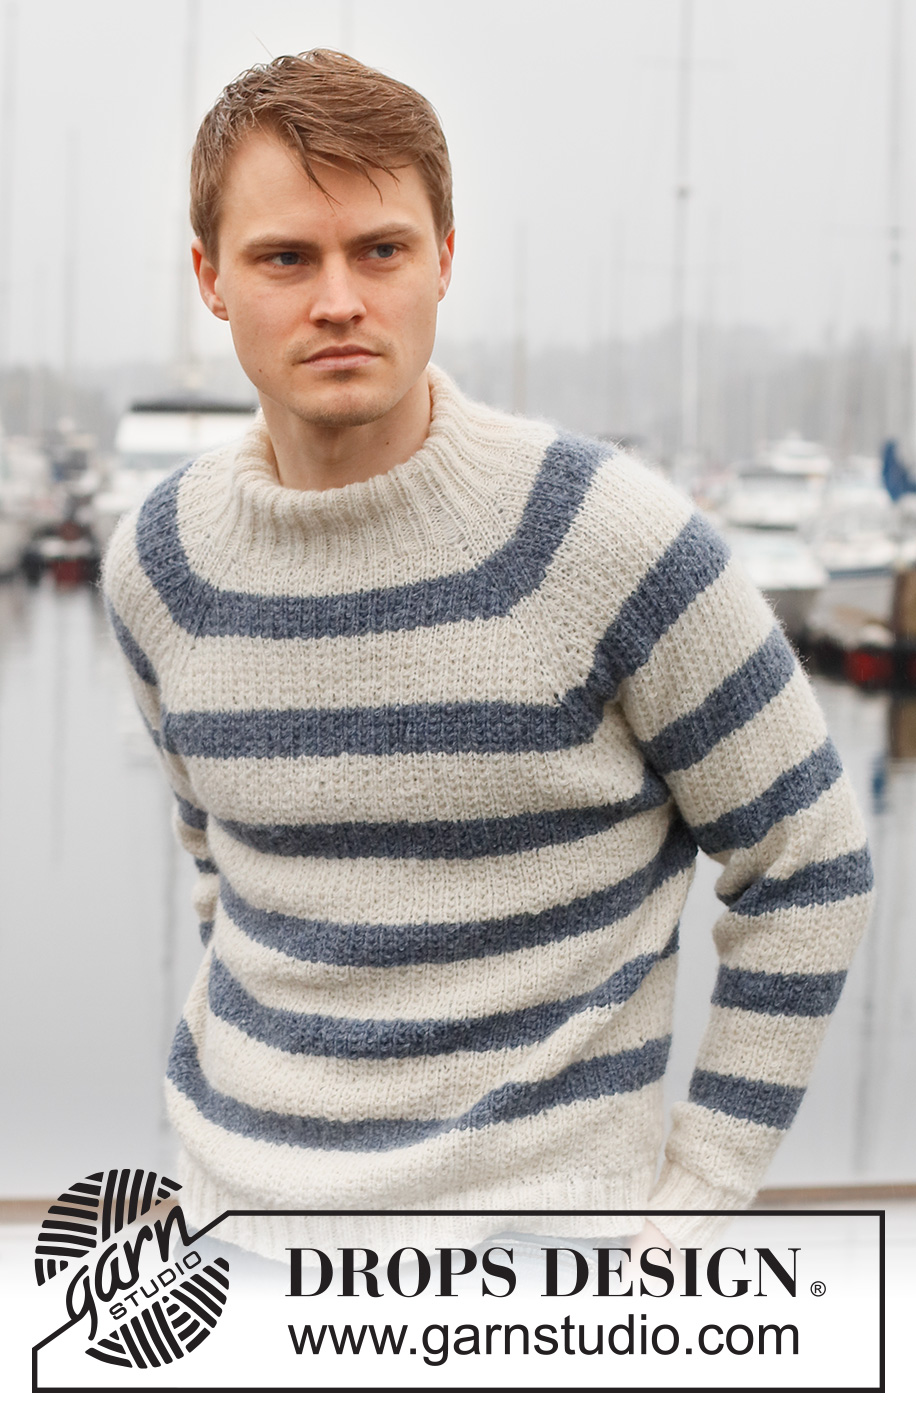
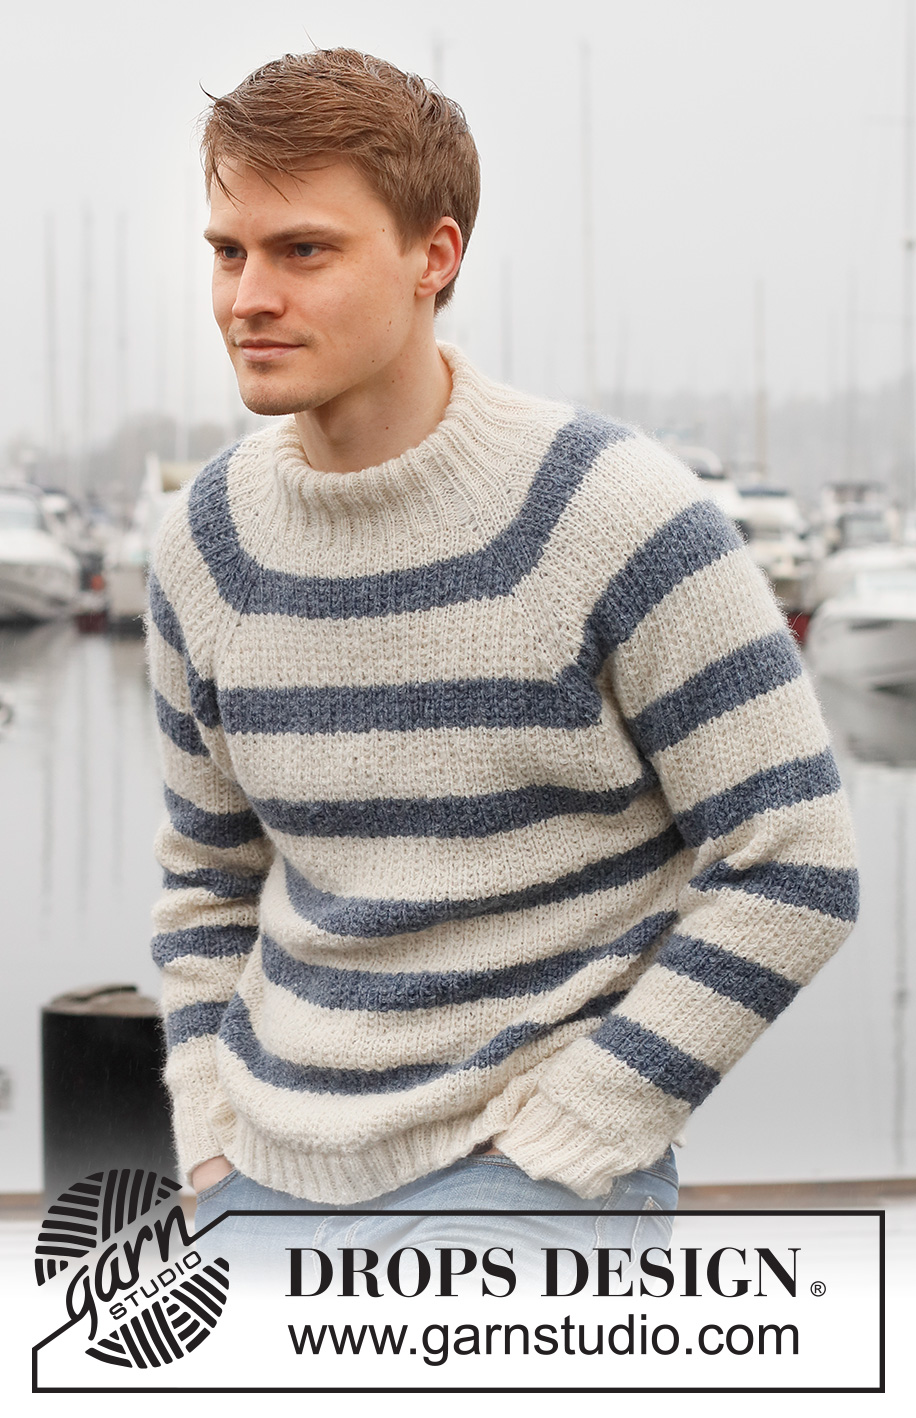
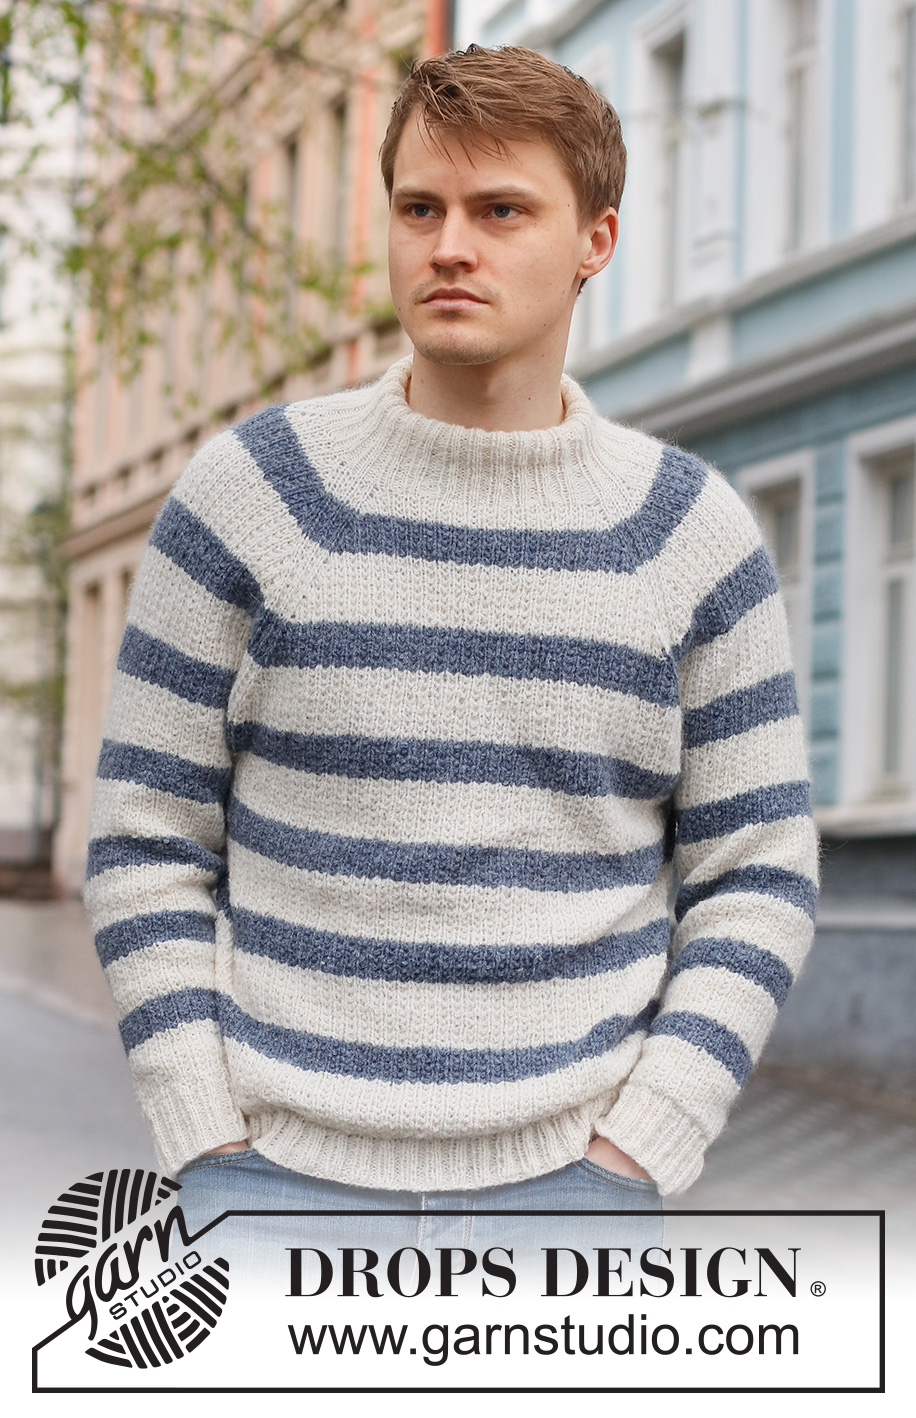
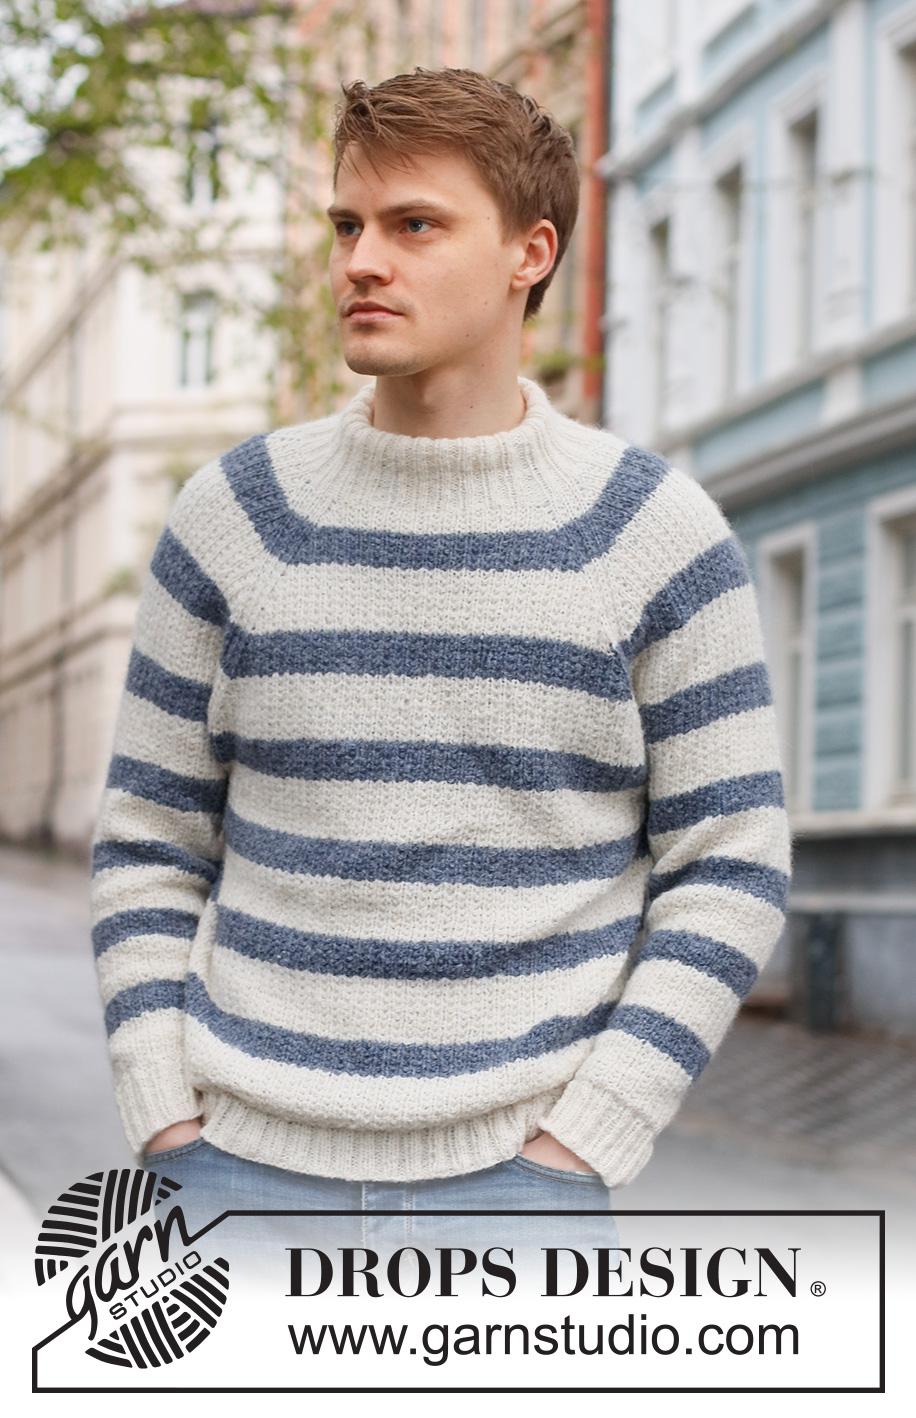
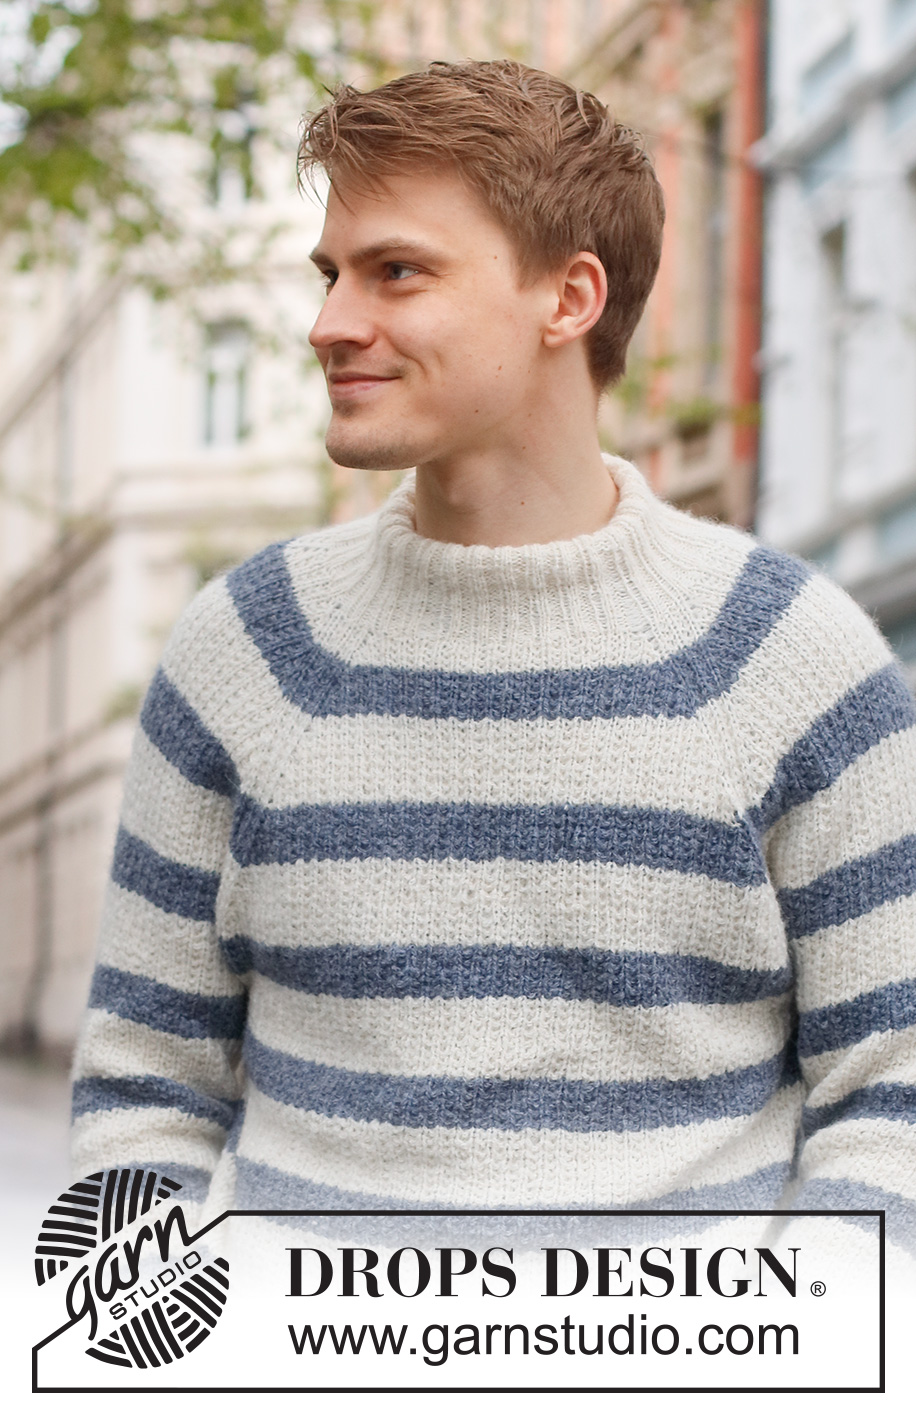
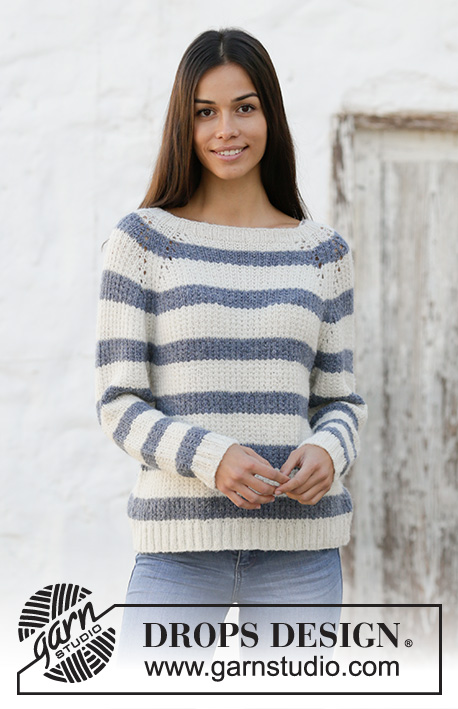
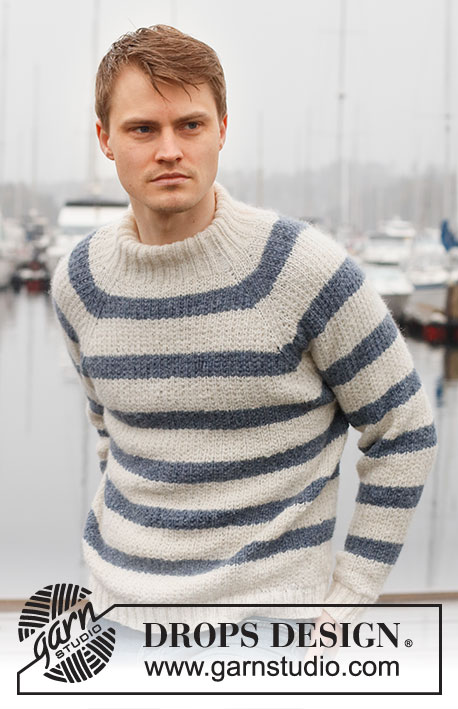
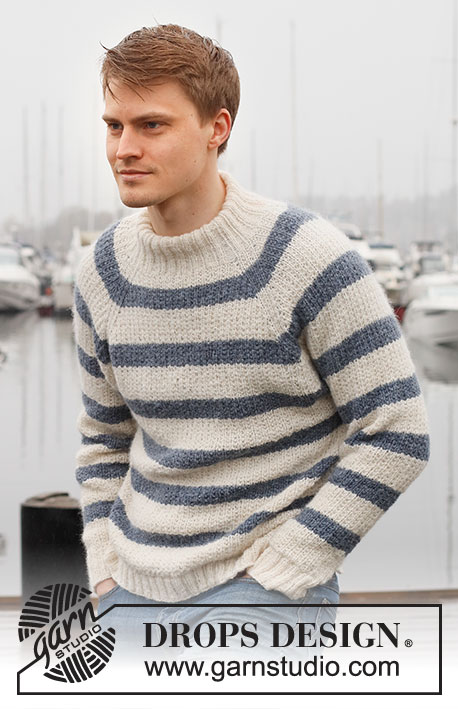
Knitted sweater for men in DROPS Sky. The piece is worked top down with raglan, stripes and textured pattern. Sizes S - XXXL.
DROPS 224-1 |
|||||||
|
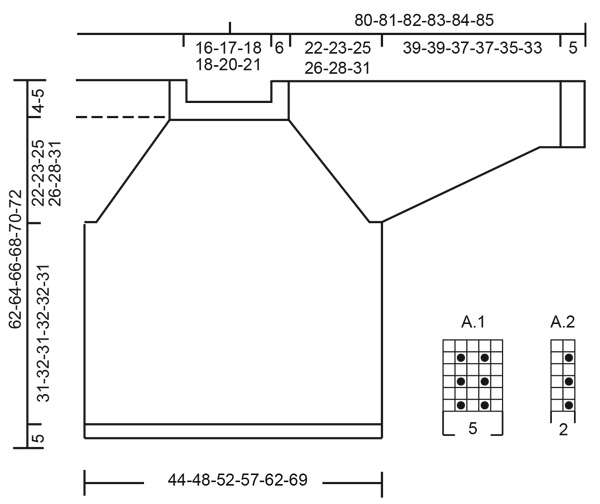
------------------------------------------------------- EXPLANATIONS FOR THE PATTERN: ------------------------------------------------------- DECREASE/INCREASE TIP (evenly spaced): To work out how to decrease/increase evenly, count the total number of stitches to be decreased/increased over (e.g. 96 stitches) and divide by number of decreases/increases to be made (e.g. 8) = 12. In this example, decrease by knitting together each 11th and 12th stitch. When increasing, make 1 yarn over after each 12th stitch. On the next round knit the yarn overs twisted to avoid holes. PATTERN: See diagrams A.1 and A.2. RAGLAN: Increase to raglan by making 1 yarn over on each side of A.1; the yarn overs are worked twisted on the next round, then worked into A.2. STRIPES: The neck and the first 2 cm = ¾" on the yoke are worked with white before starting the stripes. Then work alternately 3½-3½-3½-3-3-3½ cm = 1¼"-1¼"-1¼"-1⅛"-1⅛"-1¼" with jeans blue and 5 cm = 2" with white until you have worked 6-6-6-7-7-7 jeans blue stripes on the yoke/body and 7-7-7-7-7-7 jeans blue stripes on the yoke/sleeves. Then finish the pieces with white. DECREASE TIP (sleeves): Decrease 1 stitch on either side of the marker-stitch as follows: Work until there are 2 stitches left before the marker-stitch, knit 2 together, knit 1 (marker-stitch), slip 1 stitch as if to knit, knit 1 and pass the slipped stitch over the knitted stitch. BINDING-OFF TIP: To avoid the bind-off edge being tight you can bind off with a larger size needle. If the edge is still tight, make 1 yarn over after approx. each 4th stitch at the same time as binding off; the yarn overs are bind off as normal stitches. ------------------------------------------------------- START THE PIECE HERE: ------------------------------------------------------- SWEATER – SHORT OVERVIEW OF THE PIECE: The neck and yoke are worked in the round with circular needle, top down. The yoke is divided for body and sleeves and the body is continued in the round with circular needle. The sleeves are worked with double pointed needles/short circular needle. NECK: Cast on 96-100-104-112-120-124 stitches with circular needle size 3.5 MM = US 4 and white DROPS Sky. Work rib in the round (knit 2, purl 2) for 12 cm = 4¾" (the neck is later folded double and sewn down to the wrong side). Knit 1 round where you decrease 8-8-8-12-12-12 stitches evenly spaced – read DECREASE/INCREASE TIP in explanations above = 88-92-96-100-108-112 stitches. YOKE: Change to circular needle size 4.5 MM = US 7. Read STRIPES before continuing. Insert 1 marker thread on this round; it will be used when measuring the yoke. In addition insert 8 markers before continuing, which will be used when increasing to raglan: Insert 1 marker at the beginning of the round (= between back piece and sleeve), count 5 stitches and insert 1 marker here, count 7-7-9-9-11-11 stitches and insert 1 marker here (= sleeve), count 5 stitches and insert 1 marker here, count 27-29-29-31-33-35 stitches and insert 1 marker here (= front piece), count 5 stitches and insert 1 marker here, count 7-7-9-9-11-11 stitches and insert 1 marker here (= sleeve), count 5 stitches and insert 1 marker here. There are 27-29-29-31-33-35 stitches left between the last and the first marker (= back piece). Now work pattern and increase to RAGLAN – read description above, as follows: Work A.1 over the first 5 stitches, 1 yarn over, work A.2 over the next 7-7-9-9-11-11 stitches (= sleeve), 1 yarn over, work A.1 over the next 5 stitches, 1 yarn over, work A.2 over the next 27-29-29-31-33-35 stitches (= front piece), 1 yarn over, work A.1 over the next 5 stitches, 1 yarn over, work A.2 over the next 7-7-9-9-11-11 stitches (= sleeve), 1 yarn over, work A.1 over the next 5 stitches, 1 yarn over, work A.2 over the next 27-29-29-31-33-35 stitches (= back piece), 1 yarn over. You have increased 8 stitches on the round. REMEMBER THE KNITTING GAUGE! Continue with the pattern, stripes and increase to raglan every 2nd round a total of 24-28-30-32-34-40 times = 280-316-336-356-380-432 stitches. Continue with stripes and pattern, but without further increases, until the piece measures 22-23-25-26-28-31 cm = 8¾"-9"-9¾"-10¼"-11"-12¼" from the marker on the neck. Now divide the yoke for the body and sleeves as follows: Work the first 3-2-3-5-6-6 stitches as before (= back piece), place the next 59-69-73-73-77-89 stitches on 1 thread for the sleeve, cast on 7-7-9-9-11-11 new stitches (= in side under sleeve), work the next 81-89-95-105-113-127 stitches as before (= front piece), place the next 59-69-73-73-77-89 stitches on 1 thread for the sleeve, cast on 7-7-9-9-11-11 new stitches (= in side under sleeve), work the last 78-87-92-100-107-121 stitches (= the rest of the back piece). Body and sleeves are finished separately. THE PIECE IS NOW MEASURED FROM HERE! BODY: = 176-192-208-228-248-276 stitches. Continue the pattern and stripes as before over all stitches. When the piece measures 31-32-31-32-32-31 cm = 12¼"-12½"-12¼"-12½"-12½"-12¼" from the division, knit 1 round where you increase 36-36-40-44-48-56 stitches evenly spaced = 212-228-248-272-300-332 stitches. Change to circular needle size 3.5 MM = US 4 and work rib (knit 2, purl 2) for 5 cm = 2". Read BINDING-OFF TIP and bind off with knit over knit and purl over purl. The sweater measures approx. 62-64-66-68-70-72 cm = 24⅜"-25¼"-26"-26¾"-27½"-28⅜" from the shoulder down. SLEEVE: Place the 59-69-73-72-77-89 stitches from the thread on the one side of the piece on double pointed needles/short circular needle size 4.5 MM = US 7 and knit up 1 stitch in each of the 7-7-9-9-11-11 stitches cast on under the sleeve = 66-76-82-82-88-100 stitches. Insert a marker in the middle stitch under the sleeve and begin the round here. Continue in the round, with stripes and pattern as before. When the piece measures 2 cm = ¾" from the division, decrease 2 stitches under the sleeve – read DECREASE TIP. Decrease like this every 4-2½-2-2½-2-1 cm = 1½"-1"-¾"-1"-¾"-⅜" a total of 9-13-15-14-16-21 times = 48-50-52-54-56-58 stitches. Continue working until the piece measures 39-39-37-37-35-33 cm = 15¼"-15¼"-14½"-14½"-13¾"-13" from the division (shorter measurements in larger sizes due to longer yoke). Knit 1 round where you increase 4-2-4-2-4-2 stitches evenly spaced = 52-52-56-56-60-60 stitches. Change to double pointed needles size 3.5 MM = US 4 and work rib (knit 2, purl 2) for 5 cm = 2". Remember BINDING OFF TIP and bind off with knit over knit and purl over purl. Work the other sleeve in the same way. ASSEMBLY: Fold the neck double to the wrong side. Sew the cast-on edge to the neckline, with long, loose stitches from the wrong side (making sure the seam is invisible on the right side and that it is not tight). |
|||||||
Diagram explanations |
|||||||
|
|||||||
 |
|||||||
Have you finished this pattern?Tag your pictures with #dropspattern #sjoebrissweater or submit them to the #dropsfan gallery. Do you need help with this pattern?You'll find 22 tutorial videos, a Comments/Questions area and more by visiting the pattern on garnstudio.com. © 1982-2026 DROPS Design A/S. We reserve all rights. This document, including all its sub-sections, has copyrights. Read more about what you can do with our patterns at the bottom of each pattern on our site. |
|||||||


With over 40 years in knitting and crochet design, DROPS Design offers one of the most extensive collections of free patterns on the internet - translated to 17 languages. As of today we count 324 catalogs and 12290 patterns - 12280 of which are translated into English (US/in).
We work hard to bring you the best knitting and crochet have to offer, inspiration and advice as well as great quality yarns at incredible prices! Would you like to use our patterns for other than personal use? You can read what you are allowed to do in the Copyright text at the bottom of all our patterns. Happy crafting!
Post a comment to pattern DROPS 224-1
We would love to hear what you have to say about this pattern!
If you want to leave a question, please make sure you select the correct category in the form below, to speed up the answering process. Required fields are marked *.