
Popular categories
Looking for a yarn?


Comments / Questions (16)
![]() May Helen wrote:
May Helen wrote:
I begynnelsen på bærestykket står det: strikk 3 m rett, 3 m vrang (=6masker) OVER de første 10 maskene? hvordan får en strikket 6masker OVER 10 m? Dette forstår jeg ikke.
30.10.2025 - 22:50DROPS Design answered:
Hei, May Helen, bærestykket begynner med 3 rett, 3 vrang til stolpemasker, så strikker du rett over de neste 10-10-10-14-14-14 maskene, SAMTIDIG som det økes 0-2-2-0-2-2 masker. Du strikker altså 6 masker (3r+3vr) og så 10 masker rett. Vennlig hilsen, DROPS Design
31.10.2025 - 08:10
![]() Meike wrote:
Meike wrote:
Moin aus Hamburg. Ich komme bei der ersten Reihe nicht weiter. Ich möchte Größe L stricken und komme nur auf 100 Maschen. Wo finde ich die restlichen zwei? Sind das die Randmaschen? Folgendes hab ich errechnet: Zeile 3 bis 7 folgende Maschen: 12/14/18/22/20/8/6 nach Adam Riese 100... HILFE 😀 😉 Liebe Grüße Meike
16.07.2025 - 13:53DROPS Design answered:
Liebe Meike, so stricken Sie die 1. Reihe: 6 Blenden-Maschen + 12 M rechts +8 M A.1 + 10 M rechts + 8 M A.1 + 22 M rechts + 8 M A.1 + 10 M rechts + 8 M A.1 + 12 M rechts + 6 Blenden-Maschen = 6+12+8+10+8+22+8+10+8+12+6=110 Maschen. Viel Spaß beim Stricken!
24.07.2025 - 14:53
![]() Hanne wrote:
Hanne wrote:
I den danske version er beskrivelsen af raglan forkert. Der står Tag 1 maske ind på hver….. skulle der ikke stå Tag en maske UD? Desuden står der øverst (overskriften) at der strikkes med rib i raglanudtagninger. Mens der i den norske version står “vrang i raglanudtagninger”
07.09.2024 - 22:46
![]() Donbalak wrote:
Donbalak wrote:
J'ai tricoté un gilet top down il y a quelques années et j'aimerais savoir de quel modèle il s'agit (mon ordinateur ayant sauté je n'ai plus le modèle) Merci
06.06.2024 - 14:15DROPS Design answered:
Bonjour Mme Donbalak, retrouvez tous nos modèles de gilets et vestes tricotés de haut en bas ici, ajoutez des filtres si besoin pour affiner votre recherche. Bon tricot!
07.06.2024 - 08:10
![]() LaureM wrote:
LaureM wrote:
Mea culpa vous pouvez supprimer ma question précédente je suis fatigué et j’avais mal lu ! Par contre il me semble mais a vérifier qu’il y a une erreur dans la version française. Pour le premier rang endroit du col vous finissez par 3 mailles envers et 2 mailles endroits. Ce ne serait pas 3 mailles endroit à la fin plutôt ? Car je suis en taille M donc je monte 102 mailles et en recalculant tout le premier rang je tombe sur 101 mailles. Encore merci
05.06.2023 - 23:34DROPS Design answered:
C'est exact LaureM, merci pour votre retour, la correction a été faite. Bon tricot!
06.06.2023 - 09:29
![]() LaureM wrote:
LaureM wrote:
Bonjour, tout d’abord un grand merci pour le modèle ! J’ai une question car je ne comprend pas dutout le diagramme du A.1. En lisant vos explications je compte 6 mailles au total et non 8 et je ne vois aucune maille envers travaillée sur l’endroit. Pouvez vous m’éclairer ? Merci
05.06.2023 - 22:11DROPS Design answered:
Bonjour Laure et merci, le diagramme A.1 se tricote sur 8 mailles ainsi, vu sur l'endroit: 3 m envers, 2 m end, 3 m env; Sur l'envers, tricotez ainsi: 3 m end, 2 m env, 3 m end. Bon tricot!
06.06.2023 - 09:06
![]() Penny Cole wrote:
Penny Cole wrote:
Where on earth is the sizing chart on this pattern please
30.08.2022 - 13:57DROPS Design answered:
Dear Mrs Cole, you will read more about sizes, measurements and chart here. Happy knitting!
30.08.2022 - 15:07
![]() CARMEN CASTILLO wrote:
CARMEN CASTILLO wrote:
Canesú, delantero, ¿el raglan empieza con 12 puntos, aumento 22 veces un punto, me da 34 puntos? porque dice 48 puntos delantero (talla L)
02.01.2022 - 19:49DROPS Design answered:
Hola Carmen, el delantero tiene 40 puntos (incluyendo 3 derechos, 3 reveses). Los diagramas A.1 forman parte de las piezas delantera y espalda. Saludos!
05.01.2022 - 13:02
![]() Josie wrote:
Josie wrote:
Bonjour. J'ai déjà réalisé un grand nombre de vos modèles. J'attends ma commande de LIMA mais je voudrais juste vous dire que j'aimerais réaliser des modèles sans utiliser d'aiguille circulaire ou double pointes. Pouvez-vous le signaler aux créateurs et créatrices. Merci
03.10.2021 - 01:29
![]() Gitte Christensen wrote:
Gitte Christensen wrote:
Hvor meget garn skal der bruge ved Str. XXL
29.09.2021 - 11:56DROPS Design answered:
Hej Gitte. 450 g DROPS Air till storlek XXL. Mvh DROPS Design
29.09.2021 - 12:02
|
|||||||
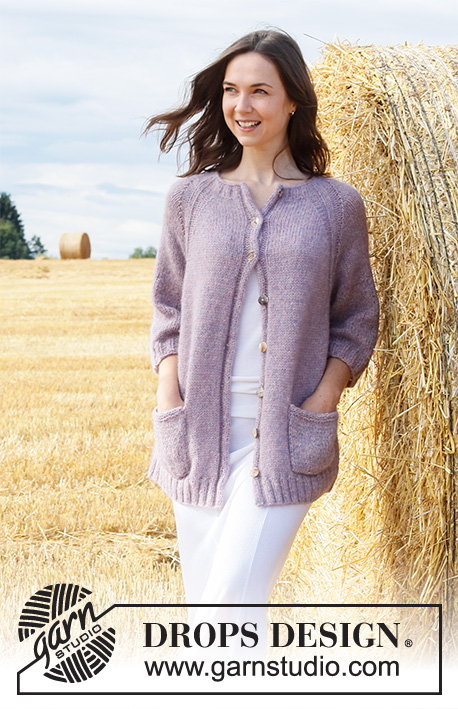
Lavender Pocket#lavenderpocketjacket |
|||||||
 |
 |
||||||
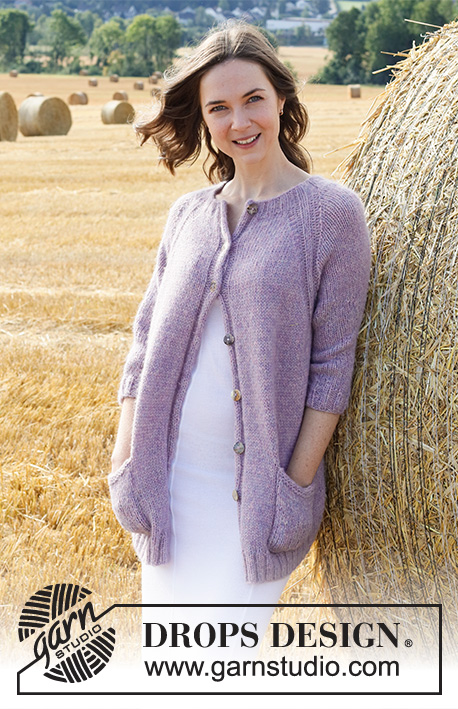
Knitted jacket in DROPS Air. The piece is worked top down with ribbed raglan and ¾-length sleeves. Sizes S - XXXL.
DROPS 223-36 |
|||||||
|
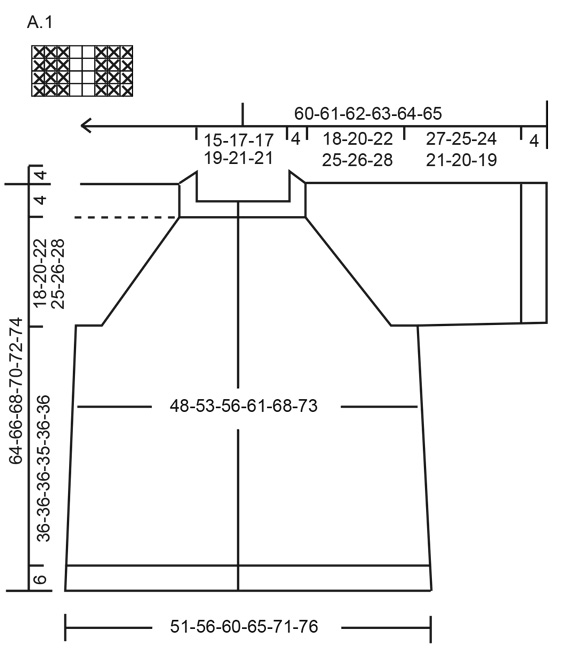
------------------------------------------------------- EXPLANATIONS FOR THE PATTERN: ------------------------------------------------------- PATTERN: See diagram A.1. The diagram shows all rows in the pattern from the right side. RIDGE/GARTER STITCH (worked back and forth): Knit all rows. 1 ridge in height = Knit 2 rows. INCREASE TIP-1 (for sides of body): Work until there are 2 stitches left before the marker thread, 1 yarn over, knit 4 (marker thread sits in the middle of these 4 stitches), 1 yarn over. On the next row purl the yarn overs twisted to avoid holes. Then work the new stitches in stockinette stitch. INCREASE TIP-2 (evenly spaced): To work out how to increase evenly, count the total number of stitches on the needle (e.g. 178 stitches) minus the bands (e.g. 12 stitches) and divide the remaining stitches by the number of increases to be made (e.g. 32) = 5.2. In this example, increase by making 1 yarn over after approx. each 5th stitch. Do not increase on the bands. On the next row purl the yarn overs twisted to avoid holes. BUTTONHOLES: Work buttonholes on the right band (when the garment is worn). Work from the right side when there are 5 stitches left on the row as follows: Make 1 yarn over, purl 2 together and knit 3. On the next row (wrong side), knit the yarn over to leave a hole. The first buttonhole is worked when the rib on the neck measures approx. 1½-2 cm = ½"-¾". Then work the other 7 buttonholes with approx. 7½-8-8-8½-8½-9 cm = 7½-3⅛"-3⅛"-3¼"-3¼"-3½" between each one. RAGLAN: Increase 1 stitch on each side of the 8 stitches in A.1, in each transition between body and sleeves (= 8 stitches increased). Increase 1 stitch by making 1 yarn over. On the next row purl the yarn overs twisted to avoid holes. Then work the new stitches in stockinette stitch. BINDING-OFF TIP: To avoid the bind-off edge being tight you can bind off with a larger size needle. ------------------------------------------------------- START THE PIECE HERE: ------------------------------------------------------- JACKET – SHORT OVERVIEW OF THE PIECE: The neck and yoke are worked back and forth with circular needle, from mid front and top down. The yoke is divided for body and sleeves and the body continued back and forth. The sleeves are worked in the round with short circular needle/double pointed needles, top down. NECK: Cast on 102-102-102-118-118-118 stitches with circular needle size 4.5 mm = US 7 and Air. Purl 1 row from the wrong side. The next row is worked as follows from the right side: Knit 3, purl 3, knit 2, * purl 2, knit 2 *, work from *-* over the next 8-8-8-12-12-12 stitches, A.1 (= 8 stitches), knit 2, purl 2, knit 2, purl 2, knit 2, A.1 * knit 2, purl 2 *, work from *-* over the next 16-16-16-24-24-24 stitches, knit 2, A.1, knit 2, purl 2, knit 2, purl 2, knit 2, A.1, * knit 2, purl 2 *, work from *-* over the next 8-8-8-12-12-12 stitches, knit 2, purl 3, knit 3. Continue this rib for 1½ cm = ½", then work a BUTTONHOLE – read description above, on the right band. When the rib measures 4 cm = 1½", insert 1 marker after the band at the beginning of the row; the yoke is measured from this marker. YOKE: Change to circular needle size 5.5 mm = US 9 and work as follows from the right side: Knit 3, purl 3 (= band), knit 10-10-10-14-14-14 AT THE SAME TIME as you increase 0-2-2-0-2-2 stitches ( = 10-12-12-14-16-16 stitches), A.1, knit 10, A.1, knit 18-18-18-26-26-26 AT THE SAME TIME as you increase 0-4-4-0-4-4 stitches (= 18-22-22-26-30-30 stitches), A.1, knit 10, A.1, knit 10-10-10-14-14-14 AT THE SAME TIME as you increase 0-2-2-0-2-2 stitches (= 10-12-12-14-16-16 stitches), purl 3, knit 3 (= band) = 102-110-110-118-126-126 stitches. Continue this pattern, AT THE SAME TIME on the next row from the right side begin to increase to RAGLAN – read description above (= 8 stitches increased). Increase every 2nd row (= each row from the right side), a total of 18-20-22-25-26-28 times = 246-270-286-318-334-350 stitches. REMEMBER THE KNITTING GAUGE! Continue working without further increases until the piece measures 18-20-22-23-25-27 cm = 7"-8"-8¾"-9"-9¾"-10⅝" from the marker. The next row is worked as follows from the right side: Work the first 42-46-48-52-56-59 stitches as before (= left front piece), place the next 46-50-54-62-62-64 stitches on 1 thread for the sleeve, cast on 6-6-8-8-10-12 new stitches on the needle (= in side under sleeve), work 70-78-82-90-98-104 stitches (= back piece), place the next 46-50-54-62-62-64 stitches on 1 thread for the sleeve, cast on 6-6-8-8-10-12 new stitches on the needle (= in side under sleeve), work the remaining 42-46-48-52-56-59 stitches as before (= right front piece). BODY: = 166-182-194-210-230-246 stitches. Insert 1 marker thread in each side, in the middle of the 6-6-8-8-10-12 stitches cast on under each sleeve; allow the threads to follow your work onwards, they will be used when increasing in the sides. Continue with stockinette stitch and band stitches as before. When the piece measures 4 cm = 1½" from the division, increase 1 stitch on each side of both marker threads – read INCREASE TIP-1 = 4 stitches increased. Increase like this every 12 cm = 4¾" a total of 3 times = 178-194-206-222-242-258 stitches. When the piece measures 36-36-36-35-36-36 cm = 14¼"-14¼"-14¼"-13¾"-14¼"-14¼" from the division, work 1 row from the right side where you increase 32-36-40-40-48-48 stitches evenly spaced – read INCREASE TIP-2 = 210-230-246-262-290-306 stitches. Work 1 row from the wrong side. Change to circular needle size 4.5 mm = US 7 and work as follows from the right side: Knit 3, purl 3, knit 2, * purl 2, knit 2 *, work from *-* until there are 10 stitches left, purl 2, knit 2, purl 3 and knit 3. Work this rib for 6 cm = 2⅜", then bind off with knit over knit and purl over purl – read BINDING-OFF TIP. The jacket measures approx. 64-66-68-70-72-74 cm = 25¼"-26"-26¾"-27½"-28⅜"-29⅛" from the shoulder down. SLEEVE: Place the 46-50-54-62-62-64 stitches from the thread on the one side of the piece on double pointed needles/short circular needle size 5.5 mm = US 9 and knit up 1 stitch in each of the 6-6-8-8-10-12 stitches cast on under the sleeve = 52-56-62-70-72-76 stitches. Insert a marker thread in the middle of the new stitches. Work stockinette stitch in the round. When the sleeve measures 27-25-24-21-20-19 cm = 10⅝"-9¾"-9½"-8¼"-8"-7½", increase 0-0-2-2-0-0 stitches evenly spaced = 52-56-64-72-72-76 stitches. Change to double pointed needles size 4.5 mm = US 7 and work rib (knit 2, purl 2) for 4 cm = 1½". Bind off with knit over knit and purl over purl. The sleeve measures 31-29-28-25-24-23 cm = 12¼"-11⅜"-11"-9¾"-9½"-9" from the division. Work the other sleeve in the same way. POCKET: Cast on 26-26-28-28-28-28 stitches with needle size 5.5 mm = US 9 and Air. Work 1 RIDGE over all stitches – read description above. Now work stockinette stitch, with 1 edge stitch in garter stitch on each side until the piece measures 12-12-13-13-14-14 cm = 4¾"-4¾"-5⅛"-5⅛"-5½"-5½". Work 2 ridges over all stitches, then bind off. Work 1 more pocket in the same way. ASSEMBLY: Sew the buttons onto the left band. Sew the pockets to the middle of each front piece, approx. 1 cm = ⅜" above the rib - see photo. |
|||||||
Diagram explanations |
|||||||
|
|||||||
 |
|||||||
Have you finished this pattern?Tag your pictures with #dropspattern #lavenderpocketjacket or submit them to the #dropsfan gallery. Do you need help with this pattern?You'll find 26 tutorial videos, a Comments/Questions area and more by visiting the pattern on garnstudio.com. © 1982-2026 DROPS Design A/S. We reserve all rights. This document, including all its sub-sections, has copyrights. Read more about what you can do with our patterns at the bottom of each pattern on our site. |
|||||||


With over 40 years in knitting and crochet design, DROPS Design offers one of the most extensive collections of free patterns on the internet - translated to 17 languages. As of today we count 324 catalogs and 12291 patterns - 12281 of which are translated into English (US/in).
We work hard to bring you the best knitting and crochet have to offer, inspiration and advice as well as great quality yarns at incredible prices! Would you like to use our patterns for other than personal use? You can read what you are allowed to do in the Copyright text at the bottom of all our patterns. Happy crafting!
Post a comment to pattern DROPS 223-36
We would love to hear what you have to say about this pattern!
If you want to leave a question, please make sure you select the correct category in the form below, to speed up the answering process. Required fields are marked *.