
Popular categories
Looking for a yarn?


Comments / Questions (26)
![]() Giovanna wrote:
Giovanna wrote:
Ho realizzato questo maglione ma adesso vorrei allungare le maniche. C’è un modo per scucirle dal basso, dal polso, senza dovere disfare il tutto ? Grazie.
31.10.2024 - 12:15DROPS Design answered:
Buonasera Giovanna, per un aiuto così personalizzato può rivolgersi al suo rivenditore di fiducia. Buon lavoro!
31.10.2024 - 16:49
![]() Dela wrote:
Dela wrote:
Hola, estoy haciendo este modelo en S y no termino de comprender la consigna del delantero para cerrar los puntos; tendría que cerrar 2 puntos (uno al principio y otro al final de la vuelta= 1*1) cada vuelta hasta que la labor midiese 37 cm desde el borde del montaje? O solamente cerrarlos la 1ª fila del delantero? Gracias por el patrón :)
03.04.2024 - 23:44DROPS Design answered:
Hola Dela, en la talla S no tienes que cerrar dos puntos (en las instrucciones pone 0 así que te saltas ese paso). Tienes que cerrar 1 punto 1 vez, es decir, 1 punto al inicio de la fila por el lado derecho y 1 punto al inicio de la fila por el lado revés (1 en cada sisa). No tienes que cerrar más puntos que estos. Continuas trabajando en punto jersey sobre el resto de puntos hasta que la labor mida 37cm.
07.04.2024 - 23:35
![]() Karen Strandesen wrote:
Karen Strandesen wrote:
I Jeres opskrift 223-23 under ærmer står der at der skal lukkes 2 masker af 7 gange i begyndelsen af hver pind på str. M. Derefter skulle der være 32 masker. Men der bliver lukket i alt 15 masker af og man begynder med 62 masker. Så vil man da slutte med 47 masker - eller er der noget her jeg har misforstået?
12.02.2024 - 23:45DROPS Design answered:
Hej Karen, du har 62 masker lukker 2x7=14 og 1x1=1 i hver side 62-14-14-1-1 = 32 masker :)
22.02.2024 - 11:33
![]() Larissa wrote:
Larissa wrote:
Bonjour. Pour ce modèle en particulier je voudrais savoir si je peux remplacer la DROPS SKY par n’importe quel fil du B. Je tiens à vous remercier de répondre à mes interrogations. Merci et bonne journée.
06.01.2024 - 04:53DROPS Design answered:
Bonjour Larissa, tout à fait, utilisez le convertisseur pour connaître la quantité correspondante à votre taille pour chacune des qualités du groupe de fils B. Notez qu'il vous faudra également tricoter avec 1 fil Kid-Silk (ou un autre fil du groupe de fils A) et obtenir la même tension pour obtenir les mesures finales du schéma. Bon tricot!
08.01.2024 - 09:45
![]() Larissa wrote:
Larissa wrote:
Bonjour. J’aimerais tricoter ce pull avec 1 fil, lequel me conseillez-vous ? J’ai essayé avec les fils proposés mais le résultat est catastrophique vu que je suis une grande débutante je n’arrive pas à travailler avec 2 fils. Merci
03.01.2024 - 18:12DROPS Design answered:
Bonjour Larissa, pour tricoter avec 2 fils, il suffit juste de les tenir en même temps comme s'il n'y en avait qu'un seul, veillez juste à ce que votre tension soit juste, autrement dit vous devez avoir 14 mailles x 16 rangs jersey = 10 x 10 cm. Si vous voulez tricoter avec un seul fil, vous pouvez utiliser DROPS Melody, mais pensez à bien vérifier votre tension pour que les mesures finales soient justes. Bon tricot!
04.01.2024 - 08:04
![]() Larissa wrote:
Larissa wrote:
Bonjour. J’aimerais faire ce pull mais en utilisant un fil de groupe C notamment Drops Air. Pour la taille S, quelle quantité me conseillez-vous? Merci
30.12.2023 - 13:39DROPS Design answered:
Bonjour Larissa, Air n'est pas forcément une alternative à ce modèle en raison de la tension; essayez dans un premier temps si vous avez la bonne tension et si la texture vous convient, car l'ouvrage risque d'être un peu plus souple et aéré en ne tricotant qu'avec 1 fil Air. Si cela vous convient, calculez le métrage total nécessaire dans les 2 laines, et divisez la plus courte par le métrage d'une pelote Air pour avoir la quantité correspondante. Bon tricot!
02.01.2024 - 10:43
![]() Nina wrote:
Nina wrote:
Synes genseren er svært kort i str, med bare 26 cm fra oppleggskant opp til maskefelling ved ermet, kan dette stemme? Og vrangborden nederst blir jo så løs da det er flere masker der enn på selve bolen, helt motsatt enn andre mønster jeg har strikket etter. Endte med at jeg må rekke opp igjen nederst, strikke lenger vrangbord hvor jeg må ha færre masker.
28.03.2023 - 08:03DROPS Design answered:
Hej Nina, ja det er en kort genser. Du finder målene i måleskitsen nederst i opskriften (du kan naturligvis altid forlænge den) :)
12.04.2023 - 15:00
![]() MDL wrote:
MDL wrote:
Hello! Thank you for this lovely pattern. Is that the correct amount listed of Sky to use? For example 150g (small/medium) is only 3 skeins /570m, whereas you call for 100g (4 skeins /848m) of Kid Silk. I feel it must be closer to 5 skeins of Sky for a sweater. Thank you for your time.
13.09.2022 - 23:06DROPS Design answered:
Hi MDL, The amounts given are correct as you are using the 2 yarns simultaneously. Happy knitting!
14.09.2022 - 06:58
![]() Hyejeong wrote:
Hyejeong wrote:
For sleeves, I’m confused that K1-1-2-3-3-3, Knit 2 and 2 stitches together over the next 30-30-30-32-32-32 stitches(= 15-15-15-16-16-16 stitches decreased)...
28.02.2022 - 17:12DROPS Design answered:
Dear Hyejeong, work this row as follows from the right side: knit 1-1-2-3-3-3 (see size), then work K2 tog a total of 15-15-15-16-16-16 times (1-1-2-3-3-3 sts remain at the end of the row), knit these last 1-1-2-3-3-3 stitches. Does it sounds now ok to you? Happy knitting!
01.03.2022 - 09:26
![]() Marte wrote:
Marte wrote:
Hei, jeg ønsker å lage denne genseren med lange ermer (til håndleddet). Hvor mye ekstra garn trenger jeg da?
08.02.2022 - 15:03DROPS Design answered:
Hej Marte, du skal nok bruge 2 ekstra nøgler DROPS Sky og 1 ekstra i DROPS Kid-Silk :)
09.02.2022 - 10:27
|
|
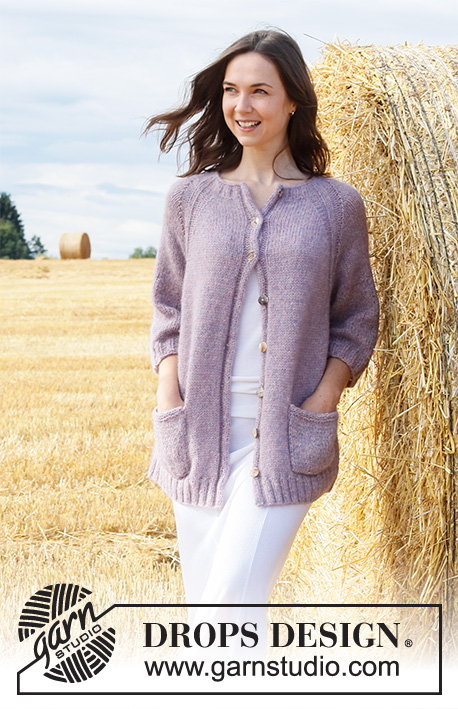
Big Sky Country#bigskycountrysweater |
|
 |
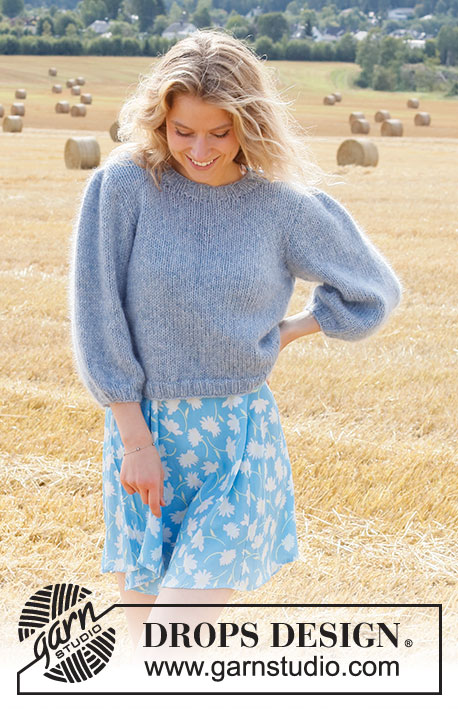 |
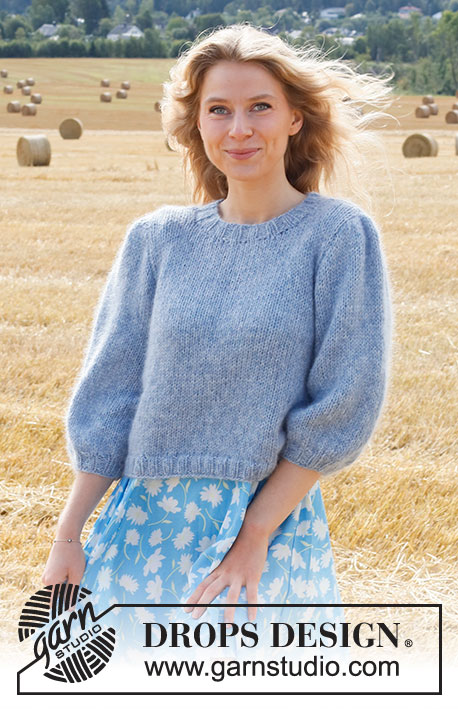
Knitted sweater in DROPS Sky and DROPS Kid-Silk. The piece is worked with ¾-length, puffed sleeves. Sizes S - XXXL.
DROPS 223-23 |
|
|
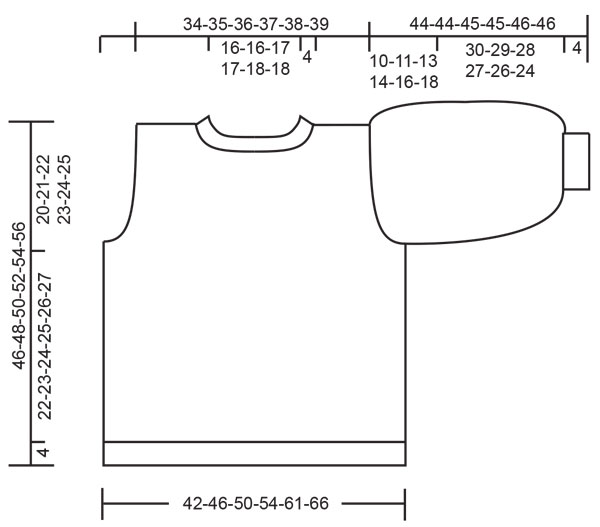
------------------------------------------------------- EXPLANATIONS FOR THE PATTERN: ------------------------------------------------------- RIDGE/GARTER STITCH (worked back and forth): Knit all rows. 1 ridge in height = Knit 2 rows. INCREASE/DECREASE TIP (evenly spaced): To work out how to increase/decrease evenly, count the total number of stitches on needle (e.g. 144 stitches) and divide by the number of increases/decreases to be made (e.g. 26) = 5.5. In this example, increase by making 1 yarn over after alternately each 5th and 6th stitch. On the next row work the yarn overs twisted to avoid holes. When decreasing, knit together alternately each 4th and 5th and each 5th and 6th stitch. ------------------------------------------------------- START THE PIECE HERE: ------------------------------------------------------- SWEATER – SHORT OVERVIEW OF THE PIECE: The body is worked in the round, bottom up as far as the armholes. Then the front and back pieces are finished separately, back and forth on the needle. The sleeves are worked in the round with double pointed needles/short circular needle, bottom up and the puffed sleeve cap worked back and forth to finish. BODY: Cast on 144-156-168-184-204-224 stitches with circular needle size 5 mm = US 8 and 1 strand Sky and 1 strand Kid-Silk (= 2 strands). Knit 1 round, then work rib (knit 2, purl 2) in the round for 4 cm = 1½". Knit 1 round where you decrease 26-26-28-32-34-38 stitches evenly spaced – read INCREASE/DECREASE TIP = 118-130-140-152-170-186 stitches. Change to circular needle size 6 mm = US 10. Insert a marker at the beginning of the round and 1 marker after 59-65-70-76-85-93 stitches (= in each side of the body). Allow the markers to follow your work onwards; they are used when working the armholes. Work stockinette stitch in the round. REMEMBER THE KNITTING GAUGE! When the piece measures 26-27-28-29-30-31 cm = 10¼"-10⅝"-11"-11⅜"-11¾"-12¼" from the cast-on edge, bind off 8-8-10-10-12-12 stitches each side for the armholes (4-4-5-5-6-6 stitches on each side of both markers). Front and back pieces are now finished separately. FRONT PIECE: = 51-57-60-66-73-81 stitches. Work stockinette stitch back and forth with 1 edge stitch in GARTER STITCH – read description above, on each side. On the first row begin to shape the armholes - bind off at the beginning of each row as follows: Bind off 2 stitches 0-1-1-2-3-4 times and 1 stitch 1-1-2-2-3-4 times = 49-51-52-54-55-57 stitches. When the piece measures 37-39-40-42-43-45 cm = 14½"-15¼"-15¾"-16½"-17"-17¾" from the cast-on edge (approx. 11-12-12-13-13-14 cm = 4⅜"-4¾"-4¾"-5⅛"-5⅛"-5½" from the 8-8-10-10-12-12 bind-off stitches for the armholes), place the middle 11-11-12-12-13-13 stitches on a thread for the neck and each shoulder is finished separately. Continue by binding off on each row from the neck as follows: Bind off 2 stitches 2 times and 1 stitch 2 times = 13-14-14-15-15-16 stitches left on shoulder. Continue working until the piece measures a total of 46-48-50-52-54-56 cm = 18"-19"-19¾"-20½"-21¼"-22" from the shoulder down. Bind off. Work the other shoulder in the same way. BACK PIECE: = 51-57-60-66-73-81 stitches. Work stockinette stitch back and forth with 1 edge stitch in garter stitch on each side. On the first row begin to shape the armholes - bind off at the beginning of each row as follows: Bind off 2 stitches 0-1-1-2-3-4 times and 1 stitch 1-1-2-2-3-4 times = 49-51-52-54-55-57 stitches. When the piece measures 43-45-47-49-51-53 cm = 17"-17¾"-18½"-19¼"-20"-21" from the cast-on edge (approx. 17-18-19-20-21-22 cm = 6¾"-7"-7½"-8"-8¼"-8¾" from the 8-8-10-10-12-12 bind-off stitches for the armholes), bind off the middle 21-21-22-22-23-23 stitches for the neck and each shoulder is finished separately. Continue by binding off 1 stitch on the next row from the neck = 13-14-14-15-15-16 stitches left on shoulder. Continue working until the piece measures a total of 46-48-50-52-54-56 cm = 18"-19"-19¾"-20½"-21¼"-22". from the shoulder down. Bind off. Work the other shoulder in the same way. SLEEVE: Cast on 40-40-44-44-48-48 stitches with double pointed needles size 5 mm = US 8 and 1 strand Sky and 1 strand Kid-Silk (= 2 strands). Knit 1 round then work rib (knit 2, purl 2) in the round for 4 cm = 1½". Knit 1 round where you increase 26-30-30-32-32-34 stitches evenly spaced – read INCREASE/DECREASE TIP = 66-70-74-76-80-82 stitches. Change to short circular needle size 6 MM = US 10 and insert 1 marker at the beginning of the round (= mid-under sleeve). Continue with stockinette stitch in the round until the sleeve measures 34-33-32-31-30-28 cm = 13⅜"-13"-12½"-12¼"-11¾"-11". Now decrease 8-8-10-10-12-12 stitches mid-under the sleeve (4-4-5-5-6-6 stitches on each side of the marker) = 58-62-64-66-68-70 stitches. Now work the puffed sleeve cap. Continue with stockinette stitch back and forth and bind off stitches at the beginning of each row as follows: Bind off 2 stitches 6-7-6-4-3-3 times on each side and 1 stitch 1-1-3-6-9-10 times on each side = 32-32-34-38-38-38 stitches. On the next row work as follows: Knit 1-1-2-3-3-3, knit 2 and 2 stitches together over the next 30-30-30-32-32-32 stitches (= 15-15-15-16-16-16 stitches decreased), knit the last 1-1-2-3-3-3 stitches = 17-17-19-22-22-22 stitches. Bind off. The sleeve measures 44-44-45-45-46-46 cm = 17¼"-17¼"-17¾"-17¾"-18"-18". Work the other sleeve in the same way. ASSEMBLY: Sew the shoulder seams with grafting stitches. Sew in the sleeves, inside the 1 edge stitch on the body and the bind-off edge on the sleeves. NECK: Knit up approx. 68-80 stitches (including the stitches from the thread) with short circular needle size 5 mm = US 8 and 1 strand Sky and 1 strand Kid-Silk (= 2 strands), inside 1 stitch around the neck. The number of stitches should be divisible by 4. Work rib (knit 2, purl 2) in the round for 4 cm = 1½". Bind off with knit over knit and purl over purl. |
|
|
|
Have you finished this pattern?Tag your pictures with #dropspattern #bigskycountrysweater or submit them to the #dropsfan gallery. Do you need help with this pattern?You'll find 29 tutorial videos, a Comments/Questions area and more by visiting the pattern on garnstudio.com. © 1982-2025 DROPS Design A/S. We reserve all rights. This document, including all its sub-sections, has copyrights. Read more about what you can do with our patterns at the bottom of each pattern on our site. |
|


With over 40 years in knitting and crochet design, DROPS Design offers one of the most extensive collections of free patterns on the internet - translated to 17 languages. As of today we count 314 catalogs and 11822 patterns - 11812 of which are translated into English (US/in).
We work hard to bring you the best knitting and crochet have to offer, inspiration and advice as well as great quality yarns at incredible prices! Would you like to use our patterns for other than personal use? You can read what you are allowed to do in the Copyright text at the bottom of all our patterns. Happy crafting!
Post a comment to pattern DROPS 223-23
We would love to hear what you have to say about this pattern!
If you want to leave a question, please make sure you select the correct category in the form below, to speed up the answering process. Required fields are marked *.