
Popular categories
Looking for a yarn?


Comments / Questions (78)
![]() Ana Oliveira wrote:
Ana Oliveira wrote:
Boa tarde, eu estou a começar a fazer o diagrama 1. Como a camisola começa na gola, a minha carreira número 6 vai começar com uma laçada e de seguida 2 malhas juntas em meia ou terei primeiro que fazer 2 malhas juntas em meia e depois a laçada? Obrigada
14.11.2025 - 13:30DROPS Design answered:
Bom dia, A carreira começa com 2 malhas tricotadas juntamente em meia, depois, 1 laçada, motivo que se repete até ao fim da carreira (ter em atenção para fazer a última laçada nesta carreira). Aconselha-se a colocar um marcador para marcar o princípio de cada carreira. Bons tricôs! A equipa DROPS
17.11.2025 - 10:01
![]() Luhaib wrote:
Luhaib wrote:
It would be more accurate to write the bust measurement rather than just showing sizes as S M L because each pattern has a different design and fits body differently. Sizes here are not a true measuring tool. I would really like to know for example what’s the bust measure of size L ?
14.09.2025 - 18:16DROPS Design answered:
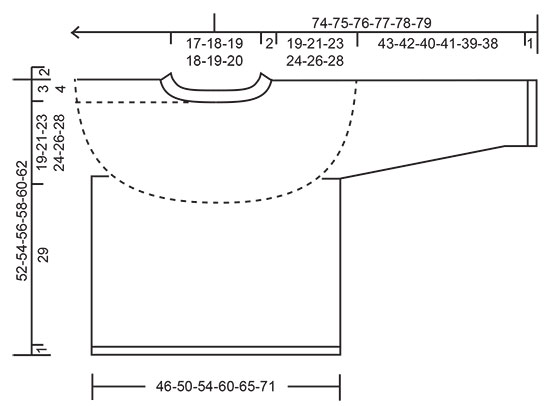
Hi, the bust measurement in size L is 108 cm, please see the schematic drawing at the end of the pattern. How to read size chart you will find HERE. Happy knitting!
15.09.2025 - 09:09
![]() Satu wrote:
Satu wrote:
Hello, What size has been knitted in the official pattern photos, please? thank you, Satu
19.08.2025 - 14:08DROPS Design answered:
Hi Satu, S or M. Happy knitting!
19.08.2025 - 14:20
![]() MURIEL COUSIN wrote:
MURIEL COUSIN wrote:
Bonjour Je vous remercie pour votre réponse précédente. J'ai une question au sujet des manches. Comment on relève une maille dans chacune des mailles montées sous la Manche svp? Merci
27.05.2025 - 15:30DROPS Design answered:
Bonjour Mme Cousin, retrouvez cette étape dans cette leçon, photo 18)B . Pour éviter un trou entre les mailles en attente et celles que l'on relève, on peut relever le fil entre la dernière /première des mailles en attente et la maille que l'on va relever, placer ce fil torse sur l'aiguille gauche et le tricoter ensemble à l'endroit avec la maille suivante. Bon tricot!
27.05.2025 - 15:50
![]() MURIEL COUSIN wrote:
MURIEL COUSIN wrote:
Bonjour Quand on commence le dis et le devant après la division, c est écrit au milieu des six mailles comment fait on svp pour tricoter au milieu de ces mailles? Cordialement
26.05.2025 - 14:33DROPS Design answered:
Bonjour Mme Cousin, les tours commencent désormais ici, donc après avoir mis les mailles des manches en attente, coupez le fil et glissez les mailles de la moitié du dos + la moitié des mailles montées sous la manche sur l'aiguille droite, sans les tricoter et commencez les tours ici, en tricotant A.4, en rond. Ou bien tricotez à l'endroit jusqu'à la moitié des mailles montées sous la 1ère manche et commencez A.4 à partir de là. Bon tricot!
26.05.2025 - 16:04
![]() Henny Van Den Berg wrote:
Henny Van Den Berg wrote:
Heeft iemand een tip om de achternaad in de pas minder duidelijk te laten verspringen
20.05.2025 - 20:30DROPS Design answered:
Dag Henny,
Helaas blijft dit altijd wel een beetje zichtbaar als je in de rondte breit met een patroon erin. Wanneer je strepen in de rondte breit kun je deze video bekijken, maar dit is minder van toepassing op ajourpatronen. /p>
01.06.2025 - 10:42
![]() Nina wrote:
Nina wrote:
Is the knitting tension with 2mm or 3 mm needles?
29.01.2025 - 22:57DROPS Design answered:
Dear Nina, if it is not mentioned differently, the gauge is given for the biggest part of the piece (in this case, the body, ),, that is knitted with 3 mm needles. Happy Knitting.
30.01.2025 - 02:14
![]() Francine Lévesque wrote:
Francine Lévesque wrote:
Merci beaucoup,
12.08.2024 - 17:56
![]() Francine Lévesque wrote:
Francine Lévesque wrote:
Bonjour je fais la grandeur médium, et j’aimerais savoir après avoir tricoté 57 m pour le dos, glisser 78 m pour manche, monter 6 m, tricoter 114 pour le devant, glisser 78m pour manche, monter 6 m et tricoter 57 m on arrive au centre du dos, ensuite ça dit en commençant le tour sur un des côtés au milieu des 6 m montées tricoter A4, ce que je veux savoir est-ce que je tricote à l’endroit jusqu’à la moitié des 6 m et a partir de là je commence A4 . Merci beaucoup
12.08.2024 - 04:03DROPS Design answered:
Bonjour Mme Lévesque, vous pouvez au choix, couper le fil et reprendre au milieu sous une des manches ou bien tricoter à l'endroit jusqu'au milieu sous la 1ère manche et commencer désormais les tours ici. Bon tricot!
12.08.2024 - 08:36
![]() Francine Lévesque wrote:
Francine Lévesque wrote:
Merci beaucoup de m’avoir répondu, je crois que j’ai compris pourquoi ça ne fonctionnait pas, c’est au rang 27 en commençant par le bas, il y a un jeté entre les 2 mailles env et je ne les avais pas fait je croyais que c’était à l’impression qu’une marque s’était formée entre les deux x, maintenant ça fonctionne bien. Merci encore
05.08.2024 - 16:52
|
|||||||||||||||||||||||||||||||
Sparrow Song#sparrowsongsweater |
|||||||||||||||||||||||||||||||
 |
 |
||||||||||||||||||||||||||||||
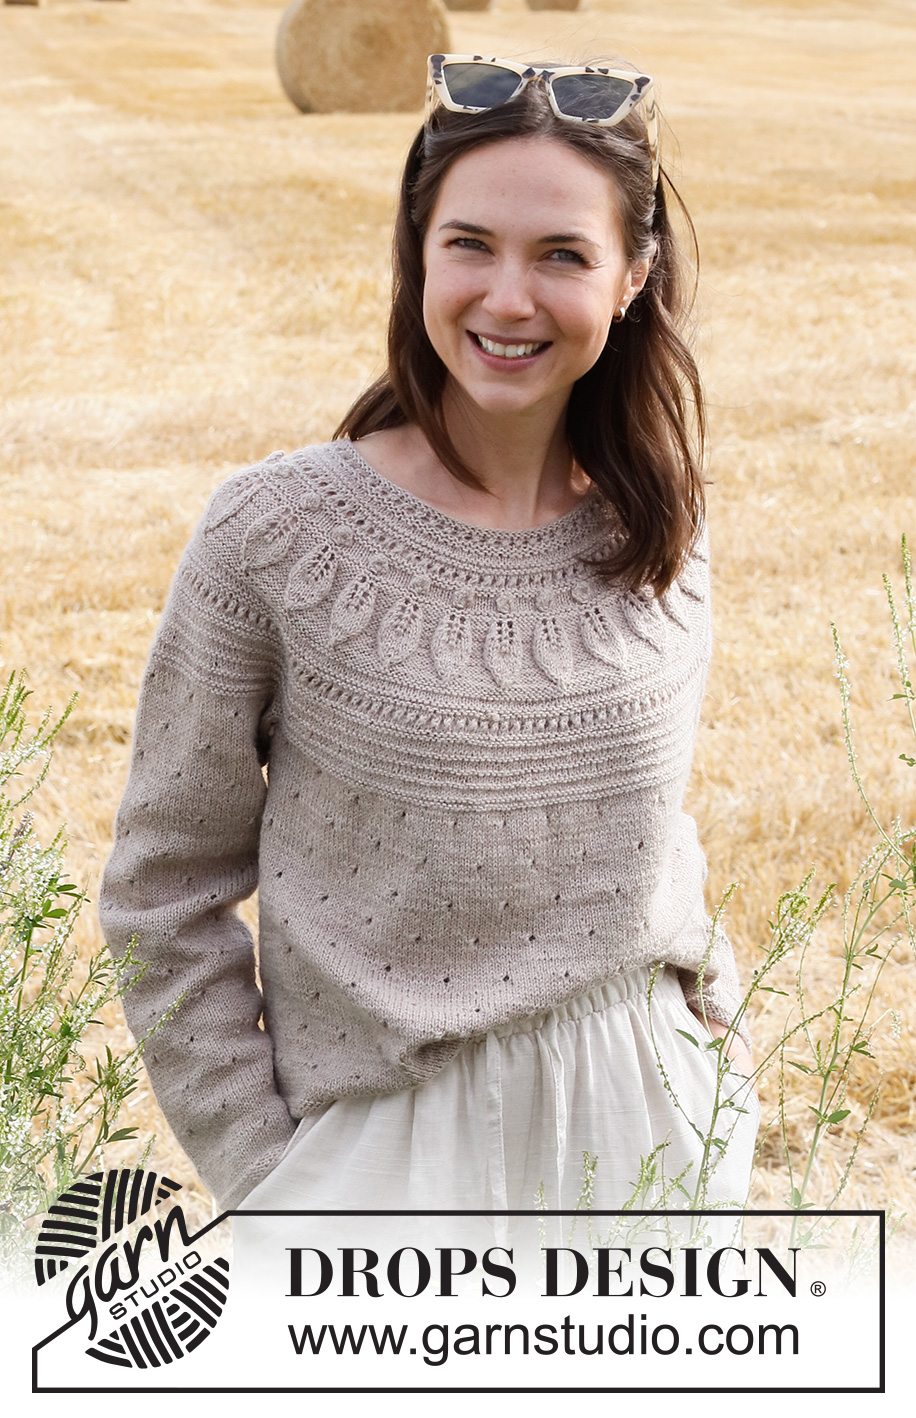
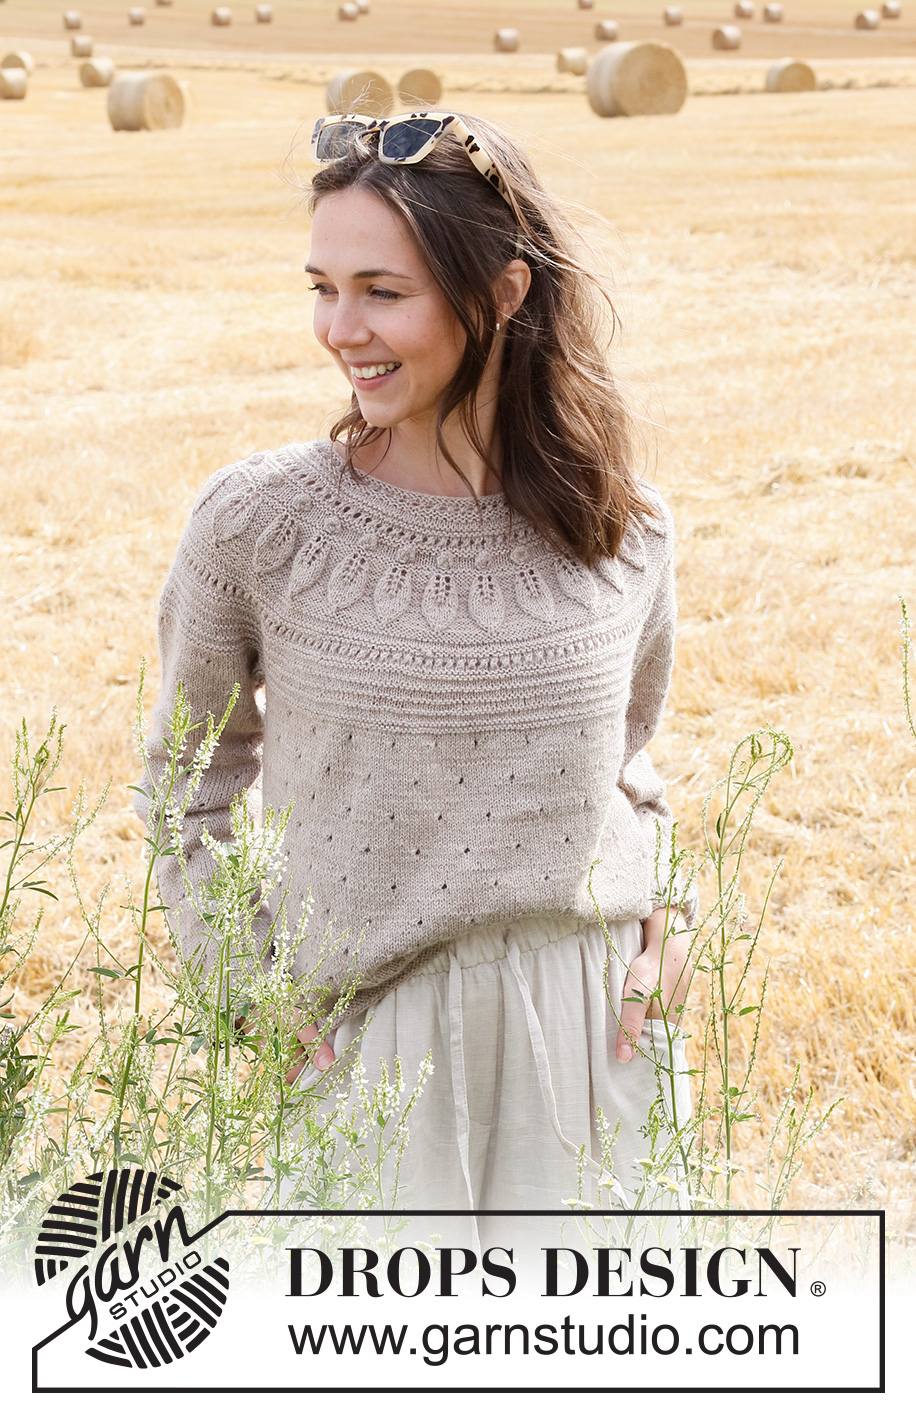
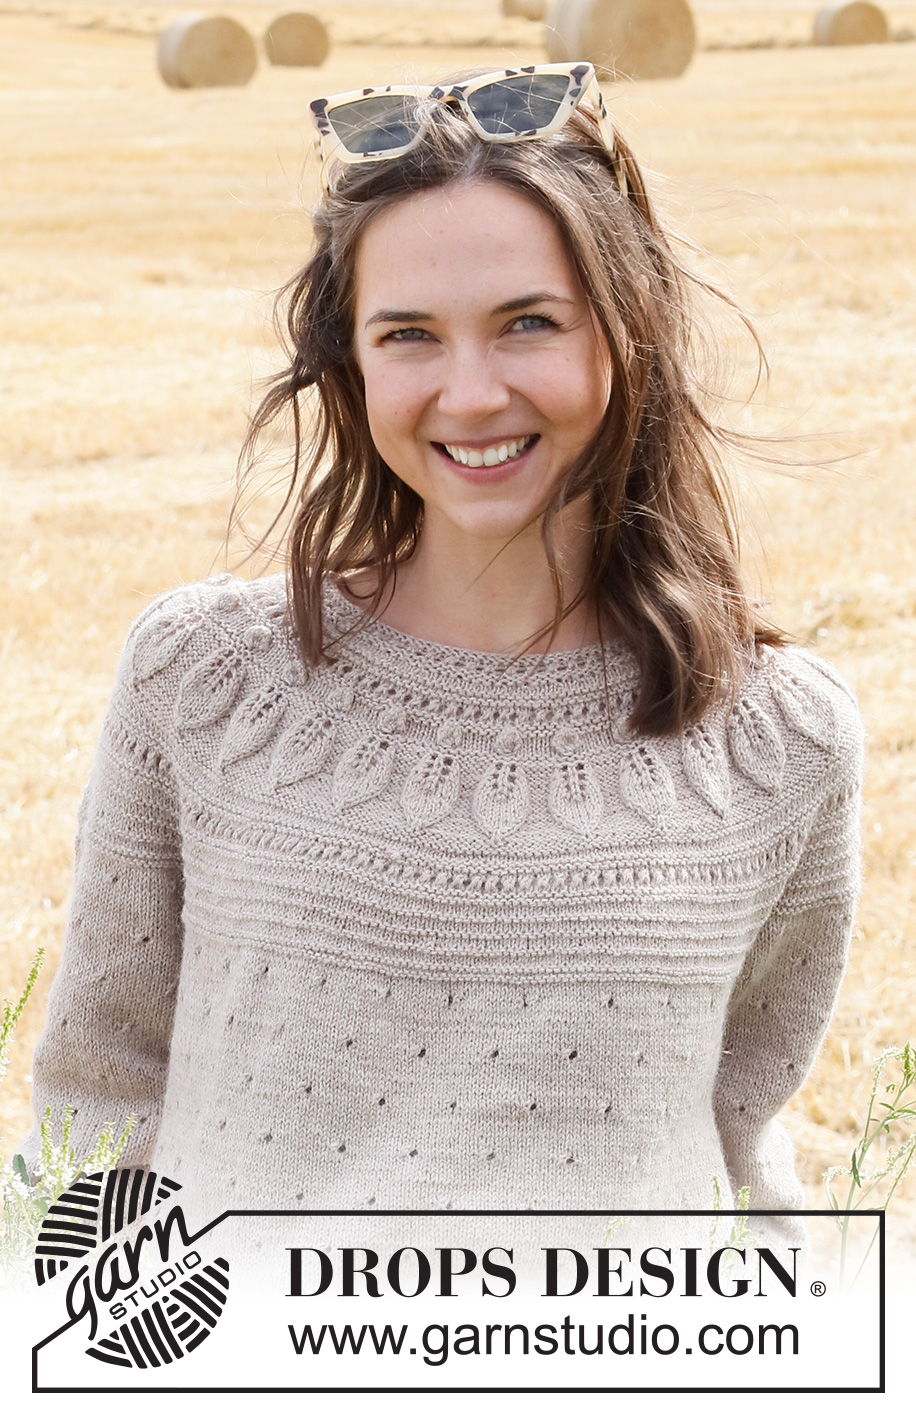
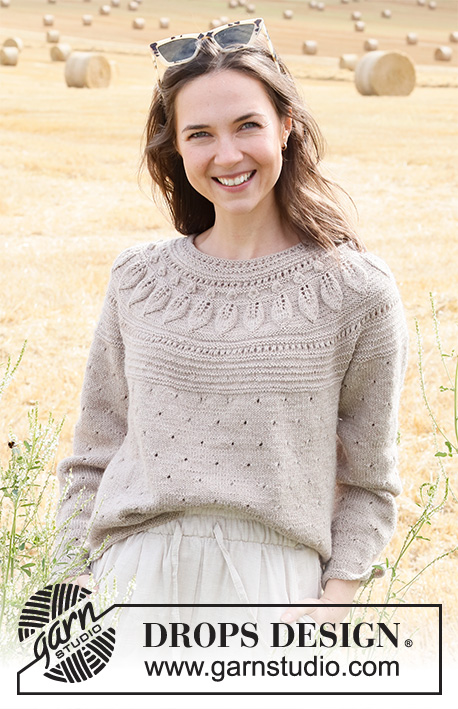
Knitted sweater in DROPS Nord. The piece is worked top down with round yoke, leaf pattern and lace pattern. Sizes S - XXXL.
DROPS 223-11 |
|||||||||||||||||||||||||||||||
|
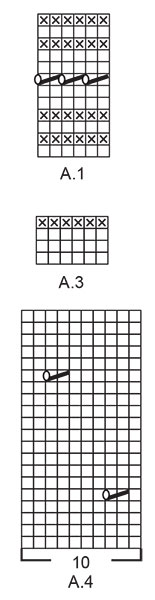
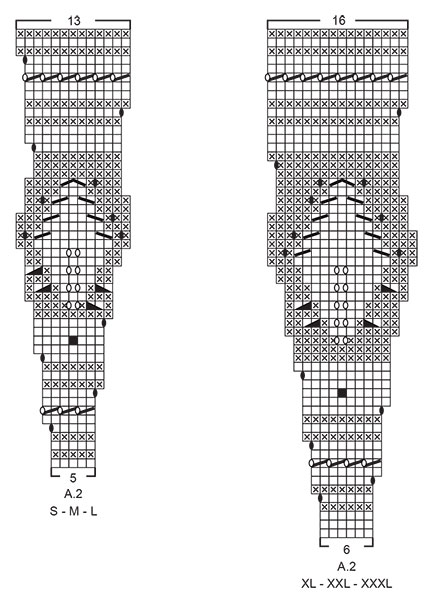
------------------------------------------------------- EXPLANATIONS FOR THE PATTERN: ------------------------------------------------------- RIDGE/GARTER STITCH (worked in the round): 1 ridge in height = 2 rounds; Knit 1 round and purl 1 round. PATTERN: See diagrams A.1 to A.4. Choose diagram for your size (applies to A.2). INCREASE TIP (evenly spaced): To work out how to increase evenly, count the total number of stitches on the needle (e.g. 110 stitches) and divide by the number of increases to be made (e.g. 25) = 4.4. In this example, increase by making 1 yarn over after alternately each 4th and 5th stitch. On the next round knit the yarn overs twisted to avoid holes. ELEVATION (back of neck): To make the back of the neck slightly higher when working a round yoke, work an elevation as described here. Skip this section if you do not want an elevation. Insert 1 marker at the beginning of the round (mid-back). Start from the right side and knit 16-17-18-20-21-22 stitches past the marker, turn, tighten the strand and purl 32-34-36-40-42-44 stitches back. Turn, tighten the strand and knit 48-51-54-60-63-66 stitches, turn, tighten the strand and purl 64-68-72-80-84-88 stitches back. Turn, tighten the strand and knit 80-85-90-100-105-110 stitches, turn, tighten the strand and purl 96-102-108-120-126-132 stitches. Turn, tighten the strand and knit to mid-back. Then work YOKE as described in the text. DECREASE TIP (for sleeves): Decrease 1 stitch on either side of the marker thread as follows: Work until there are 3 stitches left before the marker thread, knit 2 together, knit 2 (marker thread sits between these 2 stitches), slip 1 stitch as if to knit, knit 1 and pass the slipped stitch over the knitted stitch (2 stitches decreased). BINDING-OFF TIP: To avoid the bind-off edge being tight you can bind off with a larger size needle. If the edge is still tight, make 1 yarn over after approx. each 4th stitch at the same time as binding off; the yarn overs are bind off as normal stitches. ------------------------------------------------------- START THE PIECE HERE: ------------------------------------------------------- SWEATER – SHORT OVERVIEW OF THE PIECE: The neck and yoke are worked in the round with circular needle, top down from mid back. The yoke is divided for body and sleeves and the body continued in the round with circular needle. The sleeves are worked in the round with short circular needle/double pointed needles, top down. NECK: Cast on 110-116-120-124-130-134 stitches with short circular needle size 2.5 MM = US 1.5 and Nord. Work A.1 in the round. When A.1 has been completed, knit 1 round where you increase 25-29-40-44-44-46 stitches evenly spaced – read INCREASE TIP = 135-145-160-168-174-180 stitches. Knit 1 round (yarn overs knitted twisted). Change to circular needle size 3 MM = US 2.5. Insert 1 marker in the middle of the round – the yoke is measured from this marker. You can now work an ELEVATION at the back of the neck – read description above. If you do not want an elevation, go straight to YOKE. YOKE: Work A.2 in the round (= 27-29-32-28-29-30 repeats of 5-5-5-6-6-6 stitches). Continue this pattern and increase as shown in the diagram. REMEMBER THE KNITTING GAUGE! When A.2 has been completed in height, there are 351-377-416-448-464-480 stitches and the piece measures approx. 15-15-15-17-17-17 cm = 6"-6"-6"-6¾"-6¾"-6¾" from the marker on the neck. Now work A.3 in the round – AT THE SAME TIME, on the first round in A.3, increase 5-7-0-18-22-36 stitches evenly spaced = 356-384-416-466-486-516 stitches. Work A.3 until the yoke measures approx. 19-21-23-24-26-28 cm = 7½"-8¼"-9"-9½"-10¼"-11" from the marker on the neck; finishing after a complete repeat in height. Knit 1 round. Purl 1 round AT THE SAME TIME as the yoke is divided for the body and sleeves as follows: Purl the first 52-57-61-69-73-79 stitches (= ½ back piece), place the next 74-78-86-96-98-100 stitches on a thread for the sleeve, cast on 6-6-8-8-10-12 stitches (= in side under sleeve), purl 104-114-122-137-145-158 stitches (= front piece), place the next 74-78-86-96-98-100 stitches on a thread for the sleeve, cast on 6-6-8-8-10-12 stitches (= in side under sleeve) and purl the last 52-57-61-68-72-79 stitches (= ½ back piece). Body and sleeves are finished separately. THE PIECE IS NOW MEASURED FROM HERE! BODY: = 220-240-260-290-310-340 stitches. Start the round on one side – in the middle of the 6-6-8-8-10-12 stitches cast on under the sleeve, and work A.4 in the round (= 22-24-26-29-31-34 repeats of 10 stitches). Continue this pattern until the piece measures 29 cm = 11⅜" from the division. There is approx. 1 cm = ⅜" left to finished length; try the sweater on and work to desired length. Change to circular needle size 2.5 MM = US 1.5 and work 2 RIDGES over all stitches - read description above. Bind off with knit – read BINDING-OFF TIP! The sweater measures approx. 52-54-56-58-60-62 cm = 20½"-21¼"-22"-22¾"-23⅝"-24⅜" from the shoulder down. SLEEVES: Place the 74-78-86-96-98-100 stitches from the thread on the one side of the piece on double pointed needles/short circular needle size 3 MM = US 2.5 and knit up 1 stitch in each of the stitches cast on under the sleeve = 80-84-94-104-108-112 stitches. Insert a marker thread in the middle of the 6-6-8-8-10-12 stitches under the sleeve. Allow the thread to follow your work onwards; it will be used when decreasing under the sleeve. Start at the marker thread and work in the round as follows: 0-2-2-2-4-1 stitches in stockinette stitch, work A.4 over the next 80-80-90-100-100-110 stitches (= 8-8-9-10-10-11 repeats of 10 stitches) and 0-2-2-2-4-1 stitches in stockinette stitch. Continue this pattern until the sleeve measures 3-3-3-2-2-2 cm = 1⅛"-1⅛"-1⅛"-¾"-¾"-¾" from the division. Now decrease 2 stitches under the sleeve - read DECREASE TIP. Decrease like this every 2½-2-1½-1½-1-1 cm = 1"-¾"-½"-½"-⅜"-⅜" a total of 15-16-19-23-24-25 times = 50-52-56-58-60-62 stitches. Continue working until the sleeve measures 43-42-40-41-39-38 cm = 17"-16½"-15¾"-16⅛"-15¼"-15" from the division (shorter measurements in larger sizes due to wider neck and longer yoke). There is approx. 1 cm = ⅜" left to finished length; try the sweater on and work to desired length. Change to double pointed needles size 2.5 MM = US 1.5. Work 2 RIDGES– read description above. Bind off with knit – remember BINDING-OFF TIP! The sleeve measures approx. 44-43-41-42-42-39 cm = 17¼"-17"-16⅛"-16½"-16½"-15¼" from the division. Work the other sleeve in the same way. |
|||||||||||||||||||||||||||||||
Diagram explanations |
|||||||||||||||||||||||||||||||
|
|||||||||||||||||||||||||||||||
 |
|||||||||||||||||||||||||||||||
 |
|||||||||||||||||||||||||||||||
 |
|||||||||||||||||||||||||||||||
Have you finished this pattern?Tag your pictures with #dropspattern #sparrowsongsweater or submit them to the #dropsfan gallery. Do you need help with this pattern?You'll find 34 tutorial videos, a Comments/Questions area and more by visiting the pattern on garnstudio.com. © 1982-2026 DROPS Design A/S. We reserve all rights. This document, including all its sub-sections, has copyrights. Read more about what you can do with our patterns at the bottom of each pattern on our site. |
|||||||||||||||||||||||||||||||


With over 40 years in knitting and crochet design, DROPS Design offers one of the most extensive collections of free patterns on the internet - translated to 17 languages. As of today we count 324 catalogs and 12290 patterns - 12280 of which are translated into English (US/in).
We work hard to bring you the best knitting and crochet have to offer, inspiration and advice as well as great quality yarns at incredible prices! Would you like to use our patterns for other than personal use? You can read what you are allowed to do in the Copyright text at the bottom of all our patterns. Happy crafting!
Post a comment to pattern DROPS 223-11
We would love to hear what you have to say about this pattern!
If you want to leave a question, please make sure you select the correct category in the form below, to speed up the answering process. Required fields are marked *.