


Komentáře / Otázky (65)
![]() MURIEL COUSIN napsala:
MURIEL COUSIN napsala:
Bonjour Je vous remercie pour votre réponse précédente. J'ai une question au sujet des manches. Comment on relève une maille dans chacune des mailles montées sous la Manche svp? Merci
27.05.2025 - 15:30Odpověď DROPS Design :
Bonjour Mme Cousin, retrouvez cette étape dans cette leçon, photo 18)B . Pour éviter un trou entre les mailles en attente et celles que l'on relève, on peut relever le fil entre la dernière /première des mailles en attente et la maille que l'on va relever, placer ce fil torse sur l'aiguille gauche et le tricoter ensemble à l'endroit avec la maille suivante. Bon tricot!
27.05.2025 - 15:50
![]() MURIEL COUSIN napsala:
MURIEL COUSIN napsala:
Bonjour Quand on commence le dis et le devant après la division, c est écrit au milieu des six mailles comment fait on svp pour tricoter au milieu de ces mailles? Cordialement
26.05.2025 - 14:33Odpověď DROPS Design :
Bonjour Mme Cousin, les tours commencent désormais ici, donc après avoir mis les mailles des manches en attente, coupez le fil et glissez les mailles de la moitié du dos + la moitié des mailles montées sous la manche sur l'aiguille droite, sans les tricoter et commencez les tours ici, en tricotant A.4, en rond. Ou bien tricotez à l'endroit jusqu'à la moitié des mailles montées sous la 1ère manche et commencez A.4 à partir de là. Bon tricot!
26.05.2025 - 16:04
![]() Henny Van Den Berg napsala:
Henny Van Den Berg napsala:
Heeft iemand een tip om de achternaad in de pas minder duidelijk te laten verspringen
20.05.2025 - 20:30Odpověď DROPS Design :
Dag Henny,
Helaas blijft dit altijd wel een beetje zichtbaar als je in de rondte breit met een patroon erin. Wanneer je strepen in de rondte breit kun je deze video bekijken, maar dit is minder van toepassing op ajourpatronen. /p>
01.06.2025 - 10:42
![]() Nina napsala:
Nina napsala:
Is the knitting tension with 2mm or 3 mm needles?
29.01.2025 - 22:57Odpověď DROPS Design :
Dear Nina, if it is not mentioned differently, the gauge is given for the biggest part of the piece (in this case, the body, ),, that is knitted with 3 mm needles. Happy Knitting.
30.01.2025 - 02:14
![]() Francine Lévesque napsala:
Francine Lévesque napsala:
Merci beaucoup,
12.08.2024 - 17:56
![]() Francine Lévesque napsala:
Francine Lévesque napsala:
Bonjour je fais la grandeur médium, et j’aimerais savoir après avoir tricoté 57 m pour le dos, glisser 78 m pour manche, monter 6 m, tricoter 114 pour le devant, glisser 78m pour manche, monter 6 m et tricoter 57 m on arrive au centre du dos, ensuite ça dit en commençant le tour sur un des côtés au milieu des 6 m montées tricoter A4, ce que je veux savoir est-ce que je tricote à l’endroit jusqu’à la moitié des 6 m et a partir de là je commence A4 . Merci beaucoup
12.08.2024 - 04:03Odpověď DROPS Design :
Bonjour Mme Lévesque, vous pouvez au choix, couper le fil et reprendre au milieu sous une des manches ou bien tricoter à l'endroit jusqu'au milieu sous la 1ère manche et commencer désormais les tours ici. Bon tricot!
12.08.2024 - 08:36
![]() Francine Lévesque napsala:
Francine Lévesque napsala:
Merci beaucoup de m’avoir répondu, je crois que j’ai compris pourquoi ça ne fonctionnait pas, c’est au rang 27 en commençant par le bas, il y a un jeté entre les 2 mailles env et je ne les avais pas fait je croyais que c’était à l’impression qu’une marque s’était formée entre les deux x, maintenant ça fonctionne bien. Merci encore
05.08.2024 - 16:52
![]() Francine Lévesque napsala:
Francine Lévesque napsala:
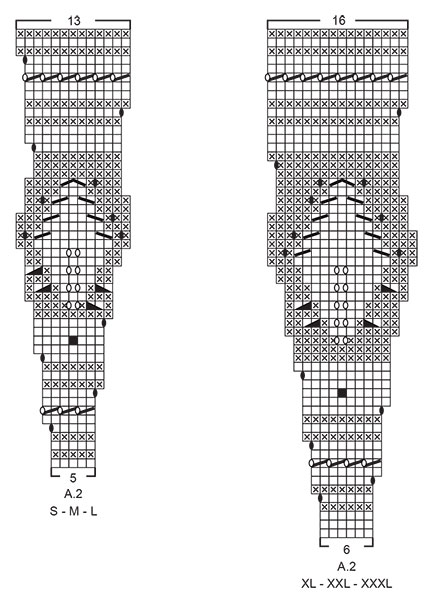
Bonjour je me demande s’il y a une erreur dans le diagramme A2, ça fonctionne jusqu’au rang où il y a 2 mailles env. gl 1maille, tricoter la suivante et passer par dessus, 5 m end, 2 m ens à l’end et 2 m env. Le Rg suivant 3 m env 7 m end 3 m env ça ne fonctionne pas. Merci beaucoup.
04.08.2024 - 23:03Odpověď DROPS Design :
Bonjour Mme Lévesque, A.2 devrait être juste, mais je ne suis pas bien sûre de comprendre de quel rang vous parlez, pouvez-vous nous dire quelle taille vous tricotez et quel est le rang du diagramme qui vous pose problème pour que l'on puisse vérifier? Merci pour votre compréhension.
05.08.2024 - 08:06
![]() Marianne Eriksson napsala:
Marianne Eriksson napsala:
Stämmer A2. Från varv 25 jag får det till 7räta maskor.
19.06.2024 - 21:07Odpověď DROPS Design :
Hej Marianne, hvilket størrelse?
25.06.2024 - 12:28
![]() Leroux Michèle napsala:
Leroux Michèle napsala:
Bonjour, j'aimerais savoir comment faire car tous les modèles que je fais, font des roulottes dans le bas du coups, ce n'est pas joli.?
22.04.2024 - 08:49Odpověď DROPS Design :
Bonjour Mme Leroux, si la bordure du bas de votre pull se retourne/s'enroule, vous pouvez le bloquer ou simplement le laver (suivez attentivement les consignes d'entretien de la laine choisie) en ajoutant des épingles si besoin. Bonne continuation!
22.04.2024 - 09:06
|
|||||||||||||||||||||||||||||||
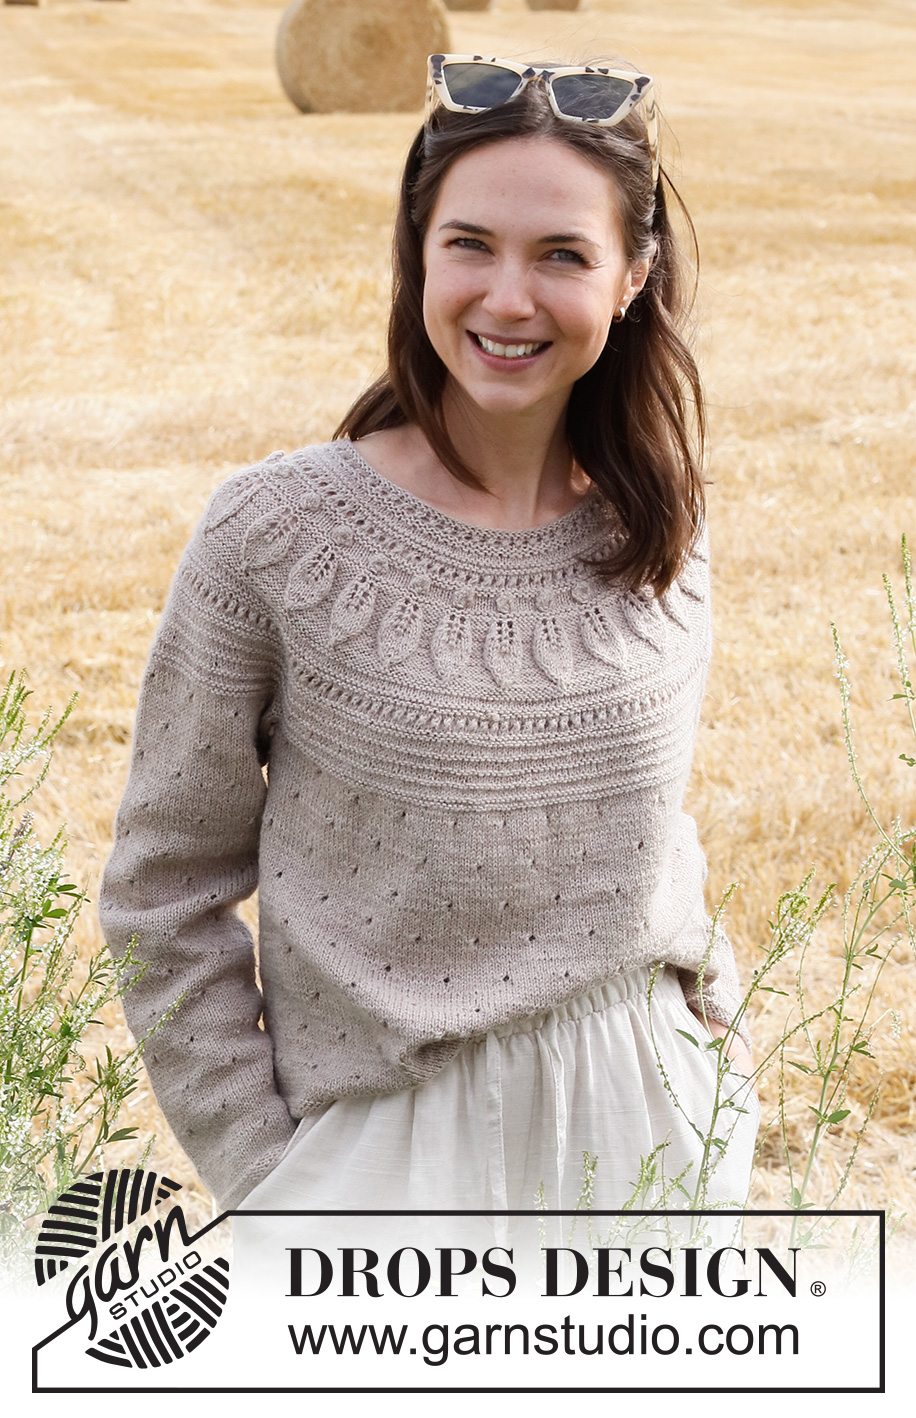
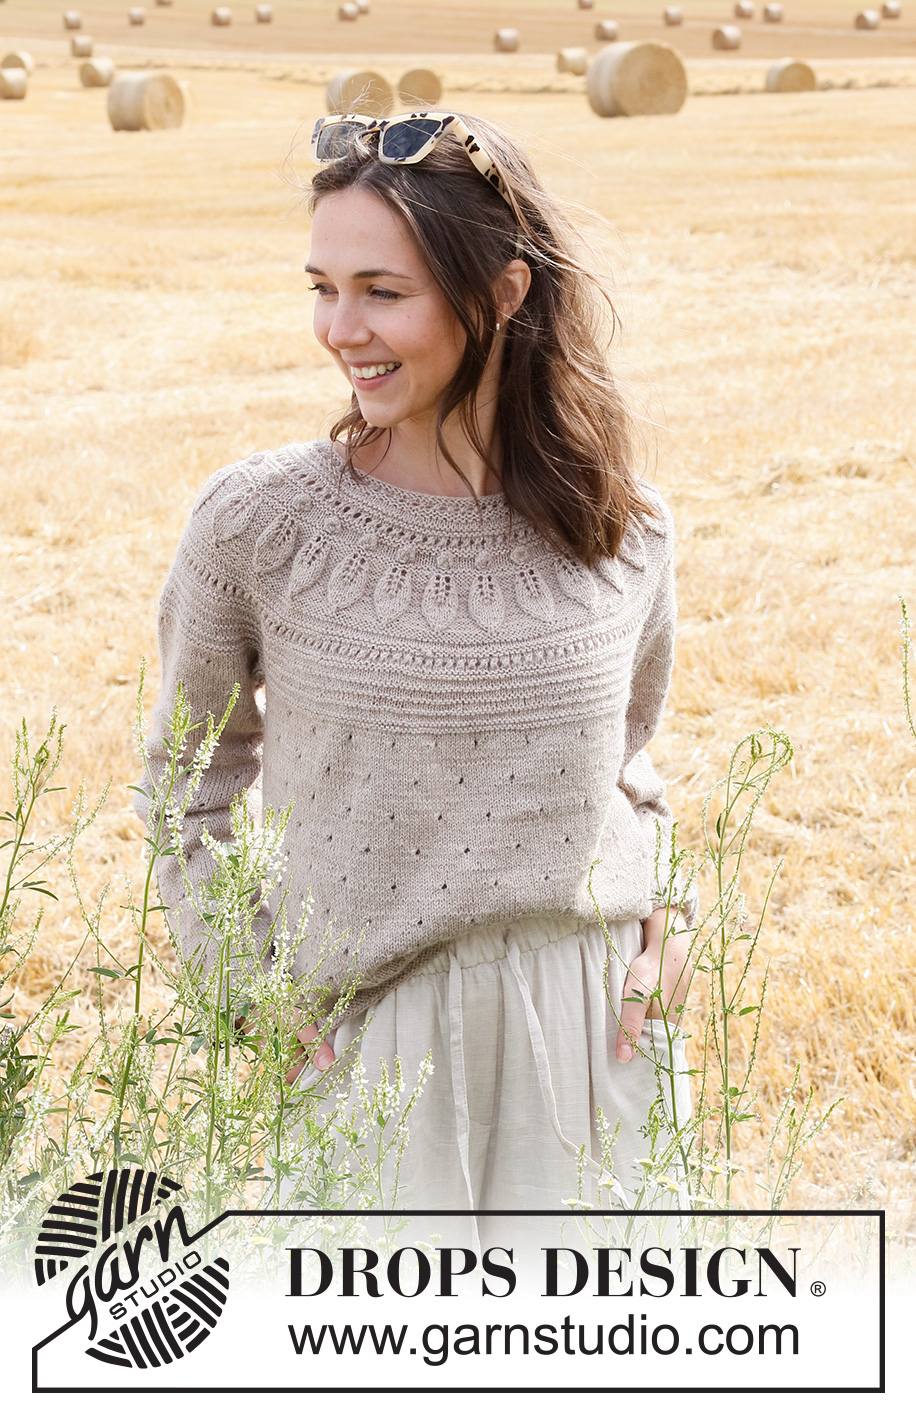
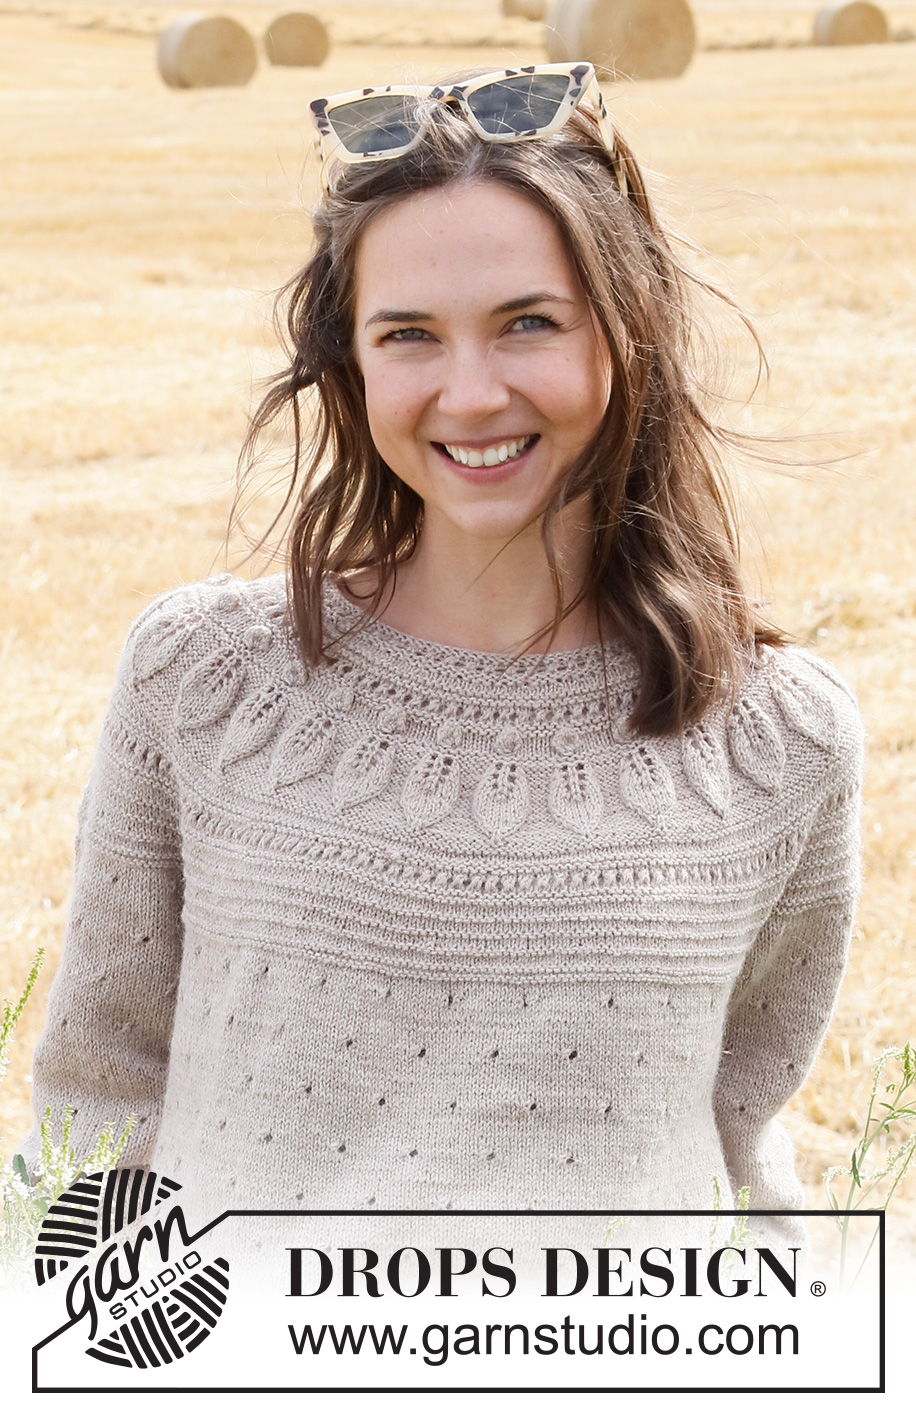
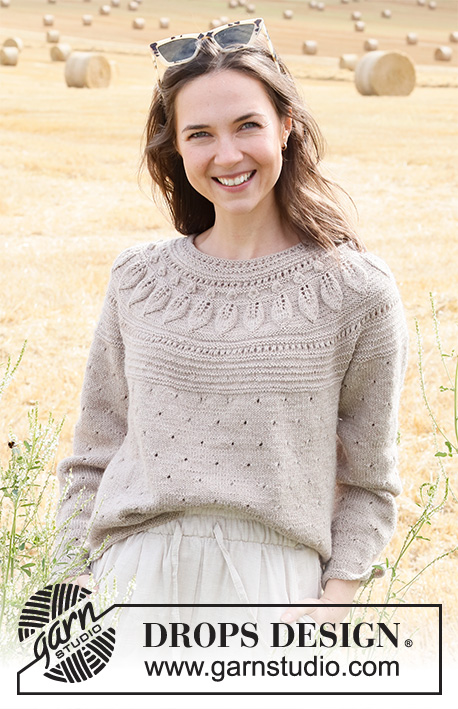
Sparrow Song#sparrowsongsweater |
|||||||||||||||||||||||||||||||
 |
 |
||||||||||||||||||||||||||||||
Pulovr s kruhovým sedlem s lístkovým a ažurovým vzorem pletený shora dolů z příze DROPS Nord. Velikost S - XXXL.
DROPS 223-11 |
|||||||||||||||||||||||||||||||
|
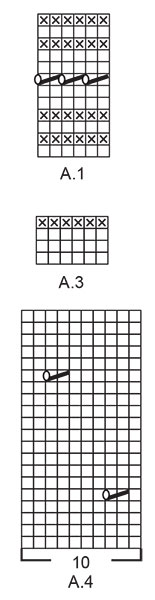
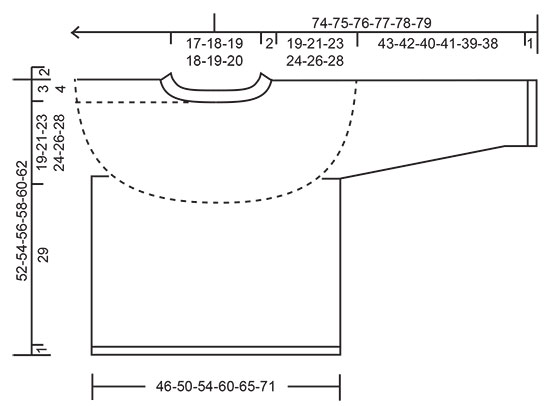
------------------------------------------------------- VYSVĚTLIVKY: ------------------------------------------------------- VROUBKOVÝ VZOR: 1 vroubek = 2 kruhové řady; pleteme střídavě 1 kruhovou řadu hladce, 1 obrace. VZOR: Viz schémata A.1 až A.4. Zvolte si schéma pro požadovanou velikost (platí pro schéma A.2). TIP – PŘIDÁVÁNÍ: Abychom vypočítali, v jakých rozestupech máme přidávat, vydělíme celkový počet ok na jehlici (tj. 110 ok) počtem ok, která potřebujeme přidat (např. 25), takže 110 : 25 = 4,4. V tomto případě tedy 1x nahodíme střídavě za každým 4. a 5. okem. V následující kruhové řadě pleteme nahození za zadní nit, aby se v pletenině netvořily dírky. ZVÝŠENÍ zadního průkrčníku: Pro lepší vytvarování průkrčníku můžeme uplést jeho zadní stranu o trochu vyšší než přední. Pokud zadní průkrčník tvarovat nechcete, tak tuto část přeskočte. Označíme si začátek kruhové řady = střed zadního průkrčníku. Začínáme z lícové strany: upleteme hladce 16-17-18-20-21-22 ok za značkou, práci otočíme, přízi utáhneme a pleteme obrace 32-34-36-40-42-44 ok. Práci otočíme, přízi utáhneme a upleteme hladce 48-51-54-60-63-66 ok, práci otočíme, přízi utáhneme a pleteme obrace 64-68-72-80-84-88 ok. Práci otočíme, přízi utáhneme a upleteme hladce 80-85-90-100-105-110 ok, práci otočíme, přízi utáhneme a pleteme obrace 96-102-108-120-126-132 ok. Práci otočíme, přízi utáhneme a pleteme hladce zpět ke značce. Pak pleteme SEDLO podle popisu níže. TIP - UJÍMÁNÍ (rukávy): Ujímáme 1 oko na obou strach značky, takto – začínáme 3 oka před značkou: 2 oka spleteme hladce, 2 oka upleteme hladce (značka leží mezi nimi), 1 oko sejmeme hladce, 1 upleteme hladce a sejmuté přes ně přetáhneme (= ujmuli jsme 2 oka). TIP - UZAVÍRÁNÍ: Abychom neměli uzavřený okraj moc stažený, můžeme na uzavírání ok použít silnější jehlice. Pokud to nepomůže, pak za každým zhruba 4. okem 1x nahodíme – nahození hned uzavřeme jako běžné oko. ------------------------------------------------------- POPIS PRÁCE: ------------------------------------------------------- SVETR – JAK BUDEME POSTUPOVAT: Lem průkrčníku a sedlo pleteme v kruhových řadách na kruhové jehlici, od středu zadního průkrčníku a shora dolů. Od sedla pak oddělíme rukávy a trup dokončíme v kruhových řadách. Rukávy dopleteme v kruhových řadách na krátké kruhové jehlici/ponožkových jehlicích, také shora dolů. LEM PRŮKRČNÍKU: Na krátkou kruhovou jehlici č.2,5 nahodíme přízí Nord 110-116-120-124-130-134 ok a pleteme v kruhových řadách vzor A.1. Po dokončení celé sekvence vzoru A.1 (na výšku) pleteme 1 kruhovou řadu hladce a SOUČASNĚ přidáme rovnoměrně 25-29-40-44-44-46 ok – viz TIP – PŘIDÁVÁNÍ = 135-145-160-168-174-180 ok. Upleteme 1 kruhovou řadu hladce, nahození pleteme za zadní nit. Pak převedeme pleteninu na kruhovou jehlici č.3 a doprostřed kruhové řady vložíme značku – SEDLO MĚŘÍME OD TOHOTO MÍSTA! Nyní můžete uplést ZVÝŠENÍ zadního průkrčníku – viz výše. Pokud toto zvýšení plést nechcete, pokračujte rovnou podle popisu v odstavci SEDLO. SEDLO: Pleteme v kruhových řadách vzor A.2 (= 27-29-32-28-29-30 sekvencí vzoru po 5-5-5-6-6-6 okách) a přidáváme podle schématu. Po dokončení celé sekvence vzoru A.2 (na výšku) máme na jehlici 351-377-416-448-464-480 ok a díl měří asi 15-15-15-17-17-17 cm od značky na průkrčníku. Nyní pleteme vzor A.3 a SOUČASNĚ v 1. kruhové řadě vzoru A.3 přidáme rovnoměrně 5-7-0-18-22-36 ok = 356-384-416-466-486-516 ok. Pokračujeme vzorem A.3 až do chvíle, kdy sedlo měří asi 19-21-23-24-26-28 cm od značky na průkrčníku, končíme po dopletení celé sekvence vzoru (na výšku). Upleteme 1 kruhovou řadu hladce. Pak pleteme 1 kruhovou řadu obrace a SOUČASNĚ rozdělíme sedlo na rukávy a trup: prvních 52-57-61-69-73-79 ok upleteme obrace (= ½ zadního dílu), následujících 74-78-86-96-98-100 ok odložíme na pomocnou jehlici (= rukáv), nahodíme 6-6-8-8-10-12 nových ok (= podpaží), 104-114-122-137-145-158 ok upleteme obrace (= přední díl), dalších 74-78-86-96-98-100 ok odložíme na pomocnou jehlici (= rukáv), nahodíme 6-6-8-8-10-12 nových ok (= podpaží) a posledních 52-57-61-68-72-79 ok upleteme obrace (= ½ zadního dílu). Trup a rukávy dokončíme odděleně. NYNÍ MĚŘÍME DÍL OD TOHOTO MÍSTA! TRUP: = 220-240-260-290-310-340 ok. Kruhovou řadu začínáme na jedné boční straně, tj. uprostřed 6-6-8-8-10-12 nových ok v podpaží. Pleteme v kruhových řadách vzor A.4 (= 22-24-26-29-31-34 sekvencí po 10 okách). Pokračujeme až do výše 29 cm od podpaží. Do ukončení práce nám zbývá doplést asi 1 cm výšky; svetr si můžete vyzkoušet a míry upravit. Pleteninu převedeme na kruhovou jehlici č.2,5 a upleteme v kruhových řadách 2 VROUBKY – viz výše. Pak všechna oka hladce uzavřeme – viz TIP - UZAVÍRÁNÍ. Pulovr měří asi 52-54-56-58-60-62 cm (od ramene). RUKÁV: Odložených 74-78-86-96-98-100 ok jednoho rukávu převedeme z pomocné jehlice zpět na ponožkové jehlice / krátkou kruhovou jehlici č.3 a navíc k nim nabereme po 1 oku z každého z nově nahozených ok v podpaží = 80-84-94-104-108-112 ok. Doprostřed 6-6-8-8-10-12 nových ok v podpaží vložíme značku. Značku během pletení snímáme vždy do aktuálně pletené kruhové řady – využijeme ji při ujímání. Začínáme u značky a pleteme v kruhových řadách, takto: 0-2-2-2-4-1 oka lícovým žerzejem, 80-80-90-100-100-110 ok vzorem A.4 (= 8-8-9-10-10-11 sekvencí po 10 okách) a 0-2-2-2-4-1 oka lícovým žerzejem. V tomto rozvržení pokračujeme až do výše 3-3-3-2-2-2 cm od místa, kde jsme rukávy oddělili od trupu. Nyní ujmeme na každé straně značky 1 oko – viz TIP - UJÍMÁNÍ. Toto ujímání opakujeme vždy po 2,5-2-1,5-1,5-1-1 cm výšky, celkem 15-16-19-23-24-25x = 50-52-56-58-60-62 ok. Pleteme dál až do výše 43-42-40-41-39-38 cm od místa, kde jsme rukávy oddělili od trupu. Do ukončení práce nám teď zbývá doplést asi 1 cm výšky – svetr si můžete vyzkoušet a míry upravit. Pak pleteninu převedeme na ponožkové jehlice č. 2,5 a upleteme 2 VROUBKY – viz výše. Pak všechna oka volně hladce uzavřeme – viz TIP - UZAVÍRÁNÍ. Rukáv měří asi 44-43-41-42-42-39 cm (od podpaží). Stejným způsobem upleteme i druhý rukáv. |
|||||||||||||||||||||||||||||||
Vysvětlivky ke schématu |
|||||||||||||||||||||||||||||||
|
|||||||||||||||||||||||||||||||
|
|||||||||||||||||||||||||||||||
|
|||||||||||||||||||||||||||||||
|
|||||||||||||||||||||||||||||||
Dokončili jste tento model?Pak označte své fotky tagem #dropspattern #sparrowsongsweater nebo je pošlete do galerie #dropsfan. Potřebujete s tímto návodem poradit?Otevřete-li si návod na stránce garnstudio.com, najdete tam 31 výukových video-ukázek, Komentáře/Dotazy a další užitečné informace. © 1982-2025 DROPS Design A/S. Vyhrazujeme si veškerá práva. Tento dokument, včetně všech jeho dílčích částí, podléhá autorským právům. Podrobnější komentář k možnostem užití našich návodů najdete dole pod každým návodem na našich stránkách. |
|||||||||||||||||||||||||||||||


V oblasti pletené a háčkované módy působí DROPS Design více než 40 let. Díky tomu vám můžeme nabídnout jednu z nejrozsáhlejších kolekcí modelů s bezplatnými návody dostupnými na internetu - navíc v 17 jazycích. K dnešnímu dni máme na 314 katalogů a 11822 návodů celkem - z nich je už 7048 dostupných v [češtině].
Přidejte komentář k návodu DROPS 223-11
Rádi bychom věděli, co si o tomto modelu myslíte!
Pokud se chcete na něco zeptat, dbejte prosím na to, abyste ve formuláři níže vybrali správnou kategorii - díky tomu se dříve dozvíte, co potřebujete vědět. Povinná pole jsou označena *.