
Popular categories
Looking for a yarn?


Comments / Questions (17)
![]() Viviana Belinsky wrote:
Viviana Belinsky wrote:
Hola! Por favor, no entiendo esto: cuando dejo de hacer los aumentos en A1 y A3 en el cuerpo, a partir de la separación de las mangas, no me queda el patrón de calado como antes. Cambia. Es posible que sea un error del patrón? Muchas gracias por leerme
18.09.2023 - 06:35DROPS Design answered:
Hola Viviana, pasaremos tu consulta al departamento de diseño.
25.09.2023 - 00:21
![]() Viviana wrote:
Viviana wrote:
Hola! Quisiera saber si los 8 puntos que agrego ,según mí talle, bajo la manga los debo tejer en Jersey o en fantasía. Y no entiendo en la espalda cuando dice seguir con A1 y A3 (debería ser A2?) Muchas gracias
04.09.2023 - 00:43DROPS Design answered:
Hola Viviana, sí, en la espalda sería de A.1 a A.3 (incluyendo A.2); ya hemos corregido la errata. Los puntos bajo la manga se trabajan como el resto de los puntos. Y los puntos bajo la manga se trabajan en punto jersey.
10.09.2023 - 19:56
![]() Deana wrote:
Deana wrote:
Dear Garn studio, thank you very much for your reply. Unfortunately, it did not help at all, I have no idea how to continue the garment after increases in size s. I tried all possible combinations, but nothing adds up. I have noticed that many knitters ask the same question, can't you make an additional chart that will clearly show what to knit, what to leave out, like you did for many other garments? Otherwise, it is just impossible. Thanks a lot for your help!
26.04.2023 - 22:24DROPS Design answered:
Dear Deana, as previously said, mark in the diagram A.1 / A.3 the last row where you stop increasing, and the first stitch in A.1 + last stitch in A.3, draw a line and then continue working diagrams forgetting the stitches on the right side of the line in A.1/ left side of the line in A.3 - work lace pattern as before making sure there is always as many yarn overs as decrease. Should you need any further individual assistance, please contact the yarn where you bought the yarn, even per mail or telephone, they will be able to help you. Happy knitting!
27.04.2023 - 08:19
![]() Deana wrote:
Deana wrote:
Dear Garn studio, I have no idea how to continue after increase. I read all comments, tried all stitch combinations, but no luck at all. I am working on size S and had exact number of stitches after increase. Can you please explain in detail which stitches in patterns A1-A3 to knit and which to leave out. Thank you so much in advance! And thank you for all lovely pattegns, it is great joy to knit them!
25.04.2023 - 17:38DROPS Design answered:
Dear Deana, note in the diagram the last row worked in A.1 and in A.3 and work these stitches as in diagram making sure in both A.1 and A.3 you will have as many yarn overs as you will decrease stitches working every remaining stitches in stocking stitch, and continue with A.2 inbetween as before. Happy knitting!
26.04.2023 - 08:37
![]() Diane wrote:
Diane wrote:
Bonjour, je fais la taille L, j’ai fini les augmentations, j’ai 311m comme requis. Je ne comprends pas comment ne pas augmenter en faisant A1 à A3 pour me rendre à environ 26 cm du marqueur du col. Est-ce possible de m’expliquer s.v.p. ce que veut dire tricoter en jersey les m qui ne peuvent plus se tricoter en point fantaisie. En faisant les diagrammes comme illustrés, on augmente inévitablement. Merci beaucoup pour votre aide habituelle.
28.02.2022 - 22:53DROPS Design answered:
Bonjour Diane, tracez un trait dans A.1 et A.3 pour montrer votre première maille dans A.1 et votre dernière maille dans A.3 et tricotez maintenant les autres mailles, sans faire les jetés du début de A.1 et de la fin de A.3 = chaque jeté doit être compensé par 1 diminution, si ce n'est pas le cas, ne faites pas le jeté, tricotez simplement en jersey. Bon tricot!
01.03.2022 - 10:01
![]() Diane wrote:
Diane wrote:
Bonjour, je crois que l’erreur n’est pas dans le diagramme mais dans les instructions de l’augmentation du 4 rang au fil marqueur 4. J’ai fait exactement ce qui est indiqué, et le trou est trop éloigné des 2 mailles jersey de chaque bord du fil marqueur. Le jeté qui doit être tricoté torse envers n’est pas le 2e, mais le premier qu’on rencontrera puisque c’est un rang envers. Merci
16.02.2022 - 12:19DROPS Design answered:
Bonjour Diane et merci pour vos éclaircissements, votre commentaire a été transmis à nos stylistes, car à priori, vous avez raison. Merci! Bonne continuation!
17.02.2022 - 10:50
![]() Diane wrote:
Diane wrote:
Bonjour, si les trous doivent suivre le long des 2 mailles jersey qui séparent le devant et la manche, il y a sans doute une erreur dans l’explication du rang 4 pour le fil marqueur 4. On devrait tricoter 1er jeté torse à l’envers (pas de trou), 1 m envers, 1 jeté envers (trou), 1 m envers. Fil marqueur, 1 m envers (manche). Exact? Merci
16.02.2022 - 03:12DROPS Design answered:
Bonjour Diane, le diagramme est juste, tricotez bien les jetés comme indiqué: le 1er jeté de A.3 (vu sur l'envers = à gauche du diagramme) se tricote à l'endroit (= trou = raglan); le 2ème jeté de A.3 se tricote torse (augmentation sans trou) et le 3ème jeté est celui du point ajouré. Dans A.1 vous terminez de la même façon: 1er des 3 jetés = point ajouré, 2ème jeté = augmentation à tricoter torse sans trou, 3ème jeté = trou pour le raglan. Bon tricot!
16.02.2022 - 11:42
![]() Diane wrote:
Diane wrote:
Bonjour, je débute ce modèle en taille L, et je suis surprise de constater que pour le 4e rang des augmentations du raglan, la façon dont on doit tricoter les jetés ne sont pas à l’inverse l’un de l’autre lorsqu’on est au début et à la fin du rang. Si je tricote comme je comprends, d’un côté le trou sera plus éloigné de la manche et ce sera l’inverse à l’autre bout. Est- ce moi qui n’ai pas compris ce que je dois faire? Merci
15.02.2022 - 13:58DROPS Design answered:
Bonjour Diane, vous devez toujours avoir 2 mailles jersey pour le raglan, et de part et d'autre de ces 2 mailles jersey, vous allez tricoter les jetés (= augmentations) à l'envers; ainsi vous créez à chaque fois une bande de jours en diagonale le long des 2 mailles du raglan; les augmentations des manches figurent bien dans les diagrammes, au 4ème rang, vous tricotez dans A.3 et A.1: le 1er et le 4ème jeté à l'envers mais le 2ème torse à l'envers; Bon tricot!
15.02.2022 - 17:08
![]() Annette Parlo wrote:
Annette Parlo wrote:
Har afsluttet udtagningerne og har nu 275 masker på pinden. Skal man bare strikke 41 masker glatstrik på forstykkerne? Hvor mange masker ret skal der strikkes efter mærketråden (ærmet) inden A1 uden udtagning startes?
23.09.2021 - 18:27DROPS Design answered:
Hei Annette. For at vi skal kunne hjelpe deg best mulig, er det fint om du opplyser hvilken str. du strikker. mvh DROPS Design
28.09.2021 - 15:31
![]() Giang wrote:
Giang wrote:
Can i ask about the sleeves, i am knitting size M and if i work on 61 stitches in A2 ( A 2 is 6 stitches) so 1 stitches is left, what should I do with that stitch? Thank you
22.07.2021 - 12:03DROPS Design answered:
Dear Mrs Giang, when working the sleeve you have to continue A.2 over the 61 sts slipped on a thread after yoke, ie work the first 3 sts at the beg of the round (the one picked up middle under sleeve) adjusting so that the pattern continues over the next 61 sts and work the last 3 sts the same way, knit the remaining stitches mid under sleeve that cannot be worked in pattern as before. Happy knitting!
22.07.2021 - 13:28
|
|||||||||||||||||||
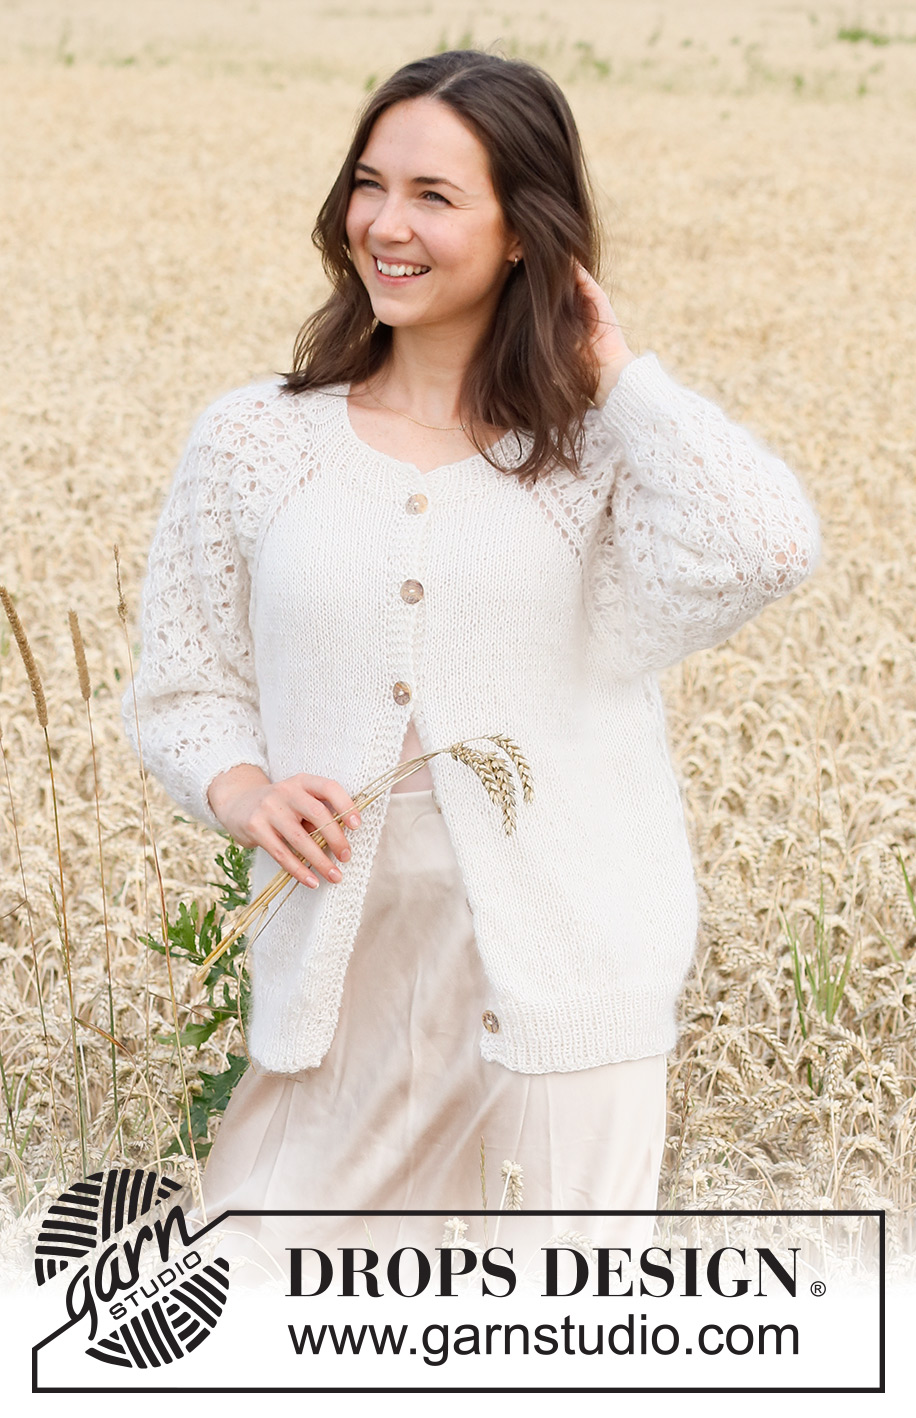
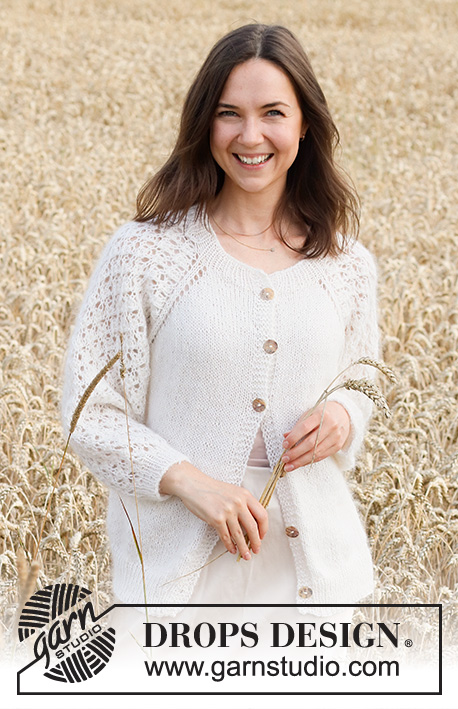
Galatea Cardigan#galateacardigan |
|||||||||||||||||||
 |
 |
||||||||||||||||||
Knitted jacket with 1 strand DROPS Kid-Silk and 1 strand DROPS Alpaca. The piece is worked top down, with raglan and lace pattern on the sleeves and back piece. Sizes S - XXXL.
DROPS 220-4 |
|||||||||||||||||||
|
------------------------------------------------------- EXPLANATIONS FOR THE PATTERN: ------------------------------------------------------- RIDGE/GARTER STITCH (worked back and forth): Knit all rows. 1 ridge in height = Knit 2 rows. PATTERN: See diagrams A.1 to A.3. The diagrams show all rows in the pattern from the right side. RAGLAN: Increase alternately 1 or 2 stitches before/after the marker threads (=a total of 8 and 16 stitches increased on alternate increase-rows). The increases on the sleeves and the back piece are included in diagrams A.1 and A.3. On the front piece, increase towards the sleeves as follows: BEFORE marker thread 1: ROW 1 (=right side): Work until there is 1 stitch left before the marker thread, make 1 yarn over, knit 1. ROW 2 (= wrong side): The yarn over is purled to leave a hole. ROW 3: Work until there are 2 stitches left before the marker thread, 1 yarn over, knit 1, 1 yarn over, knit 1. ROW 4: Work to the marker thread, purl 1, purl the yarn over (hole), purl 1, purl the yarn over twisted (no hole). AFTER marker thread 4: ROW 1 (= right side): Work to the marker thread, knit 1, 1 yarn over. ROW 2 (= wrong side): The yarn over is purled to leave a hole. ROW 3: Work to the marker thread, knit 1, 1 yarn over, knit 1, 1 yarn over. ROW 4: Purl the first yarn over (hole), purl 1, purl the second yarn over twisted (no hole). DECREASE TIP-1 (for sleeves): Decrease 1 stitch on either side of the marker thread as follows: Work until there are 3 stitches left before the marker thread, knit 2 together, knit 2 (marker thread sits between these 2 stitches), slip 1 stitch as if to knit, knit 1 and pass the slipped stitch over the knitted stitch (2 stitches decreased). DECREASE TIP-2 (evenly spaced): To work out how to decrease evenly, count the total number of stitches on needle (e.g. 47 stitches) and divide by the number of decreases to be made (e.g. 7) = 6.7. In this example decrease by knitting together alternately each 5th and 6th and each 6th and 7th stitch. BUTTONHOLES (top down): Work buttonholes on the right band (when the garment is worn). 1 buttonhole = Work from the right side as before until there are 3 stitches left on the row, make 1 yarn over, knit 2 together and knit 1. On the next row (wrong side), knit the yarn over to leave a hole. The first buttonhole is worked just after the neck. Then work the other 5-5-6-6-7-7 buttonholes with approx. 9-9-8½ -8½ -7½-7½ cm = 3½"-3½"-3¼"-3¼"-2⅞"-2⅞" between each one. BINDING-OFF TIP: To avoid the bind-off edge being tight you can bind off with a larger size needle. If the edge is still tight, make 1 yarn over after approx. each 4th stitch at the same time as binding off; the yarn overs are bind off as normal stitches. ------------------------------------------------------- START THE PIECE HERE: ------------------------------------------------------- JACKET – SHORT OVERVIEW OF THE PIECE: The neck and yoke are worked back and forth with circular needle from mid front and top down. The yoke is divided for body and sleeves and the body continued back and forth. The sleeves are worked in the round with short circular needle/double pointed needles, top down. The piece is worked with 1 strand Alpaca and 1 strand Kid-Silk. NECK: Cast on 83-95-95-107-107-119 stitches (including 5 band stitches on each side towards mid front) with circular needle size 4 MM = US 6 and 1 strand Alpaca and 1 strand Kid-Silk (= 2 strands). Purl 1 row (= wrong side). The next row is worked as follows, from the right side: 5 stitches in GARTER STITCH – read description above, * knit 1, purl 1 *, work from *-* until there are 6 stitches left, knit 1 and finish with 5 band stitches in garter stitch. Continue this rib for 4 cm = 1½". Insert 1 marker after the band at the beginning of the row; the yoke is measured from this marker. Change to circular needle size 5 MM = US 8. Then work the yoke as described below. REMEMBER THE KNITTING GAUGE! YOKE: READ THE WHOLE OF THE NEXT SECTION BEFORE CONTINUING! Insert 4 marker threads as follows (without working the stitches): Count 16-19-19-22-22-25 stitches (= left front piece), insert marker thread 1 before the next stitch, count 15 stitches (= sleeve), insert marker thread 2 before the next stitch, count 21-27-27-33-33-39 stitches (= back piece), insert marker thread 3 before the next stitch, count 15 stitches (= sleeve), insert marker thread 4 before the next stitch. There are 16-19-19-22-22-25 stitches left after marker thread 4 on the right front piece. On the next row from the right side, start to work pattern as follows: 5 band stitches in garter stitch, 10-13-13-16-16-19 stitches in stockinette stitch, increase 1 stitch for RAGLAN – read description above, work 2 stitches in stockinette stitch (marker thread sits between these 2 stitches), work A.1 (= 4 stitches), A.2 (= 6 stitches), A.3 (= 3 stitches) (= sleeve), 2 stitches in stockinette stitch (marker thread sits between these 2 stitches), work A.1, A.2 over the next 12-18-18-24-24-30 stitches (= 2-3-3-4-4-5 repeats of 6 stitches), A.3, 2 stitches in stockinette stitch (marker thread sits between these 2 stitches), work A.1, A.2, A.3 (= sleeve), 2 stitches in stockinette stitch (marker thread sits between these 2 stitches), increase 1 stitch to raglan, work 10-13-13-16-16-19 stitches in stockinette stitch and 5 band stitches in garter stitch, AT THE SAME TIME as you work the first BUTTONHOLE – read description above. Continue this pattern. On the sleeves and back piece increase on each side as shown in A.1 and A.3. Each time A.1, A.2 and A.3 are worked 1 time in height, there is room for 2 more repeats of A.2 between A.1 and A.3. On the front pieces increase to RAGLAN every 2nd row (each row from the right side); you therefore increase alternately 8 and 16 stitches each increase-row – read description above. Increase to raglan a total of 16-16-18-20-22-24 times = 275-287-311-347-371-407 stitches. Continue with pattern, stockinette stitch and garter stitch as before, but without further increases on each side of A.1 and A.3 (the stitches which do not fit into the pattern are worked in stockinette stitch) until the piece measures approx. 21-23-26-28-32-35 cm = 8¼"-9"-10¼"-11"-12½"-13¾" from the marker on the neck. Now divide the yoke for body and sleeves on the next row as follows (continue the pattern on the sleeves and back piece): Work 41-44-47-53-56-62 stitches (= front piece), place the next 61-61-67-73-79-85 stitches on 1 thread for the sleeve, cast on 6-6-6-8-8-8 stitches (= in side under sleeve), work 71-77-83-95-101-113 stitches as before (= back piece), place the next 61-61-67-73-79-85 stitches on 1 thread for the sleeve, cast on 6-6-6-8-8-8 stitches (= in side under sleeve) and work the remaining 41-44-47-53-56-62 stitches as before (= front piece). Body and sleeves are finished separately. BODY: = 165-177-189-217-229-253 stitches. Continue with stockinette stitch and garter stitch as before on the front pieces and A.1 to A.3 on the back piece until the piece measures 25-25-24-24-22-21 cm = 9¾"-9¾"-9½"-9½"-8¾"-8¼" from the division. There is 6 cm = 2⅜" left to finished length; try the jacket on and work to desired length. Change to circular needle size 4 MM = US 6 and work rib from the right side as follows: 5 band stitches in garter stitch, * knit 1, purl 1 *, work from *-* until there are 6 stitches left, knit 1 and 5 band stitches in garter stitch. Continue this rib for 6 cm = 2⅜". Bind off with garter stitch over garter stitch, knit over knit and purl over purl – read CASTING-ON TIP! The jacket measures approx. 56-58-60-62-64-66 cm = 22"-22¾"-23⅝"-24⅜"-25¼"-26" from the shoulder down. SLEEVES: Place the 61-61-67-73-79-85 stitches from the thread on the one side of the piece on double pointed needles/short circular needle size 5 MM = US 8 and knit up 1 stitch in each of the 6-6-6-8-8-8 stitches cast on under the sleeve = 67-67-73-81-87-93 stitches. Insert a marker thread in the middle of the 6-6-6-8-8-8 stitches under the sleeve. Allow the thread to follow your work onwards; it will be used when decreasing under the sleeve. Start at the marker thread and continue the pattern in the round according to diagram A.2; make sure the pattern matches the pattern on the yoke. The stitches under the sleeve, which do not fit into the pattern, are worked in stockinette stitch. When the sleeve measures 3-3-3-3-2-3 cm = 1⅛"-1⅛"-1⅛"-1⅛"-¾"-1⅛" from the division, decrease 2 stitches under the sleeve – read DECREASE TIP-1. Decrease like this every 3½-3½-2½-1½-1½-1 cm = 1¼"-1¼"-1"-½"-½"-⅜" a total of 10-9-11-14-16-18 times = 47-49-51-53-55-57 stitches. Continue working until the sleeve measures 36-34-32-29-26-22 cm = 14¼"-13⅜"-12½"-11⅜"-10¼"-8¾" from the division (there is 5 cm = 2" left to finished length; try the jacket on and work to desired length). NOTE: Shorter measurements in larger sizes due to wider neck and longer yoke. Knit 1 round where you decrease 7 stitches evenly spaced – read DECREASE TIP-2 = 40-42-44-46-48-50 stitches. Change to double pointed needles size 4 MM = US 6 and work rib (knit 1, purl 1) for 5 cm = 2". Bind off with knit over knit and purl over purl – remember BINDING-OFF TIP! The sleeve measures approx. 41-39-37-34-31-27 cm = 16⅛"-15¼"-14½"-13⅜"-12¼"-10⅝" from the division. Work the other sleeve in the same way. ASSEMBLY: Sew the buttons onto the left band. |
|||||||||||||||||||
Diagram explanations |
|||||||||||||||||||
|
|||||||||||||||||||
 |
|||||||||||||||||||
Have you finished this pattern?Tag your pictures with #dropspattern #galateacardigan or submit them to the #dropsfan gallery. Do you need help with this pattern?You'll find 30 tutorial videos, a Comments/Questions area and more by visiting the pattern on garnstudio.com. © 1982-2026 DROPS Design A/S. We reserve all rights. This document, including all its sub-sections, has copyrights. Read more about what you can do with our patterns at the bottom of each pattern on our site. |
|||||||||||||||||||


With over 40 years in knitting and crochet design, DROPS Design offers one of the most extensive collections of free patterns on the internet - translated to 17 languages. As of today we count 324 catalogs and 12290 patterns - 12280 of which are translated into English (US/in).
We work hard to bring you the best knitting and crochet have to offer, inspiration and advice as well as great quality yarns at incredible prices! Would you like to use our patterns for other than personal use? You can read what you are allowed to do in the Copyright text at the bottom of all our patterns. Happy crafting!
Post a comment to pattern DROPS 220-4
We would love to hear what you have to say about this pattern!
If you want to leave a question, please make sure you select the correct category in the form below, to speed up the answering process. Required fields are marked *.