
Popular categories
Looking for a yarn?


Comments / Questions (208)
![]() Monika Uhr wrote:
Monika Uhr wrote:
Ich möchte die dropsAnleitung für Bronze Summer Sweater nacharbeiten, komme aber mit dem Diagramm nicht zurecht und habe auch keine Strickanlei tung bei Ihnen dazu gefunden:es geht konkret um die 3. Reihe im Diagramm rechts (5 Maschen rechts zusammenstricken : 5 Maschen rechts stricken, die Maschen wieder auf die linke Nadel legen usw. Können Sie das bitte etwas anshaulicher erklären ? liebe Grüße Monika Uhr
20.04.2021 - 01:03DROPS Design answered:
Liebe Frau Uhr, das Video zur 5 Maschen rechts zusammen sollen wir aktualisieren, aber dieses Video zeigt, wie man 4 M re zusammen strickt, stricken Sie genau das gleiche aber mit 5. Hoffentlich kann es Ihnen helfen. Viel Spaß beim stricken!
20.04.2021 - 07:37
![]() Picard Gislaine wrote:
Picard Gislaine wrote:
N\'ayant pas d\'imprimante, je suis obligée d\'utiliser le téléchargement sur clé USB pour le faire imprimer ailleurs. Vos laines et vos modèles sont intéressants mais...
23.03.2021 - 06:12DROPS Design answered:
Bonjour Mme Picard et merci; vous pouvez demander à votre magasin DROPS de vous imprimer les explications du ou des modèles souhaités lorsque vous commandez la laine, ils pourront fort probablement vous le faire. Bon tricot!
23.03.2021 - 08:25
![]() Patricia wrote:
Patricia wrote:
Bonjour Ça fait 3 fois que je recommence. Je n'arrive pas à réaliser A1. Y aura t'il une vidéo pour l'expliquer. Merci.
16.03.2021 - 22:39DROPS Design answered:
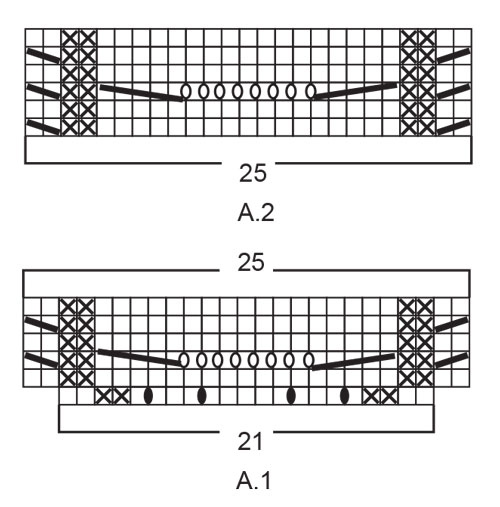
Bonjour Patricia, aux rangs 1 et 2, tricotez les mailles à l'endroit et à l'envers comme indiqué (augmentez au 1er rang et tricotez ces jetés torse à l'endroit au tour suivant). Au rang 3 tricotez ainsi: 1 torsade sur 2 m (time code 00.12); 2 m env, 5 m ens à l'end, (1 jeté, 1 m end)x7, 1 jeté, 5 m ens torse à l'end, 2 m env, 1 torsade sur 2 m (time code 00:41) = 25 mailles. Bon tricot!
17.03.2021 - 08:29
![]() Julia wrote:
Julia wrote:
Hej! Jag får det inte riktigt att gå ihop när jag börjar sticka A1 över ärmmaskorna. I och med raglanökningarna blir ju maskorna innanför ärmmarkörerna fler och fler, måste jag varje varv då räkna hur många som tillkommit och sticka mönstret på de mittersta 25 maskorna? Eller hur ska jag tänka där. Jag antar man stickar avig över föregående varvs avig osv.
13.03.2021 - 18:40DROPS Design answered:
Hej Julia, hvis du ikke kan se overgangen, så sæt et lille mærke/tråd så du tager ud på samme sted hver gang :)
23.03.2021 - 15:12
![]() Ophelie wrote:
Ophelie wrote:
Bonjour, Je ne comprends pas comment arriver aux 302 mailles pour la taille M après avoir réalisé A1 et A2 ? Merci
10.03.2021 - 13:06DROPS Design answered:
Bonjour Ophélie, avant les augmentations du raglan, vous avez 94 mailles - en tricotant 2 x A.1 (manches) vous allez augmenter 2 x 4 mailles = 8 mailles (après A.1, vous tricotez A.2) et vous augmentez pour le raglan 25 fois 8 mailles (tous les 2 tours) = 94+8+200=302 m. Quand A.2 est terminé en hauteur (= les 6 rangs), répétez ces 6 rangs et tricotez les autres mailles en jersey comme avant. En espérant que ce soit plus clair, bon tricot!
10.03.2021 - 13:43
![]() Louise H wrote:
Louise H wrote:
Hej. Er det 25 omgange med raglan, altså ca 50 runder ialt - eller skal jeg tælle anderledes? Skal til at sætte ærmer på tråd og kan se at jeg har for mange masker og tænkte dette kunne være grunden. Tak for hjælpen. Mvh Louise
09.03.2021 - 20:15DROPS Design answered:
Hej Louise, ja det stemmer, du tager ud på hver 2.omgang (strikker ialt 50 omgange) og tager 8 masker ud 25 gange :)
11.03.2021 - 10:15
![]() Angelique wrote:
Angelique wrote:
Ik heb het niet goed gelezen🙈, ik snap het al. Ik moet pas vanaf de steek met markeerdraad verder tellen. Oeps 😊
25.02.2021 - 18:17DROPS Design answered:
Dag Angelique,
Fijn dat je eruit bent gekomen en bedankt voor de terugkoppeling. Veel breiplezier!
26.02.2021 - 11:41
![]() Angelique wrote:
Angelique wrote:
Ik heb 110 st opgezet en het boordje van 3cm gebreid. Ik heb de verdeling met een markeerdraad gedaan : na 16 - 21 -32 -21 -16 st. En meteen bij de eerste naald kom ik al niet uit, als ik alle steken optel dan kom ik aan 106 in plaats van 110 steken. Klopt dit of zit ik al meteen fout?
25.02.2021 - 18:08
![]() Clare Marsh wrote:
Clare Marsh wrote:
Hey. I’ve just done the rib. 90 stitches... obviously the arms are 21 stitches. So should it be 12+24+12 for the other sections? 11+21+22+21+11=86... thanks 😊
24.02.2021 - 21:56DROPS Design answered:
Dear Mrs Marsh, and there is one stitch with a marker at the transition of each piece so that 86 stitches +4 stitches with a marker= 90 sts. Happy knitting!
25.02.2021 - 07:29
![]() SUSANA JAP wrote:
SUSANA JAP wrote:
I am trying to work out my stitch out , I have just finished making the rib and it is now 3cm. I am increasing in the raglan and also knitting the A1 pattern, at end of making A1 (6 rows), my stitch count should be 130 (making large size) but somehow I am getting 126 stitch, what am I doing wrong here? thanks
20.02.2021 - 08:19DROPS Design answered:
Dear Susana, make sure you have increased 4 sts in each A.1 (this means + 8 sts) and you should have increased 3 times for raglan (= 3 x 8 sts = 24 sts), so that there are: 98 sts from neck + 8 sts increased in A.1 + 24 sts increased for raglan = 130 sts. Hope this will help. Happy knitting!
22.02.2021 - 07:53
|
|||||||||||||||||||||||||
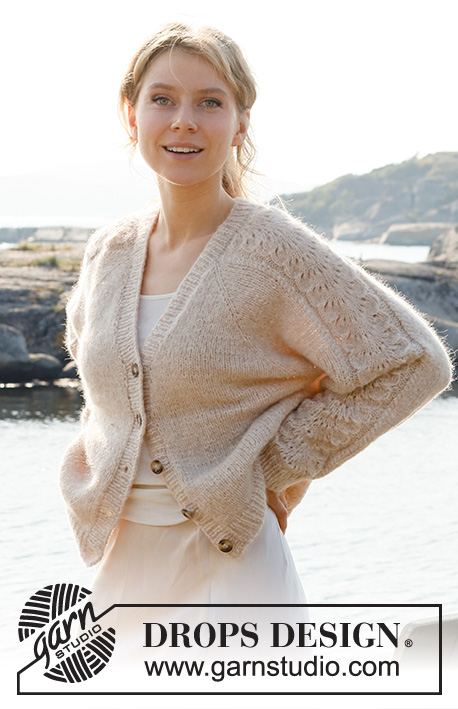
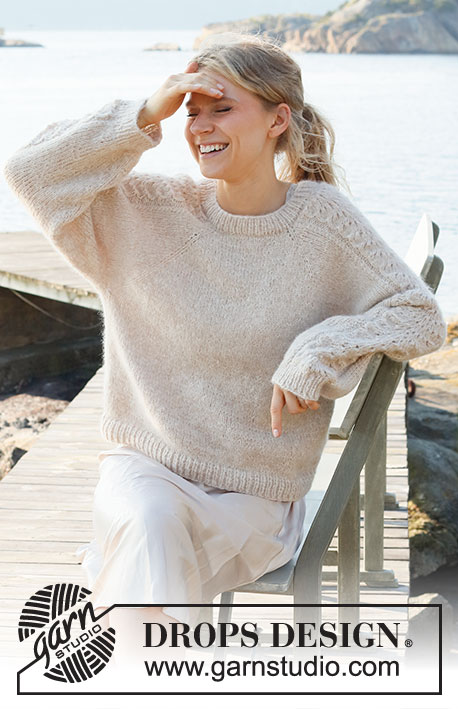
Bronze Summer Sweater#bronzesummersweater |
|||||||||||||||||||||||||
 |
 |
||||||||||||||||||||||||
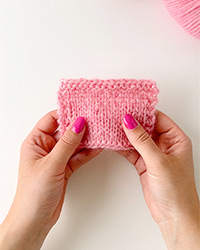
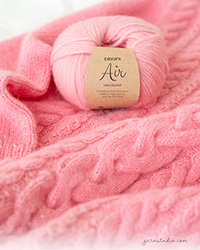
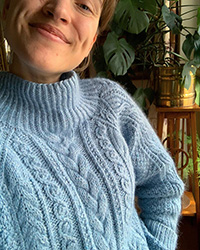
Knitted sweater in DROPS Air. Piece is knitted top down with raglan and lace pattern on sleeves. Size: S - XXXL
DROPS 221-3 |
|||||||||||||||||||||||||
|
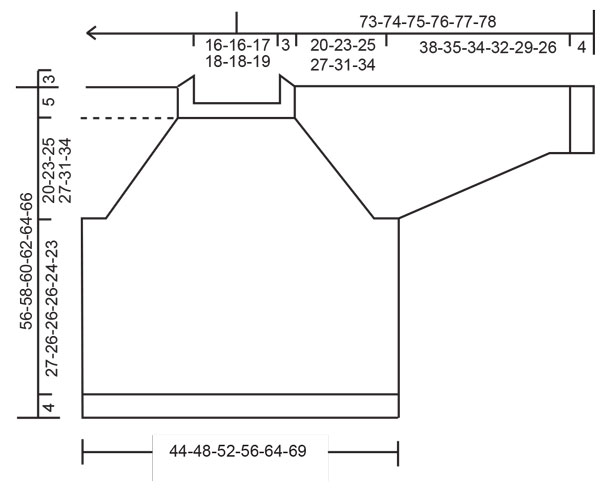
------------------------------------------------------- EXPLANATION FOR THE PATTERN: ------------------------------------------------------- PATTERN: See diagrams A.1 and A.2. RAGLAN: Increase 1 stitch on each side of 1 stitch in stockinette stitch (stitch with marker) in every transition between body and sleeves (= 8 stitches increased on round). Increase 1 stitch by making 1 yarn over. On next round work yarn overs twisted to avoid holes. Then work the new stitches in stockinette stitch. DECREASE TIP (applies to sleeves): Decrease 1 stitch on each side of marker thread as follows: Work until 3 stitches remain before marker thread and knit 2 together, knit 2 (marker thread is between these stitches), slip 1 stitch knitwise, knit 1, pass slipped stitch over stitch worked. BIND-OFF TIP: To avoid a tight bind-off edge you may use a larger needle size. If this also is too tight, work a 1 yarn over after approx. every 4th stitch while binding off (bind off yarn overs as regular stitches). ------------------------------------------------------- START THE PIECE HERE: ------------------------------------------------------- SWEATER - SHORT OVERVIEW OF THE PIECE: Work yoke in the round on circular needle from mid back, top down. AT THE SAME TIME increase for raglan. Now divide yoke for body and sleeves. Body is worked in the round on circular needle, top down. Work sleeves in the round on double pointed needles/short circular needle, top down. YOKE: Cast on 90-94-98-102-106-110 stitches on circular needle size 4 mm = US 6 with Air. Knit 1 round. Work rib (= knit 1/purl 1) over all stitches for 3 cm = 1⅛". Switch to circular size 5 mm = US 8 and insert 1 marker here, now measure piece from here. Insert 4 marker threads in piece as follows (without working the stitches): Count 11-12-13-14-15-16 stitches (= half back piece), insert 1 marker thread in next stitch, count 21 stitches (= sleeve), insert 1 marker thread in next stitch, count 22-24-26-28-30-32 stitches (= front piece), insert 1 marker thread in next stitch, count 21 stitches (= sleeve), insert 1 marker thread in next stitch, 11-12-13-14-15-16 stitches remain on row after last marker thread (= half back piece). Work in stockinette stitch over stitches on front piece and on back piece, and A.1 (= 21 stitches) over stitches on each sleeve, AT THE SAME TIME on first round start increase for RAGLAN in every transition between body and sleeves – read explanation above. Continue increases for raglan every other round. When A.1 has been worked 1 time vertically there are 122-126-130-134-138-142 stitches on round. Continue with A.2 (= 25 stitches) over stitches in A.1 with stockinette stitch over front piece and back piece, and continue with increase for raglan every other round until increase has been done 22-25-27-29-33-36 times in total on each side of the 4 stitches with marker threads = 274-302-322-342-378-406. REMEMBER THE KNITTING GAUGE! After last increase in raglan work without increases until piece measures 20-23-25-27-31-34 cm = 8"-9"-9¾"-10⅝"-12¼"-13⅜" from marker. Work next round as follows: Work the first 34-38-41-44-49-53 stitches (= half back piece), slip the next 69-75-79-83-91-97 stitches on a stitch holder for sleeve, cast on 6-6-6-8-10-12 new stitches on needle (= in the side under sleeve), work the next 68-76-82-88-98-106 stitches (= front piece), slip the next 69-75-79-83-91-97 stitches on a stitch holder (= sleeve), cast on 6-6-6-8-10-12 new stitches on needle (= in the side under sleeve), work the remaining 34-38-41-44-49-53 stitches (= half back piece). NOW MEASURE PIECE FROM HERE! BODY: = 148-164-176-192-216-236 stitches. Continue in stockinette stitch until piece measures 27-26-26-26-24-23 cm = 10⅝"-10¼"-10¼"-10¼"-9½"-9" from division. Switch to circular needle size 4 mm = US 6. Work rib (= purl 1/knit 1) over all stitches. Continue rib like this for 4 cm = 1½". Loosely bind off with knit over knit and purl over purl, read BIND-OFF TIP. Sweater measures approx. 56-58-60-62-64-66 cm = 22"-22¾"-23⅝"-24⅜"-25¼"-26" from shoulder. SLEEVE: Slip the 69-75-79-83-91-97 stitches from stitch holder in one side of piece on a short circular needle/double pointed needles size 5 mm = US 8 and pick in addition up 1 stitch in each of the 6-6-6-8-10-12 stitches cast on in the side under sleeve = 75-81-85-91-101-109 stitches. Insert 1 marker thread in the middle of the 6-6-6-8-10-12 stitches under sleeve and move the marker thread upwards when working, it is used for decrease later. Begin round at the marker thread and continue with A.2 and stockinette stitch in the round. When piece measures 3 cm = 1⅛" from division, decrease 2 stitches mid under sleeve - read DECREASE TIP. Decrease like this every 3½-3-2-1½-1-1 cm = 1¼"-1⅛"-¾"-½"-⅜"-⅜" 10-11-13-16-19-21 times in total = 55-59-59-59-63-67 stitches. Continue until piece measures 38-35-34-32-29-26 cm = 15"-13¾"-13⅜"-12½"-11⅜"-10¼" from division - or desired length (shorter measurements in the larger sizes because of longer yoke). Work 1 round while decreasing 11 stitches evenly over stitches in A.2 = 44-48-48-48-52-56 stitches. Switch to double pointed needles size 4 mm = US 6 and work rib in the round = knit 1/purl 1 for 4 cm = 1½". Bind off with knit over knit and purl over purl (to avoid a tight bind-off edge use double pointed needles size 4 mm = US 6). Work the other sleeve the same way. |
|||||||||||||||||||||||||
Diagram explanations |
|||||||||||||||||||||||||
|
|||||||||||||||||||||||||
 |
|||||||||||||||||||||||||
 |
|||||||||||||||||||||||||
Have you finished this pattern?Tag your pictures with #dropspattern #bronzesummersweater or submit them to the #dropsfan gallery. Do you need help with this pattern?You'll find 29 tutorial videos, a Comments/Questions area and more by visiting the pattern on garnstudio.com. © 1982-2026 DROPS Design A/S. We reserve all rights. This document, including all its sub-sections, has copyrights. Read more about what you can do with our patterns at the bottom of each pattern on our site. |
|||||||||||||||||||||||||


With over 40 years in knitting and crochet design, DROPS Design offers one of the most extensive collections of free patterns on the internet - translated to 17 languages. As of today we count 324 catalogs and 12190 patterns - 12180 of which are translated into English (US/in).
We work hard to bring you the best knitting and crochet have to offer, inspiration and advice as well as great quality yarns at incredible prices! Would you like to use our patterns for other than personal use? You can read what you are allowed to do in the Copyright text at the bottom of all our patterns. Happy crafting!
Post a comment to pattern DROPS 221-3
We would love to hear what you have to say about this pattern!
If you want to leave a question, please make sure you select the correct category in the form below, to speed up the answering process. Required fields are marked *.