
Popular categories
Looking for a yarn?


Comments / Questions (71)
![]() Tania Pietersz wrote:
Tania Pietersz wrote:
Hallo, na het breien van de linker- en rechter schoudergedeelten van het voorpand (deze meten 8cm vanaf de opzetrand) worden beiden gedeelten samengevoegd en brei je verder op dezelfde wijze zoals het patroon aangeeft voor het achterpand. Omdat de lengtes van de voor- (8 cm) en achter schoudergedeelten (4 cm) verschillen, moet ik bij het voorpand bij 16 cm vanaf de opzetrand pas beginnen met meerderen voor de armsgaten? Het patroon geeft namelijk 8 cm aan. Dankje voor de opheldering.
27.04.2026 - 17:58DROPS Design answered:
Dag Tania,
Het meerderen voor de armsgaten gebeurt op het voorpand op dezelfde hoogte als op het achterpand. De hoogte wordt ook beide keren gemeten vanaf de schouder, dus vanaf de opzetrand.
27.04.2026 - 18:37
![]() Iga wrote:
Iga wrote:
Hei. Jeg strikker i str s, men synes at åpning til ermer både på bakstykke og forstykket er mye større enn selve ermen slik at jeg er usikker på hvordan jeg skal montere. Diagram viser at den skal være 19 cm men jeg får det ikke til å stemme hvis jeg øker til ermer fra 17 cm fra opplegskanten. Hva gjør jeg feil ?
24.03.2026 - 07:12DROPS Design answered:
Hei Iga. Stemmer strikkefastheten din i høyden (22 pinner i høyden = 10 cm). Da skal det etter økningen (etter 17 cm ) være ca 19 -20 cm. mvh DROPS Design.
26.03.2026 - 06:27
![]() Pia wrote:
Pia wrote:
Hej er færdig med blusen, men synes der mangler opskrift på halskanten?
12.02.2026 - 12:00DROPS Design answered:
Hej Pia, halskanten er de 6 pinde retstrik du strikkede over halsmaskerne både på bagstykket og på forstykket + de 3 retstrikkede masker du har mod midt foran på hver side af halsen :)
12.02.2026 - 13:39
![]() Karla wrote:
Karla wrote:
Bonjour, j'ai mes 64 mailles, est-ce que le premier rang je dois tricoter 64 mailles et monter 3 mailles à la fin, ensuite le 2e rang je dois tricoter les 67 mailles et monter 3 mailles à la fin?
10.05.2025 - 09:28DROPS Design answered:
Bonjour Karla, tout à fait, ainsi vous avez monté 3 mailles de chaque côté; tricotez ces 3 mailles au point mousse (à l'endroit sur l'endroit et sur l'envers). Bon tricot!
12.05.2025 - 07:38
![]() HERISSON wrote:
HERISSON wrote:
Bonjour, lorsqu'il est écrit Augmenter à 3 mailles au point mousse des bords, cela signifie qu'il faut augmenter en laissant 3mailles après les 3 du point mousse, c'est à dire à 6 mailles du bord ? Merci pour l'aide que vous m'apporterez, car je suis bloquée. Cordialement
17.03.2025 - 22:39DROPS Design answered:
Bonjour Mme Herisson, pour augmenter à 3 mailles du bord pour les emmanchures, procédez ainsi sur l'endroit: Tricotez 3 mailles point mousse, augmentez 1 maille, tricotez les mailles restantes comme avant ou bien pour l'autre épaule: Tricotez les mailles comme avant jusqu'à ce qu'il reste 3 mailles, augmentez 1 maille et terminez par 3 mailles point mousse. Bon tricot!
18.03.2025 - 10:14
![]() Monika wrote:
Monika wrote:
Hallo, wie wird das rechte Schulter beendet? Danke
18.02.2025 - 20:47DROPS Design answered:
Liebe Monika, zuerst strickt man die Maschen für die rechte Schulter und legen diese Maschen still, dann strickt man die Maschen für die linke Schulter und wenn diese linke Schulter 4 cm misst, strickt man beide Schulter zusammen für das Rückenteil, dh zuerst die linke Schulter stricken, neue Maschen für den Halsausschnitt anschlagen und rechte Schulter stricken, so weiter stricken. Viel Spaß beim Stricken!
19.02.2025 - 07:40
![]() Lone Mørch wrote:
Lone Mørch wrote:
Kan man bruge drops melody istedet for til denne opskrift?
03.01.2025 - 12:49DROPS Design answered:
Hei Lone. Strikk en prøvelapp og se om du får den oppgitt strikkefastheten, men DROPS Melody er nok litt for tykt garn til denne modellen også. mvh DROPS Design
07.01.2025 - 13:38
![]() Anna Ravani wrote:
Anna Ravani wrote:
Sind die Schultern vertauscht? Wenn ich, wie beschrieben, bei der Schulter rechts hinten die Maschen für den Halsausschnitt in der Rückreihe zunehme, so liegen diese auf der rechten Seite (beim Tragen des Pullovers).
29.12.2024 - 23:55DROPS Design answered:
Liebe Frau Ravani, man soll die Maschen für den Halsauschnitt am Ende einer Rückreihe beim rechten Schulter Rückenteil anschlagen, damit diese Maschen richtig gestellt werden; dann strickt man die 1. Hin-Reihe Rückenteil mit der linken Schulter, dann die Maschen vom rechten Schulter, die mit den neu angeschlagenen Maschen beginnen. Viel Spaß beim Stricken!
02.01.2025 - 14:34
![]() Brigitte RAPPENEAU wrote:
Brigitte RAPPENEAU wrote:
Ou trouver nombre de pelotes à commander pour la taille choisie ? Merci !
08.12.2023 - 18:41DROPS Design answered:
Bonjour Mme Rappeneau, vous trouverez la quantité nécessaire au poids pour chaque taille dans l'en-tête, autrement dit, il faut ici en taille S par exemple 125 g Brushed Alpaca Silk / 25 g la pelote = 5 pelotes. Pour trouver votre taille mesurez un vêtement similaire dont vous aimez la forme et comparez les mesures à celles du schéma, retrouvez plus d'infos ici. Bon tricot!
11.12.2023 - 07:20
![]() Michelle wrote:
Michelle wrote:
Just finished this jumper for myself and I love it. Pattern instructions were easy to follow . Thank you Drops.
27.11.2023 - 11:46
|
|
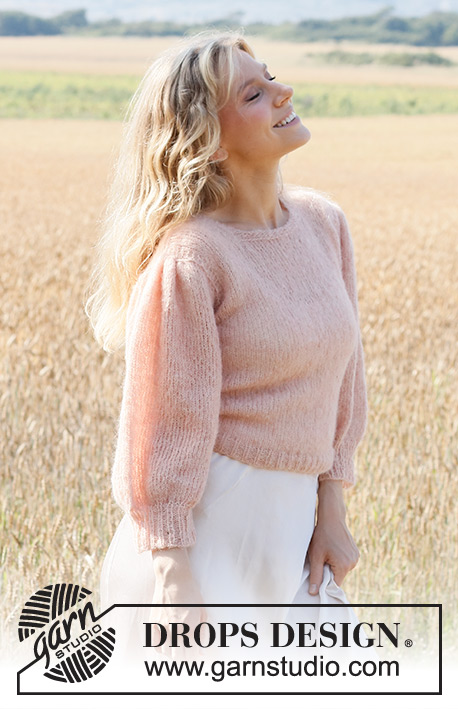
Peaches and Cream#peachesandcreamsweater |
|
 |
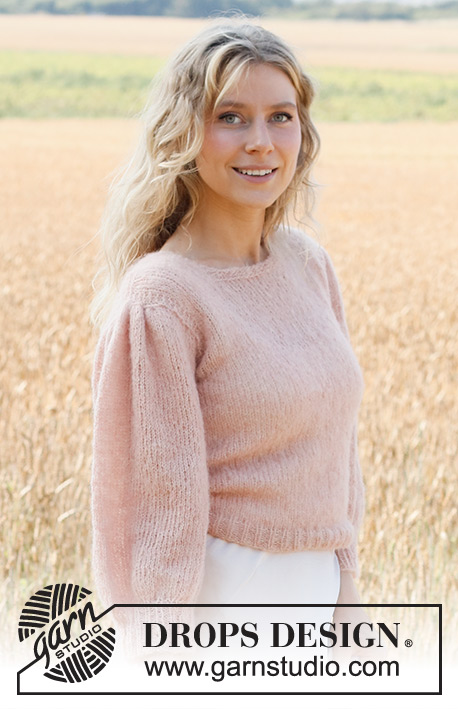 |
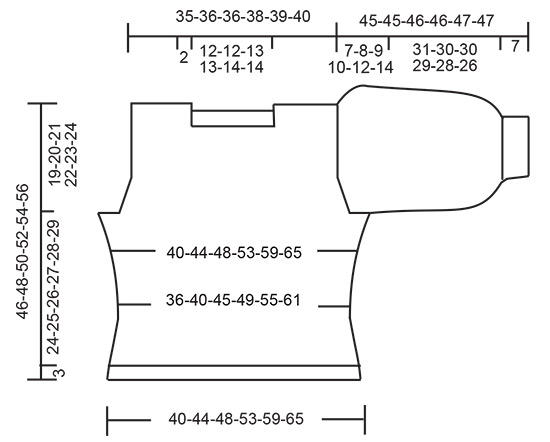
Knitted sweater in DROPS Brushed Alpaca Silk. Piece is knitted top down with ¾ pouffe sleeves. Size: S - XXXL
DROPS 223-1 |
|
|
------------------------------------------------------- EXPLANATION FOR THE PATTERN: ------------------------------------------------------- GARTER STITCH (back and forth): Knit all rows. 1 ridge vertically = knit 2 rows. INCREASE TIP-1 (applies to armholes): All increases are done from the right side. Increase inside 3 edge stitches in garter stitch. Increase 1 stitch by making 1 yarn over. On next row (wrong side) purl yarn overs twisted to avoid holes. Then work the increased stitches in stockinette stitch. INCREASE TIP-2 (applies to sides of body): Increase 1 stitch inside 1 edge stitch in garter stitch in the side by making 1 yarn over. On next row (wrong side) purl yarn overs twisted to avoid holes. INCREASE/DECREASE TIP (evenly): To calculate how to increase/decrease evenly, use the total number of stitches on row (e.g. 70 stitches) minus edge stitches (e.g. 2 stitches), and divide the remaining stitches by number of increases/decreases to be done (e.g. 8) = 8,5. In this example increase by making 1 yarn over after alternately every 8th and 9th stitch, do not increase over edge stitches. On next row work yarn overs twisted to avoid holes If decreasing knit in this example alternately every 7th and 8th stitch and every 8th and 9th stitch together. DECREASE TIP-1 (applies to sides of body): All decreases are done from the right side! Decrease inside 1 edge stitch in garter stitch. Decrease as follows after 1 edge stitch in garter stitch: Slip 1 stitch knitwise, knit 1, pass slipped stitch over stitch worked (= 1 stitch decreased). Decrease as follows before 1 edge stitch in garter stitch: Work until 2 stitches remain before edge stitch, knit 2 together(= 1 stitch decreased). DECREASE TIP-2 (applies to mid under sleeves): Work until 3 stitches remain before marker thread, knit 2 together, knit 2 stitches (marker thread is between these 2 stitches), slip 1 stitch knitwise, knit 1, pass slipped stitch over stitch worked (= 2 stitches decreased). BIND-OFF TIP: To avoid a tight bind-off edge you may use a larger needle size. If this also is too tight, work a 1 yarn over after approx. every 3rd stitch while binding off (bind off yarn overs as regular stitches). ------------------------------------------------------- START THE PIECE HERE: ------------------------------------------------------- SWEATER - SHORT OVERVIEW OF THE PIECE: Work front pieces and back piece back and forth on circular needle separately, top down. Sleeve cap is worked back and forth on circular needle, top down. Then work the rest of sleeve in the round on circular needle/double pointed needles. RIGHT SHOULDER BACK (when garment is worn): Cast on 20-21-20-21-21-22 stitches on circular needle size 4 mm = US 6. Work 1 ridge in GARTER STITCH - read explanation above, over all stitches. Switch to circular needle size 5 mm = US 8. Then work the outermost 3 stitches in each side of piece in garter stitch and work the remaining stitches in stockinette stitch. When piece measures 4 cm = 1½", work, next row from wrong side as follows: Work as before over all stitches and cast on 20-20-22-22-24-24 new stitches at the end of row for neck = 40-41-42-43-45-46 stitches. Cut the yarn. Put piece aside and work the left shoulder at the back. LEFT SHOULDER BACK (when garment is worn): Cast on 20-21-20-21-21-22 stitches on circular needle size 4 mm = US 6. Work 1 ridge over all stitches. Switch to circular needle size 5 mm = US 8. Then work the outermost 3 stitches in each side of piece in garter stitch and work the remaining stitches in stockinette stitch. Continue like this until piece measures 4 cm = 1½"– adjust to finish with last row from wrong side. Then work back piece as explained below. BACK PIECE: Now slip left and right shoulder on to same circular needle so that the 20-20-22-22-24-24 new stitches cast on for neck are in the middle of needle = 60-62-62-64-66-68 stitches. READ ALL OF THE FOLLOWING SECTION BEFORE CONTINUING! Work pattern from the right side as follows: 3 stitches in garter stitch, stockinette over the next 14-15-14-15-15-16 stitches, garter stitch over the next 26-26-28-28-30-30 stitches, stockinette stitch over the next 14-15-14-15-15-16 stitches, 3 stitches in garter stitch. Continue back and forth like this until 3 ridges have been worked over stitches for neck. Then work in stockinette stitch with 3 edge stitches in garter stitch in each side towards armholes. AT THE SAME TIME when piece measures 17-14-8-12-10-7 cm = 6¾"-5½"-3⅛"-4¾"-4"-2¾" from cast-on edge on shoulders, increase 1 stitch in each side for armholes – read INCREASE TIP-1. Increase like this every 4th-4th-4th-2nd-2nd-2nd row, 2-4-8-11-15-19 times in total in each side= 64-70-78-86-96-106 stitches. Piece measures approx. 19-20-21-22-23-24 cm = 7½"-8"-8¼"-8¾"-9"-9½". REMEMBER THE KNITTING GAUGE. Now cast on 3 new stitches for armholes at the end of the next 2 rows = 70-76-84-92-102-112 stitches. NOW MEASURE PIECE FROM HERE! Work 4 rows in stockinette stitch with 6 stitches in garter stitch in each side. Then work in stockinette stitch with 1 edge stitch in garter stitch in each side. When piece measures 4 cm = 1½" from armhole, decrease 1 stitch in each side - read DECREASE TIP-1 (= 2 stitches decreased). Repeat decrease when piece measures 8-8-9-9-10-10 cm = 3⅛"-3⅛"-3½"-3½"-4"-4" and 12-13-14-15-16-17 cm = 4¾"-5⅛"-5½"-6"-6¼"-6¾" = 64-70-78-86-96-106 stitches. When piece measures 15-16-17-18-19-20 cm = 6"-6¼"-6¾"-7"-7½"-8", increase 1 stitch inside 1 edge stitch in garter stitch in each side - READ INCREASE TIP-2 (= 2 stitches increased). Repeat increase when piece measures 19-20-21-22-23-24 cm = 7½"-8"-8¼"-8¾"-9"-9½" and 23-24-25-26-27-28 cm = 9"-9½"-9¾"-10¼"-10⅝"-11" = 70-76-84-92-102-112 stitches. Continue until piece measures 24-25-26-27-28-29 cm = 9½"-9¾"-10¼"-10⅝"-11"-11⅜" from armhole and increase 8-8-9-10-12-14 stitches evenly on last row from wrong side - read INCREASE/DECREASE TIP = 78-84-93-102-114-126 stitches. Switch to circular needle size 4 mm = US 6 and work next row from right side as follows: 1 edge stitch in garter stitch, * knit 1, purl 2 *, repeat from *-* until 2 stitches remain on needle, knit 1, 1 edge stitch in garter stitch. Continue rib like this for 3 cm = 1⅛". Bind off with knit over knit and purl over purl - read BIND-OFF TIP. Back piece measures approx. 46-48-50-52-54-56 cm = 18"-19"-19¾"-20½"-21¼"-22" from shoulder and down. LEFT SHOULDER FRONT (when garment is worn): Cast on 20-21-20-21-21-22 stitches on circular needle size 4 mm = US 6. Work 1 ridge over all stitches. Switch to circular needle size 5 mm = US 8. Then work the outermost 3 stitches in each side of piece in garter stitch and work the remaining stitches in stockinette stitch. When piece measures 7-7-8-8-9-9 cm = 2¾"-2¾"-3⅛"-3⅛"-3½"-3½", work next row from wrong side as follows: Work as before over all stitches and cast on 20-20-22-22-24-24 new stitches at the end of row for neck = 40-41-42-43-45-46 stitches. Cut the yarn. Put piece aside and work the right front shoulder. RIGHT SHOULDER FRONT (when garment is worn): Cast on 20-21-20-21-21-22 stitches on circular needle size 4 mm = US 6. Work 1 ridge over all stitches. Switch to circular needle size 5 mm = US 8. Then work the outermost 3 stitches in each side of piece in garter stitch and work the remaining stitches in stockinette stitch. Continue until piece measures 7-7-8-8-9-9 cm = 2¾"-2¾"-3⅛"-3⅛"-3½"-3½", adjust so that last row is worked from wrong side. FRONT PIECE: Work as on back piece. SLEEVE: Cast on 20-20-20-22-22-22 stitches on circular needle size 5 mm = US 8. Knit 1 row from right side while increasing 7-8-9-8-8-8 stitches evenly - read INCREASE/DECREASE TIP = 27-28-29-30-30-30 stitches. Purl 1 row from wrong side. Work next row as follows from right side: Knit 1, work 2 stitches in each of the next 25-26-27-28-28-28 stitches (i.e. work in front and back loop of stitch), knit 1 = 52-54-56-58-58-58 stitches. Work stockinette stitch back and forth to sleeve cap, and cast at the same time on new stitches at the end of every row in each side as follows: Cast on 3 stitches 1-1-1-1-1-1 time in each side, 2 stitches 3-3-3-3-3-3 times in each side, 1 stitch 0-1-2-3-5-6 times in each side, 2 stitches 3-3-3-3-3-4 times in each side, and then 3 stitches 1 time in each side = 88-92-96-100-104-110 stitches. Put piece together and continue in the round on circular needle. Insert 1 marker thread where piece is put together (= mid under sleeve). Work in stockinette stitch in the round. When piece measures 4 cm = 1½" from where it was put together, decrease 2 stitches mid under sleeve - read DECREASE TIP-2. Decrease like this every 4-4-3-3-2-2 cm = 1½"-1½"-1⅛"-1⅛"-¾"-¾" 3-3-4-4-5-6 times in total = 82-86-88-92-94-98 stitches. Work until piece measures 38-38-39-39-40-40 cm = 15"-15"-15¼"-15¼"-15¾"-15¾" from cast-on edge. Knit 1 round while decreasing 14-14-12-12-14-14 stitches evenly = 68-72-76-80-80-84 stitches. Work next round as follows: * Knit 2, knit 2 together(= 1 stitch decreased) *, work from *-* the entire round= 51-54-57-60-60-63 stitches. Switch to double pointed needles size 4 mm = US 6 and work rib in the round = knit 1/purl 2 for 7 cm = 2¾". Loosely bind off with knit over knit and purl over purl – remember BIND-OFF TIP. Sleeve measures approx. 45-45-46-46-47-47 cm = 17¾"-17¾"-18"-18"-18½"-18½" from cast-on edge and down. Work another sleeve the same way. ASSEMBLY: Sew shoulder seams inside cast-on edges. Sew side seams inside 1 edge stitch in garter stitch. Now sew sleeves to body by placing sleeves under edge in garter stitch along armholes and sewing small stitches from right side (there should not be a loose edge when sewing, and sew in outermost stitch in garter stitch from right side, so that the edge in garter stitch lies nicely outside sleeve). |
|
 |
|
Have you finished this pattern?Tag your pictures with #dropspattern #peachesandcreamsweater or submit them to the #dropsfan gallery. Do you need help with this pattern?You'll find 29 tutorial videos, a Comments/Questions area and more by visiting the pattern on garnstudio.com. © 1982-2026 DROPS Design A/S. We reserve all rights. This document, including all its sub-sections, has copyrights. Read more about what you can do with our patterns at the bottom of each pattern on our site. |
|


With over 40 years in knitting and crochet design, DROPS Design offers one of the most extensive collections of free patterns on the internet - translated to 17 languages. As of today we count 324 catalogs and 12290 patterns - 12280 of which are translated into English (US/in).
We work hard to bring you the best knitting and crochet have to offer, inspiration and advice as well as great quality yarns at incredible prices! Would you like to use our patterns for other than personal use? You can read what you are allowed to do in the Copyright text at the bottom of all our patterns. Happy crafting!
Post a comment to pattern DROPS 223-1
We would love to hear what you have to say about this pattern!
If you want to leave a question, please make sure you select the correct category in the form below, to speed up the answering process. Required fields are marked *.