
Popular categories
Looking for a yarn?


Comments / Questions (54)
![]() Joe O wrote:
Joe O wrote:
Body directions start with 161 stitches. If I decrease (4 stitches) after 5cm, then three more times after 9cm, my math says 161-4-4-4-4 = 145 stitches, not 149. What am I doing wrong? 2nd Question: usually one decreases when it's time for ribbing on the bottom, but this pattern say increase 11 stitches. Is this correct? Thanks for your help.
25.12.2022 - 20:58DROPS Design answered:
Dear Joe, you need to work the decreases 3 times in total, not 3 more times. So you decrease in total 12 stitches = 149 stitches. 2) Yes, it's correct, you need to increase for the ribbing on the bottom. Whether you increase or decrease for the bottom rib will depend on if you are working a garment from top bottom or bottom up. Happy knitting!
26.12.2022 - 00:21
![]() Rozemarijn Hessels wrote:
Rozemarijn Hessels wrote:
I know how to do raglan, and charts are always read from right to left?? if A2a is knitted after the 2nd marker (=right sleeve) it’s still rather confusing, or is a2a the left sleeve? It would be good if this is stated under the chart. It would be much clearer if the written instructions would say: keep increasing in the raglan way until there is ?? stitches on your needles, but knit the increases according to the chart in 2a/b or something like that. I’ll find my way now
25.10.2022 - 01:48
![]() Rozemarijn Hessels wrote:
Rozemarijn Hessels wrote:
I got a very weird looking increase part over A2a and A2b sections. It says you start increasing in pattern in A2a after the second stitch marker (aka after knitting right sleeve stitches). So far that means you make 1 yarn over after the second raglan stitch. On the second row you purl it twisted. If you keep increasing like that, the increased stitch is always knitted AFTER the next increas.. If you start after the second stitch marker/right sleeve, you have to start with A3b instead of A2a.
23.10.2022 - 15:29DROPS Design answered:
Dear Mrs Hessels, the first raglan increases are made on each side of the 2raglan sts at each raglan line, and then you increaese the same way when working A.2a, ie work 1 st after marker, then work A.2a = beg with raglan increases (front piece) so that you keep 2 sts on each side of raglan increases just as under INCREASE TIP (applies to raglan):. Happy knitting!
24.10.2022 - 09:34
![]() Milena wrote:
Milena wrote:
Non so lavorare top down e chiedo come è possibile lavorare il maglione bianco con trecce in maniera dal basso. Mi piacerebbe moltissimo farlo a mio nipote di 27 anni perché so che lo apprezzerebbe molto. Potete darmi un consiglio? Grazie infinite
29.01.2022 - 08:54DROPS Design answered:
Buongiorno Milena, non occorre sapere lavorare top down per lavorare questo modello, basta seguire le istruzioni riportate. I modelli sono disegnati e progettati per avere una determinata costruzione e non è possibile riprogettare un modello e adattarlo ad un'altra costruzione. Se dovesse aver bisogno di aiuto per qualche passaggio può scriverci come ha fatto ora e la aiuteremo a proseguire. Buon lavoro!
29.01.2022 - 14:17
![]() Carlos wrote:
Carlos wrote:
Guten Tag! Ich finde diese Anweisung schwer zu verstehen. Könnten Sie. ir dabei helfen? Vielen Dank! ÄRMEL: Die 48-54-58-60-62-68 stillgelegten Maschen der einen Seite der Arbeit auf Nadelspiel Nr. 5,5 legen und je 1 Masche aus den 10-10-10-12-12-12 neuen Maschen auffassen = 58-64-68-72-74-80 Maschen.
02.01.2022 - 10:29DROPS Design answered:
Lieber Carlos, diese Lektion zeigt, wie man einen Pullover von oben nach unten strickt, ab Bild 17 zeigt man wie man die Maschen der Ärmel wieder auf die Nadel liegt und wie die neuen Maschen aufgefassen werden (18-B). Das kann Ihnen sicher helfen. Viel Spaß beim stricken!
03.01.2022 - 12:12
![]() Elia Valverde wrote:
Elia Valverde wrote:
Por favor, no entiendo el canesú, en que momento hago los aumentos del frente. SOS, Gracias 🙏
29.12.2021 - 22:27DROPS Design answered:
Hola Elia, los aumentos para todas las partes se trabajan en cada punto con el marcapuntos, en los puntos del raglán. Se aumenta antes y después de cada marcapuntos, como se explica en el TIP arriba. Después de repetir los aumentos 3-3-2-2-1-1 veces, trabajar los aumentos como se explican en el patrón.
31.12.2021 - 20:22
![]() Brigitte Thibault wrote:
Brigitte Thibault wrote:
Patron drops 219-8 Après avoir mis les marqueurs, il est dit augmenter pour le raglan de chaque côté des marqueurs, que veut dire augmenter 20 fois au total tous les 2 tours mais après avoir augmenté 3 fois, tricoter les augmentations du devant en point fantaisie? 20 fois veut dire 20 tours et augmenté 3 fois, veut dire aussi 3 tours, est-ce bien ça?
13.12.2021 - 01:29DROPS Design answered:
Bonjour Mme Thibault, vous augmentez 20 fois au total, mais après avoir augmenté 3 fois (en taille M), tricotez les augmentations suivantes comme indiqué par les diagrammes (les augmentations des diagrammes font partie des 20 augmentations/fois). Bon tricot!
13.12.2021 - 10:19
![]() Salomé wrote:
Salomé wrote:
Je rencontre une difficulté pour faire ce modèle en taille M. Doit-on augmenter le raglan 20 x en hauteur, ou 20x au total et poursuivre ensuite sans augmentation jusqu'à ce qu'on arrive à 253 mailles ? En augmentant 20x en hauteur tous les 2 tours, je suis arrivée à un total de 273mailles pour une taille M...au lieu de 253mailles... Aidez-moi, merci.
11.12.2021 - 22:14DROPS Design answered:
Bonjour Salomé, en taille M vous augmentez pour le raglan 20 fois tous les 2 tours soit 93 mailles + (20x 8 mailles pour le raglan) = 253 mailles après 20x2 = 40 tours. Est-ce que cela peut vous aider?
13.12.2021 - 09:21
![]() Carlos wrote:
Carlos wrote:
Eine Anfäger-Frage: Wann soll am besten von der 40cm auf die 80cm Rundnadel wechseln? An der Passe wird es langsam eng ;-) Danke im Voraus
05.12.2021 - 10:29DROPS Design answered:
Lieber Carlos, Sie können auf die 80 cm Rundnadel wechseln, wenn Sie zuviele Maschen für die 40 cm haben; sollte die Arbeit noch nicht 80 cm Umfang sein, dann können Sie Magic Loop stricken. Viel Spaß beim stricken!
06.12.2021 - 08:11
![]() Grace Parisi wrote:
Grace Parisi wrote:
Ah!!! Thank you so much! Now it makes sense. I'll be sure to post a pic of the finished sweater.
25.11.2021 - 18:35
|
||||||||||||||||
Snow Trail#snowtrailsweater |
||||||||||||||||
 |
 |
|||||||||||||||
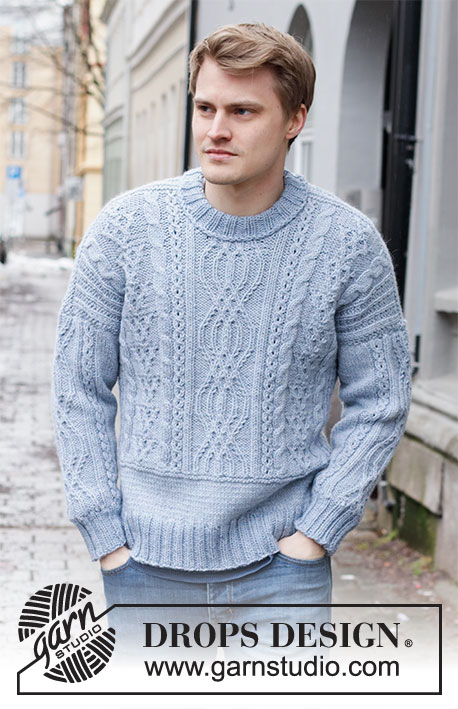
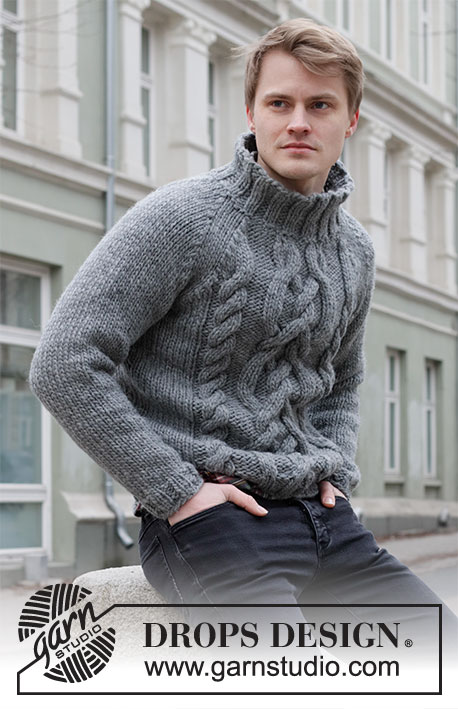
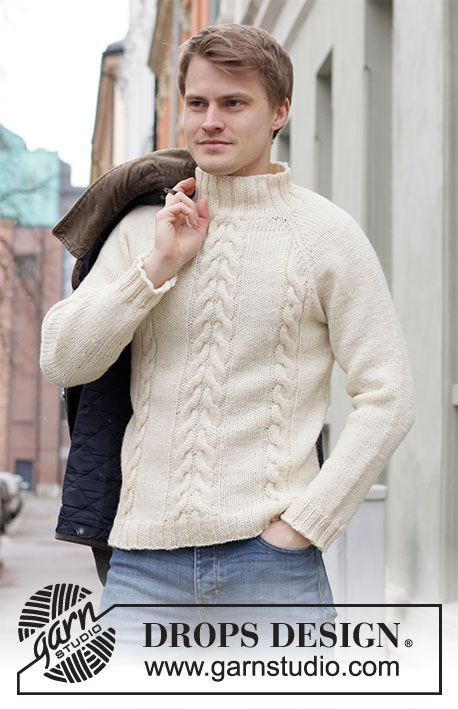
Knitted sweater for men with raglan in DROPS Nepal. Piece is knitted top down with cables and stockinette stitch. Size: S - XXXL
DROPS 219-8 |
||||||||||||||||
|
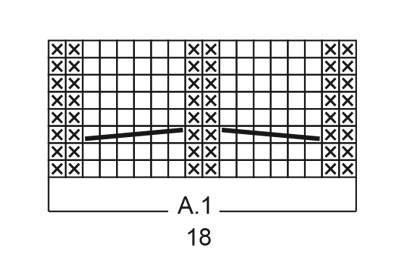
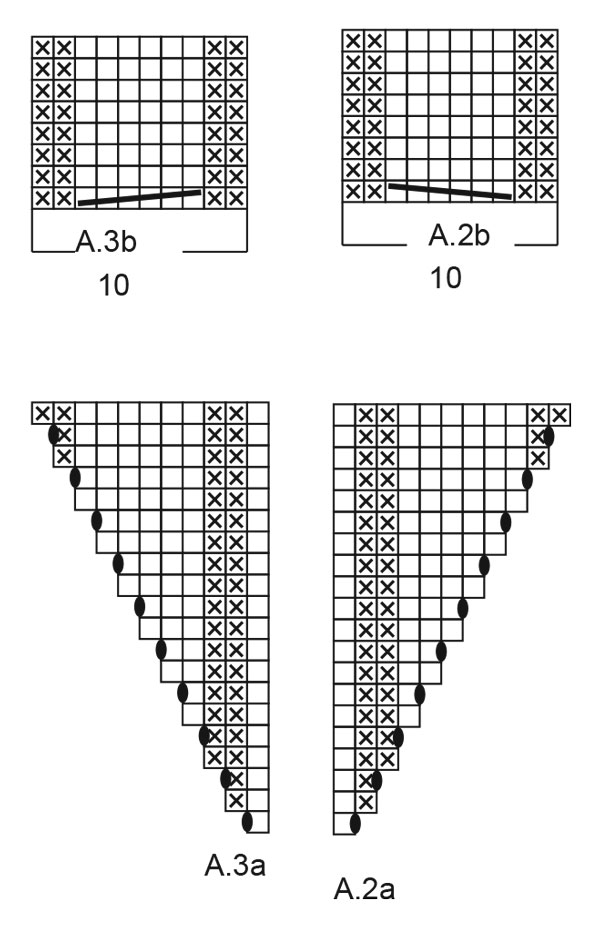
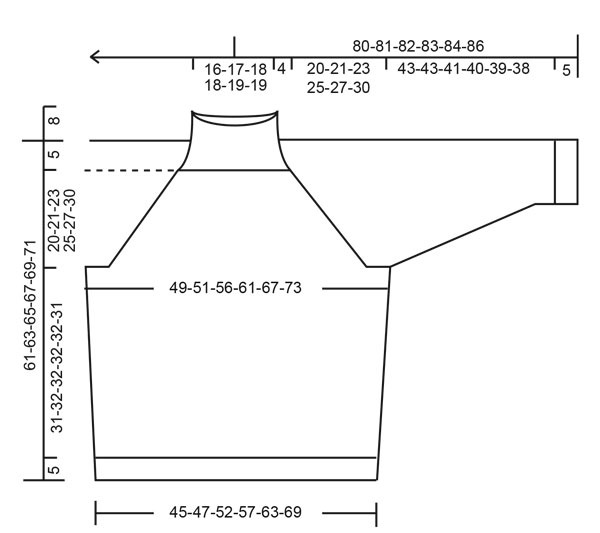
---------------------------------------------------------- EXPLANATION FOR THE PATTERN: ---------------------------------------------------------- PATTERN: See diagrams A.1 to A.3. INCREASE TIP (applies to raglan): Work until 1 stitch remains before marker, 1 yarn over (= 1 stitch increased), knit 2, 1 yarn over (= 1 stitch increased). Increase like this at all markers (= 8 stitches increased). Work yarn overs twisted on next round. Work the increased stitches in the pattern. I.e. on back piece work them in stockinette stitch, on front piece work increases first in stockinette stitch then in pattern A.2a/A.3a and then in stockinette stitch. DECREASE TIP (applies to side on body and sleeves): Decrease 1 stitch on each side of marker thread as follows: Work until 4 stitches remain before marker thread and knit 2 together, knit 4 (marker thread is in the middle of these stitches), slip 1 stitch knitwise, knit 1, pass slipped stitch over stitch worked. BIND-OFF TIP: To avoid a tight bind-off edge you may use a larger needle. If this also is too tight, make 1 yarn over after approx. every 4th stitch, bind off these as regular stitches. ---------------------------------------------------------- START THE PIECE HERE: ---------------------------------------------------------- SWEATER - SHORT OVERVIEW OF THE PIECE: Work neck edge and yoke in the round on circular needle from mid back, top down. Now divide yoke for body and sleeves. Body is worked in the round on circular needle, top down. Work sleeves in the round on double pointed needles, top down. NECK EDGE: Cast on 80-84-88-96-96-104 stitches on circular needle size 4.5 mm = US 7 with Nepal. Work rib = knit 2/purl 2 for 8 cm = 3⅛". Rounds begin mid back. Switch to circular needle size 5.5 mm = US 9. Insert 1 marker at the beginning of round, measure yoke from this marker! YOKE: Knit 1 round and increase 5-9-13-5-13-5 stitches evenly = 85-93-101-101-109-109 stitches. Work next round as follows (insert markers between stitches): Work 13-15-17-17-19- 19 stitches (= half back piece), insert 1st marker, 14 stitches in stockinette stitch (= sleeve), insert 2nd marker, 6-8-10-10-12-12 stitches in stockinette stitch, A.1 (= 18 stitches), 6-8-10-10-12-12 stitches in stockinette stitch (= front piece), insert 3rd marker, 14 stitches in stockinette stitch (= sleeve), insert 4th marker, insert 14-16-18- 18-20-20 stitches in stockinette stitch (= last half of back piece). Move the markers upwards when working, increase for raglan on each side of every marker. On next round increase 1 stitch in each side of every marker - Read INCREASE TIP! Increase like this every other round 19-20-22-24-26-30 times in total, but after the increases have been made 3-3-2-2-1-1 times, increase in pattern on front piece, READ THE REST OF SECTION BEFORE CONTINUING! When the increases have been made 3-3-2-2-1-1 times, work next round as follows: Work and increase as before until 2nd marker, work 1 stitch in stockinette stitch, A.2a (= 1 stitch), 7-9-10-10-11-11 stitches in stockinette stitch, A.1 over 18 stitches as before, 7-9-10-10-11-11 stitches in stockinette stitch, A.3a (= 1 stitch), 1 stitch in stockinette stitch (3rd marker is here), work and increase the rest of round as before. REMEMBER THE KNITTING GAUGE! When A.2a and A.3a have been worked 1 time vertically, increase as explained under INCREASE TIP (i.e. work increases on front piece in stockinette stitch) until the increases have been done a total of 19-20-22-24-26-30 times, and work A.2b and A.3b over A.2a and A.3a (adjust to make the cable on the same round as A.1) = 237- 253-277-293-317-349 stitches. Piece measures approx. 19-20-22-24-26-29 cm = 7 ½"-8"-8¾"-9½"-10¼"-11⅜" from marker mid back. Work pattern until piece measures 20-21-23-25-27-30 cm = 8"-8¼"-9"-9¾"-10⅝"-11¾" from marker. Now divide the piece for sleeves and body as follows: Work the first 34-35-39-42-47-52 stitches (= half back piece), slip the next 48-54-58- 60-62-68 stitches on a stitch holder for sleeve and cast on 10-10-10-12-12-12 stitches under sleeve, work the next 72-74-82-88-98-108 stitches as before (= front piece), slip the next 48-54-58-60-62-68 stitches on a stitch holder for sleeve and cast on 10-10-10-12-12-12 stitches under sleeve, work the last 35-36-40-43-48-53 stitches (= half back piece). BODY: = 161-165-181-197-217-237 stitches. Insert 1 marker thread in the middle of the 10- 10-10-12-12-12 new stitches under sleeve (= in the side of body). Move the marker threads upwards when working; they are used when decreasing in the sides later. Continue in the round with stockinette stitch and pattern as before. When piece measures 5 cm = 2" from division, decrease 1 stitch on each side of marker threads - read DECREASE TIP (= 4 stitches decreased). Decrease like this every 9 cm = 3 ½" 3 times in total = 149-153-169-185-205-225 stitches. When piece measures 31- 32-32-32-32-31 cm = 12¼"-12½"-12½"-12½"-12½"-12¼" from division, knit 1 round while AT THE SAME TIME increasing 11-15-11-15-11-15 stitches evenly = 160-168-180-200-216-240 stitches. Switch to circular needle size 4.5 mm = US 7 and work rib knit 2/purl 2 in the round. Bind off with knit over knit and purl over purl when rib measures 5 cm = 2" - read BIND-OFF TIP. Piece measures approx. 36-37- 37-37-37-36 cm = 14¼"-14½"-14½"-14½"-14½"-14¼" from division. SLEEVES: Slip the 48-54-58-60-62-68 stitches from stitch holder in one side of piece on double pointed needles size 5.5 mm = US 9 and knit up 1 stitch in each of the 10-10-10-12- 12-12 stitches cast on under sleeve = 58-64-68-72-74-80 stitches. Insert 1 marker thread in the middle of the 10-10-10-12-12-12 new stitches. Move the marker thread upwards when working; it should be used for decrease under sleeve. Work in stockinette stitch in the round. When sleeve measures 3-3-4-5-5-5 cm = 1⅛"-1⅛"- 1½"-2"-2"-2" from division, decrease 1 stitch on each side of marker thread - remember DECREASE TIP (= 2 stitches decreased). Decrease like this every 3½-3- 2½-2-2-1½ cm = 1¼"-1⅛"-⅞"-¾"-¾"-½" 10-12-13-15-15-18 times in total = 38-40-42-42-44-44 stitches. When sleeve measures 43-43-41-40-39-38 cm = 17"-17 ¼"-16⅛"-15¾"-15¼"-15" from division, increase 2-4-2-6-4-4 stitches evenly = 40-44-44-48-48-48 stitches. Switch to double pointed needles size 4.5 mm = US 7 and work rib knit 2/purl 2 in the round. Bind off with knit over knit and purl over purl when rib measures 5 cm = 2" - read BIND-OFF TIP. Work the other sleeve the same way. |
||||||||||||||||
Diagram explanations |
||||||||||||||||
|
||||||||||||||||
 |
||||||||||||||||
 |
||||||||||||||||
 |
||||||||||||||||
Have you finished this pattern?Tag your pictures with #dropspattern #snowtrailsweater or submit them to the #dropsfan gallery. Do you need help with this pattern?You'll find 26 tutorial videos, a Comments/Questions area and more by visiting the pattern on garnstudio.com. © 1982-2026 DROPS Design A/S. We reserve all rights. This document, including all its sub-sections, has copyrights. Read more about what you can do with our patterns at the bottom of each pattern on our site. |
||||||||||||||||


With over 40 years in knitting and crochet design, DROPS Design offers one of the most extensive collections of free patterns on the internet - translated to 17 languages. As of today we count 324 catalogs and 12290 patterns - 12280 of which are translated into English (US/in).
We work hard to bring you the best knitting and crochet have to offer, inspiration and advice as well as great quality yarns at incredible prices! Would you like to use our patterns for other than personal use? You can read what you are allowed to do in the Copyright text at the bottom of all our patterns. Happy crafting!
Post a comment to pattern DROPS 219-8
We would love to hear what you have to say about this pattern!
If you want to leave a question, please make sure you select the correct category in the form below, to speed up the answering process. Required fields are marked *.