
Popular categories
Looking for a yarn?


Comments / Questions (54)
![]() April wrote:
April wrote:
Is there a tutorial to show placement of markers? Sweater is my next project
11.03.2026 - 04:06DROPS Design answered:
Hi April, Here is a link to our video showing you how to use stitch markers: https://www.garnstudio.com/video.php?id=67&lang=en Regards, Drops Team.
11.03.2026 - 06:42
![]() Jaslie wrote:
Jaslie wrote:
Hi I have a question after I’m on my second row of the a2 a and a3 a charts meaning I already did the first increase on that chart and I’m on the round where u work the increase twisted. Do I purl that first stich after the marker or do I do one stockinette stich and then start the chart like the previous row? Making it so that the purl stich would be on the increased stich from the previous round?
16.12.2025 - 18:20
![]() Samuel wrote:
Samuel wrote:
Hello! Is the cabling only supposed to be on the front of the sweater? If it is, could i adjust the pattern and knit cable on both front and back of the sweater, or would that affect the sizing?
11.06.2025 - 14:19DROPS Design answered:
Dear Samuel, on this pattern the cables are only on front piece; you can probably adapt the pattern to get the cable on front piece, or look at the other jumpers for men with cables here. Happy knitting!
11.06.2025 - 16:01
![]() Josh wrote:
Josh wrote:
Hi! I am a new knitter and this is my first project. I got stuck while knitting the Yoke. It says to knit one round and then increase on the next while starting A2&3.a. In the diagram it says to increase on the first round of A.2a. Can someone please clear this up for me.
30.03.2025 - 20:04DROPS Design answered:
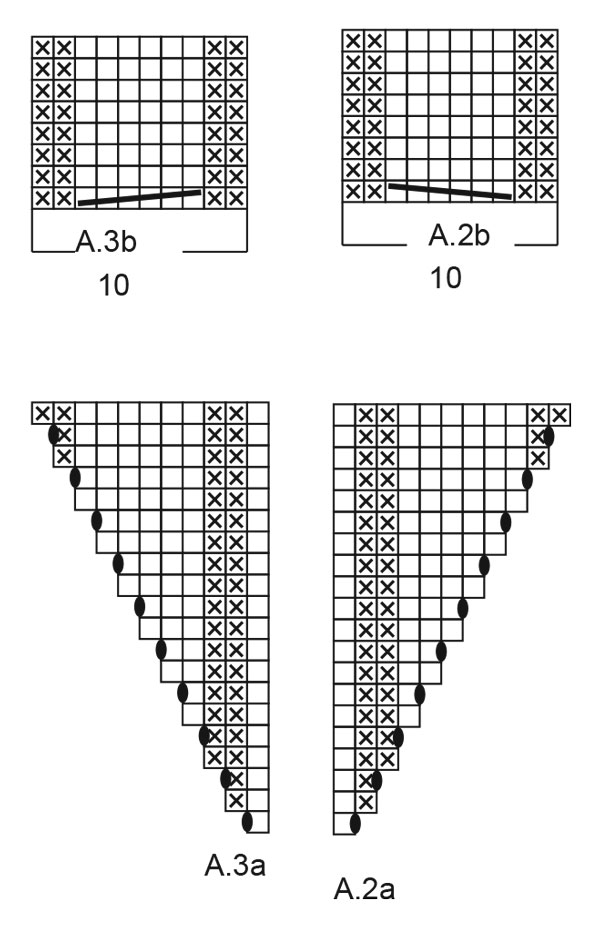
Dear Josh, in the yoke, first you knit 1 round and increase stitches evenly. In the next round you insert the markers as you work the round. Now increase on each side of the markers every other round 19-20-22-24-26-30 times in total (these are raglan increases and are not dependent on the charts). After the increases have been made 3-3-2-2-1-1 times, you will start increasing in the front piece, according to charts A.2a and A.3a, on each side of the central A.1 chart. The increases in A.2a and A.3a are only for the front piec and you will continue with the increases on each side of each marker as before. Happy knitting!
30.03.2025 - 21:08
![]() Jana wrote:
Jana wrote:
Good afternoon! I am a bit confused with the charts for a2 and a3 and the wording of how they fit in with A3b and A2b? I have never worked two charts over each other when cabling so please excuse my ignorance! I am trying to figure out how I knit over each other? Thank you for your patience with me! I have started the neck and it is a beautiful design!
07.03.2025 - 00:51DROPS Design answered:
Dear Jana, when diagrams A.2a and A.3a are done, you will just have to adjust diagrams A.2b and A.3b over the stitches worked previously, ie over the P2, K6,P2 at the beg of A.2a/end of A.3a, work the P2, (cable / K6), P2 in A.2b and A.3b. Then repeat the diagrams A.2b and A.3b (this means a cable will be worked every 8th row). Happy knitting!
07.03.2025 - 09:55
![]() Michelle wrote:
Michelle wrote:
Après avoir placer les marqueurs, nous avons 17m, 14m, 10m-18m-10m = 38m , 14m, 18m, après les 24 augm j'ai 17 +24 =41 m pour le demi dos, 14 + 24×2 =62 m pour la manche, 38 +24×2 =86m pour le devant, de nouveau 62m pour les manches et 18 m+24 m= 42 m pour le demi dos. Je ne retrouve pas les même chiffres dans la suite des explications après l empiècement pourtant j'ai bien les 293m de la taille xl... Ou est le problème ? Merci
17.02.2025 - 22:50DROPS Design answered:
Bonjour Michelle, lors de la division, la 1ère maille de la 1ère manche sera attribuée au dos, la dernière maille de la 1ère manche et la 1ère maille de la 2ème manche seront attribuées au devant et la dernière maille de la 2ème manche sera attribuée au dos, ainsi, vous aurez bien vos 41 m du dos + 1 m de la manche = 42 m au début/à la fin du tour et 62 m des manches - 2 = 60 m en attente pour les manches et 86 m du devant + 2 m = 88 m pour le devant. Bon tricot!
18.02.2025 - 10:01
![]() Raffaella wrote:
Raffaella wrote:
Hello! I'm starting the Snow Trail jumper. Is the recommended knitting tension (16 sts in 10 cm with 5.5 needles) obtained before or after blocking? Thanks in advance Raffaella
29.01.2025 - 18:55DROPS Design answered:
Dear Raffaela, we are not used to block, but if you think there might be a difference , then you might try to first block your swatch. Happy knitting!
30.01.2025 - 09:51
![]() Hilary wrote:
Hilary wrote:
I’m struggling to get A2a & A 3a. On the diagram which edge is the marker at? Right hand side of A2a and left hand side of A3a
21.01.2025 - 19:18DROPS Design answered:
Dear Hillary, correct, work until 2nd marker, then work 1 stitch in stocking stitch, A.2a (= 1 stitch), 7-9-10-10-11-11 stitches in stocking stitch, A.1 over 18 stitches as before, 7-9-10-10-11-11 stitches in stocking stitch, A.3a (= 1 stitch), 1 stitch in stocking stitch (3rd marker is here), Happy knitting!
22.01.2025 - 09:09
![]() Raffaella wrote:
Raffaella wrote:
Hello!I'm knitting model Snow Trail in size S. Does it make any difference if I increase by M1R and M1L instead of yarn-over? Thanks in advance!
20.01.2025 - 19:01DROPS Design answered:
Dear Raffaella, as long as you gauge is correct (for stitches and row-count as well), and you are careful which way your increases are leaning, and remember to increase at the correct places, you can substitute the increases. Happy Knitting!
20.01.2025 - 21:16
![]() Hilary wrote:
Hilary wrote:
I’m doing the extra large size. I did the initial first round increases at the raglan markers. My next row would be no increases or do I make the A.2a & A.3a . The pattern says work increases as before until the second marker. It looks like I am not alone with this problem. Hope you can help
19.01.2025 - 18:41DROPS Design answered:
Dear Hilary, after working the initial increases 2 times, you will continue working increases while working the cable pattern. The sleeves and back piece are still worked in stocking stitch as before; the only part that changes is the section between markers 2 and 3 (front piece). Here, you work: 1 st in stocking stitch, A.2a (= 1 stitch), 10 sts in stocking stitch, A.1 over 18 stitches, 10 sts in stocking stitch, A.3a (= 1 stitch), 1 st in stocking stitch (the increases are now in the charts). The increases in the chart are in every 2nd round (as you can see in the charts) so you will continue increasing every 2nd round as before. Happy knitting!
19.01.2025 - 20:37
|
||||||||||||||||
Snow Trail#snowtrailsweater |
||||||||||||||||
 |
 |
|||||||||||||||
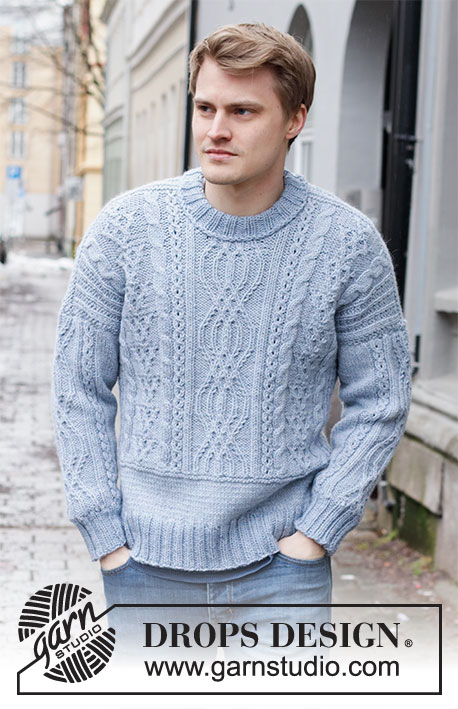
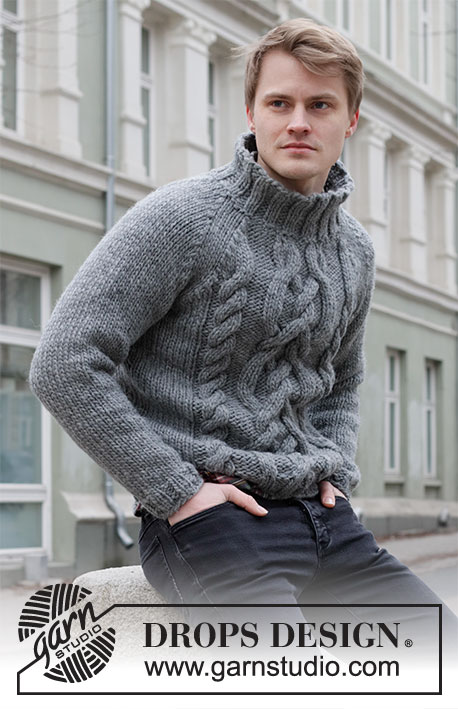
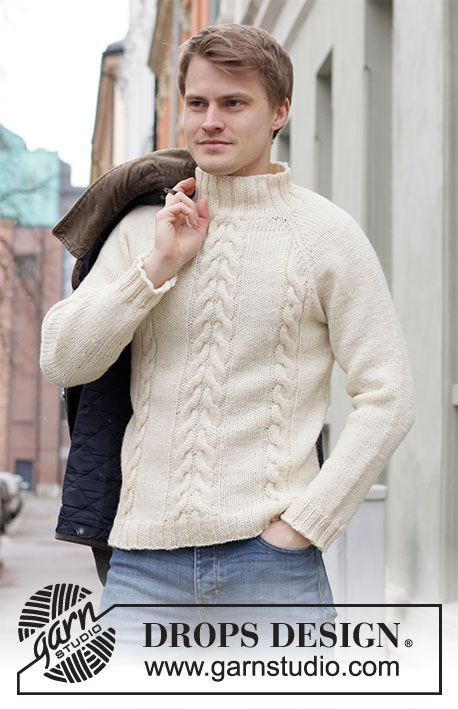
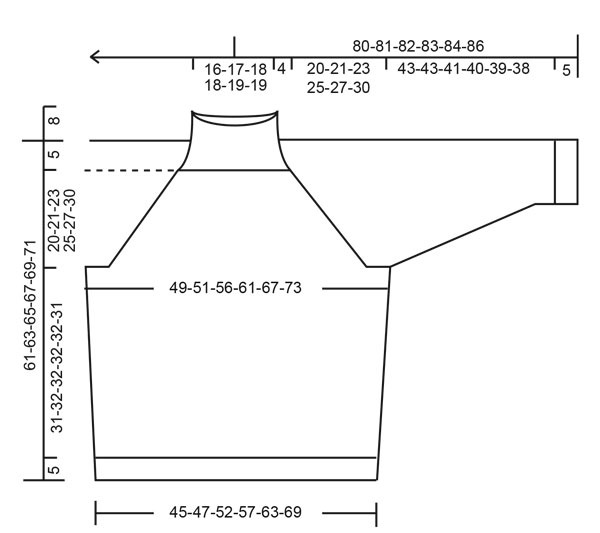
Knitted sweater for men with raglan in DROPS Nepal. Piece is knitted top down with cables and stockinette stitch. Size: S - XXXL
DROPS 219-8 |
||||||||||||||||
|
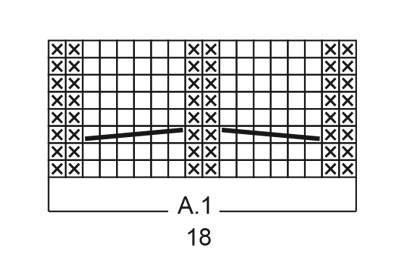
---------------------------------------------------------- EXPLANATION FOR THE PATTERN: ---------------------------------------------------------- PATTERN: See diagrams A.1 to A.3. INCREASE TIP (applies to raglan): Work until 1 stitch remains before marker, 1 yarn over (= 1 stitch increased), knit 2, 1 yarn over (= 1 stitch increased). Increase like this at all markers (= 8 stitches increased). Work yarn overs twisted on next round. Work the increased stitches in the pattern. I.e. on back piece work them in stockinette stitch, on front piece work increases first in stockinette stitch then in pattern A.2a/A.3a and then in stockinette stitch. DECREASE TIP (applies to side on body and sleeves): Decrease 1 stitch on each side of marker thread as follows: Work until 4 stitches remain before marker thread and knit 2 together, knit 4 (marker thread is in the middle of these stitches), slip 1 stitch knitwise, knit 1, pass slipped stitch over stitch worked. BIND-OFF TIP: To avoid a tight bind-off edge you may use a larger needle. If this also is too tight, make 1 yarn over after approx. every 4th stitch, bind off these as regular stitches. ---------------------------------------------------------- START THE PIECE HERE: ---------------------------------------------------------- SWEATER - SHORT OVERVIEW OF THE PIECE: Work neck edge and yoke in the round on circular needle from mid back, top down. Now divide yoke for body and sleeves. Body is worked in the round on circular needle, top down. Work sleeves in the round on double pointed needles, top down. NECK EDGE: Cast on 80-84-88-96-96-104 stitches on circular needle size 4.5 mm = US 7 with Nepal. Work rib = knit 2/purl 2 for 8 cm = 3⅛". Rounds begin mid back. Switch to circular needle size 5.5 mm = US 9. Insert 1 marker at the beginning of round, measure yoke from this marker! YOKE: Knit 1 round and increase 5-9-13-5-13-5 stitches evenly = 85-93-101-101-109-109 stitches. Work next round as follows (insert markers between stitches): Work 13-15-17-17-19- 19 stitches (= half back piece), insert 1st marker, 14 stitches in stockinette stitch (= sleeve), insert 2nd marker, 6-8-10-10-12-12 stitches in stockinette stitch, A.1 (= 18 stitches), 6-8-10-10-12-12 stitches in stockinette stitch (= front piece), insert 3rd marker, 14 stitches in stockinette stitch (= sleeve), insert 4th marker, insert 14-16-18- 18-20-20 stitches in stockinette stitch (= last half of back piece). Move the markers upwards when working, increase for raglan on each side of every marker. On next round increase 1 stitch in each side of every marker - Read INCREASE TIP! Increase like this every other round 19-20-22-24-26-30 times in total, but after the increases have been made 3-3-2-2-1-1 times, increase in pattern on front piece, READ THE REST OF SECTION BEFORE CONTINUING! When the increases have been made 3-3-2-2-1-1 times, work next round as follows: Work and increase as before until 2nd marker, work 1 stitch in stockinette stitch, A.2a (= 1 stitch), 7-9-10-10-11-11 stitches in stockinette stitch, A.1 over 18 stitches as before, 7-9-10-10-11-11 stitches in stockinette stitch, A.3a (= 1 stitch), 1 stitch in stockinette stitch (3rd marker is here), work and increase the rest of round as before. REMEMBER THE KNITTING GAUGE! When A.2a and A.3a have been worked 1 time vertically, increase as explained under INCREASE TIP (i.e. work increases on front piece in stockinette stitch) until the increases have been done a total of 19-20-22-24-26-30 times, and work A.2b and A.3b over A.2a and A.3a (adjust to make the cable on the same round as A.1) = 237- 253-277-293-317-349 stitches. Piece measures approx. 19-20-22-24-26-29 cm = 7 ½"-8"-8¾"-9½"-10¼"-11⅜" from marker mid back. Work pattern until piece measures 20-21-23-25-27-30 cm = 8"-8¼"-9"-9¾"-10⅝"-11¾" from marker. Now divide the piece for sleeves and body as follows: Work the first 34-35-39-42-47-52 stitches (= half back piece), slip the next 48-54-58- 60-62-68 stitches on a stitch holder for sleeve and cast on 10-10-10-12-12-12 stitches under sleeve, work the next 72-74-82-88-98-108 stitches as before (= front piece), slip the next 48-54-58-60-62-68 stitches on a stitch holder for sleeve and cast on 10-10-10-12-12-12 stitches under sleeve, work the last 35-36-40-43-48-53 stitches (= half back piece). BODY: = 161-165-181-197-217-237 stitches. Insert 1 marker thread in the middle of the 10- 10-10-12-12-12 new stitches under sleeve (= in the side of body). Move the marker threads upwards when working; they are used when decreasing in the sides later. Continue in the round with stockinette stitch and pattern as before. When piece measures 5 cm = 2" from division, decrease 1 stitch on each side of marker threads - read DECREASE TIP (= 4 stitches decreased). Decrease like this every 9 cm = 3 ½" 3 times in total = 149-153-169-185-205-225 stitches. When piece measures 31- 32-32-32-32-31 cm = 12¼"-12½"-12½"-12½"-12½"-12¼" from division, knit 1 round while AT THE SAME TIME increasing 11-15-11-15-11-15 stitches evenly = 160-168-180-200-216-240 stitches. Switch to circular needle size 4.5 mm = US 7 and work rib knit 2/purl 2 in the round. Bind off with knit over knit and purl over purl when rib measures 5 cm = 2" - read BIND-OFF TIP. Piece measures approx. 36-37- 37-37-37-36 cm = 14¼"-14½"-14½"-14½"-14½"-14¼" from division. SLEEVES: Slip the 48-54-58-60-62-68 stitches from stitch holder in one side of piece on double pointed needles size 5.5 mm = US 9 and knit up 1 stitch in each of the 10-10-10-12- 12-12 stitches cast on under sleeve = 58-64-68-72-74-80 stitches. Insert 1 marker thread in the middle of the 10-10-10-12-12-12 new stitches. Move the marker thread upwards when working; it should be used for decrease under sleeve. Work in stockinette stitch in the round. When sleeve measures 3-3-4-5-5-5 cm = 1⅛"-1⅛"- 1½"-2"-2"-2" from division, decrease 1 stitch on each side of marker thread - remember DECREASE TIP (= 2 stitches decreased). Decrease like this every 3½-3- 2½-2-2-1½ cm = 1¼"-1⅛"-⅞"-¾"-¾"-½" 10-12-13-15-15-18 times in total = 38-40-42-42-44-44 stitches. When sleeve measures 43-43-41-40-39-38 cm = 17"-17 ¼"-16⅛"-15¾"-15¼"-15" from division, increase 2-4-2-6-4-4 stitches evenly = 40-44-44-48-48-48 stitches. Switch to double pointed needles size 4.5 mm = US 7 and work rib knit 2/purl 2 in the round. Bind off with knit over knit and purl over purl when rib measures 5 cm = 2" - read BIND-OFF TIP. Work the other sleeve the same way. |
||||||||||||||||
Diagram explanations |
||||||||||||||||
|
||||||||||||||||
 |
||||||||||||||||
 |
||||||||||||||||
 |
||||||||||||||||
Have you finished this pattern?Tag your pictures with #dropspattern #snowtrailsweater or submit them to the #dropsfan gallery. Do you need help with this pattern?You'll find 26 tutorial videos, a Comments/Questions area and more by visiting the pattern on garnstudio.com. © 1982-2026 DROPS Design A/S. We reserve all rights. This document, including all its sub-sections, has copyrights. Read more about what you can do with our patterns at the bottom of each pattern on our site. |
||||||||||||||||


With over 40 years in knitting and crochet design, DROPS Design offers one of the most extensive collections of free patterns on the internet - translated to 17 languages. As of today we count 324 catalogs and 12290 patterns - 12280 of which are translated into English (US/in).
We work hard to bring you the best knitting and crochet have to offer, inspiration and advice as well as great quality yarns at incredible prices! Would you like to use our patterns for other than personal use? You can read what you are allowed to do in the Copyright text at the bottom of all our patterns. Happy crafting!
Post a comment to pattern DROPS 219-8
We would love to hear what you have to say about this pattern!
If you want to leave a question, please make sure you select the correct category in the form below, to speed up the answering process. Required fields are marked *.