
Popular categories
Looking for a yarn?


Comments / Questions (41)
![]() Andrigibals wrote:
Andrigibals wrote:
Error in the pattern I think? The size starting with 88 stitches cast on, then decreased by 4, for 84 stitches. The markers are set so there are only 80 stitches on the needles. Please help?
08.05.2022 - 07:28DROPS Design answered:
Dear Andrigibals, when inserting the markers you need to insert them inside the next stitch, after counting or working the previous ones. So you have 80 stitches + 4 stitches (each with a marker stitch). Please remember to tag your comment as a question so that we will answer sooner. Happy knitting!
08.05.2022 - 19:00
![]() Julie Krystal Trnavsky wrote:
Julie Krystal Trnavsky wrote:
When you get to the sleeves in the english version the decrease directions are reversed. decrease 2 stitches toward the left BEFORE and 2 stitches to the right AFTER - follow the video not the instructions for this part and you will have happy knitting!
28.03.2022 - 20:03DROPS Design answered:
Dear Mrs Krystal Trnavsky, thanks for your feedback, our design team has checked the decreases and they are correct like this, but you can of course decrease like you rather like them to be. Happy knitting!
29.03.2022 - 16:03
![]() Elena wrote:
Elena wrote:
Sono di nuovo io.. nella spiegazione dice di lavorare sette giri di coste inglesi (dopo il collo) prima di fare i primi aumenti, ma guardando la foto sembrerebbe esserci un aumento subito al primo giro di coste.. è giusta la spiegazione scritta? grazie mille
22.01.2022 - 10:11DROPS Design answered:
Buonasera Elena, se sta facendo riferimento all'inizio del paragrafo RAGLAN, le spiegazioni sono corrette. Buon lavoro!
22.01.2022 - 18:54
![]() Elena wrote:
Elena wrote:
Buongiorno, sarebbe possibile sapere che taglia veste la modella della foto e quanto è alta? grazie
17.01.2022 - 12:53DROPS Design answered:
Buonasera Elena, le modelle solitamente vestono una taglia M e hanno un'altezza media di 170 cm. Buon lavoro!
18.01.2022 - 22:57
![]() Camilla wrote:
Camilla wrote:
Hejsa. Jeg har svært ved at regne ud, hvordan de 2 udtagningsmasker, på hver side af raglanmaskerne, skal strikkes på den efterfølgende omgang. Håber i kan hjælpe med lidt klarhed over det. Mvh. Camilla.
16.10.2021 - 00:37DROPS Design answered:
Hei Camilla. Alle økningnene gjøres på en omgang hvor kastet og rettmasken skal strikkes rett sammen (= en omgang som strikkes med Air= partalls-omganger). Så da blir neste omgang / oddetalls-omganger strikket med DROPS Big Deligt. Videre strikkes de nye maskene i helpatent (A.1), men vær oppmerksom på at på første omgang etter en omgang med økninger, strikkes vrangmaskene i økningen vrang uten å strikkes sammen med kast fordi kastet ikke er lagd. mvh DROPS Design
18.10.2021 - 10:26
![]() Mariëlle wrote:
Mariëlle wrote:
Hallo, ik brei met de draad in mijn rechterhand, en krijg het patroon niet goed. Ik heb mijn werk inmiddels een aantal keer weer uitgehaald en opnieuw begonnen maar krijg het niet goed 😣Ook is voor mij de overgang van nld 2 naar nld 3 niet duidelijk. Het begin van mijn werk verspringt. Ik heb de instructiefilm bekeken maar daarin wordt gebreid met de draad in de linkerhand. Ik kom er niet uit. Kunt u mij helpen? Alvast bedankt. Hartelijke groet, Mariëlle
28.02.2021 - 13:35DROPS Design answered:
Dag Mariëlle,
Het kan inderdaad frustrerend zijn als het niet lukt en het is jammer dat ik niet mee kan kijken vanaf hier. Naald 3 is weer hetzelfde als naald 1, dus je breit 1 omslag en haalt 1 steek recht af, dan brei je de omslag en de afgehaalde steek averecht samen. Dit herhaal je steeds. Dus op de oneven naalden brei je steeds de averecht samen en op de even naalden brei je de omslag en de afgehaalde steek recht samen. Het maakt niet uit of je de draad in de rechter of linker hand houd. Misschien moet je even niet naar de video kijken, maar alleen het patroon (A.1) volgen
09.03.2021 - 10:43
![]() Sonja Wijngaard wrote:
Sonja Wijngaard wrote:
Kunt u mij uitleggen wat ik de eerste 7 naalden bij de markeerdraden moet doen? Het meerderen begint pas na naald 7 toch?
17.02.2021 - 12:15DROPS Design answered:
Dag Sonja,
Klopt, de eerste 7 naalden brei je volgens telpatroon A.1, daarna beginnen de raglanmeerderingen.
21.02.2021 - 10:41
![]() Laila Sandaas wrote:
Laila Sandaas wrote:
Det står ikke på målskissen hvor bred gjenseren er tvers over ,bare bredden på vragngbord. Dvs vanskelig å finne størrelse
04.02.2021 - 20:11DROPS Design answered:
Hej Laila, jo men målene nederst i måleskitsen stemmer nøjagtig med bredden af trøjen og altså ikke kun på vrangborden :)
05.02.2021 - 14:55
![]() Anna Marciniak wrote:
Anna Marciniak wrote:
Hej! De maskorna som markörerna sitter i, ska de stickas på annat att än A1? Jag får jag har stickat alla maskor enl A1 och ser att jag inte för ngn rand som på bilden längst med de markerade maskorna. Tack!
22.01.2021 - 17:17DROPS Design answered:
Hej Anna, om du gör såhär får du också en rand :) ÖKNING TILL RAGLAN: Öka till raglan på varje sida av avigmaskorna med markör i (= raglanmaskorna), dvs öka i rätmaskan och omslaget som ligger närmast raglanmaskan. Det ökas 2 maskor på varje sida av raglanmaskorna (= 16 maskor ökade på ökningsvarvet). Alla ökningarna görs på ett varv där omslaget och rätmaskan ska stickas räta tillsammans (= ett varv som stickas med Air).
29.01.2021 - 13:45
![]() TORRI wrote:
TORRI wrote:
Bonjour, Vous donnez la longueur des câbles 40-60-80 pour les côtes : 40 pour le col et les poignets . 60 et 80 pour quelles parties ? Je vais tricoter la taille S mais si je veux la taille L comment savoir la longueur du câble ?? Merci beaucoup pour votre aide Cordialement
20.01.2021 - 20:24DROPS Design answered:
Bonjour Mme Torri, une aiguille circulaire doit toujours être d'une longueur inférieure à la circonférence de l'ouvrage, ainsi, la 40 cm s'utilisera au tout début pour le col jusqu'à ce qu'il y ait suffisamment de mailles augmentées pour passer à la 60 ou à la 80 cm - vos mailles seront plus serrées sur une 60 et moins sur une 80 cm. Bon tricot!
21.01.2021 - 07:54
|
||||||||||||||||
Dancing Aurora#dancingaurorasweater |
||||||||||||||||
 |
 |
|||||||||||||||
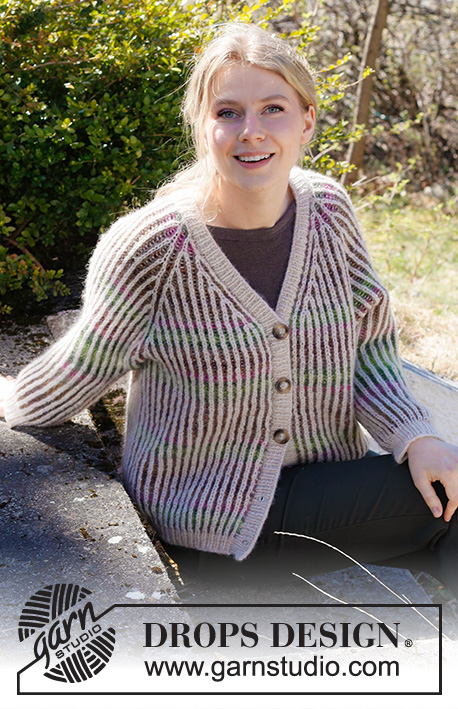
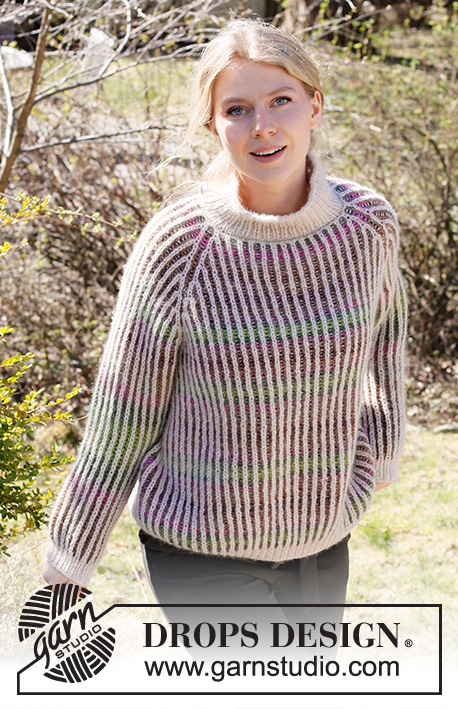
Knitted sweater in DROPS Air and DROPS Big Delight. Piece is knitted top down in two colored English rib with raglan. Size: S - XXXL
DROPS 218-26 |
||||||||||||||||
|
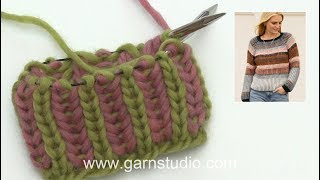
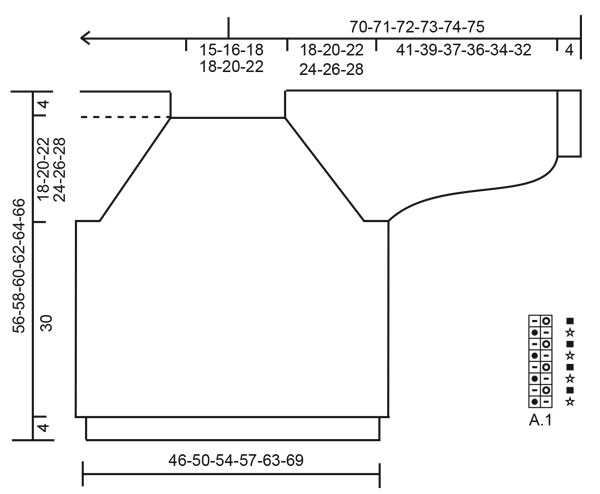
------------------------------------------------------- EXPLANATION FOR THE PATTERN: ------------------------------------------------------- PATTERN: See diagram A.1. All uneven rounds are worked with Big Delight. All even rounds are worked with Air (see diagram). INCREASE FOR RAGLAN: Increase for raglan on each side of purl stitches with marker (= raglan stitches), i.e. Increase in knit stitch and yarn over closes raglan stitch. Increase 2 stitches on each side of raglan stitches (= 16 stitches increased on increase round): All increases are done on a round where yarn over and knit stitch are knitted together (= a round with Air). Increase 2 stitches in knit stitch and yarn over by working 3 stitches in stitch and yarn over follows: Knit stitch and yarn over together but wait to pass stitch and yarn over off left needle, make 1 yarn over on right needle, knit same stitch and yarn over together one more time, then slip knit stitch and yarn over worked off left needle (= 2 stitches increased). Then work the new stitches in English rib (A.1) but note that on first round after increases, purl purl stitches in increase without working together with yarn over because yarn over is not made. DECREASE TIP (applies to mid under sleeves): Decrease under sleeves on each side of 3 stitches mid under sleeve (= 1 purl stitch + 1 English rib stitch (= stitch with marker) + 1 purl stitch). All decreases are done on a round where yarn over and knit stitch are knitted together (= a round worked with Air). DECREASE 2 STITCHES TOWARDS THE LEFT AS FOLLOWS (i.e. begin right after first purl stitch after stitch with marker): Slip first knit stitch and yarn over on to right needle knitwise, knit the next 2 stitches together (i.e. 1 purl + knit stitch and yarn over), then slip the loose stitch and yarn over over stitches worked together (= 2 stitches decreased). DECREASE 2 STITCHES TOWARDS THE RIGHT AS FOLLOWS (i.e. begin 4 stitches + 2 yarn overs before stitch with marker): Slip first knit stitch and yarn over loosely on to right needle knitwise, purl 1, pass slipped stitch and yarn over over purl stitch, slip stitch back on left needle, pass slipped stitch and yarn over over stitch place back on left needle, slip the remaining stitch over on to right needle (= 2 stitches decreased). BIND-OFF TIP: To avoid a tight bind-off edge you may use a larger needle size. If this also is too tight, work a 1 yarn over after approx. every 4th stitch while binding off (bind off yarn overs as regular stitches). ------------------------------------------------------- START THE PIECE HERE: ------------------------------------------------------- SWEATER - SHORT OVERVIEW OF THE PIECE: Neck edge and yoke are worked in the round on circular needle, top down. Now divide yoke for body and sleeves. Body is worked in the round on circular needle, top down. Work sleeves in the round on double pointed needles/short circular needle, top down. Work yoke, body and sleeves in two-colored English rib with Air visible on right side and Big Delight visible on wrong side. Work neck edge and rib at the bottom of sleeves and body with Air. NOTE! All numbers of given when working English rib is without yarn overs because yarn overs are counted as 1 stitch together with slipped stitch. NECK EDGE: Cast on 78-82-86-88-96-100 stitches on a short circular needle size 4 mm = US 6 with 1 strand Air. Rounds begin mid back. Knit 1 round. Then work rib in the round (= knit 1/purl 1) for 8 cm = 3⅛". Knit 1 round while decreasing 2-2-6-4-0-0 stitches evenly = 76-80-80-84-96-100 stitches. Insert 1 marker in middle of round. Then work yoke as explained below. Measure yoke from marker. YOKE: Switch to circular needle size 5 mm = US 8 and knit 1 round. Work next round as follows: * Knit 1, make 1 yarn over, slip 1 stitch purlwise *, work from *-* the entire round. Now insert 4 markers in piece as explained below (this is done without working the stitches). Use markers when increasing for raglan. Count 13-15-15-15-17-17 stitches (= half back piece), insert 1 marker in next stitch (= raglan stitch), count 9-9-9-9-13-13 stitches (= sleeve), insert 1 marker in next stitch (= raglan stitch), count 27-29-29-31-33-35 stitches (= front piece), insert 1 marker in next stitch (= raglan stitch), count 9-9-9-9-13-13 stitches (= sleeve), insert 1 marker in next stitch (= raglan stitch). 14-14-14-16-16-18 stitches remain on back piece after last marker. Then work A.1 in the round, every other round with Air/Big Delight. AT THE SAME TIME increase for RAGLAN as explained below. REMEMBER THE KNITTING GAUGE! RAGLAN: When 7 rounds of A.1 have been worked in total (and next round begins with "knit yarn over and slipped stitch together" and worked with Air), increase for RAGLAN – read explanation above (= 16 stitches increased on increase round). Increase like this every 8th round (i.e. every 4th round with visible English rib stitches vertically) 7-8-9-10-11-12 times in total vertically = 188-208-224-244-272-292 stitches on needle. Continue A.1 in the round without increases until piece measures 18-20-22-24-26-28 cm = 7"-8"-8¾"-9½"-10¼"-11" from marker by the neck (piece measures approx. 22-24-26-28-30-32 cm = 8¾"-9½"-10¼"-11"-11¾"-12½" from shoulder). Now divide yoke for body and sleeves. I.e. work next round as follows from mid back: Work 27-31-33-35-39-43 stitches as before (= half back piece), slip the next 39-43-45-51-57-59 stitches on 1 stitch holder for sleeve, cast on 9 new stitches on row (= in the side under sleeve), work 55-61-67-71-79-87 stitches as before (= front piece), slip the next 39-43-45-51-57-59 stitches on 1 stitch holder for sleeve, cast on 9 new stitches on needle (= in the side under sleeve) and work the 28-30-34-36-40-44 stitches as before (= half back piece). Finish body and sleeves separately. NOW MEASURE PIECE FROM HERE! BODY: = 128-140-152-160-176-192 stitches. Continue A.1 in the round as before. Work until piece measures 30 cm = 11¾" from division in all sizes (approx. 4 cm = 1½" remain until finished measurements, try the sweater on and work to desired length). Switch to circular needle size 4 mm = US 6 and work with Air until finished measurements. Work rib in the round (= knit 1/purl 1) - on first round knit yarn overs together with knit stitches. When rib measures 4 cm = 1½", loosely bind off with knit over knit and purl over purl - read BIND-OFF TIP! Sweater measures approx. 56-58-60-62-64-66 cm = 22"-22¾"-23⅝"-24⅜"-25¼"-26" from shoulder and down. SLEEVE: Slip the 39-43-45-51-57-59 stitches from stitch holder in one side of piece on double pointed needles or a small circular needle size 5 mm = US 8, and cast on 9 new stitches mid under sleeve = 48-52-54-60-66-68 stitches. Insert 1 marker in the middle of the 9 stitches that were cast on under sleeve. Move the marker upwards when working; it should be used for decrease mid under sleeve. Work A.1 in the round and make sure to begin on correct round in pattern so that round with Air is most visible from right side the same way as on yoke. AT THE SAME TIME ON 8th round (i.e. on 4th visible round with English rib vertically), decrease 4 stitches mid under sleeve - read DECREASE TIP (decrease 2 stitches towards the left after stitch with marker, and decrease 2 stitches towards the right before stitch with marker). Decrease like this every 8th-8th-8th-8th-6th-6th round (i.e. every 4th-4th-4th-4th-3rd-3rd round with visible English rib stitches vertically) 3-3-3-4-4-4 times in total vertically = 36-40-42-44-50-52 stitches. Work until sleeve measures 41-39-37-36-34-32 cm = 16⅛"-15¼"-14½"-14¼"-13⅜"-12½" from division (approx. 4 cm = 1½" remain until finished measurements, try the sweater on and work to desired length). Switch to double pointed needles size 4 mm = US 6 and work with Air until finished measurements. Work rib in the round (= knit 1/purl 1) - on first round knit yarn overs together with knit stitches. When rib measures 4 cm = 1½", bind off with knit over knit and purl over purl - remember BIND-OFF TIP! Sleeve measures approx. 45-43-41-40-38-36 cm = 17¾"-17"-16⅛"-15¾"-15"-14¼" from division. Work the other sleeve the same way. ASSEMBLY: Sew the opening under the sleeves. |
||||||||||||||||
Diagram explanations |
||||||||||||||||
|
||||||||||||||||
 |
||||||||||||||||
Have you finished this pattern?Tag your pictures with #dropspattern #dancingaurorasweater or submit them to the #dropsfan gallery. Do you need help with this pattern?You'll find 22 tutorial videos, a Comments/Questions area and more by visiting the pattern on garnstudio.com. © 1982-2026 DROPS Design A/S. We reserve all rights. This document, including all its sub-sections, has copyrights. Read more about what you can do with our patterns at the bottom of each pattern on our site. |
||||||||||||||||


With over 40 years in knitting and crochet design, DROPS Design offers one of the most extensive collections of free patterns on the internet - translated to 17 languages. As of today we count 324 catalogs and 12245 patterns - 12235 of which are translated into English (US/in).
We work hard to bring you the best knitting and crochet have to offer, inspiration and advice as well as great quality yarns at incredible prices! Would you like to use our patterns for other than personal use? You can read what you are allowed to do in the Copyright text at the bottom of all our patterns. Happy crafting!
Post a comment to pattern DROPS 218-26
We would love to hear what you have to say about this pattern!
If you want to leave a question, please make sure you select the correct category in the form below, to speed up the answering process. Required fields are marked *.