
Popular categories
Looking for a yarn?


Comments / Questions (42)
![]() Mette Knudsen wrote:
Mette Knudsen wrote:
Strikker winter wheat jacket, men forstår ikke hvordan man gjør økningen på ermet. Finnes det en video som viser?
27.03.2022 - 13:27DROPS Design answered:
Hej Mette, du strikker 1 ret, 1 omslag, 1 ret, 1 omslag, 1 ret i samme maske og på denne måde tager du 4 masker ud samtidig, så mønsteret går op :)
30.03.2022 - 14:45
![]() Joëlle wrote:
Joëlle wrote:
Bonjour, Quand vous dites « tricoter les 3-5-5-7-7-9 mailles suivantes à l'endroit en augmentant en même temps 3-1-3-1-4-3 mailles à intervalles réguliers » (taille L) cela veut-il dire qu’il faut intégrer 3 augmentations sur les 5 mailles ? Merci
23.03.2022 - 14:33DROPS Design answered:
Bonjour Joëlle, en taille L, vous allez tricoter les 5 mailles suivantes à l'endroit en augmentant 3 mailles à intervalles réguliers (= vous aurez désormais 8 mailles au lieu de 5 ici). Bon tricot!
23.03.2022 - 15:29
![]() Jule wrote:
Jule wrote:
Ich finde keine Masse für die verschieden Größen. Sonst ist ein " Schnittmuster" mit Angaben in cm dabei. Bräuchte zumindest Breite unter den Armen und Jackenlänge. Danke
28.09.2021 - 18:05DROPS Design answered:
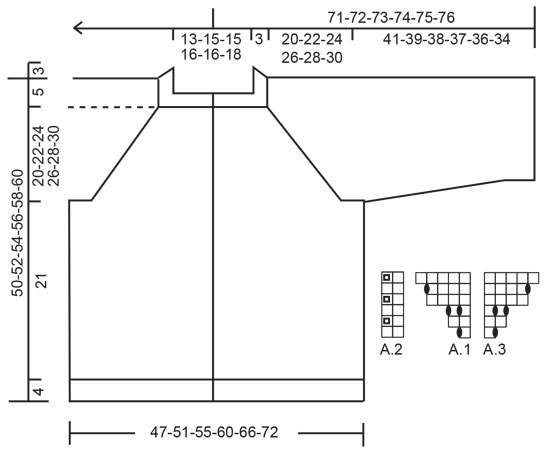
Liebe Jule, diese beiden Angaben finden Sie in der Skizze: untere Breite = 47-51-55-60-66-72 cm und Ärmel (nach der Passe = unter den Armen) = 41-39-38-37-36-34 cm. Vergleichen Sie die Maßen einer ähnlichen Jacke, die Sie gerne haben zu allen Maßen in der Skizze, um die richtige Größe zu finden - hier lesen Sie mehr. Viel Spaß beim stricken!
29.09.2021 - 07:35
![]() Marie-anne Vanherberghen wrote:
Marie-anne Vanherberghen wrote:
Ik ben met dit patroon top down begonnen in maat L. U geeft aan voor de pas: Verdeling 5-5-40-11-40-5-5= 111st. Maar er staan na de bies 117 steken op de naald. Er is een verschil van 6 steken. Kan U mij verder helpen? Alvast bedankt bij voorbaat.
20.09.2021 - 14:39DROPS Design answered:
Dag Marie-anne,
Over de eerste 5 steken na de knoopbies meerder je 3 steken en dit doe je ook over de 5 steken voor de bies aan het eind van de naald. Dit is denk ik het verschil van 6 steken.
23.09.2021 - 14:40
![]() Nelly wrote:
Nelly wrote:
Bonjour je ne comprends pas comment faire les augmentations des manches 1 m end et un jeté ok mais comment faire 2 fois dans la même maille. Avez un tuto pour ce type d’augmentation Merci
18.05.2021 - 12:43DROPS Design answered:
Bonjour Nelly, vous devez tricoter la même maille plusieurs fois avec 1 jeté entre chaque jusqu'à ce que vous ayez 5 mailles sur l'aiguille droite (= 1 m, 1 jeté, 1 m, 1 jeté, 1 m) - cette vidéo montre, pour un autre modèle, comment faire ce type d'augmentations, attention à bien tricoter les mailles comme il faut au rang suivant (pas comme dans la vidéo); Bon tricot!
18.05.2021 - 13:55
![]() Valente Christine wrote:
Valente Christine wrote:
Merci pour votre rapide réponse mais pour moi ca change rien les explication ne sont pas claire. le plus simple serai de dire tricoter tant de maille en augmentant tant de maille. je pense de le fait de traduire d'une langue à l'autre perturbe bcq. encore merci je vais tricoter à ma façon comme dab
15.03.2021 - 12:01DROPS Design answered:
Bonjour Mme Valente, les explications sont écrites par des stylistes scandinaves qui n'ont pas la même façon d'écrire les modèles que les françaises, toutefois, vous pouvez toujours vous référer au modèle original (en norvégien) si cela peut vous aider. Vous trouverez également quelques explications sur les diagrammes ici, et si vous avez une autre question, n'hésitez pas à utiliser cet espace. Bon tricot!
15.03.2021 - 13:23
![]() Valente Christine wrote:
Valente Christine wrote:
Bonjour, pour moi il y a un problème avec augmentations du 1 rangs sur la base de 117 m : 5 m pt mousse + 5 m avec 3 augmentations = 8 m pour le (1/2 devant) + 40m (1er manche) + 11m avec 7 augmentations = 18 m (dos), + 40m (2eme manche) + 5 m avec 3 augmentations = 8 pour le (1/2 devant), 5 m pt mousse = au total 130 m et NON134 m comme indiquée dans l'explication.
15.03.2021 - 10:34DROPS Design answered:
Bonjour Mme Valente, n'oubliez pas que vous augmentez 1 maille dans les diagrammes A.1 et A.3 pour les raglans, autrement dit, vous tricotez 2 fois A.1 et 2 fois a.3 au total = 4 augmentations; soit 134 mailles à la fin du 1er rang. Bon tricot!
15.03.2021 - 10:43
![]() Eva Jonsson wrote:
Eva Jonsson wrote:
Hej. Jag undrar över diagrammet till fram och bakstycket. Jag tänker att det är på räta varvet som man ökar (gör omslag) emot raglan/ärm. Är det rätt så?
07.03.2021 - 10:19DROPS Design answered:
Hei Eva. Ja, økningene gjøres fra retten, slik står det i oppskriften: "Alla ökningar görs från rätsidan!" På slutten av halskanten står det: "När resåren mäter 3 cm – anpassa så att nästa varv stickas från rätsidan" så når du begynner på bolen (OK) starter du fra retten og diagrammet viser 1. pinne fra retten der du starter med å øke. mvh DROPS design
10.03.2021 - 13:59
![]() Eva Jonsson wrote:
Eva Jonsson wrote:
Önskade att frågor och svar kunde översättas. Kan se att fler är förvirrade av stickbeskrivningen. Det känns väldigt rörigt.
27.02.2021 - 18:18
![]() Véronique wrote:
Véronique wrote:
Bonjour, je ne comprend comment augmenter les manches. Je n'arrive pas à mettre en pratique les explications. *Tricoter une maille, une jetée* , tricoter de *-* 2 fois au total ( jusque là ça va, mais après ) dans la même maille ( quelle maille ?)et tricoter encore une dans la même ???!!! Là , je comprend plus . D'avance merci.
21.02.2021 - 20:13DROPS Design answered:
Regardez bien la vidéo indiquée ci-dessous pour savoir comment augmenter pour les manches, en espérant que cette vidéo puisse vous aider. Bon tricot!
22.02.2021 - 09:24
|
||||||||||
Winter Wheat Jacket#winterwheatjacket |
||||||||||
 |
 |
|||||||||
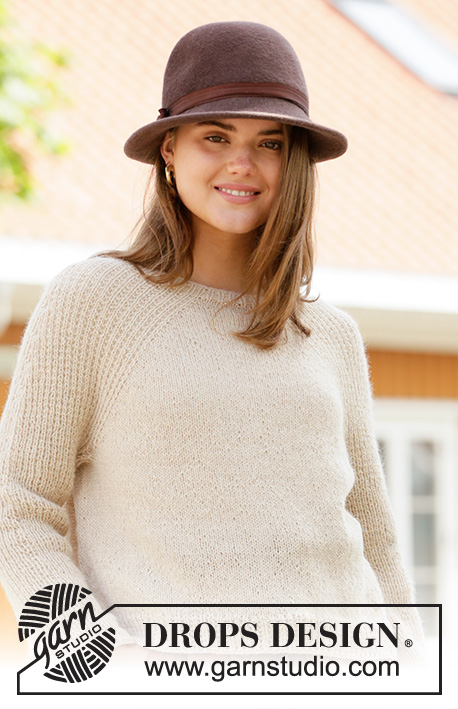
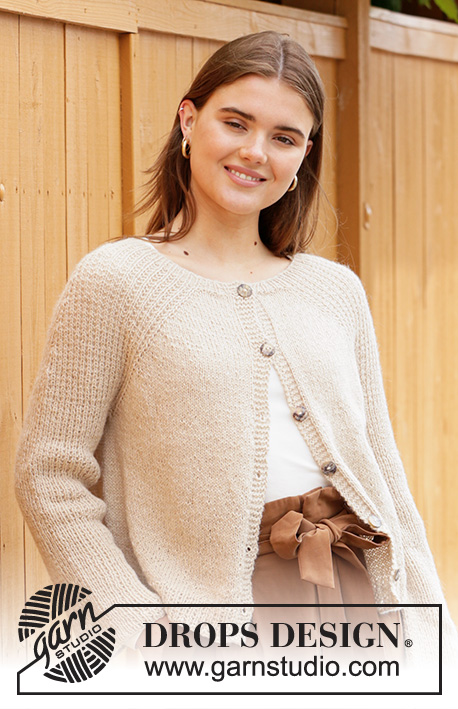
Knitted jacket with raglan in DROPS Puna. The piece is worked top down with textured pattern on the sleeves. Sizes S - XXXL.
DROPS 206-47 |
||||||||||
|
------------------------------------------------------- EXPLANATIONS FOR THE PATTERN: ------------------------------------------------------- RIDGE/GARTER STITCH (worked back and forth): Knit all rows. 1 ridge in height = Knit 2 rows. PATTERN: See diagrams A.1 to A.3. The diagrams show all rows in the pattern seen from the right side. INCREASE TIP (evenly spaced): To work out how to increase evenly, count the total number of stitches to be increased over (e.g. 3 stitches) and divide by the number of increases to be made (e.g. 3) = 1. In this example, increase by making 1 yarn over after each stitch. On the next row work the yarn overs twisted to avoid holes. INCREASE SLEEVES: All increases are worked from the right side! Work as far as the mid-stitch on the sleeve (= stitch with marker), * knit 1, make 1 yarn over *, work from *-* a total of 2 times in the same stitch, knit 1 in the same stitch (= 4 stitches increased in the same stitch). Repeat on the other sleeve. The new stitches are worked into pattern A.2. DECREASE TIP (for sleeves): Decrease in the different sizes as follows: Sizes L and XXXL: Work until there are 2 stitches left before the stitch with the marker, knit 2 together, purl 1 (marker in this stitch), slip 1 stitch as if to knit, knit 1 and pass the slipped stitch over (= 2 stitches decreased). Sizes XL and XXL: Work until there are 3 stitches left before the stitch with the marker, knit 2 together, knit 3 (marker in the middle stitch of these 3), slip 1 stitch as if to knit, knit 1 and pass the slipped stitch over (= 2 stitches decreased). BUTTONHOLES: Work buttonholes on the right band (when the garment is worn). Work from the right side when there are 3 stitches left on the row as follows: Make 1 yarn over, knit 2 together and knit 1. On the next row (wrong side), knit the yarn over to leave a hole. The first buttonhole is worked when the rib on the neck measures approx. 1½-2 cm = ½"-¾". Then work the other 5-5-5-5-5-5 buttonholes with approx. 8½-9-9-9½-10-10 cm = 3¼"-3½"-3½"-3¾"-4"-4" between each one. ------------------------------------------------------- START THE PIECE HERE: ------------------------------------------------------- JACKET – SHORT OVERVIEW OF THE PIECE: The piece is worked back and forth, top down. The sleeves are worked in the round with double pointed needles/short circular needle. Stockinette stitch is worked on the front and back pieces, textured pattern on the sleeves. NECK: Cast on 109-117-117-125-125-133 stitches with circular needle size 3 mm = US 2,5 and Puna. Purl 1 row from the wrong side then work rib from the right side as follows: 5 band stitches in GARTER STITCH – read description above, (knit 1 / purl 1) until there are 6 stitches left on the row, knit 1 and finish with 5 band stitches in garter stitch. Continue back and forth like this. Remember BUTTONHOLES on the right band – read description above. When the rib measures approx. 3 cm = 1⅛" – adjust so the next row is from the right side, insert a marker. THE PIECE IS NOW MEASURED FROM HERE! YOKE: Change to circular needle size 4.5 mm = US 7 and work the next row as follows: 5 band stitches in garter stitch, knit the next 3-5-5-7-7-9 stitches and increase at the same time 3-1-3-1-4-3 stitches evenly spaced – read INCREASE TIP, work A.1 over the next stitch, insert a marker thread here, (= transition between left front piece and left sleeve), work A.2 over the next 40 stitches, work the first stitch in A.2, insert a marker thread here (= transition between left sleeve and back piece), A.3 over the next stitch, knit the next 7-11-11-15-15-19 stitches and increase at the same time increase 7-4-7-3-9-7 stitches evenly spaced, A.1 over the next stitch, insert a marker thread here (= transition between back piece and right sleeve), work A.2 over the next 40 stitches, work the first stitch in A.2, insert a marker thread here (= transition between right sleeve and right front piece), work A.3 over the next stitch, knit the next 3-5-5-7-7-9 stitches and increase at the same time 3-1-3-1-4-3 stitches evenly spaced, 5 band stitches in garter stitch = 126-127-134-134-146-150 stitches on the needle. There is now 1 marker thread in each transition between body and sleeves (= 4 marker threads). Insert 1 marker in the mid-stitch on each sleeve (= knitted stitch). REMEMBER THE KNITTING GAUGE! Continue back and forth with pattern A.2 between the marker threads on the sleeve, with 5 band stitches in garter stitch on each side towards mid front and A.1/A.3 + stockinette stitch on the remaining stitches on the front and back pieces – AT THE SAME TIME on the next row from the right side (row 3 in A.1/A.3) start INCREASE SLEEVES – read description above (= 4 stitches increased on each sleeve). Increase like this every 8th-8th-6th-6th-4th-4th row a total of 6-7-10-11-13-14 times. When A.1 and A.3 have been completed in height continue to repeat towards the raglan-lines 7-8-9-10-11-12 more times (a total of 8-9-10-11-12-13 times), then work the first 3-3-1-1-0-0 rows in the diagrams. When all the increases to sleeves and front and back pieces are finished there are 310-335-374-398-438-466 stitches on the needle (increased 24-28-40-44-52-56 stitches on each sleeve and 35-39-41-45-48-52 stitches on each side of the back piece and the one side of the front pieces). The piece now measures approx. 20-22-24-26-28-30 cm = 8"-8¾"-9½"-10¼"-11"-11¾" from the marker on the neck. If the piece is shorter than this continue working to the right length. The next row from the wrong side is worked as follows: Work the first 47-51-55-59-65-70 stitches (= right front piece), place the next 65-69-81-85-93-97 stitches on 1 thread for sleeve and cast on 9-9-9-11-11-13 new stitches on the needle (= in side under sleeve), work the next 86-95-102-110-122-132 stitches (= back piece), place the next 65-69-81-85-93-97 stitches on 1 thread for sleeve and cast on 9-9-9-11-11-13 new stitches on the needle (= in side under sleeve) and work the remaining 47-51-55-59-65-70 stitches (= left front piece). Body and sleeves are finished separately. THE PIECE IS NOW MEASURED FROM HERE! BODY: There are 198-215-230-250-274-298 stitches on the body. Continue back and forth with stockinette stitch and 5 band stitches in garter stitch on each side. When the piece measures 21 cm = 8¼" increase 1-0-1-1-1-1 stitch = 199-215-231-251-275-299 stitches. Work an edge as follows: 5 band stitches in garter stitch, A.2 until there are 6 stitches left on the row, work the first stitch in A.2 and finish with 5 band stitches in garter stitch. Continue back and forth until the edge measures 4 cm = 1½". Bind off with knit over knit and purl over purl. The jacket measures approx. 50-52-54-56-58-60 cm = 19¾"-20½"-21¼"-22"-22¾"-23⅝" from the shoulder down. SLEEVE: Place the 65-69-81-85-93-97 stitches from the thread on the one side of the piece on short circular needle size 4.5 mm = US 7 and knit up 1 stitch in each of the 9-9-9-11-11-13 stitches cast on under the sleeve = 74-78-90-96-104-110 stitches. Work pattern A.2 in the round as before. The pattern should fit on the round. Work as follows in the different sizes: Sizes S, M: Work textured pattern until the sleeve measures 41-39 cm = 16⅛"-15¼" from the division. Bind off with knit over knit and purl over purl. Sizes L, XL, XXL and XXXL: Work textured pattern until the sleeve measures 4 cm = 1½" from the division. Insert a marker in the middle stitch under the sleeve. On the next round begin to decrease under the sleeve – read DECREASE TIP. Decrease like this every 2nd round a total of 4-4-4-4 times = 82-88-96-102 stitches. Continue with textured pattern until the sleeve measures 38-37-36-34 cm = 15"-14½"-14¼"-13⅜". Bind off with knit over knit and purl over purl. Work the other sleeve in the same way. ASSEMBLY: Sew buttons onto left band. |
||||||||||
Diagram explanations |
||||||||||
|
||||||||||
 |
||||||||||
Have you finished this pattern?Tag your pictures with #dropspattern #winterwheatjacket or submit them to the #dropsfan gallery. Do you need help with this pattern?You'll find 26 tutorial videos, a Comments/Questions area and more by visiting the pattern on garnstudio.com. © 1982-2026 DROPS Design A/S. We reserve all rights. This document, including all its sub-sections, has copyrights. Read more about what you can do with our patterns at the bottom of each pattern on our site. |
||||||||||


With over 40 years in knitting and crochet design, DROPS Design offers one of the most extensive collections of free patterns on the internet - translated to 17 languages. As of today we count 324 catalogs and 12290 patterns - 12280 of which are translated into English (US/in).
We work hard to bring you the best knitting and crochet have to offer, inspiration and advice as well as great quality yarns at incredible prices! Would you like to use our patterns for other than personal use? You can read what you are allowed to do in the Copyright text at the bottom of all our patterns. Happy crafting!
Post a comment to pattern DROPS 206-47
We would love to hear what you have to say about this pattern!
If you want to leave a question, please make sure you select the correct category in the form below, to speed up the answering process. Required fields are marked *.