
Popular categories
Looking for a yarn?


Comments / Questions (47)
![]() Myrna Laupland wrote:
Myrna Laupland wrote:
Further to my query yesterday re sleeve A3 and A8. I now think that Graph A8 rows 5,7 & 9 should be moved to rows 17, 19 and 21 as they would follow the pattern with A3. Please confirm or advise the correct method . Thank you
26.07.2020 - 03:56DROPS Design answered:
Dear Mrs Laupland, see previous answer :) Happy knitting!
29.07.2020 - 10:49
![]() Myrna Laupland wrote:
Myrna Laupland wrote:
Rivage Z-856 size M started the sleeve Work 7 stocking sts; A.8 (5 sts); A.3 (60sts) & 7 stocking sts. (total 79 sts) However, A.8 pattern rows 5, 7, 9 end up too close to A.3 Pattern rows. Almost seems like it should be A.3 before A.8 or ??? Thanks
25.07.2020 - 05:47DROPS Design answered:
Dear Mrs Laupland, dividing row on yoke is worked on the last row in A.5/A.7 (= 3 rows after a pattern row), work now on sleeve A.8/A.3 from first row (= 4 rows before next pattern row) = there are 7 rows between lace patterns, as before and as in A.3. Happy knitting!
29.07.2020 - 10:18
![]() Barbara Henseleit wrote:
Barbara Henseleit wrote:
Ich stricke den Pulli von unten nach oben, wie muß ich an der Raglanschräge stricken, um die Lochreihe zu erhalten? Dankeschön für ihre Antwort
22.07.2020 - 16:14DROPS Design answered:
Liebe Frau Henseleit, statt der Zunahmen (Umschläge = Löcher) müssen Sie ja Abnahmen machen, wenn Sie von unten nach oben arbeiten. Um trotzdem die Loch-Reihe zu erhalten, müssen Sie zwei statt eine Abnahme pro Abnahmestelle machen und dazwischen den Umschlag einarbeiten. Also 5 Maschen vor dem Raglanmarkierer beginnen und 2 Maschen rechts zusammenstricken, 1 Umschlag, 2 Maschen rechts zusammenstricken, 1 Masche rechts, dann kommt der Markierer, auf der anderen Seite des Markierers die Abnahmen entsprechend arbeiten, aber überzogen. Viel Spaß beim Weiterstricken!
23.07.2020 - 10:28
![]() Eugenia wrote:
Eugenia wrote:
Hello! I'm size M and I've knited the yoke, but it measures 18 cm instead of 20 cm. I'd followed the pattern, but is shorter. Why is different?
13.07.2020 - 11:38DROPS Design answered:
Dear Eugenia, did your tension match in height? you should have 24 sts x 32 rows stocking st = 10 x 10 cm with the larger needles. Happy knitting!
13.07.2020 - 13:44
![]() Anne Frovåg wrote:
Anne Frovåg wrote:
Jeg får ikke mønsteret på ermer til å gå opp. Hvis man skal strikke A8 og A3 slik de står vil hullmønsteret komme for tett på hverandre. For å få samme avstand som tidligere må det legges inn 6 masker mellom A8 og A3 Strikker i str. L
22.06.2020 - 10:48
![]() Anne Frovåg wrote:
Anne Frovåg wrote:
Jeg får ikke mønsteret på ermer til å gå opp. Hvis man skal strikke A8 og A3 slik de står vil hullmønsteret komme for tett på hverandre. For å få samme avstand som tidligere må det legges inn 6 masker mellom A8 og A3.
16.06.2020 - 15:04DROPS Design answered:
Hei Anne. Vi skal hjelpe deg så godt vi kan, men hvilken størrelse strikker du? mvh DROPS design
22.06.2020 - 09:28
![]() Barbara wrote:
Barbara wrote:
Hallo,ich möchte das Modell Z-856 stricken, wenn 2 Umschläge zu stricken sind, strickt man dann 1 Masche dazwischen, oder 2 Umschläge hintereinander ? Ich hab noch 3 Fragen :wie breit ist der Ärmel am Handgelenk, und dann meine letzte Frage :kann man den Pulii wie üblich von unten nach oben mit eingenähten Ärmeln stricken,ich würde mich leichter tun,wie werden die Umschläge in den Rückreihen gestrickt?Vilen Dank im voraus für Ihre Mühe
02.06.2020 - 08:28DROPS Design answered:
Liebe Barbara, es wird nur 1 Umschlag zwischen 2 Maschen gestrickt, es sollte nicht 2 Umschläge hintereinander sein. Mehr über Maßskizze lesen Sie hier. Sicher können Sie die Arbeit von unten nach oben stricken, aber Anleitung und Diagramme sollen Sie dann anders lesen. Gern wird Ihr DROPS Laden damit weiter helfen - Gerne können Sie auch unser Video und unser Lektion über von oben nach unten gestrickten Pullover. Viel Spaß beim stricken!
02.06.2020 - 10:45
![]() Gitte wrote:
Gitte wrote:
Ved sidste mønster diagram skal der laves hulmønster uden at tage ud ved start og slut på ærmer. Skal det også gøres på for og bagstykke? Eller skal jeg bare strikke glatstrik helt hen til mærketråd inden ærmer?
26.05.2020 - 08:45DROPS Design answered:
Hej Gitte, tænker du på udtagningen til raglan, dem laver du uafhængig af hulmønsteret på ærmerne. Når du har nok nye masker på ærmerne strikkes der også hulmønster over dem. God fornøjelse!
05.06.2020 - 08:58
![]() Mirella wrote:
Mirella wrote:
Mi sono accorta di aver messo troppe maglie se non faccio gli aumenti sotto le ascelle il lavoro viene bene ugualmente? Grazie
10.04.2020 - 22:56DROPS Design answered:
Buonasera Mirella, in che punto ha troppe maglie? Se è all'inizio le consigliamo di disfare e ripartire, altrimenti può continuare provando regolarmente il modello per valutare dove fermarsi con gli aumenti.. Buon lavoro!
12.04.2020 - 20:08
![]() Birgit wrote:
Birgit wrote:
Hallo! Wenn ich nach dem Rumpfteil die Ärmel stricke, heisst es: 4 Maschen glatt, A8 und dann A3. Aber wenn ich das so stricke ist das Lochmuster zu eng beisammen. Was mache ich falsch? Danke für die Rückmeldung und LG, Birgit
26.01.2020 - 15:09DROPS Design answered:
Liebe Birgit, Sie können einfach das Muster anpassen, damit das Lochmuster forsetzt das von der Passe. Viel Spaß beim stricken!
27.01.2020 - 09:15
|
|||||||||||||
Rivage#rivagesweater |
|||||||||||||
 |
 |
||||||||||||
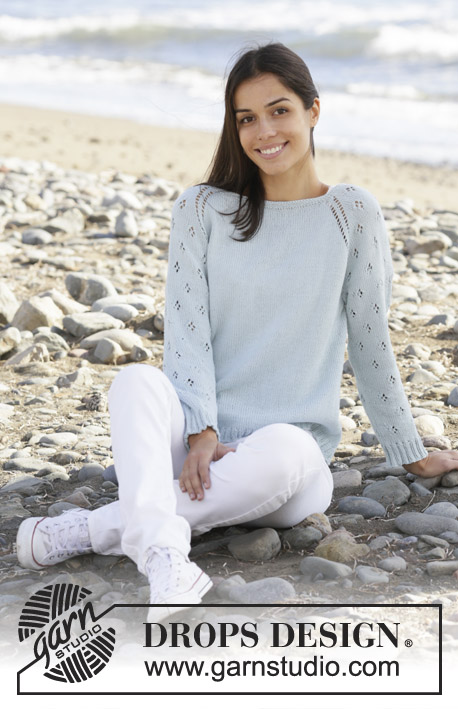
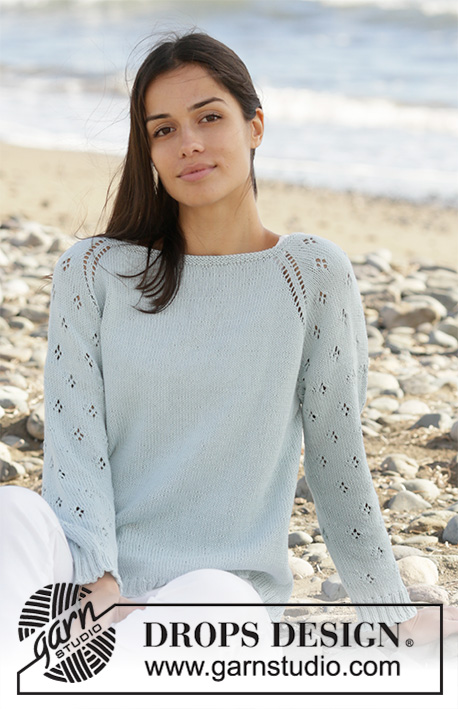
Knitted sweater with raglan in DROPS Alpaca. Piece is knitted top down with lace pattern on sleeves. Size: S - XXXL
DROPS 199-22 |
|||||||||||||
|
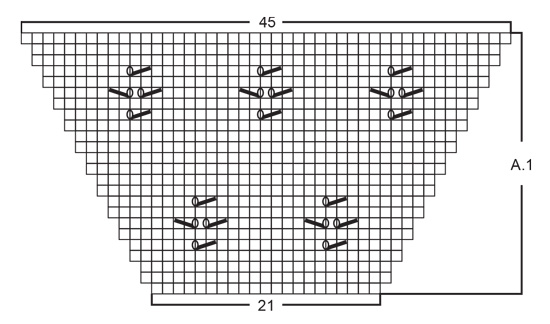
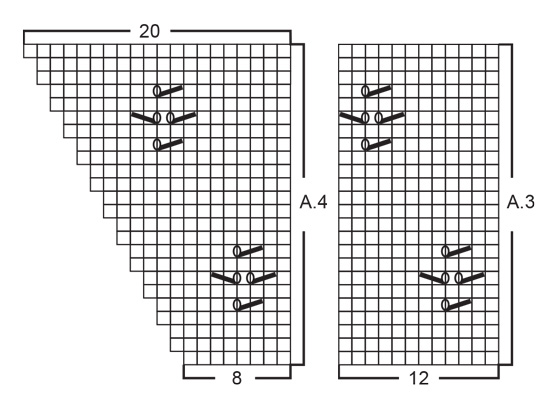
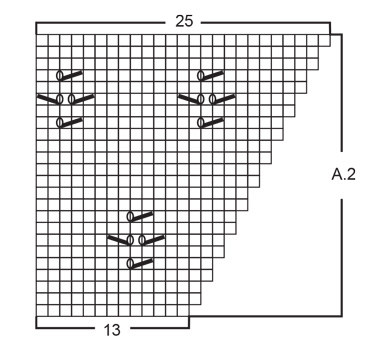
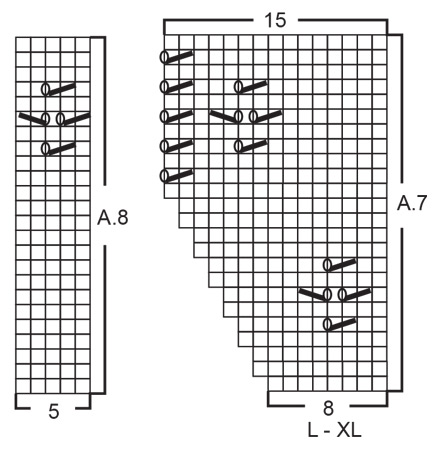
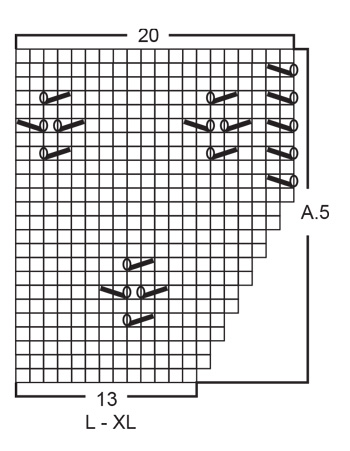
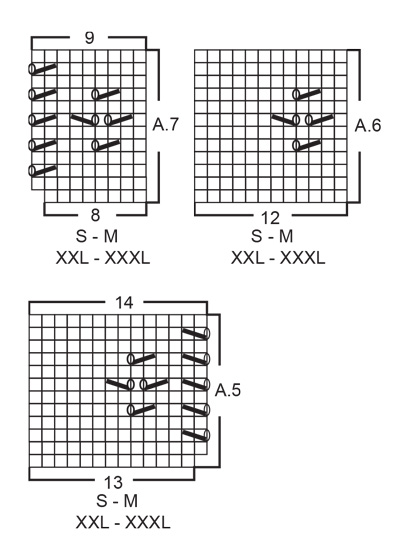
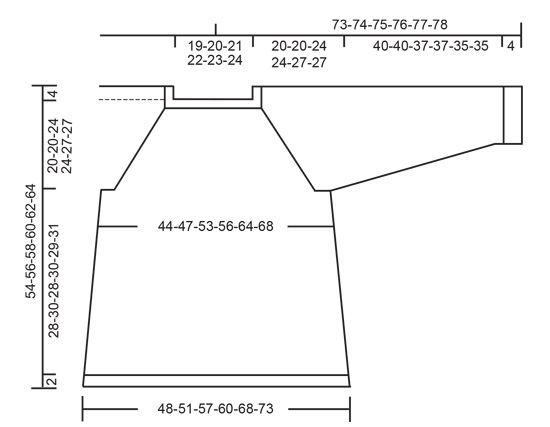
---------------------------------------------------------- EXPLANATION FOR THE PATTERN: ---------------------------------------------------------- GARTER STITCH (worked in the round): 1 ridge vertically = 2 rounds, i.e. knit 1 round and purl 1 round. PATTERN: See diagrams A.1 to A.8. Choose diagram for your size (applies to A.5, A.6 and A.7). INCREASE TIP-1 (evenly): To calculate how to increase evenly, use the total number of stitches on row (e.g. 124 stitches) and divide stitches by number of increases to be done (e.g. 26) = 4.8. In this example increase by making 1 yarn over after approx. every 5th stitch. On next round knit yarn overs twisted to avoid holes. RAGLAN: Increase for raglan in every transition between front/back piece and sleeves as explained below. Increase after the marker thread as follows: knit 1, make 1 yarn over. Increase before the marker thread as follows: work until 1 stitch remain before marker thread, make 1 yarn over, knit 1. In other words: you increase 2 stitches at each of the marker threads, and a total of 8 stitches on the round. On next round knit the yarn overs to make holes. Then work the new stitch in stockinette stitch on body and in lace pattern on sleeves. INCREASE TIP-2 (applies to sides of body): Work until 3 stitches remain before marker thread, make 1 yarn over, knit 6 (marker thread is in the middle of these 6 stitches), make 1 yarn over (= 2 stitches increased at the marker thread and 4 stitches increased in total on round.) On next round knit yarn overs twisted to avoid holes. Then work the new stitches in stockinette stitch. DECREASE TIP (applies to mid under sleeves): Decrease 1 stitch on each side of marker thread as follows: Work until 3 stitches remain before marker thread, knit 2 together, knit 2 stitches (marker thread is between these 2 stitches), slip 1 stitch knitwise, knit 1, pass slipped stitch over stitch worked (= 2 stitches decreased). ---------------------------------------------------------- START THE PIECE HERE: ---------------------------------------------------------- SWEATER - SHORT OVERVIEW OF THE PIECE: Neck edge and yoke are worked in the round on circular needle, top down. Now divide yoke for body and sleeves. Continue body in the round, top down. Work sleeves in the round on double pointed needles/short circular needle, top down. NECK EDGE: Cast on 120-124-128-132-138-146 stitches on circular needle size 2.5 mm = US 1,5 with Alpaca. Work 3 ridges in GARTER STITCH in the round - read explanation above. Knit 1 round while increasing 6-26-22-38-32-44 stitches evenly - read INCREASE TIP-1 = 126-150-150-170-170-190 stitches. Knit 1 round (knit yarn overs twisted). Then work yoke as explained below. YOKE: Switch to circular needle size 3 mm = US 2,5. Insert 4 marker threads in piece as explained below (without working the stitches). Use marker threads when increasing for raglan: Insert 1 marker thread at beginning of round, count 23 stitches (= sleeve), insert 1 marker thread before next stitch, count 40-52-52-62-62-72 stitches (= front piece), insert 1 marker thread before next stitch, count 23 stitches (= sleeve), insert 1 marker thread before next stitch. There are 40-52-52-62-62-72 stitches after last marker thread on back piece. Work first round as follows: Increase for RAGLAN after marker thread– read explanation above, work A.1 over the next 21 stitches (= sleeve), increase for raglan on each side of marker thread, work in stockinette stitch until 1 stitch remains before next marker thread (= front piece), increase for raglan on each side of marker thread, work A.1 over the 21 stitches (= sleeve), increase for raglan on each side of marker thread, work in stockinette stitch until 1 stitch before marker thread at the beginning of round (= back piece). Increase for raglan before the marker thread. Continue pattern like this in stockinette stitch on front and back piece and A.1 on sleeves. REMEMBER THE KNITTING GAUGE! AT THE SAME TIME continue increase for raglan every other round until increase has been done 25-25-31-31-37-37 times in total at every marker thread (including increase explained on first round). Work the new stitch in stockinette stitch on front and back piece and in lace pattern the way diagrams show on sleeves. When A.1 has been worked 1 time vertically, continue lace pattern on sleeves as explained below: LACE PATTERN SLEEVE: SIZE S and M: When A.1 has been worked 1 time vertically, work next round as follows over stitches on sleeves: Work A.2 (= 13 stitches), work A.3 over the next 24 stitches (= 2 repetition of 12 stitches), and finish with A.4 (= 8 stitches). When A.2 to A.4 have been worked 1 time vertically, work next round as follows over stitches on sleeves: Work A.5 (= 13 stitches), work A.6 over the next 48 stitches (= 4 repetition of 12 stitches), and finish with A.7 (= 8 stitches). When last row in A.5 to A.7 remain, divide yoke for body and sleeves as explained below ALL SIZES. SIZE L and XL: When A.1 has been worked 1 time vertically, work next round as follows over stitches on sleeves: Work A.2 (= 13 stitches), work A.3 over the next 24 stitches (= 2 repetition of 12 stitches), and finish with A.4 (= 8 stitches). When A.2 to A.4 have been worked 1 time vertically, work next round as follows over stitches on sleeves: Work A.5 (= 13 stitches), work A.3 over the next 48 stitches (= 4 repetition of 12 stitches), and finish with A.7 (= 8 stitches). When last row in A.5 to A.7 remain, divide yoke for body and sleeves as explained below ALL SIZES. SIZE XXL and XXXL: When A.1 has been worked 1 time vertically, work next round as follows over stitches on sleeves: Work A.2 (= 13 stitches), work A.3 over the next 24 stitches (= 2 repetition of 12 stitches), and finish with A.4 (= 8 stitches). When A.2 to A.4 have been worked 1 time vertically, work next round as follows over stitches on sleeves: Work A.2 (= 13 stitches), work A.3 over the next 48 stitches (= 4 repetition of 12 stitches), and finish with A.4 (= 8 stitches). When A.2 to A.4 have been worked, work next round as follows over stitches on sleeves: Work A.5 (= 13 stitches), work A.6 over the next 72 stitches (= 6 repetition of 12 stitches), and finish with A.7 (= 8 stitches). When last row in A.5 to A.7 remain, divide yoke for body and sleeves as explained below ALL SIZES. ALL SIZES: When increases for raglan are done, there are 326-350-398-418-466-486 stitches on round. Continue lace pattern as explained above until last row in A.5 and A.7 remains. Now divide yoke for body and sleeves and work last round as follows: Knit 4-1-2-0-4-3, slip the next 65-71-81-85-89-91 stitches on 1 stitch holder for sleeve, cast on 8-8-8-10-10-12 new stitches on needle (= in the side under sleeve), knit the next 98-104-118-124-144-152 stitches (= front piece), slip the next 65-71-81-85-89-91 stitches on 1 stitch holder for sleeve, cast on 8-8-8-10-10-12 new stitches on needle (= in the side under sleeve) and knit the remaining 94-103-116-124-140-149 stitches (= back piece). Yoke measures now approx. 20-20-24-24-27-27 cm = 8"-8"-9½"-9½"-10⅝"-10⅝" from cast-on edge mid front. Remove all marker threads in piece and cut the yarn. Now finish body and sleeves separately. NOW MEASURE THE PIECE FROM HERE! BODY: = 212-224-252-268-308-328 stitches. Insert 1 marker thread in each side on body, in the middle of the 8-8-8-10-10-12 stitches that were cast on under sleeves. Move the marker threads upwards when working; they should be used for increase later in the sides. Begin round at one of the marker threads and work stockinette stitch in the round. When piece measures 4 cm = 1½" from division in all sizes, increase 1 stitch on each side of both markers - READ INCREASE TIP-2 (= 4 stitches increased). Increase like this every 5 cm = 2" 5 times in total in all sizes = 232-244-272-288-328-348 stitches. Work until piece measures approx. 28-30-28-30-29-31 cm = 11"-11¾"-11"-11¾"-11⅜"-12¼" from division (or desired length, approx. 2 cm remain until finished measurements). Knit 1 round while increasing 56-60-68-72-80-84 stitches evenly = 288-304-340-360-408-432 stitches. This is done to avoid the rib to be worked, from contracting. Switch to circular needle size 2.5 mm = US 1,5. Work rib in the round = knit 2/purl 2 for 2 cm = ¾". Bind off stitches with knit over knit and purl over purl. Sweater measures approx. 54-56-58-60-62-64 cm = 21¼"-22"-22¾"-23⅝"-24⅜"-25¼" from shoulder and down. SLEEVE: Slip the 65-71-81-85-89-91 stitches from stitch holder in one side of piece on double pointed needles or a short circular needle size 3 mm = US 2,5 and pick in addition up 1 stitch in each of the 8-8-8-10-10-12 new stitches cast on under sleeve = 73-79-89-95-99-103 stitches. Insert 1 marker thread in the middle of the 8-8-8-10-10-12 stitches under sleeve. Move the marker thread upwards when working; it should be used for decrease under sleeve. Begin round at the marker thread and work as follows: Work 4-7-6-9-5-7 stitches in stockinette stitch, work A.8 (= 5 stitches), work A.3 over the next 60-60-72-72-84-84 stitches (= 5-5-6-6-7-7 repetitions of 12 stitches) and finish with 4-7-6-9-5-7 stitches in stockinette stitch. Continue pattern like this (the lace pattern continues nicely over sleeve). AT THE SAME TIME when piece measures 3-3-3-2-2-2 cm = 1⅛"-1⅛"-1⅛"-¾"-¾"-¾" from division, decrease 2 stitches mid under sleeve - read DECREASE TIP. Decrease like this every 3½-3-2-2-1½-1½ cm = 1¼"-1⅛"-¾"-¾"-½"-½" 11-13-17-19-20-21 times in total = 51-53-55-57-59-61 stitches - NOTE: Work stitches that do not fit the lace pattern when decreasing under sleeve, in stockinette stitch. Work until piece measures approx. 40-40-37-37-35-35 cm = 15¾"-15¾"-14½"-14½"-13¾"-13¾" from division (or desired length, approx. 4 cm = 1½" remain until finished measurements). NOTE: Shorter measurements in the larger sizes because of wider neck and longer yoke. Knit 1 round while increasing 17-15-17-19-17-19 stitches evenly = 68-68-72-76-76-80 stitches. This is done to avoid the rib to be worked, from contracting. Switch to double pointed needles size 2.5 mm = US 1,5. Work rib in the round = knit 2/purl 2 for 4 cm = 1½". Loosely bind off stitches with knit over knit and purl over purl. Sleeve measures approx. 44-44-41-41-39-39 cm = 17¼"-17¼"-16⅛"-16⅛"-15¼"-15¼" from division. Work the other sleeve the same way. |
|||||||||||||
Diagram explanations |
|||||||||||||
|
|||||||||||||
 |
|||||||||||||
 |
|||||||||||||
 |
|||||||||||||
 |
|||||||||||||
 |
|||||||||||||
 |
|||||||||||||
 |
|||||||||||||
Have you finished this pattern?Tag your pictures with #dropspattern #rivagesweater or submit them to the #dropsfan gallery. Do you need help with this pattern?You'll find 24 tutorial videos, a Comments/Questions area and more by visiting the pattern on garnstudio.com. © 1982-2026 DROPS Design A/S. We reserve all rights. This document, including all its sub-sections, has copyrights. Read more about what you can do with our patterns at the bottom of each pattern on our site. |
|||||||||||||


With over 40 years in knitting and crochet design, DROPS Design offers one of the most extensive collections of free patterns on the internet - translated to 17 languages. As of today we count 324 catalogs and 12290 patterns - 12280 of which are translated into English (US/in).
We work hard to bring you the best knitting and crochet have to offer, inspiration and advice as well as great quality yarns at incredible prices! Would you like to use our patterns for other than personal use? You can read what you are allowed to do in the Copyright text at the bottom of all our patterns. Happy crafting!
Post a comment to pattern DROPS 199-22
We would love to hear what you have to say about this pattern!
If you want to leave a question, please make sure you select the correct category in the form below, to speed up the answering process. Required fields are marked *.