
Popular categories
Looking for a yarn?


Comments / Questions (43)
![]() Joke Remmen wrote:
Joke Remmen wrote:
In het patroon staat 1 naald naturel en 1 naald oudroze. Moet dat niet zijn: 1 RIBBEL naturel en 1 RIBBEL oudrose. De kleuren lopen anders in elkaar over. Laat het telpatroon alleen de rechtse naalden zien?
03.05.2019 - 17:18DROPS Design answered:
Dag Joke,
Nee, je breit de strepen steeds in averecht en in het telpatroon staan alle naalden aangegeven.
05.05.2019 - 16:42
![]() Lise wrote:
Lise wrote:
20/3 kl 20.15 mangler bl.a. mønsterdiagram A3 og A4
20.03.2019 - 20:21DROPS Design answered:
hei Lise. Vi har nå dobbelsjekket, og alle diagrammene (fra A.1-A.5) ligger ute, og er synlige. Har du problemer med å se dem uansett hvaslags enhet du bruker (mobil, PC, nettbrett)? Hilsen DROPS
25.03.2019 - 08:19
![]() Marlou wrote:
Marlou wrote:
In het patroon staat maak 1 omslag, 1 steek averecht afhalen op de rechter naald. Betekend dat ik de steek van de rechternaald dan moet overhalen over de omslag?
02.03.2019 - 11:52DROPS Design answered:
Dag Marlou,
Nee, je maakt 1 omslag en dan haal je de volgende steek averecht af. Dus je steekt de rechter naald in de steek op de linker naald alsof je hem averecht gaat breien, maar je breit de steek vervolgens niet (je haalt hem alleen af zodat hij op de rechter naald staat)
05.03.2019 - 20:27
![]() Marlou wrote:
Marlou wrote:
Klopt het opgegeven benodigde materiaal?
17.02.2019 - 09:27DROPS Design answered:
Dag Marlou,Ja, de opgegeven hoeveelheid zou moeten kloppen.
17.02.2019 - 19:17
![]() Valeria wrote:
Valeria wrote:
😍💕 "the One" of my ten favorites I voted. waiting for the release of the pattern
23.01.2019 - 03:22
![]() Eli wrote:
Eli wrote:
Es precioso! Yo le pondría blooming, me recuerda a las primeras hojas de las flores de primavera 😍😍
21.01.2019 - 23:13
![]() Jenny Strick wrote:
Jenny Strick wrote:
Ich kann es kaum erwarten bis diese Anleitung online ist. Bin so gespannt, wie das funktioniert - wahnsinnig schön!
20.01.2019 - 16:13
![]() Port Folio wrote:
Port Folio wrote:
Heel Leuk, echt een keer iets anders!
17.01.2019 - 18:02
![]() Alice wrote:
Alice wrote:
Meraviglioso !! 😍😍
16.01.2019 - 19:30
![]() Michaela K wrote:
Michaela K wrote:
Best of!!!
12.01.2019 - 18:30
|
|||||||||||||||||||||||||||||||
Spring Harvest#springharvestsweater |
|||||||||||||||||||||||||||||||
 |
 |
||||||||||||||||||||||||||||||
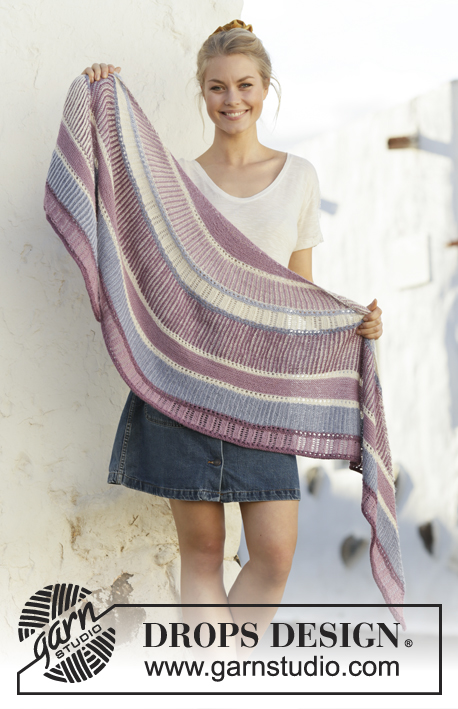
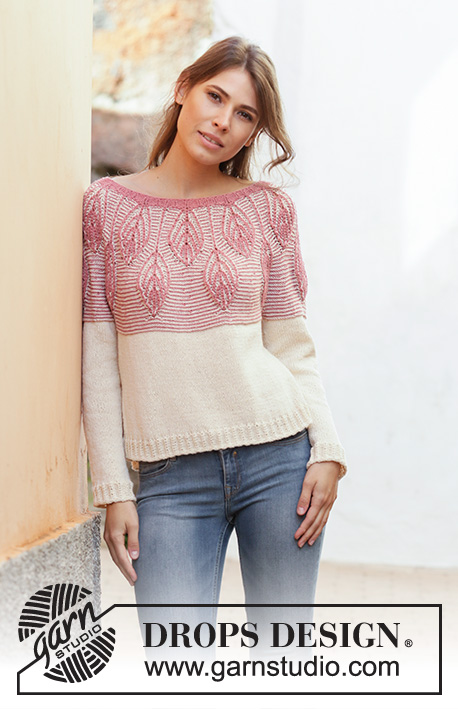
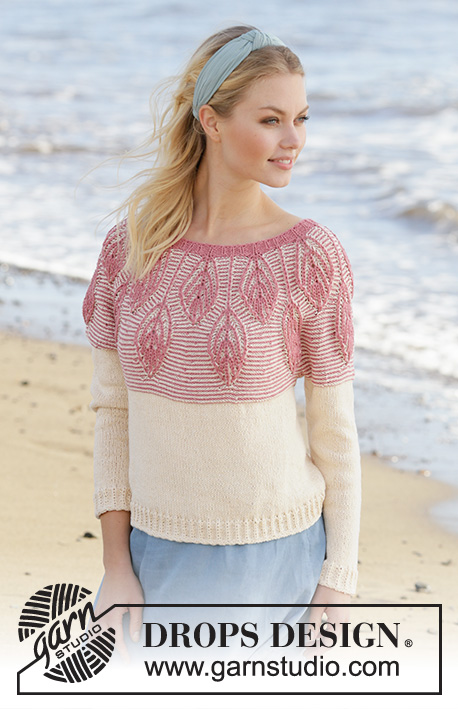
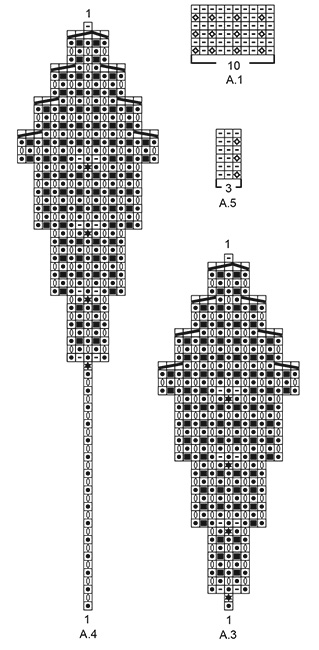
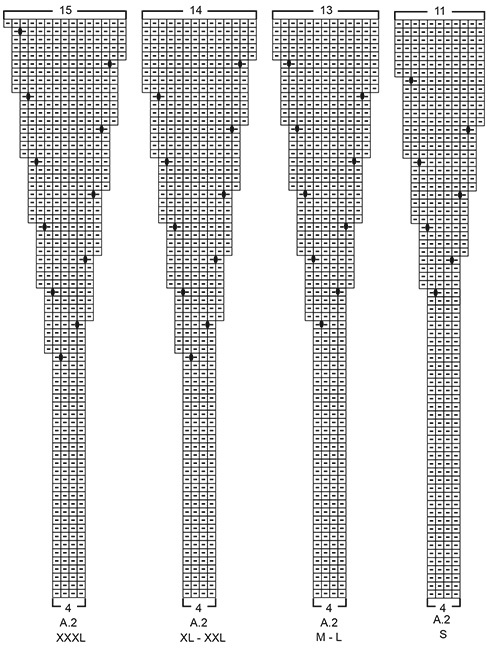
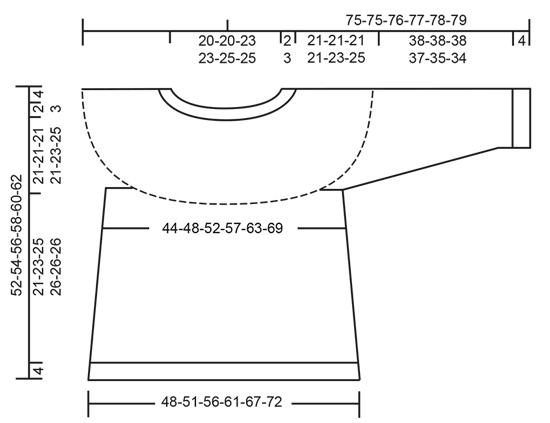
Knitted sweater with round yoke in DROPS Belle. The piece is worked top down with stripes and 2-colored leaf pattern in English rib on yoke. Size: S - XXXL.
DROPS 201-1 |
|||||||||||||||||||||||||||||||
|
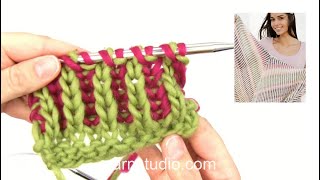
------------------------------------------------------- EXPLANATIONS FOR THE PATTERN: ------------------------------------------------------- PATTERN: See diagrams A.1 to A.5. Choose diagram for your size (applies to A.2). 2-COLORED LEAF PATTERN IN ENGLISH RIB (in the round): The leaf pattern is worked in English rib as shown in diagrams A.3 and A.4. The other stitches are worked in reversed stockinette stitch; i.e. the stitches are purled as shown in diagram A.2. To get the 2-colored effect, work stripes with alternately 1 round off-white and 1 round old pink. A.2 to A.4 start with a round of off-white as described in the text. Each time you either increase or decrease in A.3 and A.4, this will be on a round of old pink. KNITTING TIP: All stitch-numbers given when working English rib do not include the yarn overs; they belong to the knitted stitches and are therefore counted with them as 1 stitch. INCREASE TIP (for sides of body): Start 3 stitches before the marker thread in the side, make 1 yarn over, knit 6 (marker thread sits in the middle of these 6 stitches), 1 yarn over (= 2 stitches increased at marker thread and a total of 4 stitches increased on round). On the next round knit the yarn overs twisted to avoid holes. Then work the new stitches in stockinette stitch. DECREASE TIP (for mid under sleeves): Start 3 stitches before the marker thread, knit 2 together, knit 2 (marker thread sits between these 2 stitches), slip 1 stitch as if to knit, knit 1 and pass the slipped stitch over the knitted stitch (= 2 stitches decreased). ------------------------------------------------------- START THE PIECE HERE: ------------------------------------------------------- SWEATER - SHORT OVERVIEW OF THE PIECE: Neck and yoke are worked in the round with circular needle from mid back, top down. The yoke is worked with stripes and 2-colored leaf pattern in English rib. The yoke is divided for body and sleeves. The body is continued in the round with circular needle, top down. The sleeves are worked in the round with short circular needle/double pointed needles, top down. NECK: Cast on 110-110-120-120-130-130 stitches with short circular needle size 3 mm and old pink. Knit 1 round. Then work A.1 in the round (= 11-11-12-12-13-13 repeats of 10 stitches). Continue this pattern until the piece measures approx. 2-2-2-3-3-3 cm = ¾"-¾"-¾"-1⅛"-1⅛"-1⅛" from the cast-on edge mid front, but finish after a round of knitted stitches worked in the stitches from the previous round. Continue with yoke as described below. YOKE: Read KNITTING TIP and REMEMBER THE KNITTING GAUGE! Change to circular needle size 4 mm = US 6. Read description for 2-COLORED LEAF PATTERN IN ENGLISH RIB (i.e. the whole yoke is worked in stripes as described above at the same time as you work leaf-pattern in English rib as shown in A.3 and A.4). The first round is worked with off-white as follows: * Work A.2 (= 4 stitches), A.3 (= 1 stitch), A.2 (= 4 stitches), A.4 (= 1 stitch) *, work from *-* a total of 11-11-12-12-13-13 times. Continue this pattern. When A.3 has been worked 1 time vertically, continue purling this stitch. On the last round in diagrams A.2 to A.4 increase 16-4-4-12-6-4 stitches evenly spaced (increase in the purl-sections) = 280-312-340-372-396-420 stitches. When A.2 to A.4 have been completed, the piece measures approx. 27-27-27-28-28-28 cm = 10⅝"-10⅝"-10⅝"-11"-11"-11" from the cast-on edge mid front. Continue the stripes without leaf pattern until the piece measures 27-27-27-28-30-32 cm = 10⅝"-10⅝"-10⅝"-11"-11¾"-12½" from the cast-on edge mid front. The next round is worked as follows (with the next color in the stripes): Purl 42-46-50-55-60-65 stitches (= ½ back piece), place the next 56-64-70-76-78-80 stitches on 1 thread for sleeve, cast on 8-8-10-10-12-14 new stitches on needle (= in side under sleeve), purl 84-92-100-110-120-130 stitches (= front piece), place the next 56-64-70-76-78-80 stitches on 1 thread for sleeve, cast on 8-8-10-10-12-14 new stitches on needle (= in side under sleeve) and purl the remaining 42-46-50-55-60-65 stitches (= ½ back piece). Cut the strand. Body and sleeves are finished separately. THE PIECE IS NOW MEASURED FROM HERE! BODY: = 184-200-220-240-264-288 stitches. Insert 1 marker thread in each side, in the middle of the 8-8-10-10-12-14 stitches cast on under the sleeves. Allow the marker threads to follow your work onwards – they will be used when increasing in the sides. Start the round by one of the marker threads and continue with stripes in purl with alternately 1 round off-white and 1 round old pink. When the piece measures 2 cm = ¾" from the division, stop working stripes. Continue with stockinette stitch in the round (i.e. knit all rounds) and off-white. When the piece measures 3-3-4-4-4-4 cm = 1⅛"-1⅛"-1½"-1½"-1½"-1½" from the division, increase 1 stitch on each side of both marker threads – read INCREASE TIP (= 4 stitches increased). Increase like this every 5-5-6-6-6-6 cm = 2"-2"-2⅜"-2⅜"-2⅜"-2⅜" a total of 4 times in all sizes = 200-216-236-256-280-304 stitches. When the piece measures 21-23-25-26-26-26 cm = 8¼"-9"-9¾"-10¼"-10¼"-10¼" from the division, knit 1 round where you increase 4-6-4-2-2-2 stitches evenly spaced = 204-222-240-258-282-306 stitches. Change to circular needle size 3 mm = US 2,5. Work A.5 in the round for approx. 4 cm = 1½". Loosely bind off with knit. The sweater measures approx. 52-54-56-58-60-62 cm = 20½"-21¼"-22"-22¾"-23⅝"-24⅜" from the shoulder down. SLEEVE: Place the 56-64-70-76-78-80 stitches from the thread on the one side of the piece on short circular needle/double pointed needles size 4 mm = US 6 and knit up 1 stitch in each of the 8-8-10-10-12-14 stitches cast on under the sleeve = 64-72-80-86-90-94 stitches. Insert 1 marker thread in the middle of the 8-8-10-10-12-14 stitches under the sleeve. Allow the marker thread to follow your work onwards - it will be used when decreasing mid under sleeve. Start the round by the marker thread and continue with purl and stripes, with alternately 1 round off-white and 1 round old pink – adjust to match the yoke. When the piece measures 2 cm = ¾" from the division, stop working stripes. Continue with stockinette stitch in the round (i.e. knit all rounds) with off white. When the piece measures 3-4-4-2-4-3 cm = 1⅛"-1½"-1½"-¾"-1½"-1⅛" from the division, decrease 2 stitches mid under sleeve – read DECREASE TIP. Decrease like this every 3½-2½-2-2-1½-1½ cm = 1¼"-1"-¾"-¾"-½"-½" a total of 10-13-16-18-19-20 times = 44-46-48-50-52-54 stitches. Continue working until the sleeve measures 38-38-38-37-35-34 cm = 15"-15"-15"-14½"-13¾"-13⅜" from the division (or to desired length; there is approx. 4 cm = 1½" left to finished length. NOTE: Shorter measurements in larger sizes due to wider neck and longer yoke). Knit 1 round where you decrease 2-1-0-2-1-0 stitches evenly spaced = 42-45-48-48-51-54 stitches. Change to double pointed needles size 3 mm = US 2,5. Work A.5 in the round for approx. 4 cm = 1½" (= 14-15-16-16-17-18 repeats of 3 stitches). Loosely bind off with knit. The sleeve measures approx. 42-42-42-41-39-38 cm = 16½"-16½"-16½"-16⅛"-15¼"-15" from the division. Work the other sleeve in the same way. |
|||||||||||||||||||||||||||||||
Diagram explanations |
|||||||||||||||||||||||||||||||
|
|||||||||||||||||||||||||||||||
 |
|||||||||||||||||||||||||||||||
 |
|||||||||||||||||||||||||||||||
 |
|||||||||||||||||||||||||||||||
Have you finished this pattern?Tag your pictures with #dropspattern #springharvestsweater or submit them to the #dropsfan gallery. Do you need help with this pattern?You'll find 29 tutorial videos, a Comments/Questions area and more by visiting the pattern on garnstudio.com. © 1982-2026 DROPS Design A/S. We reserve all rights. This document, including all its sub-sections, has copyrights. Read more about what you can do with our patterns at the bottom of each pattern on our site. |
|||||||||||||||||||||||||||||||


With over 40 years in knitting and crochet design, DROPS Design offers one of the most extensive collections of free patterns on the internet - translated to 17 languages. As of today we count 324 catalogs and 12290 patterns - 12280 of which are translated into English (US/in).
We work hard to bring you the best knitting and crochet have to offer, inspiration and advice as well as great quality yarns at incredible prices! Would you like to use our patterns for other than personal use? You can read what you are allowed to do in the Copyright text at the bottom of all our patterns. Happy crafting!
Post a comment to pattern DROPS 201-1
We would love to hear what you have to say about this pattern!
If you want to leave a question, please make sure you select the correct category in the form below, to speed up the answering process. Required fields are marked *.