
Looking for a yarn?


Comments / Questions (44)
![]() Melanie wrote:
Melanie wrote:
Ich habe mich an die Diagramme gehalten und mir fehlen ca. 70 Maschen, wie kann das sein?
17.03.2025 - 10:26DROPS Design answered:
Liebe Melanie, in L stricken Sie so: *A.2 (= 4 Maschen), A.3 (= 1 Maschen), A.2 (= 4 Maschen), A.4 (= 1 Maschen) *, von *-* 12 x arbeiten so sind es *4+1+4+1*x12=120 Maschen. Wenn die Diagramme fertig sind, sind es A.2 (= 13 Maschen), A.3 (= 1 Masche), A.2 (= 13 Maschen), A.4 (= 1 Maschen) *, von *-* insgesamt 12 x = (13+1+13+1)x12=.336 Maschen + die 4 Zunahmen bei der letzten Runde A.2-A.4 = 340 Maschen. Viel Spaß beim Stricken!
17.03.2025 - 13:49
![]() Melanie wrote:
Melanie wrote:
Ich stricke den Pullover in L. Wie komme ich von anfangs 120 M auf nachher 340 M? Wann genau sind zusätzliche Zunahmen notwendig?
16.03.2025 - 08:08DROPS Design answered:
Liege Melanie, wenn man die Diagramme strickt, wird man zunehmen, wie in den Diagrammen (A.2, A.3, A.4) gezeigt; und bei der letzten Reihe A.2-A.4 wird man dann zusätlichen Maschen zunehmen. Viel Spaß beim STricken!
17.03.2025 - 08:46
![]() Antonella Vaia wrote:
Antonella Vaia wrote:
Dopo il motivo a foglie nella descizione dello sprone il lavoro dovrebbe misurare 27 cm dal bordo di avvio (taglia M). Quindi si continua fino a 27 cm (non sono già 27 cm?) Perché nella foto dello schema prima della suddivisione misura invece 21 cm + 2 cm di bordo? Mi riferisco sempre alla. Taglia M. Non mi pare corretto o sbaglio io? Grazie
07.05.2022 - 14:35DROPS Design answered:
Buonasera Antonella, se ha già raggiunto i 27 cm con il motivo a foglie continui come indicato, altrimenti prosegua fino a 27 cm senza lavorare il motivo a foglie. Le misure si prendono dal ferro di avvio, quindi sono corrette. Buon lavoro!
07.05.2022 - 17:30
![]() Antonella wrote:
Antonella wrote:
Mi riallaccio alla precedente risposta. Il campione fatto corrisponde. Ho fatto altre maglie seguendo le Vs indicazioni e mi sono sempre trovata con le misure. Chiedo scusa, ma dopo le foglie dovrei avere 27 cm, (io ne ho 23), Poi dice di proseguire fino a 27 cm prima di suddividere. Intendo per la taglia M. Quindi secondo le Vs indicazioni dopo le foglie ci sarebbe subito la suddivisone. È corretto? Grazie
16.05.2021 - 09:28DROPS Design answered:
Buonasera Antonella, se il suo lavoro risulta più corto, può lavorare fino a 27 cm senza lavorare il motivo a foglie e poi dividere il lavoro come indicato. Buon lavoro!
17.05.2021 - 22:11
![]() Antonella wrote:
Antonella wrote:
Buongiorno, ho seguito il modello taglia M, alla fine della lavorazione delle foglie il mio lavoro misura cm 24 compresi i cm del collo, mentre dalle spiegazioni dovrebbe misurare cm 27. Ho utilizzato ferri 4 e stesso cotone Belle. È corretto che dovrebbe misurare 27 cm (e credo escluso il bordo del collo)? Grazie
15.05.2021 - 09:30DROPS Design answered:
Buonasera Antonella, ha lavorato il campione prima di iniziare? Probabilmente ha una tensione diversa durante la lavorazione delle coste inglesi. Buon lavoro!
15.05.2021 - 22:23
![]() Carmen Giguère wrote:
Carmen Giguère wrote:
Vu que je tricote ce pull en rond, j’aimerais avoir des explications sur la façon de tricoter le point de feuilles en côtes anglaises. Merci
01.10.2019 - 15:34DROPS Design answered:
Bonjour Mme Giguère, le point de feuilles se tricote en suivant les diagrammes, suivez bien la légende de chaque symbole, vous trouverez également ici, des vidéos des différentes techniques utilisées dans ce modèle. Bon tricot!
01.10.2019 - 15:38
![]() Laura wrote:
Laura wrote:
Ben er mee bezig, wordt erg mooi maar zeker geen patroon voor beginners.
21.08.2019 - 21:01
![]() Käthi Nicol-Moor wrote:
Käthi Nicol-Moor wrote:
Meine Tochter wünscht sich diesen schönen Pullover, jedoch nur einfarbig. Ergibt das den gleichen Effekt?
15.07.2019 - 14:59DROPS Design answered:
Liebe Frau Nicol-Moor, einfarbig wird das Blattmuster etwas wie fl-046 und fl-047 neueste Kollektion aussehen, das Muster ist zwar unterschiedlich, aber mit diesen beiden neuen Modellen haben Sie so eine Idee, wie ein anderes einfarbiges Blattmuster aussehen kann. Ihr DROPS Laden wird Ihnen auch gerne - auch telefonisch oder per E-Mail weiterhelfen. Viel Spaß beim stricken!
15.07.2019 - 16:21
![]() Dea wrote:
Dea wrote:
Buongiorno. Siamo sicuri delle misure del cartamodello? Il collo dice che pe la taglia M è 20 cm più 2 di bordino. La cosa è strana perchè se fosse così in foto dovrebbe risultare più accollato, ma da quello che vedo e da come risulta il mio è molto più ampio.
14.07.2019 - 08:18
![]() Dea wrote:
Dea wrote:
Ho bisogno un chiarimento. Mi trovo alla fine del penultimo giro di A2 - A4 e ora devo aumentare 4 m (taglia m) nell'ultimo giro e devo farlo solo nelle sezioni a rovescio. Come devo procedere? Dal calcolo totale tolgo le 11 m di A3 e divido per 4? Ovvero 308 m totali meno 11 m (A3) ottengo 297 m e queste diviso i 4 aumenti avrò da aumentare ogni 74 - 75 m... ok?
13.07.2019 - 21:02
|
|||||||||||||||||||||||||||||||
Spring Harvest#springharvestsweater |
|||||||||||||||||||||||||||||||
 |
 |
||||||||||||||||||||||||||||||
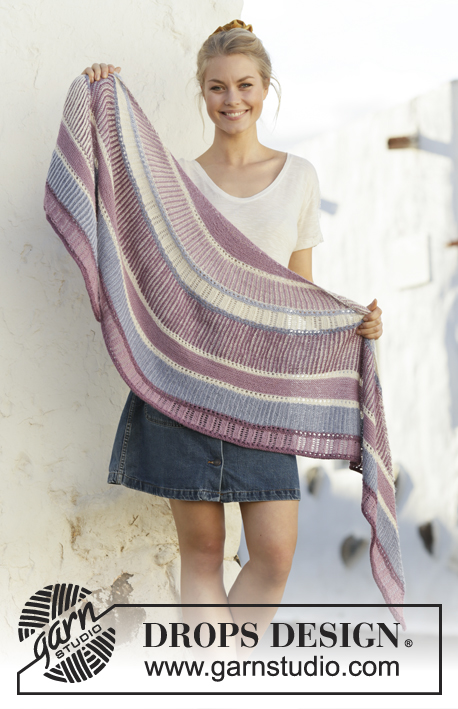
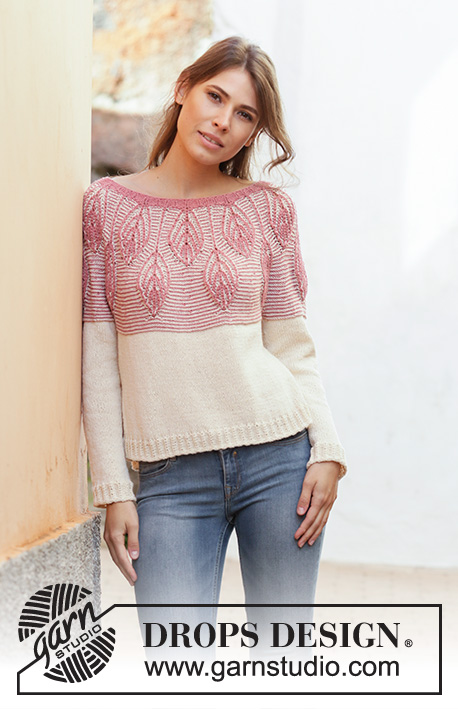
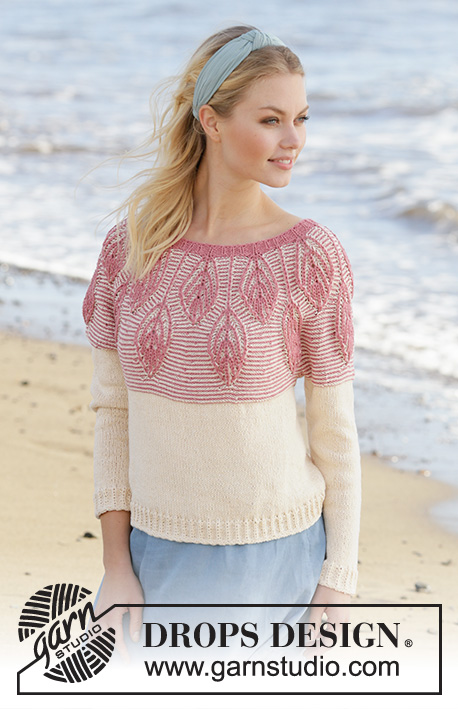
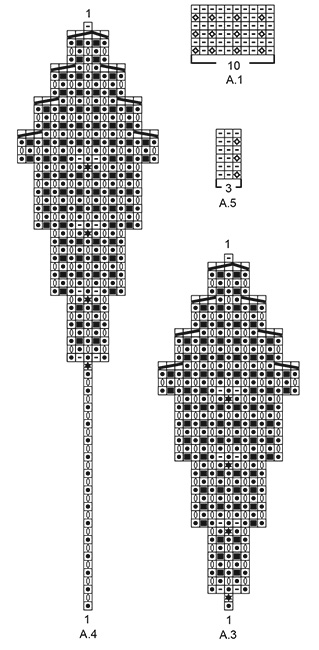
Knitted sweater with round yoke in DROPS Belle. The piece is worked top down with stripes and 2-colored leaf pattern in English rib on yoke. Size: S - XXXL.
DROPS 201-1 |
|||||||||||||||||||||||||||||||
|
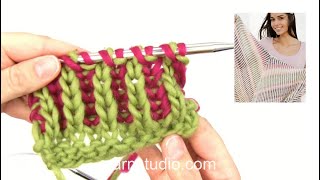
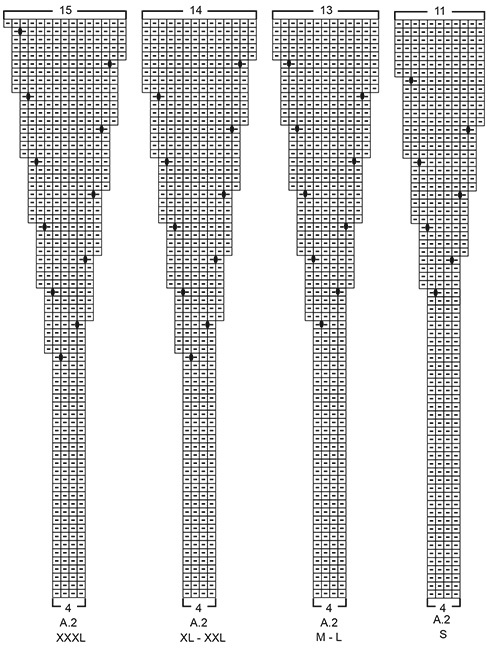
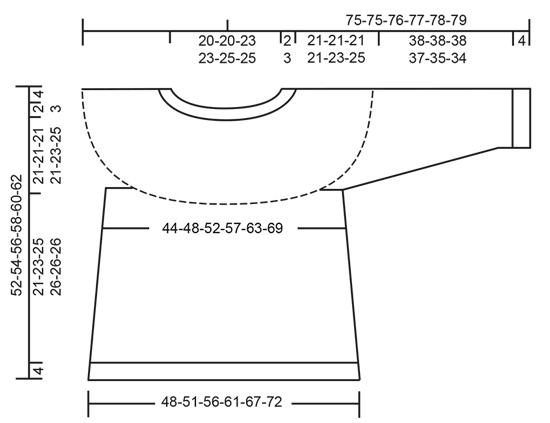
------------------------------------------------------- EXPLANATIONS FOR THE PATTERN: ------------------------------------------------------- PATTERN: See diagrams A.1 to A.5. Choose diagram for your size (applies to A.2). 2-COLORED LEAF PATTERN IN ENGLISH RIB (in the round): The leaf pattern is worked in English rib as shown in diagrams A.3 and A.4. The other stitches are worked in reversed stockinette stitch; i.e. the stitches are purled as shown in diagram A.2. To get the 2-colored effect, work stripes with alternately 1 round off-white and 1 round old pink. A.2 to A.4 start with a round of off-white as described in the text. Each time you either increase or decrease in A.3 and A.4, this will be on a round of old pink. KNITTING TIP: All stitch-numbers given when working English rib do not include the yarn overs; they belong to the knitted stitches and are therefore counted with them as 1 stitch. INCREASE TIP (for sides of body): Start 3 stitches before the marker thread in the side, make 1 yarn over, knit 6 (marker thread sits in the middle of these 6 stitches), 1 yarn over (= 2 stitches increased at marker thread and a total of 4 stitches increased on round). On the next round knit the yarn overs twisted to avoid holes. Then work the new stitches in stockinette stitch. DECREASE TIP (for mid under sleeves): Start 3 stitches before the marker thread, knit 2 together, knit 2 (marker thread sits between these 2 stitches), slip 1 stitch as if to knit, knit 1 and pass the slipped stitch over the knitted stitch (= 2 stitches decreased). ------------------------------------------------------- START THE PIECE HERE: ------------------------------------------------------- SWEATER - SHORT OVERVIEW OF THE PIECE: Neck and yoke are worked in the round with circular needle from mid back, top down. The yoke is worked with stripes and 2-colored leaf pattern in English rib. The yoke is divided for body and sleeves. The body is continued in the round with circular needle, top down. The sleeves are worked in the round with short circular needle/double pointed needles, top down. NECK: Cast on 110-110-120-120-130-130 stitches with short circular needle size 3 mm and old pink. Knit 1 round. Then work A.1 in the round (= 11-11-12-12-13-13 repeats of 10 stitches). Continue this pattern until the piece measures approx. 2-2-2-3-3-3 cm = ¾"-¾"-¾"-1⅛"-1⅛"-1⅛" from the cast-on edge mid front, but finish after a round of knitted stitches worked in the stitches from the previous round. Continue with yoke as described below. YOKE: Read KNITTING TIP and REMEMBER THE KNITTING GAUGE! Change to circular needle size 4 mm = US 6. Read description for 2-COLORED LEAF PATTERN IN ENGLISH RIB (i.e. the whole yoke is worked in stripes as described above at the same time as you work leaf-pattern in English rib as shown in A.3 and A.4). The first round is worked with off-white as follows: * Work A.2 (= 4 stitches), A.3 (= 1 stitch), A.2 (= 4 stitches), A.4 (= 1 stitch) *, work from *-* a total of 11-11-12-12-13-13 times. Continue this pattern. When A.3 has been worked 1 time vertically, continue purling this stitch. On the last round in diagrams A.2 to A.4 increase 16-4-4-12-6-4 stitches evenly spaced (increase in the purl-sections) = 280-312-340-372-396-420 stitches. When A.2 to A.4 have been completed, the piece measures approx. 27-27-27-28-28-28 cm = 10⅝"-10⅝"-10⅝"-11"-11"-11" from the cast-on edge mid front. Continue the stripes without leaf pattern until the piece measures 27-27-27-28-30-32 cm = 10⅝"-10⅝"-10⅝"-11"-11¾"-12½" from the cast-on edge mid front. The next round is worked as follows (with the next color in the stripes): Purl 42-46-50-55-60-65 stitches (= ½ back piece), place the next 56-64-70-76-78-80 stitches on 1 thread for sleeve, cast on 8-8-10-10-12-14 new stitches on needle (= in side under sleeve), purl 84-92-100-110-120-130 stitches (= front piece), place the next 56-64-70-76-78-80 stitches on 1 thread for sleeve, cast on 8-8-10-10-12-14 new stitches on needle (= in side under sleeve) and purl the remaining 42-46-50-55-60-65 stitches (= ½ back piece). Cut the strand. Body and sleeves are finished separately. THE PIECE IS NOW MEASURED FROM HERE! BODY: = 184-200-220-240-264-288 stitches. Insert 1 marker thread in each side, in the middle of the 8-8-10-10-12-14 stitches cast on under the sleeves. Allow the marker threads to follow your work onwards – they will be used when increasing in the sides. Start the round by one of the marker threads and continue with stripes in purl with alternately 1 round off-white and 1 round old pink. When the piece measures 2 cm = ¾" from the division, stop working stripes. Continue with stockinette stitch in the round (i.e. knit all rounds) and off-white. When the piece measures 3-3-4-4-4-4 cm = 1⅛"-1⅛"-1½"-1½"-1½"-1½" from the division, increase 1 stitch on each side of both marker threads – read INCREASE TIP (= 4 stitches increased). Increase like this every 5-5-6-6-6-6 cm = 2"-2"-2⅜"-2⅜"-2⅜"-2⅜" a total of 4 times in all sizes = 200-216-236-256-280-304 stitches. When the piece measures 21-23-25-26-26-26 cm = 8¼"-9"-9¾"-10¼"-10¼"-10¼" from the division, knit 1 round where you increase 4-6-4-2-2-2 stitches evenly spaced = 204-222-240-258-282-306 stitches. Change to circular needle size 3 mm = US 2,5. Work A.5 in the round for approx. 4 cm = 1½". Loosely bind off with knit. The sweater measures approx. 52-54-56-58-60-62 cm = 20½"-21¼"-22"-22¾"-23⅝"-24⅜" from the shoulder down. SLEEVE: Place the 56-64-70-76-78-80 stitches from the thread on the one side of the piece on short circular needle/double pointed needles size 4 mm = US 6 and knit up 1 stitch in each of the 8-8-10-10-12-14 stitches cast on under the sleeve = 64-72-80-86-90-94 stitches. Insert 1 marker thread in the middle of the 8-8-10-10-12-14 stitches under the sleeve. Allow the marker thread to follow your work onwards - it will be used when decreasing mid under sleeve. Start the round by the marker thread and continue with purl and stripes, with alternately 1 round off-white and 1 round old pink – adjust to match the yoke. When the piece measures 2 cm = ¾" from the division, stop working stripes. Continue with stockinette stitch in the round (i.e. knit all rounds) with off white. When the piece measures 3-4-4-2-4-3 cm = 1⅛"-1½"-1½"-¾"-1½"-1⅛" from the division, decrease 2 stitches mid under sleeve – read DECREASE TIP. Decrease like this every 3½-2½-2-2-1½-1½ cm = 1¼"-1"-¾"-¾"-½"-½" a total of 10-13-16-18-19-20 times = 44-46-48-50-52-54 stitches. Continue working until the sleeve measures 38-38-38-37-35-34 cm = 15"-15"-15"-14½"-13¾"-13⅜" from the division (or to desired length; there is approx. 4 cm = 1½" left to finished length. NOTE: Shorter measurements in larger sizes due to wider neck and longer yoke). Knit 1 round where you decrease 2-1-0-2-1-0 stitches evenly spaced = 42-45-48-48-51-54 stitches. Change to double pointed needles size 3 mm = US 2,5. Work A.5 in the round for approx. 4 cm = 1½" (= 14-15-16-16-17-18 repeats of 3 stitches). Loosely bind off with knit. The sleeve measures approx. 42-42-42-41-39-38 cm = 16½"-16½"-16½"-16⅛"-15¼"-15" from the division. Work the other sleeve in the same way. |
|||||||||||||||||||||||||||||||
Diagram explanations |
|||||||||||||||||||||||||||||||
|
|||||||||||||||||||||||||||||||
|
|||||||||||||||||||||||||||||||
|
|||||||||||||||||||||||||||||||
|
|||||||||||||||||||||||||||||||
Have you finished this pattern?Tag your pictures with #dropspattern #springharvestsweater or submit them to the #dropsfan gallery. Do you need help with this pattern?You'll find 29 tutorial videos, a Comments/Questions area and more by visiting the pattern on garnstudio.com. © 1982-2025 DROPS Design A/S. We reserve all rights. This document, including all its sub-sections, has copyrights. Read more about what you can do with our patterns at the bottom of each pattern on our site. |
|||||||||||||||||||||||||||||||


With over 40 years in knitting and crochet design, DROPS Design offers one of the most extensive collections of free patterns on the internet - translated to 17 languages. As of today we count 314 catalogs and 11822 patterns - 11812 of which are translated into English (US/in).
We work hard to bring you the best knitting and crochet have to offer, inspiration and advice as well as great quality yarns at incredible prices! Would you like to use our patterns for other than personal use? You can read what you are allowed to do in the Copyright text at the bottom of all our patterns. Happy crafting!
Post a comment to pattern DROPS 201-1
We would love to hear what you have to say about this pattern!
If you want to leave a question, please make sure you select the correct category in the form below, to speed up the answering process. Required fields are marked *.