
Popular categories
Looking for a yarn?


Comments / Questions (200)
![]() Nicole wrote:
Nicole wrote:
Bonjour Après avoir diminuer les 12 mailles sur les 48 mailles du centre Il nous restent sur chaque épaule 39mailles
22.03.2026 - 00:53DROPS Design answered:
Bonjour Nicole, il doit vous rester 41 mailles en taille XL, vous aviez 130 mailles, vous mettez en attente les 48 m centrales = il reste (130-48)/2) = 41 m pour chaque épaule. En même temps que vous mettez ces 48 m centrales en attente, vous les tricotez en diminuant 12 m = 48-12= vous avez ainsi 36 m en attente au milieu pour l'encolure devant. Bon tricot!
23.03.2026 - 08:56
![]() Nicole wrote:
Nicole wrote:
Bonjour J'ai de la difficulté pour les diminutions des manches après le 15 cm On diminue 19 mailles Le rang suivant on rabat 8 mailles 2 par 2 Un autre rang on diminue une fois 3 mailles et une autre fois 2 mailles
18.03.2026 - 21:48DROPS Design answered:
Bonjour Nicole, pour la manche droite procédez ainsi: rabattez en début de rang sur l'endroit: 1 x 19 m (en même temps diminuez 8 mailles - cf vidéo; il reste 22 mailles, terminez le rang, tournez et tricotez le rang suivant sur l'envers, rabattez ensuite 3 m au début du rang suivant sur l'endroit, terminez le rang, tournez et tricotez le rang suivant sur l'envers, rabattez ensuite 2 m au début du rang suivant sur l'endroit, terminez le rang, tournez et tricotez le rang suivant sur l'envers = il reste 22-3-2=17 m. Tricotez 2 rangs sans diminuer (3 au total avec le dernier rang sur l'envers) puis rabattez 1 m au début du rang suivant sur l'endroit = il reste 16 m. Tricotez jusqu'à ce que la manche mesure 24 cm et rabattez ces 16 m. Bon tricot!
19.03.2026 - 08:54
![]() Nicole wrote:
Nicole wrote:
Bonjour Vous dites qu'a 49 cm on diminue pour l'emmanchure Par la suite on continue de tricoter jusqu'a 63 cm Donc 63 moins 49 =14 Sur le chéma de l'emmanchure à 63 cm il est indiqué 23 cm pour l'emmanchure Merci
14.03.2026 - 22:14DROPS Design answered:
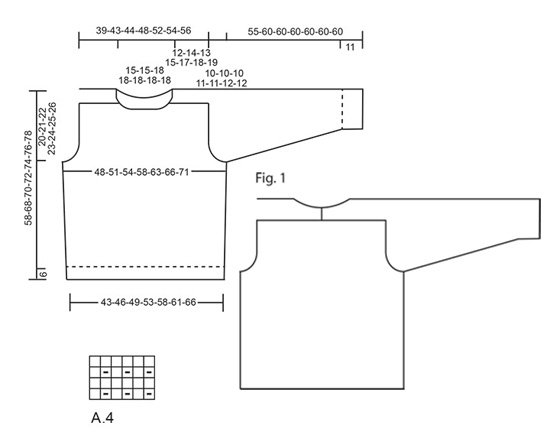
Bonjour Nicole, comme on le voit également sur le schéma, le devant n'arrive pas exactement non plus aux 23 cm, dans ce type de modèles avec manches marteau, la hauteur de l'emmanchure est obtenue par la hauteur du dos/devant à partir des mailles rabattues pour les emmanchures + le haut de la manche que l'on tricote pour les épaules (= les 41 m tricotées pendant 15 cm pour l'épaule). Sur le fig. 1 vous voyez le pull de dos: les manches sont reliées entre elles par une couture et cousues le long des mailles rabattues du dos. Côté devant, on aura une encolure pour le devant et les manches de chaque côté. Bon tricot!
16.03.2026 - 09:33
![]() Steffi Bere wrote:
Steffi Bere wrote:
19 Maschen einmal abkettenund gleichzeitig von diesen 19 M. 8 paarweise zusammenstricken… Ich begreife diese Angabe überhaupt nicht, gibt es da ein Video dazu? Liebe Grüße Steffi
12.03.2026 - 12:42DROPS Design answered:
Liebe Steffi,ja genau, in diesem Video zeigen wir, wie man Maschen abkettet und gleichzeitig abnimmt. Viel Spaß beim Stricken!
12.03.2026 - 15:55
![]() Nicole wrote:
Nicole wrote:
Bonjour Vous dites que pour le dons on diminues 22 mailles De votre façon de diminuer vous dites qu'on diminue une maille de plus Font t'elle partie des 22 diminutions Merci
12.03.2026 - 04:48
![]() Nicole wrote:
Nicole wrote:
Bonjour Lorsque nous diminuons 22 mailles pour le dos De la façon que vous le faites Vous diminuez une maille de plus Alors ces mailles font t'elle partie des 22 mailles ou non Merci
12.03.2026 - 04:36DROPS Design answered:
Bonjour Nicole, je ne suis pas sûre de la maille en plus dont vous parlez, vous avez 124 mailles sur l'aiguille et rabattez en diminuant en même temps 22 mailles à intervalles réguliers dans les torsades (cf vidéo); si vous comptez le nombre de mailles rabattues vous aurez alors 124-22=102. Bon tricot!
12.03.2026 - 10:23
![]() Nicole wrote:
Nicole wrote:
Bonjour Apres les 22 diminutions du dos sur les 84 mailles du centre Il reste 62 mailles et 21 sur chaque épaule Vous dites de diminuez 5 m dans les 16 mailles côté encolure Donc j'enlève ces 5 mailles sur les 62 mailles restantes du centre Merci
09.03.2026 - 03:03DROPS Design answered:
Bonjour Nicole, pour le dos en taille L , on va rabattre, à 63 cm toutes les mailles sur l'aiguille = les 124 mailles en diminuant en même temps 22 mailles à intervalles réguliers. Découvrez ici, en vidéo comment diminuer et rabattre en même temps. Le haut du dos doit être "plat" sans encolure, cf. Fig. 1; les manches seront cousues le long des mailles rabattues. Bon tricot!
09.03.2026 - 10:35
![]() Lena wrote:
Lena wrote:
Hej! Stickar tröjan i strl 13/14år. Fram och bakstycke =228m efter ökning, med markörer vid 114m.Enl texten ska jag vara vid 1a markören efter 20m slät,A1(22m),A2(10m)A3(22m),20m slät och då ska man vara vid 1a markören( =114e maskan) vilket jag då inte är. Förstår inte heller vad som menas med att de 20 maskorna+A1 och A2 ska stickas över nästa 30 maskorna.
08.03.2026 - 21:48DROPS Design answered:
Hei Lena. A.2 skal strikkes over 30 masker, ikke 10 masker, som du skriver. A.2 består av 10 masker, men det står i oppsrkiften at det skal strikkes over 30 masker = 3 rapporter av A.2. Da vil maskeantallet stemme. mvh DROPS Design
07.04.2026 - 14:02
![]() Eva Kolde wrote:
Eva Kolde wrote:
Skall sy ihop med sadelaxel men jag får inte ihop det. Jag får två stora utstående bitar där sadelaxeln möter bakstycket och lika på framstycket.behöver verkligen hjälp hur det skall sys ihop
05.03.2026 - 10:43DROPS Design answered:
Hei Eva. Vi har dessverre ingen video som viser hvordan/hvor det sys sammen, men ta en titt på målskissene. Der ser du formen på sadelskulderen både på forstykket og bakstykket (Fig.1). Man ser også hvor monteringssømmen skal være, både foran skuldrene, bak skuldrene og hvor sadelskuldrene sys sammen midt bak. mbv DROPS Design
23.03.2026 - 11:12
![]() Nicole wrote:
Nicole wrote:
Bonjour Pour les mesures vous dites à 49 cm diminuer pour les emmanchures Donc 6 cm de cotés plus 49 cm devrais donner 55cm pas 72 comme je voie sur le modèle Je comprend pas les mesures. Merci
24.02.2026 - 16:32DROPS Design answered:
Bonjour Nicole, les 49 cm en taille L sont à mesurer à partir du rang de montage. Si vous y ajoutez les 23 cm d'emmanchure du schéma, vous obtenez ainsi les 72 cm de hauteur totale indiqués à gauche. Bon tricot!
25.02.2026 - 07:10
|
||||||||||||||||||||||
Siberia#siberiasweater |
||||||||||||||||||||||
 |
 |
|||||||||||||||||||||
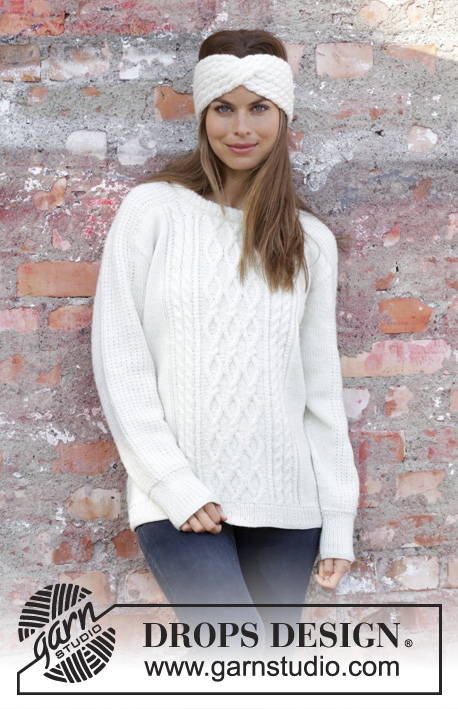
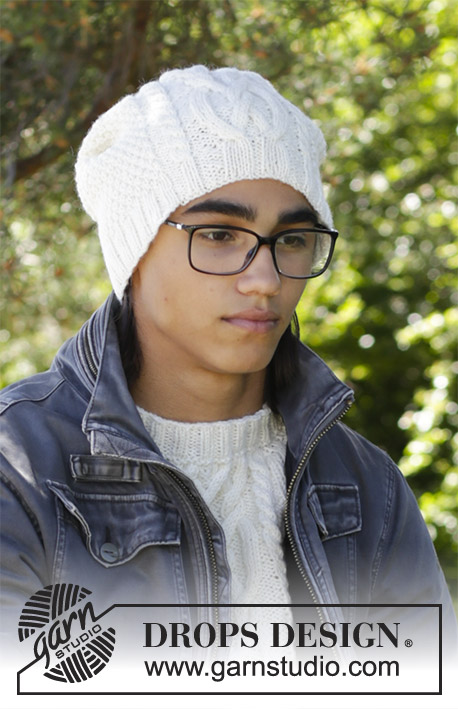
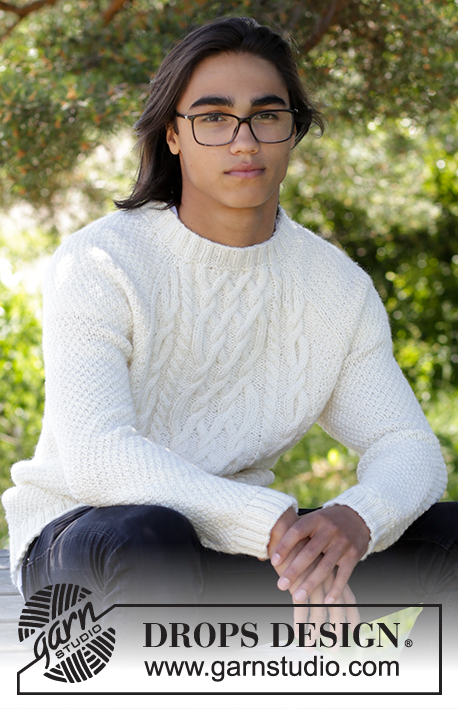
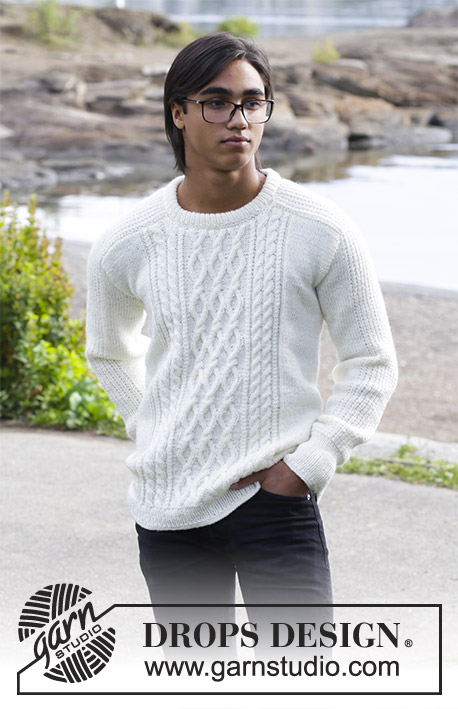
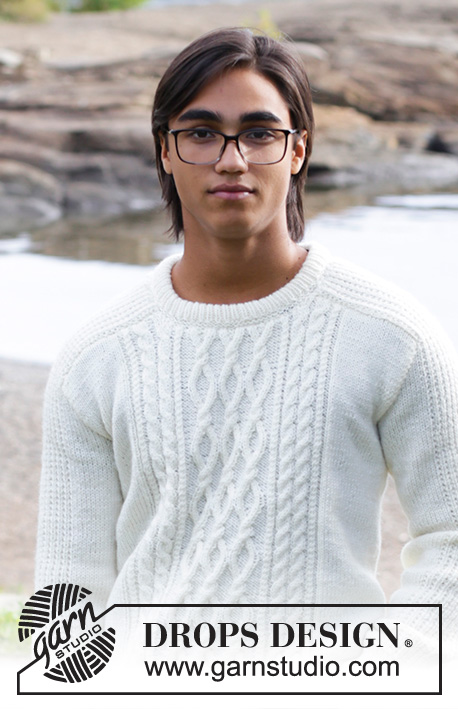
Men’s knitted sweater with cables. Sizes 13/14 years – XXXL. The piece is worked in DROPS Merino Extra Fine.
DROPS 185-2 |
||||||||||||||||||||||
|
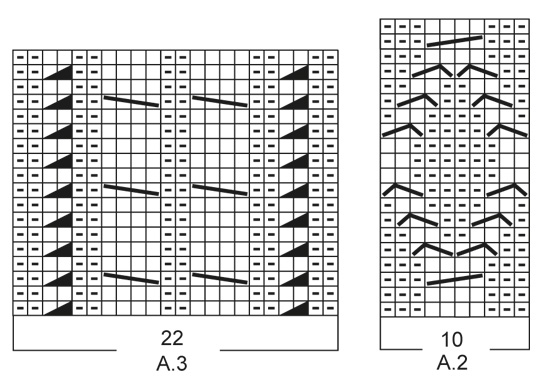
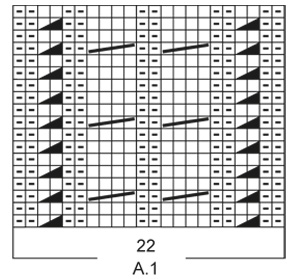
INFORMATION FOR THE PATTERN: SWEATER– SHORT OVERVIEW OF THE PIECE: The sleeve is worked upwards, continued onto the shoulder and along the neck, top back. The neck-stitches at the top of the sleeve are decreased towards the front piece and a small section of the sleeve is continued along the top of the back piece and later sewn together mid-back, so the neck is higher at the back than at the front – see Fig.1. RIDGE/GARTER STITCH (worked in the round): 1 ridge = 2 rounds. Knit 1 round and purl 1 round. PATTERN: See diagrams A.1 to A.4. The diagrams show all the rows in the pattern seen from the right side. INCREASE/DECREASE TIP (evenly spaced): To work out how to increase/decrease evenly, count the total number of stitches on the needle (e.g. 218 stitches) and divide by the number of increases/decreases to be made (e.g. 10) = 21.8. In this example, increase alternately after approx. every 21st and 22nd stitch by making 1 yarn over. On the next round, work the yarn overs twisted to avoid holes. If you are decreasing (in this example) knit together alternately approx. every 20th and 21st stitch and every 21st and 22nd stitch. INCREASE TIP (for sides in body and sleeves): Start 1 stitch before the marker, make 1 yarn over, knit 2 (the marker sits in the middle of these two stitches), make 1 yarn over. On the next round knit the yarn overs twisted to avoid holes. The new stitches are subsequently worked in stockinette stitch. BINDING OFF TIP: Decrease 1 stitch at the same time as binding off as follows: Knit 2 stitches together, knit 1 stitch, pass over (bind off) (= 1 extra stitch decreased). ---------------------------------------------------------- SWEATER: The piece is worked in the round with circular needle as far as the armholes, then the front and back pieces are worked back and forth separately. The sleeves are worked in the round with double pointed needles as far as the armholes, then the sleeves are worked back and forth. To finish, the sleeves are sewn into the armhole and shoulders on front and back pieces. BODY: Cast on 218-230-246-264-280-298-314 stitches with circular needle size 3.5 mm / US 4 and Merino Extra Fine. Work 2 RIDGES – see description above! Then work rib (knit 1 /purl 1). When the piece measures 5 cm / 2" work 1 ridge, AT THE SAME TIME as you increase 10-10-10-12-12-14-14 stitches evenly on the first round – read INCREASE/DECREASE TIP= 228-240-256-276-292-312-328 stitches. Insert 2 markers in the piece, one at the beginning of the round and one after 114-120-128-138-146-156-164 stitches (= in each side). Change to circular needle size 4 mm / US 6 and work PATTERN as follows – see description above: * Work 20-23-27-27-31-31-35 stitches stockinette stitch, A.1 (= 22 stitches), A.2 (= 10 stitches) over the next 30-30-30-40-40-50-50 stitches (= 3-3-3-4-4-5-5 repeats in width), A.3 (= 22 stitches), 20-23-27-27-31-31-35 stitches stockinette stitch, the marker sits here *, work from *-* 1 more time. REMEMBER THE GAUGE! Continue the pattern in this way. When the piece measures 9 cm / 3½" increase 1 stitch on both sides of the markers in each side – read INCREASE TIP (= 4 stitches increased). Increase in this way every 6-8-8-9-9-9-10 cm / 4" a total of 5 times = 248-260-276-296-312-332-348 stitches. When the piece measures 38-47-48-49-50-51-52 cm / 18½"-19"-19¼"-19¾"-20"-20½" bind off 6 stitches for the armhole in each side (bind off 3 stitches on both side of the markers in each side) and continue each piece separately. BACK PIECE: = 118-124-132-142-150-160-168 stitches. The piece is worked back and forth with circular needle. Continue with pattern, stockinette stitch and 1 edge stitch in garter stitch in each side, AT THE SAME TIME continue to bind off for armhole at the beginning of each row in each side as follows: 2 stitches 3-3-4-4-4-4-5 times and 1 stitch 1-0-1-1-2-2-2 times = 104-112-114-124-130-140-144 stitches. When the piece measures 49-59-61-63-65-67-69 cm / 23¼"-24"-24¾"-25½"-26⅜"-27⅛" bind off, AT THE SAME TIME as you decrease 20-20-20-22-18-24-24 stitches evenly over the stitches in diagrams A.1, A.2 and A.3 – read BINDING OFF TIP. FRONT PIECE: = 118-124-132-142-150-160-168 stitches. Continue with pattern, stockinette stitch and 1 edge stitch in garter stitch, AT THE SAME TIME as bind off for armhole as for back piece = 104-112-114-124-130-140-144 stitches. When the piece measures 46-56-58-60-62-64-66 cm / 22"-22¾"-23⅝"-24⅜"-25¼"-26" decrease 10-10-10-12-12-12 stitches evenly over the middle 40-40-40-48-48-48-48 stitches before these stitches are placed on a thread for the neck (= 30-30-30-36-36-36-36 stitches on thread). The shoulders are now finished separately. On the next row from the neck bind off 2 stitches = 30-34-35-36-39-44-46 stitches. When the piece measures 49-59-61-63-65-67-69 cm / 23¼"-24"-24¾"-25½"-26⅜"-27⅛" (adjust to match the back piece) bind off, AT THE SAME TIME as you decrease 5-5-4-5-3-6-6 stitches evenly over the 15-15-15-16-16-21-21 stitches towards the neck – remember BINDING OFF TIP. Work the other shoulder in the same way. RIGHT SLEEVE: The piece is worked in the round with double pointed needles. Cast on 56-58-60-62-64-66-68 stitches with double pointed needles size 3.5 mm / US 4 and Merino Extra Fine. Work 2 ridges. Then work rib (= knit 1 /purl 1) until the piece measures 10 cm / 4". Work 1 ridge, AT THE SAME TIME as you decrease 5 stitches evenly on row = 51-53-55-57-59-61-63 stitches. Insert 1 marker at the beginning of the round. Change to double pointed needles size 4 mm / US 6 and work pattern on the next round as follows: Stockinette stitch over the first 4-5-6-7-8-9-10 stitches, work A.4 over the next 42 stitches, work the first stitch in A.4, 4-5-6-7-8-9-10 stitches stockinette stitch. Continue this pattern upwards. AT THE SAME TIME when the piece measures 13-12-13-12-12-14-13 cm / 5"-4¾"-5"-4¾"-4¾"-5½"-5" increase 1 stitch on each side of the marker – remember INCREASE TIP! Increase in this way every 2-2½-2-2-2-1½-1½ cm / ¾"-⅞"-¾"-¾"-¾"-½"-½" a total of 14-15-16-17-18-19-20 times = 79-83-87-91-95-99-103 stitches. When the piece measures 45-50-50-49-49-48-48 cm / 19¾"-19¾"-19¼"-19¼"-19"-19" bind off 6 stitches mid under the sleeve (bind off 3 stitches on each side of the marker). Then work back and forth on the needle AT THE SAME TIME as you bind off for sleeve cap at the beginning of each row in each side as follows: 2 stitches 2-4-6-7-9-10-12 times and 1 stitch 12-10-8-8-6-6-4 times = 41 stitches left in all sizes. The piece measures 55-60-60-60-60-60-60 cm / 21½"-23½"-23½"-23½"-23½"-23½". NOW YOU MEASURE THE PIECE FROM HERE! Continue with pattern over the remaining stitches until the piece measures 12-14-13-15-17-18-19 cm / 4¾"-5½"-5"-6"-6⅔"-7"-7½". Then you bind off at the beginning of each row from the right side as follows: 19 stitches 1 time AT THE SAME TIME as 8 of these 19 stitches are knitted together 2 and 2 before they are bind off, 3 stitches 1 time, 2 stitches 1 time. Work 3 rows without decreases. Bind off 1 stitch on the next row = 16 stitches left in all sizes. Continue working until the piece measures 19-21-22-24-26-27-28 cm / 7½"-8¼"-8¾"-9½"-10¼"-10½"-11". The whole sleeve measures approx. 74-81-82-84-86-87-88 cm / 29"-32"-32¼"-33"-34"-34¼"-34½". LEFT SLEEVE: Worked as for right sleeve, but decreases at top are worked in opposite side, i.e. at the beginning of every row from the wrong side. ASSEMBLY: Sew the sleeves together mid back inside the bind off edge of each sleeve. Sew the sleeves to front and back piece on body in the outermost stitch as follows: Sew from the armhole and up along shoulder on back piece to mid back. Repeat on the other side. Sew in that same way from armhole and up along shoulder to the neck on the front piece. Repeat on the other side. NECKLINE: Knit up 94-94-108-108-108-108-108 stitches around the neck (including the stitches from the thread) with short circular needle size 3.5 mm / US 4 and Merino Extra Fine. Work 2 ridges, AT THE SAME TIME as you increase on the last round 22-22-26-26-26-26-26 stitches evenly = 116-116-134-134-134-134-134 stitches. Then work rib (= knit 1 /purl 1). When the rib measures 8 cm / 3⅛" work 1 ridge. Bind off. Fold the neck double and fasten on the inside, ridge to ridge. |
||||||||||||||||||||||
Diagram explanations |
||||||||||||||||||||||
|
||||||||||||||||||||||
 |
||||||||||||||||||||||
 |
||||||||||||||||||||||
 |
||||||||||||||||||||||
Have you finished this pattern?Tag your pictures with #dropspattern #siberiasweater or submit them to the #dropsfan gallery. Do you need help with this pattern?You'll find 29 tutorial videos, a Comments/Questions area and more by visiting the pattern on garnstudio.com. © 1982-2026 DROPS Design A/S. We reserve all rights. This document, including all its sub-sections, has copyrights. Read more about what you can do with our patterns at the bottom of each pattern on our site. |
||||||||||||||||||||||


With over 40 years in knitting and crochet design, DROPS Design offers one of the most extensive collections of free patterns on the internet - translated to 17 languages. As of today we count 324 catalogs and 12290 patterns - 12280 of which are translated into English (US/in).
We work hard to bring you the best knitting and crochet have to offer, inspiration and advice as well as great quality yarns at incredible prices! Would you like to use our patterns for other than personal use? You can read what you are allowed to do in the Copyright text at the bottom of all our patterns. Happy crafting!
Post a comment to pattern DROPS 185-2
We would love to hear what you have to say about this pattern!
If you want to leave a question, please make sure you select the correct category in the form below, to speed up the answering process. Required fields are marked *.