Siberia by DROPS Design

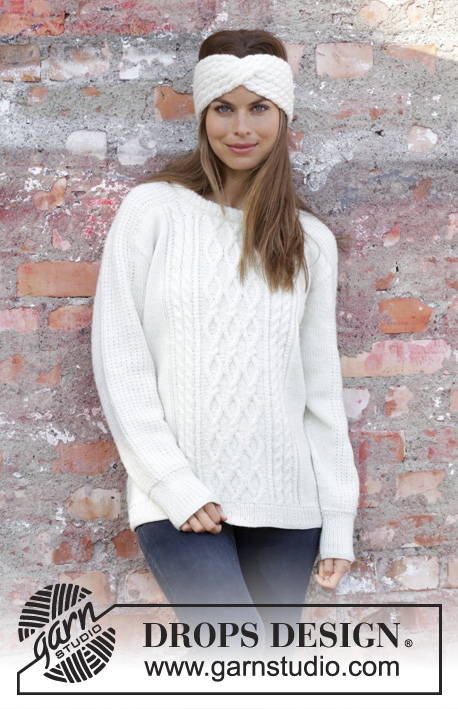
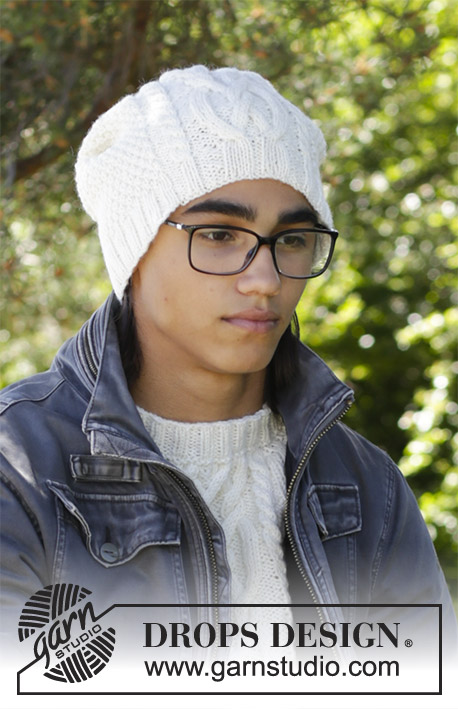
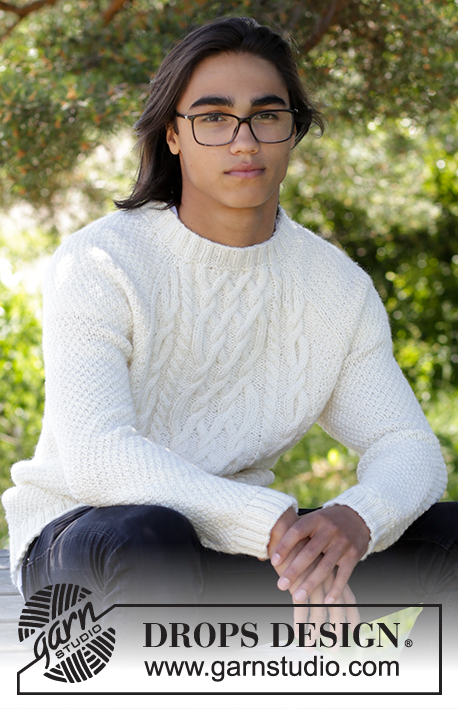
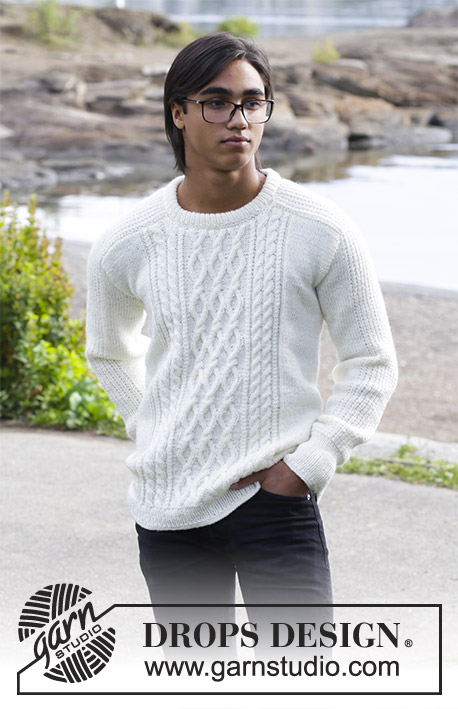
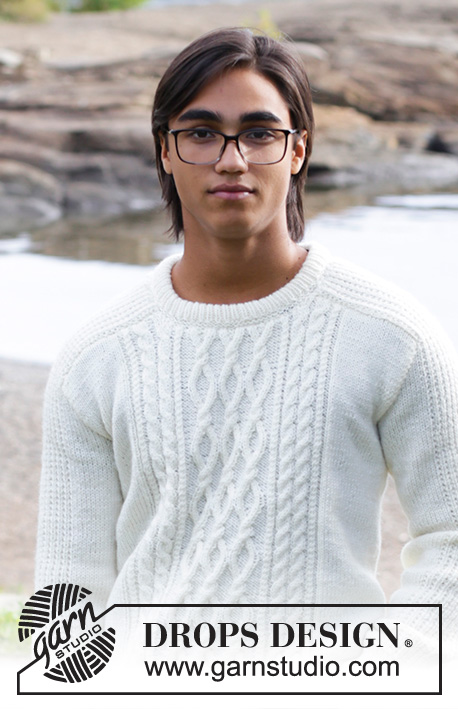
Men’s knitted jumper with cables. Sizes 13/14 years – XXXL. The piece is worked in DROPS Merino Extra Fine.

DROPS 185-2
DROPS Design: Pattern no me-124
Yarn group B
-----------------------------------------------------------
Sizes:
13/14 years - S - M - L - XL - XXL - XXXL
Materials:
DROPS MERINO EXTRA FINE from Garnstudio (belongs to yarn group B)
700-750-850-950-1000-1100-1200 g colour 01, off white

The piece can also be knitted with yarn from:
"Alternative yarn (Yarn Group B)" – see link below.

DROPS DOUBLE POINTED NEEDLES AND CIRCULAR NEEDLE (80 cm) SIZE 4 MM - or the size needed to get 21 stitches and 28 rows stocking stitch on 10 cm in width and 10 cm in height.
 
DROPS DOUBLE POINTED NEEDLES AND CIRCULAR NEEDLE (40 and 80 cm) SIZE 3.5 MM for rib – or the size needed to get 22 stitches and 30 rows stocking stitch on 10 cm in width and 10 cm in height.

DROPS CABLE NEEDLE – for cables.
----------------------------------------------------------

-------------------------------------------------------

Knitting tension – See how to measure it and why here
Alternative Yarn – See how to change yarns here
Yarn Groups A to F – Use the same pattern and change the yarn here
Yarn usage using an alternative yarn – Use our yarn converter here

-------------------------------------------------------


100% Wool
from 3.35 £ /50g
DROPS Merino Extra Fine uni colour DROPS Merino Extra Fine uni colour 3.35 £ /50g
Wool Warehouse Direct Ltd
Order
DROPS Merino Extra Fine mix DROPS Merino Extra Fine mix 3.35 £ /50g
Wool Warehouse Direct Ltd
Order
needles DROPS Needles & Hooks Order
You can get the yarn to make this pattern from 46.90£. Read more.

Pattern instructions

NOTE: This pattern is written in British English. All measurements in charts are in cm. For conversion from cm to inches - click here. There are different terms for crocheting in British and American English. If this pattern includes crochet, click for "crochet terms" here. For this pattern in American English, please click here.
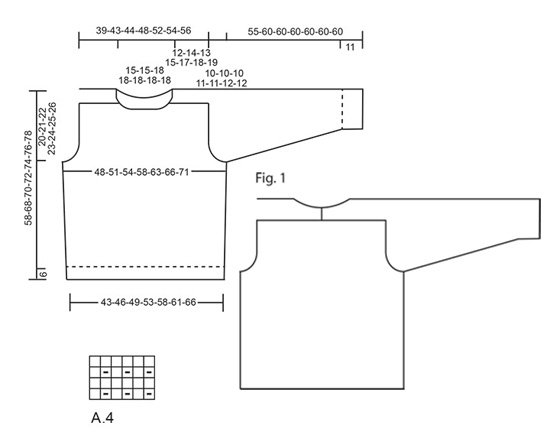
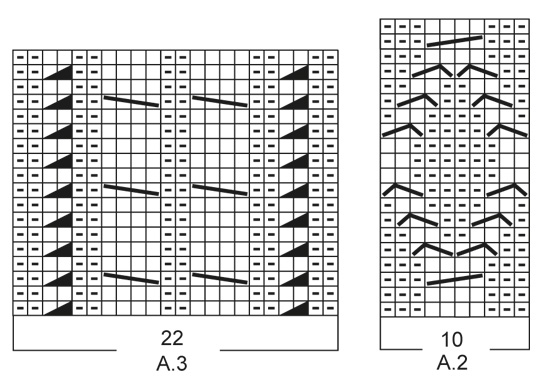
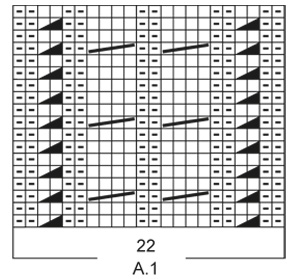
INFORMATION FOR THE PATTERN:

RIDGE/GARTER STITCH (worked in the round):
1 ridge = 2 rounds. Knit 1 round and purl 1 round.

PATTERN:
See diagrams A.1 to A.4.
The diagrams show all the rows in the pattern seen from the right side.

INCREASE/DECREASE TIP (evenly spaced):
To work out how to increase/decrease evenly, count the total number of stitches on the needle (e.g. 218 stitches) and divide by the number of increases/decreases to be made (e.g. 10) = 21.8. In this example, increase alternately after approx. every 21st and 22nd stitch by making 1 yarn over. On the next round, work the yarn overs twisted to avoid holes.
If you are decreasing (in this example) knit together alternately approx. every 20th and 21st stitch and every 21st and 22nd stitch.

INCREASE TIP (for sides in body and sleeves):
Start 1 stitch before the marker, make 1 yarn over, knit 2 (the marker sits in the middle of these two stitches), make 1 yarn over. On the next round knit the yarn overs twisted to avoid holes. The new stitches are subsequently worked in stocking stitch.

CASTING OFF TIP:
Decrease 1 stitch at the same time as casting off as follows: Knit 2 stitches together, knit 1 stitch, pass over (cast off)
(= 1 extra stitch decreased).
----------------------------------------------------------

JUMPER – SHORT OVERVIEW OF THE PIECE:
The sleeve is worked upwards, continued onto the shoulder and along the neck, top back. The neck-stitches at the top of the sleeve are decreased towards the front piece and a small section of the sleeve is continued along the top of the back piece and later sewn together mid-back, so the neck is higher at the back than at the front – see Fig.1.
----------------------------------------------------------

JUMPER:
The piece is worked in the round with circular needle as far as the armholes, then the front and back pieces are worked back and forth separately. The sleeves are worked in the round with double pointed needles as far as the armholes, then the sleeves are worked back and forth. To finish, the sleeves are sewn into the armhole and shoulders on front and back pieces.

BODY:
Cast on 218-230-246-264-280-298-314 stitches with circular needle size 3.5 mm and Merino Extra Fine. Work 2 RIDGES – see description above! Then work rib (knit 1 /purl 1). When the piece measures 5 cm work 1 ridge, AT THE SAME TIME as you increase 10-10-10-12-12-14-14 stitches evenly on the first round – read INCREASE/DECREASE TIP= 228-240-256-276-292-312-328 stitches. Insert 2 markers in the piece, one at the beginning of the round and one after 114-120-128-138-146-156-164 stitches (= in each side). Change to circular needle size 4 mm and work PATTERN as follows – see description above: * Work 20-23-27-27-31-31-35 stitches stocking stitch, A.1 (= 22 stitches), A.2 (= 10 stitches) over the next 30-30-30-40-40-50-50 stitches (= 3-3-3-4-4-5-5 repeats in width), A.3 (= 22 stitches), 20-23-27-27-31-31-35 stitches stocking stitch, the marker sits here *, work from *-* 1 more time. REMEMBER THE KNITTING TENSION! Continue the pattern and repeat the charts in height. When the piece measures 9 cm increase 1 stitch on both sides of the markers in each side – read INCREASE TIP (= 4 stitches increased). Increase in this way every 6-8-8-9-9-9-10 cm a total of 5 times = 248-260-276-296-312-332-348 stitches. When the piece measures 38-47-48-49-50-51-52 cm cast off 6 stitches for the armhole in each side (cast off 3 stitches on both side of the markers in each side) and continue each piece separately.

BACK PIECE: 
= 118-124-132-142-150-160-168 stitches. The piece is worked back and forth with circular needle. Continue with pattern, stocking stitch and 1 edge stitch in garter stitch in each side, AT THE SAME TIME continue to cast off for armhole at the beginning of each row in each side as follows: 2 stitches 3-3-4-4-4-4-5 times and 1 stitch 1-0-1-1-2-2-2 times = 104-112-114-124-130-140-144 stitches. When the piece measures 49-59-61-63-65-67-69 cm cast off, AT THE SAME TIME as you decrease 20-20-20-22-18-24-24 stitches evenly over the stitches in diagrams A.1, A.2 and A.3 – read CASTING OFF TIP.

FRONT PIECE:
= 118-124-132-142-150-160-168 stitches. Continue with pattern, stocking stitch and 1 edge stitch in garter stitch, AT THE SAME TIME as cast off for armhole as for back piece = 104-112-114-124-130-140-144 stitches. When the piece measures 46-56-58-60-62-64-66 cm decrease 10-10-10-12-12-12-12 stitches evenly over the middle 40-40-40-48-48-48-48 stitches before these stitches are placed on a thread for the neck (= 30-30-30-36-36-36-36 stitches on thread). The shoulders are now finished separately. On the next row from the neck cast off 2 stitches = 30-34-35-36-39-44-46 stitches.
When the piece measures 49-59-61-63-65-67-69 cm (adjust to match the back piece) cast off, AT THE SAME TIME as you decrease 5-5-4-5-3-6-6 stitches evenly over the 15-15-15-16-16-21-21 stitches towards the neck – remember CASTING OFF TIP.
Work the other shoulder in the same way.

RIGHT SLEEVE: 
The piece is worked in the round with double pointed needles. Cast on 56-58-60-62-64-66-68 stitches with double pointed needles size 3.5 mm and Merino Extra Fine. Work 2 ridges. Then work rib (= knit 1 /purl 1) until the piece measures 10 cm. Work 1 ridge, AT THE SAME TIME as you decrease 5 stitches evenly on row = 51-53-55-57-59-61-63 stitches. Insert 1 marker at the beginning of the round. Change to double pointed needles size 4 mm and work pattern on the next round as follows: Stocking stitch over the first 4-5-6-7-8-9-10 stitches, work A.4 over the next 42 stitches, work the first stitch in A.4, 4-5-6-7-8-9-10 stitches stocking stitch. Continue this pattern upwards. AT THE SAME TIME when the piece measures 13-12-13-12-12-14-13 cm increase 1 stitch on each side of the marker – remember INCREASE TIP! Increase in this way every 2-2½-2-2-2-1½-1½ cm a total of 14-15-16-17-18-19-20 times = 79-83-87-91-95-99-103 stitches. When the piece measures 45-50-50-49-49-48-48 cm cast off 6 stitches mid under the sleeve (cast off 3 stitches on each side of the marker). Then work back and forth on the needle AT THE SAME TIME as you cast off for sleeve cap at the beginning of each row in each side as follows: 2 stitches 2-4-6-7-9-10-12 times and 1 stitch 12-10-8-8-6-6-4 times = 41 stitches left in all sizes. The piece measures 55-60-60-60-60-60-60 cm. NOW YOU MEASURE THE PIECE FROM HERE! Continue with pattern over the remaining stitches until the piece measures 12-14-13-15-17-18-19 cm. Then you cast off at the beginning of each row from the right side as follows: 19 stitches 1 time AT THE SAME TIME as 8 of these 19 stitches are knitted together 2 and 2 before they are cast off, 3 stitches 1 time, 2 stitches 1 time. Work 3 rows without decreases. Cast off 1 stitch on the next row = 16 stitches left in all sizes. Continue working until the piece measures 19-21-22-24-26-27-28 cm. The whole sleeve measures approx. 74-81-82-84-86-87-88 cm. 

LEFT SLEEVE:
Worked as for right sleeve, but decreases at top are worked in opposite side, i.e. at the beginning of every row from the wrong side.

ASSEMBLY:
Sew the sleeves together mid back inside the cast off edge of each sleeve. Sew the sleeves to front and back piece on body in the outermost stitch as follows: Sew from the armhole and up along shoulder on back piece to mid back. Repeat on the other side. Sew in that same way from armhole and up along shoulder to the neck on the front piece. Repeat on the other side.

NECKLINE:
Knit up 94-94-108-108-108-108-108 stitches around the neck (including the stitches from the thread) with short circular needle size 3.5 mm and Merino Extra Fine. Work 2 ridges, AT THE SAME TIME as you increase on the last round 22-22-26-26-26-26-26 stitches evenly = 116-116-134-134-134-134-134 stitches. Then work rib (= knit 1 /purl 1). When the rib measures 8 cm work 1 ridge. Cast off. Fold the neck double and fasten on the inside, ridge to ridge.

This pattern has been corrected. .

Updated online: 25.10.2017
No correction, but chart A.1 and A.3 are simplified + there is added an additional line under the BODY:(= ... REMEMBER THE KNITTING TENSION! Continue the pattern and repeat the charts in height. When the piece measures 9 cm...).

Diagram

symbols = knit from right side, purl from wrong side
symbols = purl from right side, knit from wrong side
symbols = place 1 stitch on cable needle behind piece, knit 1, knit stitch from cable needle
symbols = place 1 stitch on cable needle behind piece, knit 2, purl stitch from cable needle
symbols = place 2 stitches on cable needle in front of piece, purl 1, knit 2 from cable needle
symbols = place 2 stitches on cable needle behind piece, knit 2, knit 2 from cable needle
symbols = place 2 stitches on cable needle in front of piece, knit 2, knit 2 from cable needle
diagram
diagram
diagram

Do you need help with this pattern?

Thank you for choosing a DROPS Design pattern. We take pride in providing patterns that are correct and easy to understand. All patterns are translated from Norwegian and you can always check the original pattern (DROPS 185-2) for measurements and calculations.

Are you having trouble following the pattern? See below for a list of resources to help you finish your project in no time - or why not, learn something new.

signature-image signature

Are you having trouble following the pattern? See below for a list of resources to help you finish your project in no time - or why not, learn something new.

Each of our patterns has specific tutorial videos to help you.

We have also step-by-step guides for different techniques which you'll find here.

1) Why is the knitting/crochet tension so important?

Knitting tension is what determines the final measurements of your work, and is usually measured per 10 x 10 cm. It is provided like so: number of stitches in width x number of rows in height - eg: 19 stitches x 26 rows = 10 x 10 cm.

The knitting tension is very individual; some people knit/crochet loosely while others work tightly. You adjust the knitting tension with the needle size, which is why the suggested needle size only serve as a guide! You need to adjust this (up or down) to ensure that YOUR knitting tension matches the knitting tension provided in the pattern. If you work with a different knitting tension than provided you will have a different yarn consumption, and your work will have different measurements than what the pattern suggests.

The knitting tension also determines which yarns can replace each other. As long as you achieve the same knitting tension you can replace one yarn with another.

See DROPS lesson: How to measure your tension/gauge

See DROPS video: How to make a gauge tension swatch

to top

2) What are the yarn groups?

All our yarns are categorised into yarn groups (from A to F) according to thickness and knitting tension – group A contains the thinnest yarns and group F the thickest. This makes it easier for you to find alternative yarns to our patterns, should you wish to switch yarn. All yarns within the same group have a similar knitting tension and can easily replace each other. However, different yarn qualities have different structures and properties which will give the finished work a unique look and feel.

Click here for an overview of the yarns in each yarn group

to top

3) Can I use a different yarn than what the pattern suggests?

The important thing when changing from one yarn to another is that the knitting/crochet tension remains the same. This is so that the measurements of the finished piece will be the same as on the sketch provided. It is easier to achieve the same knitting tension using yarns from the same yarn group. It is also possible to work with multiple strands of a thinner yarn to achieve the knitting tension of a thicker one. Please try our yarn converter. We recommend you to always work a test swatch.

Please NOTE: when changing yarn the garment might have a different look and feel to the garment in the photo, due to individual properties and qualities of each yarn.

See DROPS lesson: Can I use a different yarn than the one mentioned in the pattern?

to top

4) How do I use the yarn converter?

At the top of all our patterns you’ll find a link to our yarn converter, which is a helpful tool should you wish to use a different yarn than suggested. By filling in the yarn quality you wish to replace, the amount (in your size) and number of strands, the converter will present good alternative yarns with the same knitting tension. Additionally it will tell you how much you’ll require in the new qualities and whether you’ll need to work with multiple strands. Most skeins are 50g (some are 25g or 100g).

If the pattern is worked with multiple colours, every colour will have to be converted separately. Similarly, if the pattern is worked with several strands of different yarns (for example 1 strand Alpaca and 1 strand Kid-Silk) you will have to find alternatives for each, individually.

Click here to see our yarn converter

to top

5) Why do I get the wrong knitting tension with the suggested needle size?

The needle size provided in the pattern serves only as a guide, the important thing is to follow the knitting tension. And since knitting tension is very individual, you will have to adjust the needle size to ensure that YOUR tension is the same as in the pattern – maybe you’ll have to adjust 1, or even 2 needle sizes, up or down to achieve the correct tension. For this, we recommend that you work test swatches.

Should you work with a different knitting tension than the one provided, the measurements of the finished garment might deviate from the measurement sketch.

See DROPS lesson: How to measure your tension/gauge

See DROPS video: How to make a gauge tension swatch

to top

6) Why is the pattern worked top-down?

Working a garment top-down provides more flexibility and room for personal adjustment. For example it is easier to try the garment on while working, as well as making adjustments to length of yoke and shoulder caps.

The instructions are carefully explaining every step, in the correct order. Diagrams are adjusted to the knitting direction and are worked as usual.

to top

7) Why are the sleeves shorter in larger sizes?

The total width of the garment (from wrist-to-wrist) will be larger in the larger sizes, despite the actual sleeves being shorter. The larger sizes have longer sleeve caps and wider shoulders, so there will be a good fit in all sizes.

to top

8) What is a repeat?

Diagrams are often repeated on the round or in height. 1 repeat is the diagram the way it appears in the pattern. If it says to work 5 repeats of A.1 in the round, then you work A.1 a total of 5 times after/next to each other in the round. If it says to work 2 repeats of A.1 vertically/in height you work the entire diagram once, then begin again at the start and work the entire diagram one more time.

to top

9) How do I work according to a knitting diagram?

The diagram depicts all rows/rounds, and every stitch seen from the right side. It is read from bottom to top, from right to left. 1 square = 1 stitch.

When working back and forth, every other row is worked from the right side and every other row is worked from the wrong side. When working from the wrong side, the diagram will have to be worked reversed: from left to right, knit stitches are purled, purl stitches are knit etc.

When working in the round every round is worked from the right side and the diagram are worked from right to left on all rounds.

See DROPS lesson: How to read knitting diagrams

to top

10) How do I work according to a crochet diagram?

The diagram depicts all rows/rounds, and every stitch seen from the right side. It is worked from bottom to top, from right to left.

When working back and forth every other row is worked from the right side: from right to left and every other row is worked from the wrong side: from left to right.

When working in the round, every row in the diagram are worked from the right side, from right to left.

When working a circular diagram you start in the middle and work your way outwards, counter clockwise, row by row.

The rows usually start with a given number of chain stitches (equivalent to the height of the following stitch), this will either be depicted in the diagram or explained in the pattern.

See DROPS lesson: How to read crochet diagrams

to top

11) How do I work several diagrams simultaneously on the same row/round?

Instructions for working several diagrams after each other on the same row/round, will often be written like so: “work A.1, A.2, A.3 a total of 0-0-2-3-4 times". This means you work A.1 once, then A.2 is worked once, and A.3 is repeated (in width) the number of times provided for your size – in this case like so: S = 0 times, M = 0 times, L=2 times, XL= 3 times and XXL = 4 times.

The diagrams are worked as usual: begin with the first row in A.1, then work the first row in A.2 etc.

See DROPS lesson: How to read knitting diagrams

See DROPS lesson: How to read crochet diagrams

to top

12) Why does the piece start with more chain stitches than it’s worked with?

Chain stitches are slightly narrower than other stitches and to avoid working the cast-on edge too tight, we simply chain more stitches to begin with. The stitch count will be adjusted on the following row to fit the pattern and measurement sketch.

to top

13) Why increase before the rib edge when the piece is worked top-down?

The rib edge is more elastic and will contract slightly compared to, for example, stocking stitch. By increasing before the rib edge, you avoid a visible difference in width between the rib edge and the rest of the body.

to top

14) Why increase in the cast-off edge?

It’s very easy to cast off too tightly, and by making yarn overs while casting off (and simultaneously casting these off) you avoid a too tight cast off edge.

See DROPS video: How to bind off with yarn overs (yo)

to top

15) How do I increase/decrease on every 3rd and 4th row/round alternately?

To achieve an even increase (or decrease) you can increase on, for example: every 3rd and 4th row alternately, like so: work 2 rows and increase on the 3rd row, work 3 rows and increase on the 4th. Repeat this until the increase is complete.

See DROPS lesson: Increase or decrease 1 st on every 3rd and 4th row alternately

to top

16) Why is the pattern slightly different than what I see in the photo?

Pattern repeats can vary slightly in the different sizes, in order to get the correct proportions. If you’re not working the exact same size as the garment in the photo, yours might deviate slightly. This has been carefully developed and adjusted so that the complete impression of the garment is the same in all sizes.

Make sure to follow instructions and diagrams for your size!

to top

17) How can I work a jacket in the round instead of back and forth?

Should you prefer to work in the round instead of back and forth, you may of course adjust the pattern. You’ll need to add steeks mid-front (usually 5 stitches), and follow the instructions. When you would normally turn and work from the wrong side, simply work across the steek and continue in the round. At the end you’ll cut the piece open, pick up stitches to work bands, and cover the cut edges.

See DROPS video: How to knit steeks and cut open

to top

18) Can I work a jumper back and forth instead of in the round?

Should you prefer to work back and forth instead of in the round, you may of course adjust the pattern so you work the pieces separately and then assemble them at the end. Divide the stitches for the body in 2, add 1 edge stitch in each side (for sewing) and work the front and back pieces separately.

See DROPS lesson: Can I adapt a pattern for circular needles into straight needles?

to top

19) Why do you show discontinued yarns in the patterns?

Since different yarns have different qualities and textures we have chosen to keep the original yarn in our patterns. However, you can easily find options among our available qualities by using our yarn converter, or simply pick a yarn from the same yarn group.

It is possible that some retailers still have discontinued yarns in stock, or that someone has a few skeins at home that they would like to find patterns for.

The yarn converter will provide both alternative yarn as well as required amount in the new quality.

to top

20) How do I make a women’s size garment into a men’s size one?

If you have found a pattern you like which is available in women’s size it’s not very difficult to convert it to men’s size. The biggest difference will be the length of sleeves and body. Start working on the women size that you think would fit across the chest. The additional length will be worked right before you cast off for the armhole/sleeve cap. If the pattern is worked top-down you can add the length right after the armhole or before the first decrease on sleeve.

Regarding additional yarn amount, this will depend on how much length you add, but it is better with a skein too many than too few.

to top

21) How do I prevent a hairy garment from shedding?

All yarns will have excess fibres (from production) that might come off as lint or shedding. Brushed yarns (ie hairier yarns) have more of these loose, excess fibres, causing more shedding.

Shedding also depends on what is worn under or over the garment, and whether this pulls at the yarn fibres. It’s therefore not possible to guarantee that there will be no shedding

Below are some tips on how to get the best result when working with hairier yarns:

1. When the garment is finished (before you wash it) shake it vigorously so the looser hairs come off. NOTE: do NOT use a lint roller, brush or any method that pulls at the yarn.

2. Place the garment in a plastic bag and put it in your freezer - the temperature will cause the fibres to become less attached to each other, and excess fibres will come off easier.

3. Leave in the freezer for a few hours before taking it out and shaking it again.

4. Wash the garment according to the instructions on the yarn label.

to top

22) Where on the garment is the length measured?

The measurement sketch/schematic drawing provides information regarding the full length of the garment. If it’s a jumper or a jacket the length is measured from the highest point on the shoulder closest to the neckline, and straight down to the bottom of the garment. It is NOT measured from the tip of shoulder. Similarly, the length of yoke is measured from the highest point on the shoulder and down to where yoke is split into body and sleeves.

On a jacket measures are never taken along bands, unless specifically stated. Always measure inside band stitches when measuring the length.

See DROPS lesson: How to read a schematic drawing

to top

23) How do I know how many balls of yarn I need?

The required amount of yarn is provided in grams, eg: 450 g. To calculate how many balls you’ll need you first need to know how many grams are in 1 ball (25g, 50g or 100g). This information is available if you click on the individual yarn quality on our pages. Divide the amount required with the amount of each ball. For example, if each ball is 50g (the most common amount), the calculation will be as follows: 450 / 50 = 9 balls.

to top

Have you purchased DROPS yarn to make this pattern? Then you are entitled to receive help from the store where you bought the yarn. Find a list of DROPS stores here!
Still can't find the answer you need? Then scroll down and leave your question so one of our experts can try to help you. This will be done normally within 5 to 10 working days. In the meantime, you can read the questions and answers that others have left to this pattern or join the DROPS Workshop on Facebook to get help from fellow knitters/crocheters!

Comments / Questions (127)

country flag Judith Foster wrote:

I am unsure what you mean in pattern for back piece . When pieces measures 61cm bind off , at the same time as you decrease 20 st evenly over the stitches in diagram ?

12.03.2023 - 07:23

DROPS Design answered:

Dear Judith, you need to continue working the pattern, that is, the sequence of the charts as established in the body: "Work 27 stitches stocking stitch, A.1 (= 22 stitches), A.2 (= 10 stitches) over the next 30 stitches (= 3 repeats in width), A.3 (= 22 stitches), 27 stitches stocking stitch"plus the edge stitch in garter stitch on each side . When casting off the back piece, decrease 20 over the stitches worked according to the charts, that is, the stitches stitches in A.1, A.2, A.3 and not those worked in stocking stitch or the edge stitches. Happy knitting!

12.03.2023 kl. 18:11

country flag Kenneth Carlsson wrote:

Jag ser att det är fler som frågat om just det här, men jag är trögtänkt och google översätt ger inte riktigt rätt ordbetydelse! Diagrammen A1, A2, A3 har olika många rader, hur hanterar jag det? \r\nTacksam för ett enkelt svar.\r\nMed vänlig hälsning,Kenneth Carlsson

08.03.2023 - 00:00

DROPS Design answered:

Hej Kenneth, du følger diagrammerne uafhængig af hinanden i højden. Det vil sige i A.1 og A.3 har du 5 varv mellan varje fläta hela tröjan upp. Och A.2 børjar du om enligt diagrammet för varje gång du har stickat 20 varv. Lycka till :)

08.03.2023 kl. 09:50

country flag Josie wrote:

Merci beaucoup d'avoir répondu aussi vite, j'aimerais finir le pull de mon mari pour le printemps. Je le réalisé en soft tweed bleu jeans, il va être trop CHOUPI.

28.02.2023 - 11:21

country flag Josie wrote:

Bonjour, je n'aime pas les aiguilles double pointes ni le magic loop, est-ce que je peux faire mes manches en aller et retour ? Merci et belle journée à vous.

28.02.2023 - 10:58

DROPS Design answered:

Bonjour Josie, tout à fait, retrouvez ici comment vous pouvez procéder. Bon tricot!

28.02.2023 kl. 11:15

country flag Myriam Marty wrote:

Bonjour Comment tricoter sur l'envers les mailles que l'on place sur les aiguilles auxiliaires devant ou derrière l'ouvrage Merci à vous

12.02.2023 - 16:44

DROPS Design answered:

Bonjour Mme Marty, en fonction de la torsade il faudra tricoter ces mailles soit à l'endroit, soit à l'envers, c'est indiqué dans la légende sous "reprendre la maille/les 2 mailles en attente et les tricoter: à l'endroit ou à l'envers" en fonction de la torsade. Bon tricot!

13.02.2023 kl. 10:12

country flag Mylène wrote:

Bonjour, Pour la taille M, arrivé à 61 cm de hauteur, je dois rabattre les mailles en diminuant 20 mailles au-dessus des diagrammes A1-A2-A3. Si j'ai bien compris, les diminutions se font dans les torsades. Hors si je diminue dans les torsades, je n'ai que 18 diminutions. Je ne sais pas où diminuer les 2 mailles qu'il me reste. Pouvez-vous m'éclairer Svp ? J'espère avoir été clair. Merci beaucoup.

24.01.2023 - 15:10

DROPS Design answered:

Bonjour Mylène, tricotez les mailles des diagrammes ensemble 2 par 2 à l'endroit ou 2 par 2 à l'envers pour un total de 20 diminutions, c'est important pour que vous conserviez bien la bonne largeur. Bon tricot!

24.01.2023 kl. 16:46

country flag Marianne wrote:

Kan dere forklare hvordan A2 strikkes. Rettmaskene forsvinner helt og dette partiet på 40 m blir ikke pent

17.12.2022 - 22:10

country flag ROSA CARUSO wrote:

Vorrei capire come riempire le righe del diagramma A3+ A1 PERCE INVECE IL DIAGRAMMA A2 HA 20 GIRI A DIFFERENZA DEL DIAGRAMMA A3 E A1 CHE NE HA 18

02.12.2022 - 10:35

DROPS Design answered:

Buonasera Rosa, una volta finito il diagramma, deve ricominciare dal 1° ferro. Si ricordi di scrivere in minuscolo la prossima volta. Buon lavoro!

03.12.2022 kl. 16:20

country flag Winter wrote:

Hi, for the Front piece, I have CO 2 stitches from the neck. After that, what do I do? Continue with 35 stitches until piece measure 61 cm? The neck line looks very squarish if I do that. Or CO 2 stitches on each row until I reach 61 cm? Thank you.

23.11.2022 - 08:25

DROPS Design answered:

Dear Winter, for the neckline on front piece you just cast off 2 stitches 1 time, then continue asb efore and cast off when piece measures 61 cm. You will then work the 2nd shoulder the same way. The neckline will be worked whole around piece (see chart): along top of sleeves as well as along the neck on front piece so that it won't look squarish anymore but nicely rounded just as on the picture. Happy knitting!

23.11.2022 kl. 09:19

country flag Dorothée wrote:

Bonjour J'ai un problème pour les diminutions de l'arrondi de la manche. On nous dit qu'il reste 41m dans toutes les tailles. Pourtant en S, j'ai 83m-6m au marqueur = 77m. Ensuite j'ai (4x2m) + (10x1m) = 18m de diminutions. Mais 77m-18m = 59m mais pas 41m. Que faire ? Diminuer de 6m+18m, ou obtenir 41m? Merci d'avance !

01.11.2022 - 13:26

DROPS Design answered:

Bonjour Dorothée, vous avez 83 mailles et rabattez 3 m de chaque côté (= 83-6=77 m), vous rabattez ensuite 4 x 2 m (soit 8 m x 2 côtés = 16 m) et 10 x 1 m (soit 10 m x 2 côtés = 20 m) de chaque côté (=77-16-20=41 mailles). Bon tricot!

01.11.2022 kl. 15:46

Post a comment to pattern DROPS 185-2

We would love to hear what you have to say about this pattern!

If you want to leave a question, please make sure you select the correct category in the form below, to speed up the answering process. Required fields are marked *.

From the #dropsfan gallery

Siberia

svtcox, United States

Siberia

Tanis, Canada

Siberia

Franjaplus, United Kingdom

See more