
Popular categories
Looking for a yarn?


Comments / Questions (99)
![]() Gudrun Schneider wrote:
Gudrun Schneider wrote:
Hei, jeg får ikke økningen i sidene til å stemme. Det står at man skal lage et kast når det er to masker igjen til merketråden, og så strikke to masker hvor merketråden da skal være i midten. Men det er jo to masker TIL merketråden? Så hvis den skal være i midten, så må man enten strikke fire masker før neste kast eller lage det første kastet når det er EN maske igjen til tråden?
08.04.2018 - 13:07DROPS Design answered:
Hei Gudrun. Du har helt rett i at dette ikke stemmer. Oppskriften har nå blitt endret, og du skal strikke til det gjenstår 1 maske før merketråden, ikke 2. Takk for beskjed, og god fornøyelse
13.04.2018 - 13:09
![]() Anna Ellnemo Rejnö wrote:
Anna Ellnemo Rejnö wrote:
Hej! Jag stickar i stl xl. När jag ska börja med att minska två maskor vid markörerna och öka på på yttersidan av varje A1 så är det 252 maskor på varvet. Maskantalet förblir ju detsamma. Jag har även minskat tre maskor vid flätorna. Det står att efter detta så ska det vara 228 maskor på varvet. Det stämmer inte. Jag har 240 maskor på varvet. Dvs det är minskat 12 maskor tillsammans vid flätorna. Hur ska det kunna bli 128 maskor? Jag kan inte hitta felet?
07.04.2018 - 17:01DROPS Design answered:
Hei Anna. Du skal felle 3 masker i begge 6-maskers flettene i A.1 = 6 masker felt per A.1. Det er totalt 4 rapporter av A.1 = 24 masker felt på omgangen og du sitter igjen med 228 masker på pinnen. God fornøyelse
12.04.2018 - 13:56
![]() FORTIN wrote:
FORTIN wrote:
Re-bonjour, excusez-moi, j'ai vu dans les explications d'une autre personne qu'il fallait diminuer 8x6m, donc, je tricote les 6m de chaque torsade 2 par 2 = 24 m diminuées
29.03.2018 - 15:56
![]() FORTIN Nicole wrote:
FORTIN Nicole wrote:
Bonjour, Je ne saisis pas bien, comme d'autres, comment on diminue 3 m au dessus de chaque torsade de 2x6 m end + 1m env = 13m....je répartis 3 diminutions dans ces 13 m ? merci pour votre réponse
29.03.2018 - 15:05
![]() FORTIN Nicole wrote:
FORTIN Nicole wrote:
Bonjour, J'ai bien un échantillon qui fait plus ou moins 10 x 10 cm au 4.5 avec ce fil, mais je trouve que ça fait un tricot tout mou....ça serait plus joli au 4 ou 4.25, mais je n'aurais pas les bonnes dimensions d'échantillon, suis déçue
09.03.2018 - 10:11DROPS Design answered:
Bonjour Mme Fortin, lavez et faites sécher votre échantillon dans les mêmes conditions que vous entretiendrez le pull par la suite et vérifiez ensuite votre tension, et ajustez si besoin la taille des aiguilles. Il est effectivement important d'avoir le bon échantillon pour obtenir les mêmes mesures que dans le schéma du bas de page. Bon tricot!
09.03.2018 - 11:29
![]() Lena Wallstedt wrote:
Lena Wallstedt wrote:
Enl bilden ska bakstycket bli 4 cm högre i nacken, men jag kan inte se det i beskrivningen. Hur?
07.03.2018 - 09:50DROPS Design answered:
Hej Lena, nej det är själva ärmdelen som mäter 4 cm.Lycka till!
07.03.2018 - 16:25
![]() Susanne Bloch wrote:
Susanne Bloch wrote:
Strikker str. S - samme spørgsmål som så mange andre. Ryg og forstykke har jeg 196 m - jeg skal tage 3 masker ind fordelt på snoningen som har 6 m- altså 3 m 4 gange = 12 som giver 184 m, efter opskriften skal jeg ende på 172? Hvordan når jeg det?
27.02.2018 - 18:44DROPS Design answered:
Hej Susanne, Du har 2 snoninger i hver overgang til raglan, det vil sige at du tager 6 masker ind i hver overgang = 24 masker. 196-24=172m. God fornøjelse!
06.03.2018 - 14:21
![]() Lena Elfvingsson wrote:
Lena Elfvingsson wrote:
Hej, Har svårt att förstå beskrivningen när jag nu kommit till att det inte finns tillräckligt med maskor för att fläta 6-maskorsflätorna. Då ska man sticka dessa i slätstickning SAMTIDIGT som det minskas 3 maskor jämnt fördelat över flätan. Det förstår jag men... sen står det att det inte minskas över flätorna med 2 maskor. Vad menas med det? Jag förstår det inte.
19.02.2018 - 20:29DROPS Design answered:
Hej, du ska endast minska maskor över de flätor som går över 6 maskor. De små flätorna med 2 maskor ska det alltså inte minskas över.
20.02.2018 - 18:11Marialuisa Cevolani wrote:
In the body at the increasings and the decreasings at the sides, it is not clear to me how many times I have to decrease the 3 sts inside the 6 sts cable. And: the 2 sts cable remains?Thank you for your attention!
01.02.2018 - 09:17DROPS Design answered:
Dear Mrs Cevolani, you will decrease only once in the 6-sts-cables mid under arm, ie dec 3 sts in each of these cables when there are not enough sts to work this cables (so that width keep correct). But there will be no decrease over the 2-sts-cables. Happy knitting!
01.02.2018 - 12:07
![]() Aurore wrote:
Aurore wrote:
Le modèle est magnifique. J'en suis aux manches. Vous dites de continuer en jersey. Est-ce dire que les premières mailles, de part et d'autre des mailles ajoutées sous le bras, qui représentent les six mailles de la petite torsade de deux mailles entourée de mailles envers va se terminer tout droit alors que pour le corps les mailles torsades s'achevaient en pointe ? Merci d'avance pour votre réponse.
22.01.2018 - 14:02DROPS Design answered:
Bonjour Aurore, effectivement, les manches se tricotent en jersey, libre à vous de continuer le motif de l'empiècement si vous le souhaitez. Bon tricot!
22.01.2018 - 18:00
|
|||||||||||||||||||
Arendal#arendalsweater |
|||||||||||||||||||
 |
 |
||||||||||||||||||
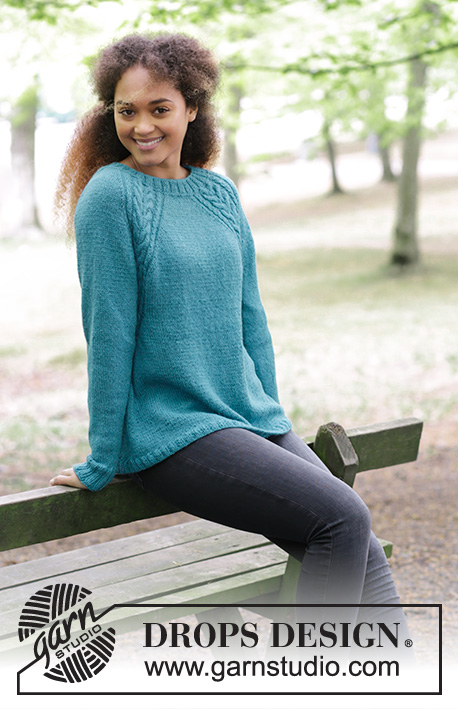
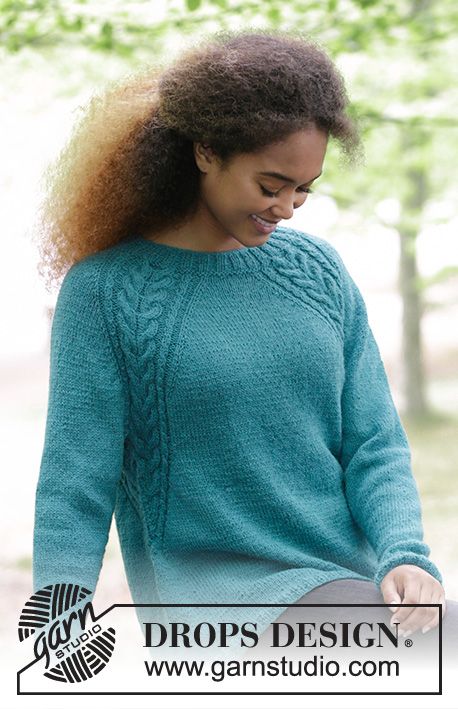
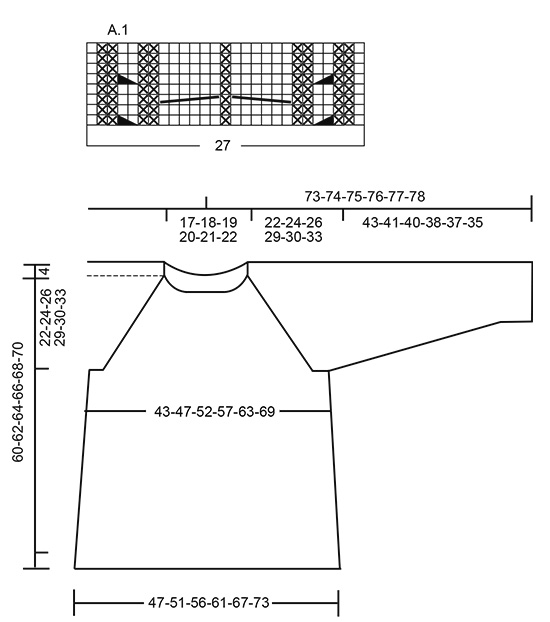
Knitted jumper with cables and raglan, worked top down. Sizes S - XXXL. The piece is worked in DROPS Puna.
DROPS 181-7 |
|||||||||||||||||||
|
INFORMATION FOR THE PATTERN: RIDGE/GARTER STITCH (worked in the round): 1 ridge = 2 rounds. Knit 1 round and purl 1 round. PATTERN: See diagram A.1. The diagram shows all the rows in the pattern seen from the right side. RAGLAN: Increase to raglan on each side of A.1. Increase 1 stitch on each side of A.1 as follows (= 8 new stitches each time you increase). Work to A.1, 1 yarn over, work A.1, 1 yarn over. On the next round knit the yarn overs twisted to prevent holes. INCREASE TIP (for the sides): Work until there is 1 stitch left before the marker thread in the side. Make 1 yarn over, knit 2 stitches (the marker thread sits between these) and make 1 yarn over. On the next round, knit the yarn overs twisted to prevent holes. DECREASE TIP (for the sleeves): Decrease 1 stitch on each side of the marker thread as follows: Work until there are 3 stitches left before the marker thread, slip 1 stitch as if to knit, knit 1, pass the slipped stitch over, knit 2 stitches (the marker thread sits between these stitches), knit the next 2 stitches together. ---------------------------------------------------------- The jumper is worked in the round with circular needle, from mid back and top down. JUMPER: Cast on 112-120-124-128-136-136 stitches with circular needle size 4 mm / US 6 and Puna. Knit 1 round, then work rib, knit 2/ purl 2. Continue with rib in this way for 4 cm / 1½". Change to circular needle size 4.5 mm / US 7. Work 1 RIDGE – see description above, on the first round, decrease 4 stitches evenly on round = 108-116-120-124-132-132 stitches. Continue working as follows: Knit 11-12-13-15-16-18, *1 yarn over, knit 1 *, repeat from *-* a total of 3 times, knit 1, * 1 yarn over, knit 1 *, repeat from *-* a total of 3 times (= these 7 stitches become 13 stitches), knit 18-20-20-18-20-16, *1 yarn over, knit 1 *, repeat from *-* a total of 3 times, knit 1, * 1 yarn over, knit 1 *, repeat from *-* a total of 3 times, knit 22-24-26-30-32-36, * 1 yarn over, knit 1 *, repeat from *-* a total of 3 times, knit 1, * 1 yarn over, knit 1 *, repeat from *-* a total of 3 times, knit 18-20-20-18-20-16, *1 yarn over, knit 1 *, repeat from *-* a total of 3 times, knit 1, * 1 yarn over, knit 1 *, repeat from *-* a total of 3 times and knit 11-12-13-15-16-18 = 132-140-144-148-156-156 stitches. Knit 1 round, the yarn overs are knitted twisted to prevent holes. Continue working as follows: Knit 4-5-6-8-9-11 (= half back piece), A.1 (= 27 stitches), knit 4-6-6-4-6-2 (=sleeve), A.1, knit 8-10-12-16-18-22 (= front piece), A1, knit 4-6-6-4-6-2 (= sleeve), A.1, knit 4-5-6-8-9-11 (= half back piece). READ THE WHOLE OF THE NEXT SECTION BEFORE CONTINUING! Continue this pattern, at the same time increase on each side of A.1 to RAGLAN – see description above. Increase every 2nd round 21-24-27-30-32-35 times. REMEMBER THE GAUGE! After all the increases, there are 300-332-360-388-412-436 stitches on the needle. Continue the pattern as before (without increases) until the piece measures 22-24-26-29-30-33 cm / 8¾"-9½"-10¼"-11½"-11¾"-13" from the cast-on edge mid front. The next round is worked as follows: Work 45-49-53-58-63-68 stitches (= half back piece), place the next 60-68-74-78-80-82 stitches on 1 thread (= sleeve), cast on 8-8-10-10-12-14 new stitches on the needle (= under the sleeve), work 90-98-106-116-126-136 stitches (= front piece), place the next 60-68-74-78-80-82 stitches on 1 thread (= sleeve), cast on 8-8-10-10-12-14 new stitches on the needle (= under the sleeve) and work the remaining 45-49-53-58-63-68 stitches (= half back piece). BODY: = 196-212-232-252-276-300 stitches. THE PIECE IS NOW MEASURED FROM HERE! Insert a marker thread in each side, in the middle of the new stitches that where cast on. Continue A.1 over the 20-20-20-20-22-22 stitches in the pattern which remain on the front and back piece, but on every 2nd round, make 1 yarn over on the outside of each A.1 (= towards mid front and mid back) and knit 2 stitches together on each side of marker thread in the side. The yarn overs are knitted twisted on the next round. The number of stitches is the same, but the stitches in A.1 will gradually be decreased towards the sides of the jumper and there will be more and more stitches in stockinette stitch. When there are not enough stitches in A.1 to work 6-stitch cables, work these stitches in stockinette stitch, AT THE SAME TIME as you decrease 3 stitches evenly over the cable, do not decrease over the cables with 2 stitches (remember to increase on the outsides of A.1 and decrease on each side of the marker threads). When all of A.1 has been decreased there are 172-188-208-228-252-276 stitches on the round. Continue with stockinette stitch. When the piece measures 15-15-15-15-15-15 cm / 6"-6"-6"-6"-6"-6" increase 1 stitch on each side of the marker threads (= 4 stitches increased) – READ INCREASE TIP! Increase every 5 cm / 2" a total of 4 times = 188-204-224-244-268-292 stitches. When the piece measures 34-34-34-34-34-34 cm / 13½"-13½"-13½"-13½"-13½"-13½" increase 40-44-48-52-56-60 stitches evenly on round = 228-248-272-296-324-352 stitches. Change to circular needle size 4 mm / US 6. Work rib, knit 2/ purl 2. Work rib for 2 cm / ¾", bind off with knit over knit and purl over purl. The jumper measures approx. 60-62-64-66-68-70 cm / 23⅝"-24⅜"-25¼"-26"-26¾"-27½" from the shoulder. SLEEVE: The piece is worked in the round with circular needle/double pointed needles. Place the 60-68-74-78-80-82 stitches from the thread in the one side of the piece on a short circular needle size 4.5 mm / US 7. In addition, cast on 8-8-10-10-12-14 new stitches mid under the sleeve = 68-76-84-88-92-96 stitches on the needle. Insert a marker thread in the middle of these new stitches – The piece is now measured from here! Work stockinette stitch in the round. When the piece measures 2-2-2-2-2-4 cm / ¾"-¾"-¾"-¾"-¾"-1½' decrease 2 stitches mid under the sleeve – READ DECREASE TIP. Decrease every 3-2-1½-1½-1½-1 cm / 1"-¾"-½"-½"-½"-⅜" a total of 12-15-18-19-20-21 times = 44-46-48-50-52-54 stitches. When the sleeve measures 38-36-35-33-32-30 cm / 15"-14¼"-13¾"-13"-12½"-11¾" increase 4-6-8-6-8-10 stitches evenly on round = 48-52-56-56-60-64 stitches. Change to double pointed needles size 4 mm / US 6 and work rib, knit 2/ purl 2 over all stitches. Bind off when the sleeve measures 43-41-40-38-37-35 cm / 17"-16"-15¾"-15"-14½"-13¾". Work the other sleeve in the same way. ASSEMBLY: Sew the openings under the sleeves. |
|||||||||||||||||||
Diagram explanations |
|||||||||||||||||||
|
|||||||||||||||||||
 |
|||||||||||||||||||
Have you finished this pattern?Tag your pictures with #dropspattern #arendalsweater or submit them to the #dropsfan gallery. Do you need help with this pattern?You'll find 30 tutorial videos, a Comments/Questions area and more by visiting the pattern on garnstudio.com. © 1982-2026 DROPS Design A/S. We reserve all rights. This document, including all its sub-sections, has copyrights. Read more about what you can do with our patterns at the bottom of each pattern on our site. |
|||||||||||||||||||


With over 40 years in knitting and crochet design, DROPS Design offers one of the most extensive collections of free patterns on the internet - translated to 17 languages. As of today we count 325 catalogs and 12298 patterns - 12288 of which are translated into English (US/in).
We work hard to bring you the best knitting and crochet have to offer, inspiration and advice as well as great quality yarns at incredible prices! Would you like to use our patterns for other than personal use? You can read what you are allowed to do in the Copyright text at the bottom of all our patterns. Happy crafting!
Post a comment to pattern DROPS 181-7
We would love to hear what you have to say about this pattern!
If you want to leave a question, please make sure you select the correct category in the form below, to speed up the answering process. Required fields are marked *.