
Popular categories
Looking for a yarn?


Comments / Questions (99)
![]() Shay wrote:
Shay wrote:
Just starting. When I increase front/back piece, is that the "Raglan" increase? Where does the "Increase as follows after marker thread' start?
06.03.2018 - 14:56DROPS Design answered:
Dear Shay, the raglan inc on next round after inserting marking thread. You will inc for raglan on front/back piece after the marking thread at the beg of piece and before the marking thread at the end of piece. You will increase for raglan at the beg of sleeve after marking thread and at the end of sleeve before the marking thread. Happy knitting!
06.03.2018 - 16:08Sue wrote:
Arrr yes that makes perfect sense. I asked the question about which the row to start the increases on on Oct 2nd and was told to increase on even rows after the ridges. That's row 6,8,10, 12. (Row12 is row 2 of A2). But I should inc on row 5,7,9,11 (row 11 is row 1 of A2) . That is what I thought should happen. Thank you. So much. Confusion over :-).
30.10.2017 - 11:54Sue wrote:
Starting with 18 sleeve stitches. Marker, knit1, YO (raglan inc). Knit 2 tog, Yarn over (8times - A2). Then you need to do a YO, knit 1 for last raglan inc to make 20 stitches. That makes 2 YO's next to each other. If you don't do 2 yo's next to each oth r you end up with 19 stitches!!!
30.10.2017 - 08:49DROPS Design answered:
Dear Sue, the row with K2tog, YO, is not a row with increase for raglan, you should have increased on row before, then work row 2 in diagram as explained in previous answer (repeating K2 tog/YO the number of sts required as number of sts will inc). Happy knitting!
30.10.2017 - 10:37Sue wrote:
Im sorry I just don't understand how this can occur. The increase occurs on the 2nd row of the A2 pattern. The row with all knit 2 tog followed by Yarn over. If you follow the pattern as per the chart as well as with the Raglan increase instructions then it should go like this..see above
30.10.2017 - 08:38DROPS Design answered:
Dear Sue, you inc 1 st on first row in A.2, so that you will work the 12 sts between markers for sleeve as follows: marker, K1, YO, K10, YO, K1 (= 14 sts between markers). On row 2 in A.2 work: K2 (the first K1 + YO), (K2 tog, YO) x 6, K2 (the YO + last K1). Happy knitting!
30.10.2017 - 10:34Sue wrote:
Also I note that doing 2 Yarn overs next to each other just creates one big hole instead of 2 holes next to each other which I can't imagine is ideal. I'm stumped.
30.10.2017 - 00:53DROPS Design answered:
Hi Sue, The pattern does not have 2 yarn overs next to each other. They are either between 2 stitches, with 2 stitches either side or have 1 knitted stitch either side. I hope this helps and happy knitting!
30.10.2017 - 08:04Sue wrote:
Just to add the the last comment. I tried knitting the last 'knit 2 tog followed by Yarn over' (the 8th one - on the 2nd line A2) then just knitting the last s titch but that leaves you with an odd number of stitches, which I note is the same problem another person had. I think the difficulty with this pattern is that the increases aren't so straight forward when they fall on the patterned round for the sleeves, and the instructions don't seem to account for this.
29.10.2017 - 14:07DROPS Design answered:
Dear Sue, you are starting sleeves with 12 sts less 2 sts for raglan line (1 st at the beg + 1 st at the end of sleeve) and you will increase 2 sts so that you should always get an even number of sts for sleeve. Happy knitting!
30.10.2017 - 09:52Sue wrote:
Hi I'm having trouble trying to figure out the increases on the sleeve pattern A2. As per raglan instructions I knit 1 Yarn over after the marker. Then knit 2 tog, Yarn over 8 times then I'm left with 1 stitch. How do I get the last Yarn over in before the last stitch.....do I do 2 Yarn overs next to each other ??
29.10.2017 - 07:34DROPS Design answered:
Dear Sue, knit the last st in this case, ie when the number of sts do not match the diagram, finish pattern with K1 to avoid double yarn overs next to each other. Happy knitting!
30.10.2017 - 09:22Sue wrote:
Secondly with the increases for the Raglan the pattern states that the increases are to be done every 2nd row, but it doesn't indicate which row to start the raglan increases on. Is it row 5 or row 6? I am assuming the first round of increases is on row 5 then 7,9 etc as this means the increases are done on the knit rows of the sleeve pattern and are not getting mixed up in the lace patterning rows. Is this correct?
01.10.2017 - 03:37DROPS Design answered:
Dear Sue, you will inc on round 6, ie after ridges, work 1 round in pattern as explained, then start to inc on next round. Happy knitting!
02.10.2017 - 09:50Sue wrote:
Sorry, typos on he last question. Hello, I am trying to work out this pattern before I start. The pattern states to increase 20 stitches on the last ROUND of the ridges. Does this mean it can be done on either row 3 or 4 which both make up the last round of ridges. I wound prefer to increase on the knit row which is row 3 with a kfb. Or do the increases have to be on the 4th and last row of the ridges which is a purl row.
01.10.2017 - 03:35DROPS Design answered:
Hi Sue, The last round of the ridges is round 4, the purl round. So you increase on this 4th round. Happy knitting!
01.10.2017 - 12:25Sue wrote:
Hello, I am trying to work out this pattern before I start. The pattern states to increase 20 stitches on the last ROUND of the ridges. Does this mean it can be one I thee row 3 or 4 which both make up the last round of ridges. I wound prefer to increase on the knit row which is row 3 with a kfb. Or do the increase have to be on the 4th and last row of the ridges which is a purl row.
01.10.2017 - 03:33DROPS Design answered:
Dear Sue, you will increase on the last round of ridges, ie on 4th round, you can increase also with kfb on last round of ridges (= P round). Happy knitting!
02.10.2017 - 09:48
|
|||||||||||||
Petronella Top#petronellatop |
|||||||||||||
|
|
|||||||||||||
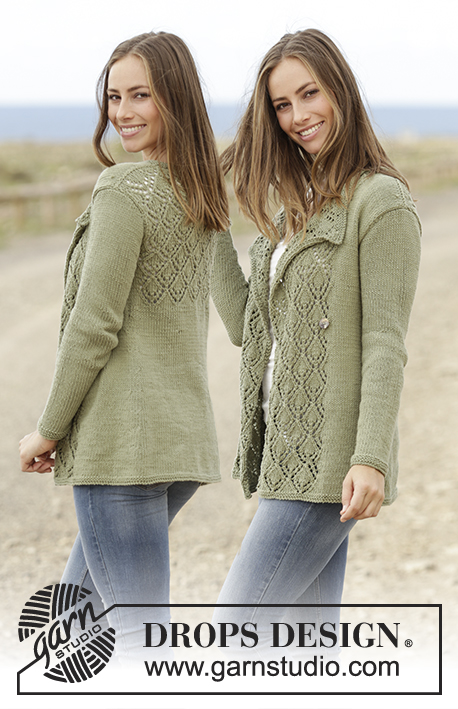
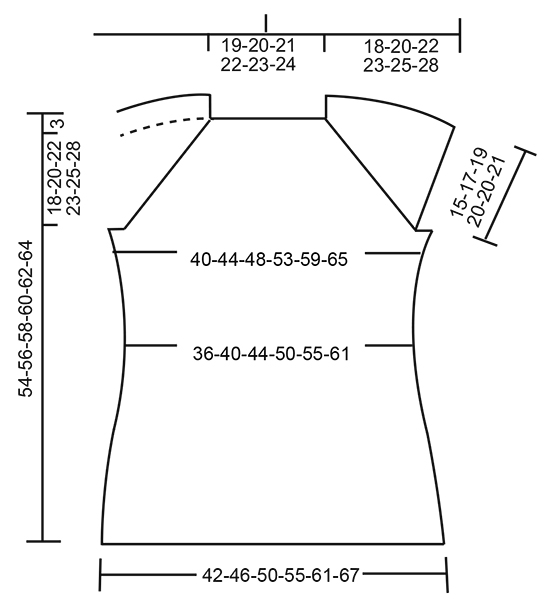
Knitted top with raglan and lace pattern, worked top down in DROPS Muskat. Sizes S - XXXL.
DROPS 175-32 |
|||||||||||||
|
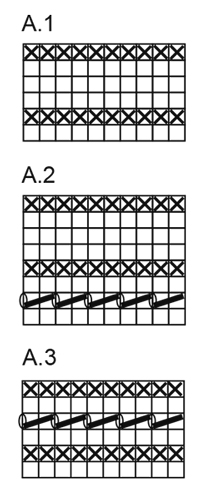
RIDGE/GARTER STITCH (worked in the round): 1 ridge = 2 rounds. Knit 1 round and purl 1 round. PATTERN: See diagrams A.1, A.2 and A.3. The diagrams show all the rows in the pattern from the right side. RAGLAN: Increase every 2nd round as follows: Increase as follows before the marker thread: Start 1 stitch before the marker thread: Make 1 yarn over, knit 1, marker thread. Increase as follows, after the marker thread: Marker thread, knit 1, make 1 yarn over. On the next round work the yarn overs knit, there will be holes. Increase every 4th round as follows: Increase as follows before the marker thread: ROUND 1: Start 1 stitch before the marker thread: Make 1 yarn over, knit1, marker thread. ROUND 2: The yarn overs are worked knit, there will be holes. ROUND 3: Start 3 stitches before the marker thread: Knit 2 together, make 1 yarn over, knit1, marker thread. No increases, but the row of holes continues as before. ROUND 4: The yarn overs are worked knit, there will be holes. Increase as follows, after the marker thread: ROUND 1: Marker thread, knit 1, make 1 yarn over. ROUND 2: The yarn overs are worked knit, there will be holes. ROUND 3: Marker thread, knit 1, make 1 yarn over, slip 1 stitch as if to knit, knit 1, pass the slipped stitch over the knitted stitch. No increases, but the row of holes is continued as before. ROUND 4: Work the yarn overs knit, there will be holes. DECREASE TIP: Start 3 stitches before the marker thread: Knit 2 together, knit 2 (the marker thread sits between these 2 stitches), slip 1 stitch as if to knit, knit 1, pass the slipped stitch over the knitted stitch = 2 stitches decreased. INCREASE TIP: Work until there is 1 stitch left before the marker thread. Make 1 yarn over, knit 2 (the marker thread sits between these 2 stitches) and make 1 yarn over. On the next round work the yarn overs twisted knit to prevent holes (the increased stitches are worked in stockinette stitch). --------------------------------------------------------- TOP: The piece is worked in the round with circular needle from mid back, top down. YOKE: Cast on 80-84-88-92-96-100 stitches with circular needle size 4 mm / US 6 and Muskat. Work 2 RIDGES – see description above, on the last round of the ridges increase 20 stitches evenly along the round = 100-104-108-112-116-120 stitches. Insert 4 marker threads in the piece as follows: first marker thread after 19-20-21-22-23-24 stitches (= half the back piece), second marker thread after 12 new stitches (= sleeve), third marker thread after 38-40-42-44-46-48 new stitches (= front piece), fourth marker thread after 12 new stitches (= sleeve), there are 19-20-21-22-23-24 stitches left on the needle after the last marker thread (= half the back piece). Begin with the increases to RAGLAN as described above and work stockinette stitch across the stitches on the back piece and front piece and A.1 across all the sleeve stitches. READ THIS WHOLE SECTION BEFORE WORKING! The increases are different on the front piece/back piece and the sleeves as follows: FRONT PIECE/BACK PIECE: Increase every 2nd round 12-15-17-25-30-35 times, then every 4th round 7-7-7-4-3-2 times. SLEEVES: Increase every 2nd round 18-23-27-29-26-25 times, then every 4th round 4-3-2-2-5-7 times. When A.1 has been completed 1 time in height, repeat A.2 in height. The increased stitches on the sleeves are worked in to the pattern as you go. After the next to last increase on the sleeve (there are 4 rounds left), continue by working garter stitch across the stitches on each sleeve, the stitches on the front piece/back piece are continued in stockinette stitch as before. REMEMBER THE GAUGE! After all the increases to raglan there are 264-296-320-352-372-396 stitches on the needle. The next round is worked as follows: Work 38-42-45-51-56-61 stitches (= half the back piece), bind off the next 56-64-70-74-74-76 stitches, work the next 76-84-90-102-112-122 stitches (= front piece), bind off the next 56-64-70-74-74-76 stitches, work the next 38-42-45-51-56-61 stitches (= half the back piece). BODY: Continue working as follows: work half the back piece, cast on 8-8-10-10-12-14 new stitches, work the front piece, cast on 8-8-10-10-12-14 new stitches, work half the back piece. There are now 168-184-200-224-248-272 stitches on the body. Insert a marker thread in each side, in the middle of the new stitches which were cast on. THE PIECE IS NOW MEASURED FROM HERE. Continue with stockinette stitch, but across the 8-8-10-10-12-14 new stitches in each side work 2 ridges, then work stockinette stitch across all stitches. When the piece measures 4 cm / 1½" decrease 1 stitch on each side of the marker threads (= 4 stitches decreased), decrease every 3 cm / 1" in total 4 times – READ DECREASE TIP = 152-168-184-208-232-256 stitches. When the piece measures 19-19-19-18-18-19 cm / 7½"-7½"-7½"-7"-7"-7½" increase 1 stitch on each side of the marker threads (= 4 stitches increased), increase every 2 cm / ¾" in total 6 times– READ INCREASE TIP = 176-192-208-232-256-280 stitches. When the piece measures 32-32-32-33-33-32 cm / 12½"-12½"-12½"-13"-13"-12½" work A.3 across all stitches. Then bind off in knit, the piece measures approx. 54-56-58-60-62-64 cm / 21¼"-22"-22¾"-23⅝"-24⅜"-25¼" from the shoulder. |
|||||||||||||
Diagram explanations |
|||||||||||||
|
|||||||||||||
 |
|||||||||||||
 |
|||||||||||||
Have you finished this pattern?Tag your pictures with #dropspattern #petronellatop or submit them to the #dropsfan gallery. Do you need help with this pattern?You'll find 23 tutorial videos, a Comments/Questions area and more by visiting the pattern on garnstudio.com. © 1982-2026 DROPS Design A/S. We reserve all rights. This document, including all its sub-sections, has copyrights. Read more about what you can do with our patterns at the bottom of each pattern on our site. |
|||||||||||||


With over 40 years in knitting and crochet design, DROPS Design offers one of the most extensive collections of free patterns on the internet - translated to 17 languages. As of today we count 324 catalogs and 12290 patterns - 12280 of which are translated into English (US/in).
We work hard to bring you the best knitting and crochet have to offer, inspiration and advice as well as great quality yarns at incredible prices! Would you like to use our patterns for other than personal use? You can read what you are allowed to do in the Copyright text at the bottom of all our patterns. Happy crafting!
Post a comment to pattern DROPS 175-32
We would love to hear what you have to say about this pattern!
If you want to leave a question, please make sure you select the correct category in the form below, to speed up the answering process. Required fields are marked *.