
Popular categories
Looking for a yarn?


Comments / Questions (121)
![]() Yvonne wrote:
Yvonne wrote:
Hvis jeg ska samle det hele efter 11/2 rapport i højden, og mangler 1/2 passer det jo ikke med de andre rapporter da jo der ska starte på nye
04.04.2018 - 15:08DROPS Design answered:
Er du begyndt at strikket over de nye masker du slog op?
04.04.2018 - 16:01
![]() Yvonne wrote:
Yvonne wrote:
Er det 11/2 rapport i højden eller i breden,for jeg kan ikke få maskerne til at passe
04.04.2018 - 14:53DROPS Design answered:
Hej Yvonne, det er i bredden :)
04.04.2018 - 16:00
![]() Yvonne wrote:
Yvonne wrote:
Efter der er taget ind og slået nye masker op,ska det hele så strikkes sammen og den halve A1 gøres færdig Til ærmegab
04.04.2018 - 12:56DROPS Design answered:
Hej Yvonne, ja nu strikker du samme mønster over de nye masker, du lige har slået op, som du har gjort hele tiden. Men nu har du et hul imellem de masker du lukkede af og de nye masker som bliver dit ærmegab. God fornøjelse!
04.04.2018 - 14:09
![]() Yvonne wrote:
Yvonne wrote:
Hej igen Ska det forstås at der ska strikkes 11/2 rapport før man lukker masker af og samler op,eller har jeg misforstået det
04.04.2018 - 12:36DROPS Design answered:
Hej Yvonne, bare følg opskriften: Lav ærmegab således: Strik de første 58 masker på pinden (= 1½ rapport), luk de næste 39-46-53 masker af, strik de næste 117-103-89 masker, luk de næste 39-46-53 masker af, strik de sidste 20 masker :)
04.04.2018 - 14:10
![]() Yvonne wrote:
Yvonne wrote:
Hej Jeg kan ikke finde ud af a starte på mønster A1 til str xxxl har slået de 7 op og så går jeg i stå?
02.04.2018 - 16:49DROPS Design answered:
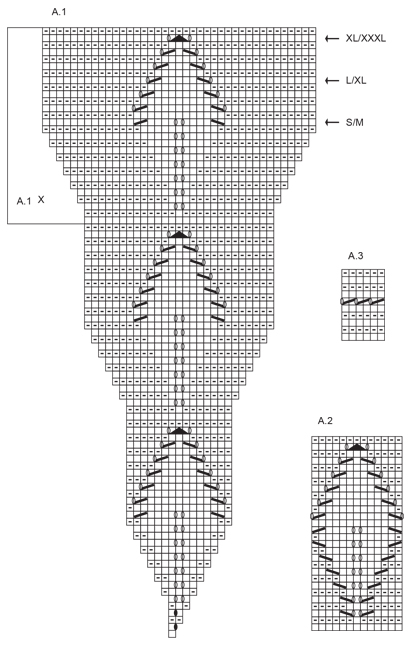
Hei Yvonne. Dette mønsteret strikkes som en sirkel med startpunkt midt i blomsten, A1 viser en m nederst på første omg i diagrammet, gjenta denne 7 ganger = 7 rapporter. Altså når du legger opp 7 m er det starten på de 7 rapportene - følg diagrammet oppover og øk som vist. God fornøyelse.
03.04.2018 - 11:53
![]() Yvonne wrote:
Yvonne wrote:
Hej Jeg kan ikke finde ud af hvor jeg skal starte på selve mønsteret til en XXL har slået de 7 masker op og så går jeg i stå
02.04.2018 - 16:45
![]() Bettina wrote:
Bettina wrote:
Bonjour, j'en suis à tricoter A1X, il faut augmenter de 6 mailles de chaque côté de A1X. Ou faut-il positionner les augmentations sur chaque motifs ? Et sur quels rangs faut-il les mettre (tous les rangs/tous les 2 rangs) ? Merci de votre réponse.
26.03.2018 - 17:08DROPS Design answered:
Bonjour Bettina, quand on répète A.1X en hauteur, on augmente au milieu de chaque motif (feuille) sur les 6 premiers rangs. Le nombre de mailles avant/après chaque feuille va augmenter au fur et à mesure mais les feuilles doivent toujours rester alignées. Bon tricot!
28.03.2018 - 14:41
![]() Andrea Mačková wrote:
Andrea Mačková wrote:
Dobrý den, šlo by prosím poslat tento návod na email? Stáhla jsem si ho už aspoň 10x,ale pokaždé se mi uloží prazdný (0kb) a nelze jej tudíž otevřít. Podotýkám, že jiné návody se mi uložili v pořádku. Děkuji.
24.03.2018 - 06:38DROPS Design answered:
Milá Andreo, díky za zprávu, zjistíme, proč stahování zlobí. Pro odeslání na e-mail (nebo třeba na Facebook či jinou sociální síť nebo aplikaci) je možné využít ikonky přímo pod fotkou (fotkami) modelu. Hezký den! Hana
27.03.2018 - 06:38Евгения wrote:
Здравствуйте, связала круг, проймы, закончила вязать схему А1, перехожу на схему А 1 X, нужно добавлять по 6 петель в каждом рапорте А1 Х, не могу понять когда нужно добавлять эти петли: с самого начала рапорта А1Х, через сколько рядов делать прибавки? Спасибо за помощь.
20.03.2018 - 21:39DROPS Design answered:
Добрый день, Евгения. 6 петель, которые надо прибавить в каждом ряду с прибавлениями, уже включены в схему.
29.03.2018 - 19:35
![]() MariP wrote:
MariP wrote:
Ei saa aru, kuidas on võimalik alustada sukavarrastel 7silmusega või mõistan ma skeemi valesti?
11.01.2018 - 20:39DROPS Design answered:
Tere MariP! Ringil on 7 mustrikordust, muster algab 1 silmusega = 7 silmust ringil. Head kudumist!
12.01.2018 - 13:00
|
||||||||||||||||||||||
Andromeda#andromedacardigan |
||||||||||||||||||||||
 |
 |
|||||||||||||||||||||
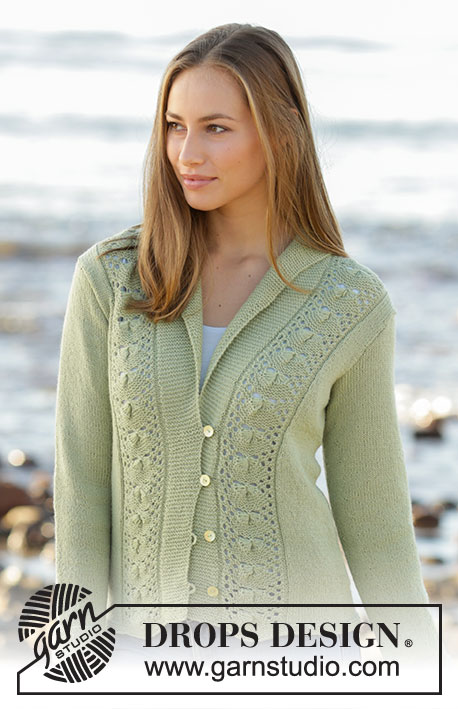
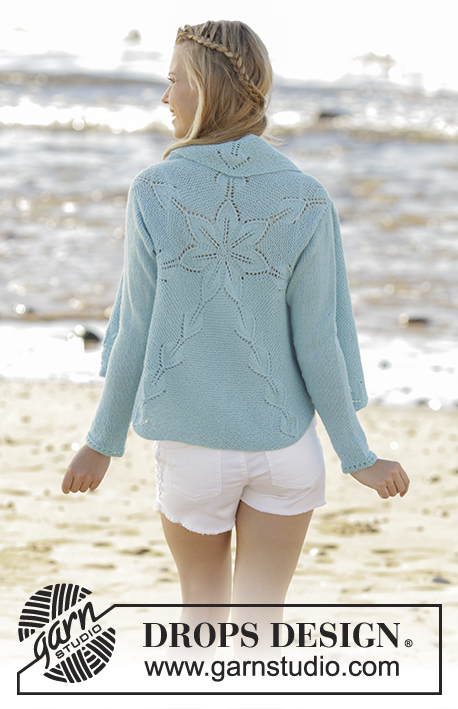
Knitted jacket worked in a circle with leaf pattern in DROPS Alpaca. Size: S - XXXL
DROPS 175-14 |
||||||||||||||||||||||
|
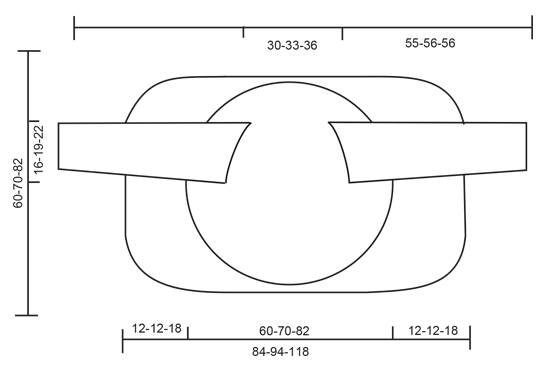
INCREASE TIP: Work until 1 stitch remains before marker thread. Make 1 yarn over, knit 2 (marker is between these 2 stitches) and make 1 yarn over. On next round work yarn overs twisted to avoid holes - work increased stitches in stockinette stitch. GARTER STITCH (worked in the round): 1 ridge = 2 rounds. Knit 1 round and purl 1 round. GARTER STITCH (back and forth): 1 ridge = knit 2 rows. ---------------------------------------------------------- JACKET WORKED IN A CIRCLE: Work jacket in the round from middle of motif (back), then back and forth in each side. Work sleeves separately and sew them in when finished. Cast on 7 stitches with Alpaca and divide them on 4 double pointed needles size 3 mm / US 2.5. Work according to A.1 (= 7 repetitions of A.1 on round). Insert a marker thread at beginning of round. Work until round marked with arrow for desired size. There are now 273 stitches on needle. Make armholes as follows: Work the first 58 stitches on needle (= 1½ repetition), bind off the next 39-46-53 stitches, work the next 117-103-89 stitches, bind off the next 39-46-53 stitches, work the last 20 stitches. On next round cast on 39-46-53 new stitches over the bind off stitches = 273 stitches in all sizes. Finish A.1. When A.1 has been worked 1 time vertically, repeat A.1X above A.1. Every time A.1X is worked vertically, 6 stitches have been increased on each side of A.1X, work the new stitches as the outermost stitches in A.1X. Work A.1X 2-3-4 times in total vertically (84 stitches increase every time A.1X is worked) = 441-525-609 stitches. LEFT FRONT PIECE: Then work as follows: Slip the first 63-75-87 stitches on a stitch holder (= 1 repetition), keep the next 153-187-217 stitches on needle, slip the rest of stitches on a stitch holder. Now work back and forth over all stitches on needle. Work A.2 directly over leaves in A.1X and GARTER STITCH between leaves as before - see explanation above. At the end of every row slip the last 2 stitch on to stitch holder (do not work them, turn). Continue until 41-75-49 stitches remain on the needle (A.2 has now been worked 2-2-3 times vertically). Slip the last 41-75-49 stitches on stitch holder. RIGHT FRONT PIECE: Slip the last 153-187-217 stitches on round back on needle, and work as left front piece over these stitches. Then knit all stitches from stitch holders from right side back onto circular needle size 3 mm / US 2.5, pick up stitches between the 2 and 2 stitches that were put on holders in each side as follows: Pick up the strand between 2 stitches, twist the strand and place in on the right hand needle (i.e. between 2 and 2 stitches 1 stitch is increased and holes in transitions are avoided) = 553-637-777 stitches. Work 3 ridges over all stitches and loosely bind off. SLEEVES: Work sleeves in the round on double pointed needles bottom up, switch to short circular needle when needed. Cast on 46-50-56 stitches on double pointed needles size 3 mm / US 2.5 with Alpaca. Work A.3 over all stitches. When A.3 has been worked 1 time vertically, continue in stockinette stitch. Insert 1 marker thread at beginning of round = mid under sleeve. When piece measures 6-10-4 cm / 2½"-4"-1½"", increase 1 stitch on each side of marker thread mid under sleeve - READ INCREASE TIP. Increase every 3-2-2 cm / 1"-¾"-¾" 15-21-25 times in total = 76-92-106 stitches. When sleeve measures approx. 55-56-56 cm / 21½"-22"-22", loosely bind off. Make another sleeve the same way. ASSEMBLY: Sew in sleeves. |
||||||||||||||||||||||
Diagram explanations |
||||||||||||||||||||||
|
||||||||||||||||||||||
 |
||||||||||||||||||||||
 |
||||||||||||||||||||||
Have you finished this pattern?Tag your pictures with #dropspattern #andromedacardigan or submit them to the #dropsfan gallery. Do you need help with this pattern?You'll find 26 tutorial videos, a Comments/Questions area and more by visiting the pattern on garnstudio.com. © 1982-2026 DROPS Design A/S. We reserve all rights. This document, including all its sub-sections, has copyrights. Read more about what you can do with our patterns at the bottom of each pattern on our site. |
||||||||||||||||||||||


With over 40 years in knitting and crochet design, DROPS Design offers one of the most extensive collections of free patterns on the internet - translated to 17 languages. As of today we count 324 catalogs and 12290 patterns - 12280 of which are translated into English (US/in).
We work hard to bring you the best knitting and crochet have to offer, inspiration and advice as well as great quality yarns at incredible prices! Would you like to use our patterns for other than personal use? You can read what you are allowed to do in the Copyright text at the bottom of all our patterns. Happy crafting!
Post a comment to pattern DROPS 175-14
We would love to hear what you have to say about this pattern!
If you want to leave a question, please make sure you select the correct category in the form below, to speed up the answering process. Required fields are marked *.