
Popular categories
Looking for a yarn?


Comments / Questions (121)
![]() Jannie wrote:
Jannie wrote:
Jeg skal til at tage masker ud på hver side af mærketråden på ærmet. Udtagningstippet forklarer kun for 1 udtagning. Hvordan laver jeg den anden. Der skal jo tages en maske ud på Hver Side. Please hvorden skal jeg gøre - gerne trin for trin.
01.07.2019 - 12:42DROPS Design answered:
Hej Jannie. Om du gör som det står i udtagningstipset så blir det en maska ökad på hver side av märketråden eftersom du slår om 2 gånger. "UDTAGNINGSTIPS: Strik til der er 1 maske tilbage før mærketråden. Slå om, strik 2 masker ret (mærketråden sidder mellem disse 2 masker) slå om. På næste omgang strikkes omslaget drejet så der ikke bliver hul (de nye masker strikkes i glatstrik)." Lycka till!
01.07.2019 - 14:19
![]() Jannie wrote:
Jannie wrote:
Æv, har lavet en mega fejl, og opdager den først i starten af venstre forstykke. Strikker rundt, og derfor 1 RET OG 1 OG VRANG. Gik så ud fra, mønstret skulle læses modsat ved vrang pindene når man strikkede rundt, men jeg må så nu fortsætte fejlene - dvs IKKE RET PÅ HVER PIND, ved Retstrik frem og tilbage. æv køn bliver den ikke.
10.04.2019 - 17:09
![]() Michele QUESNEL wrote:
Michele QUESNEL wrote:
Bonjour, quand j'ai 273 mailles et que je forme les emmanchures, je remonte les mailles au rang suivant comme indiqué, A1 a été tricoté une fois en hauteur et il faut répéter A.1X plusieurs fois. Ma question faut-il continuer à tricoter en rond ou sur des aiguilles normales ? Je pense que les devants se font sur des aiguilles normales. Merci de me confirmer mes demandes. Très cordialement. Michèle
01.04.2019 - 23:49DROPS Design answered:
Bonjour Mme Quesnel, on tricote en rond jusqu'à ce qu'on ait 441-525-609 mailles (en continuant A.1x 2-3-4 fois en fonction de la taille). Puis on va tricoter le devant gauche en allers et retours et mettre les mailles en attente, tricoter le devant droit et mettre les mailles en attente et reprendre ensuite toutes les mailles de nouveau pour tricoter en rond 3 côtes mousse. Vous pouvez tricoter en allers et retours les devants soit sur aiguille circulaire soit sur aiguilles droites, au choix. Bon tricot!
02.04.2019 - 10:20
![]() Michele QUESNEL wrote:
Michele QUESNEL wrote:
Bonjour, comment à partir du 20ème rang de A1 peut on tricoter 2 fois 2 mailles ensemble et continuer à avoir 15 mailles sans augmentation ??? Merci d'avance pour votre aide
30.03.2019 - 23:35DROPS Design answered:
Bonjour Mme Quesnel, au rang 20 on va faire 1 jeté avant la 1ère diminution et 1 jeté après la 2ème diminution, ainsi le nombre de mailles restera le même tout le long de la pointe de la feuille. Bon tricot!
01.04.2019 - 12:54
![]() Agnes Deflanfre wrote:
Agnes Deflanfre wrote:
Bonjour je suis entrain de le faire mais comprend pas tout après avoir fini le dessin complet on doit refaire A1 mais avec des augmentations 6points . Faut il le faire à chaque dessin alors au début? Merci
26.03.2019 - 17:56DROPS Design answered:
Bonjour Mme Deflanfre, quand A.1 a été tricoté 1 fois en hauteur, vous répétez la partie A.x seulement, mais répétez les feuilles pour qu'elles s'alignent les unes au-dessus des autres, vous aurez plus de mailles entre chaque feuille à chaque fois grâce aux augmentations au début de A.x. Bon tricot!
27.03.2019 - 07:48
![]() VADOT Martine wrote:
VADOT Martine wrote:
Modele n° Drops 175-14 j'ai 609 mailles, je laisse les 87 mailles en attente. Je tricote les 217 mailles suivantes pour le devant gauche j'en tricote aussi 217 mailles pour le devant droit. Où mettons les 88 mailles restantes, avant les 217 du devant droit, ou après. Je les ai mises après, et ça ressemble à rien. Merci de me donner une explication. Cordialement. Martine VADOT
21.03.2019 - 18:02DROPS Design answered:
Bonjour Mme Vadot! Apres le devant gauche, vous avez 88 mailles (dos, en bas) et vous les mettez ensemble avec 217 mailles du devant droit en attente, et vous travaillez le devant gauche. Bon tricot!
22.03.2019 - 07:54
![]() Christelle CAUX wrote:
Christelle CAUX wrote:
Bonjour, Comment mesure t on la taille ? J'ai dû mal à comprendre les mesures ? Merci
15.03.2019 - 18:16DROPS Design answered:
Bonjour Christelle! Comment lire les schemat de mesures vous trouverez ICI. Bon travail!
18.03.2019 - 07:47
![]() Griet wrote:
Griet wrote:
Ik heb de 2 voorpanden gebreid. Als ik de dwarsdaad opneem tussen elk paar van 2 steken dan meerder ik per pand 26 steken, dus 56 in totaal en geen 112 zoals in het patroon aangegeven.Moet ik dan tussen elke steek meerderen?
02.03.2019 - 12:51DROPS Design answered:
Dag Griet,
Dit doe je inderdaad tussen elke steek.
05.03.2019 - 20:25
![]() Charlotte Busse wrote:
Charlotte Busse wrote:
Thanks a lot for sharing :)
22.01.2019 - 04:39Elena wrote:
Hi, I am a bit of confused about the working yarn when making left front piece. How do I get my working yarn towards the next 153 stitches if I need to slip the first 63 stitches on a stitch holder without working them over first? Thanks. Elena
01.12.2018 - 00:11DROPS Design answered:
Dear Elena, at the end of circle you have to cut the yarn, then divide piece slipping some stitches on a thread/stitch holder, then join the yarn again fo work left front piece. Happy knitting!
03.12.2018 - 08:19
|
||||||||||||||||||||||
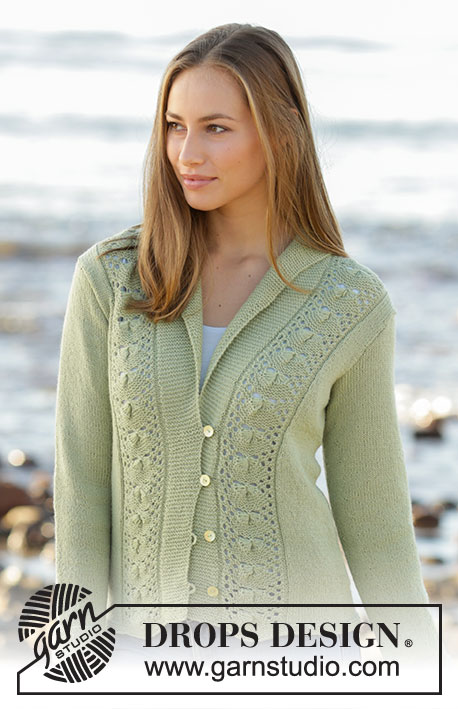
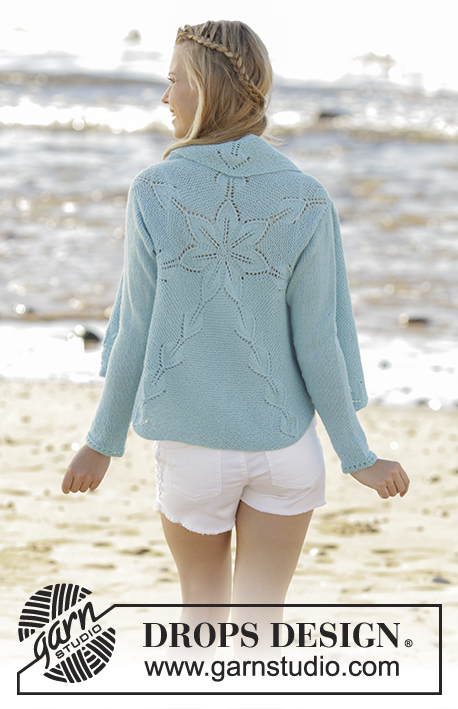
Andromeda#andromedacardigan |
||||||||||||||||||||||
 |
 |
|||||||||||||||||||||
Knitted jacket worked in a circle with leaf pattern in DROPS Alpaca. Size: S - XXXL
DROPS 175-14 |
||||||||||||||||||||||
|
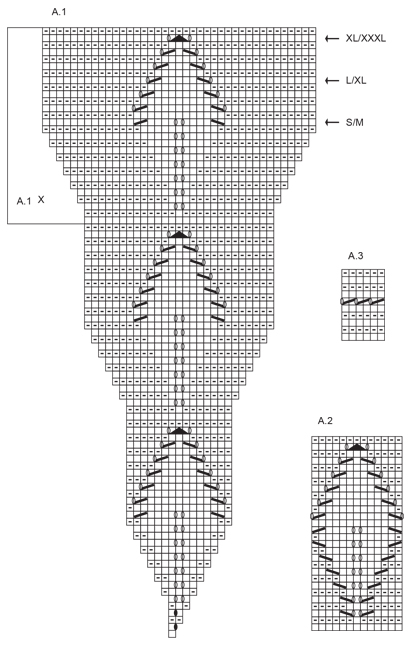
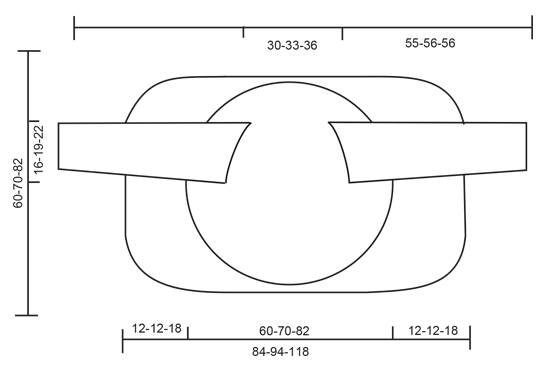
INCREASE TIP: Work until 1 stitch remains before marker thread. Make 1 yarn over, knit 2 (marker is between these 2 stitches) and make 1 yarn over. On next round work yarn overs twisted to avoid holes - work increased stitches in stockinette stitch. GARTER STITCH (worked in the round): 1 ridge = 2 rounds. Knit 1 round and purl 1 round. GARTER STITCH (back and forth): 1 ridge = knit 2 rows. ---------------------------------------------------------- JACKET WORKED IN A CIRCLE: Work jacket in the round from middle of motif (back), then back and forth in each side. Work sleeves separately and sew them in when finished. Cast on 7 stitches with Alpaca and divide them on 4 double pointed needles size 3 mm / US 2.5. Work according to A.1 (= 7 repetitions of A.1 on round). Insert a marker thread at beginning of round. Work until round marked with arrow for desired size. There are now 273 stitches on needle. Make armholes as follows: Work the first 58 stitches on needle (= 1½ repetition), bind off the next 39-46-53 stitches, work the next 117-103-89 stitches, bind off the next 39-46-53 stitches, work the last 20 stitches. On next round cast on 39-46-53 new stitches over the bind off stitches = 273 stitches in all sizes. Finish A.1. When A.1 has been worked 1 time vertically, repeat A.1X above A.1. Every time A.1X is worked vertically, 6 stitches have been increased on each side of A.1X, work the new stitches as the outermost stitches in A.1X. Work A.1X 2-3-4 times in total vertically (84 stitches increase every time A.1X is worked) = 441-525-609 stitches. LEFT FRONT PIECE: Then work as follows: Slip the first 63-75-87 stitches on a stitch holder (= 1 repetition), keep the next 153-187-217 stitches on needle, slip the rest of stitches on a stitch holder. Now work back and forth over all stitches on needle. Work A.2 directly over leaves in A.1X and GARTER STITCH between leaves as before - see explanation above. At the end of every row slip the last 2 stitch on to stitch holder (do not work them, turn). Continue until 41-75-49 stitches remain on the needle (A.2 has now been worked 2-2-3 times vertically). Slip the last 41-75-49 stitches on stitch holder. RIGHT FRONT PIECE: Slip the last 153-187-217 stitches on round back on needle, and work as left front piece over these stitches. Then knit all stitches from stitch holders from right side back onto circular needle size 3 mm / US 2.5, pick up stitches between the 2 and 2 stitches that were put on holders in each side as follows: Pick up the strand between 2 stitches, twist the strand and place in on the right hand needle (i.e. between 2 and 2 stitches 1 stitch is increased and holes in transitions are avoided) = 553-637-777 stitches. Work 3 ridges over all stitches and loosely bind off. SLEEVES: Work sleeves in the round on double pointed needles bottom up, switch to short circular needle when needed. Cast on 46-50-56 stitches on double pointed needles size 3 mm / US 2.5 with Alpaca. Work A.3 over all stitches. When A.3 has been worked 1 time vertically, continue in stockinette stitch. Insert 1 marker thread at beginning of round = mid under sleeve. When piece measures 6-10-4 cm / 2½"-4"-1½"", increase 1 stitch on each side of marker thread mid under sleeve - READ INCREASE TIP. Increase every 3-2-2 cm / 1"-¾"-¾" 15-21-25 times in total = 76-92-106 stitches. When sleeve measures approx. 55-56-56 cm / 21½"-22"-22", loosely bind off. Make another sleeve the same way. ASSEMBLY: Sew in sleeves. |
||||||||||||||||||||||
Diagram explanations |
||||||||||||||||||||||
|
||||||||||||||||||||||
 |
||||||||||||||||||||||
 |
||||||||||||||||||||||
Have you finished this pattern?Tag your pictures with #dropspattern #andromedacardigan or submit them to the #dropsfan gallery. Do you need help with this pattern?You'll find 26 tutorial videos, a Comments/Questions area and more by visiting the pattern on garnstudio.com. © 1982-2026 DROPS Design A/S. We reserve all rights. This document, including all its sub-sections, has copyrights. Read more about what you can do with our patterns at the bottom of each pattern on our site. |
||||||||||||||||||||||


With over 40 years in knitting and crochet design, DROPS Design offers one of the most extensive collections of free patterns on the internet - translated to 17 languages. As of today we count 324 catalogs and 12290 patterns - 12280 of which are translated into English (US/in).
We work hard to bring you the best knitting and crochet have to offer, inspiration and advice as well as great quality yarns at incredible prices! Would you like to use our patterns for other than personal use? You can read what you are allowed to do in the Copyright text at the bottom of all our patterns. Happy crafting!
Post a comment to pattern DROPS 175-14
We would love to hear what you have to say about this pattern!
If you want to leave a question, please make sure you select the correct category in the form below, to speed up the answering process. Required fields are marked *.