
Popular categories
Looking for a yarn?


Comments / Questions (47)
![]() Loretta wrote:
Loretta wrote:
Io mi trovo sul rovescio del lavoro e le 12 maglia me le trovo alla fine del ferro come faccio a farle per prime e dopo aver ripetuto da ** per 3volte devo fare 2ferri sulle 12maglue del diagramma a1? Per la treccia devo fate la successione come prima ogni 7ferri?
19.03.2020 - 18:24DROPS Design answered:
Buongiorno Loretta. I ferri accorciati iniziano sul diritto del lavoro, quindi le 12 m del diagramma sono le prime maglie sul ferro. Dopo aver ripetuto 3 volte le indicazioni tra gli *, lavora due ferri solo sulle 12 maglie di A1. La treccia viene fatta dopo ogni 7 ferri . Buon lavoro!
20.03.2020 - 09:31
![]() Loretta wrote:
Loretta wrote:
Dopo le 56 maglie non e chiaro il procedimento da fare lavorate 2 ferri avanti e indietro o 2 ferri avanti e 2 ferri indietro per tre volte a poi 2 ferri avanti e indietro solo sulle 12maglie del diagramma a1?
18.03.2020 - 17:25DROPS Design answered:
Buongiorno Loretta. Deve lavorare: Ferro 1: lavorare le 12 maglie del diagramma A1. Ferro 2: lavora il ferro di ritorno su queste 12 maglie. Ferro 3: lavora tutte le maglie . Ferro 4: ferro di ritorno su tutte le maglie. Lavora questi 4 ferri in questo ordine, in tutto 3 volte. Buon lavoro!
19.03.2020 - 10:53
![]() Kerstin wrote:
Kerstin wrote:
Liebes Drops Team, das Tuch habe ich gestrickt bis zu den 56 Maschen auf der Nadel. Danach habe ich die verkürzten Reihen über A1 im Wechsel mit kompletten Reihen gestrickt, wie in der Anleitung angegeben. Dabei entstehen zwischen Zopf und Tuch sehr unschöne „Löcher“, vor allen da, wo der Zopf gekreuzt wird. Gibt es für dieses Problem eine Lösung? Vielen Dank vorab für einen Tipp.
14.09.2019 - 09:19DROPS Design answered:
Liebe Kerstin, hier finden Sie ein Video für die verkürzten Reihen und hier die Technik mit Umschläge. Viel Spaß beim stricken!
16.09.2019 - 08:55
![]() Nrimi wrote:
Nrimi wrote:
Ein ganz besonders schönes Tuch. Ich trage es viel und werde immer wieder darauf angesprochen!
16.05.2019 - 14:41
![]() Bibou wrote:
Bibou wrote:
Quand vous dites de tricoter 2 rangs etc Je fais les 2 premieres ligne du diagramme sans augmentation? 3 fois les deux premieres lignes ou bien je passe au ligne au dessus? 3, 4.. etc puis tricoter 2 rangs etc je n'ai pas compris non plus
12.01.2019 - 14:06DROPS Design answered:
Bonjour Bibou, pour le châle, vous augmentez au 1er rang de A.1 (= RANG 1 (= sur l'endroit): Tricoter le diagramme A.1 sur les 12 premières m, tricoter 2 fois la 1ère m après le marqueur et tricoter les mailles restantes à l'end (= 1 augmentation)., puis tricotez les 3 rangs suivant sans augmentez, en même temps tricotez les 3 rangs suivants de A.1 et continuez ainsi en augmentant 1 m tous les 4 rangs. Bon tricot!
14.01.2019 - 10:04
![]() Bibou wrote:
Bibou wrote:
Je ne comprends pas le même passage que pâquerettes vous lui avez répondu mais je comprends pas Pour éviter que la torsade ne soit trop serrée au niveau de la pointe, tricoter maintenant des rangs raccourcis ainsi: * Tricoter 2 rangs sur les 12 premières m de A.1, 2 rangs sur toutes les mailles comme avant mais ne pas augmenter*, répéter de *-* 3 fois au total, puis tricoter de nouveau 2 rangs sur les 12 m de A.1.
12.01.2019 - 14:00
![]() Bibou wrote:
Bibou wrote:
Bonjour je ne comprends pas arrivée rang 6 pour tricoter le jeté torse à l'envers , dois je continuer de le prendre dans le brin arrière ?
09.01.2019 - 23:20DROPS Design answered:
Bonjour Bibou, tout à fait, pour tricoter un jeté torse à l'envers, on le tricote dans le brin arrière au lieu du brin avant - Cette vidéo montre comment procéder (les 2 façons, non torse et torse). Bon tricot!
10.01.2019 - 09:51
![]() Alves wrote:
Alves wrote:
Si je veux faire avec une laine épaisseur 5 comment procéder s'il vous plaît pour avoir la bonne taille ?
28.11.2018 - 17:58DROPS Design answered:
Bonjour Mme Alves, cet ensemble se tricote avec soit une laine du groupe E comme DROPS Cloud soit avec 2 fils d'une laine du groupe E comme DROPS Air sur la base de 12 m x 16 rangs jersey = 10 x10 cm pour le bonnet et 11 m x 22 rangs point mousse = 10 x 10 cm pour le châle. Si vous n'avez pas cet échantillon, il vous faudra recalculer chaque pièce pour l'adapter à votre tension. Vous trouverez plus d'infos sur les alternatives ici. Bon tricot!
29.11.2018 - 08:44
![]() Jessica wrote:
Jessica wrote:
Hallo liebes Drops-Team, Als Strick Anfängerin muss ich hier Mal nachfragen wie genau ihr das meint mit den verkürzten reihen zur Mitte des Tuches, weil ich das noch nie gemacht habe: 2 R hin und zurück über die 12 M von A.1,..... Wird hier je eine Reihe hin und eine zurück gestrickt? Oder müssen je 2 reihen hin und zurück gestrickt werden, also insgesamt 4 reihen? Danke für eure Hilfe. :)
16.09.2018 - 22:49DROPS Design answered:
Liebe Jessica, ja genau, Sie stricken zuerst 1 Hinreihe über die Maschen von A.1, dann wenden und die Rückreihe über diese Maschen stricken (A.1 wie zuvor weiterstricken), dann 1 Hinreihe über alle Maschen (mit A.1 wie zuvor, aber keine Zunahmen mehr), wenden und die Rückreihe stricken = es sind 4 Reihen insgesamt, diese 4 Reihen stricken Sie noch 2 Mal mehr = 3 Mal insgesamt, dann 2 Reihen (= 1 Hin + 1 Rückreihe) über die Maschen von A.1 stricken. Viel Spaß beim stricken!
17.09.2018 - 09:46
![]() Mari Carmen wrote:
Mari Carmen wrote:
Buenos días. En el patrón en español creo que hay un error. Cuando llegas al centro, al empezar las vueltas acortadas, pone trabajar 2 vueltas de ida y vuelta sobre los 1 puntos del gráfico, y creo que en vez de 1 deben ser 12. Gracias y saludos.
11.01.2018 - 06:52
|
|||||||
Winter Cozy#wintercozyset |
|||||||
 |
 |
||||||
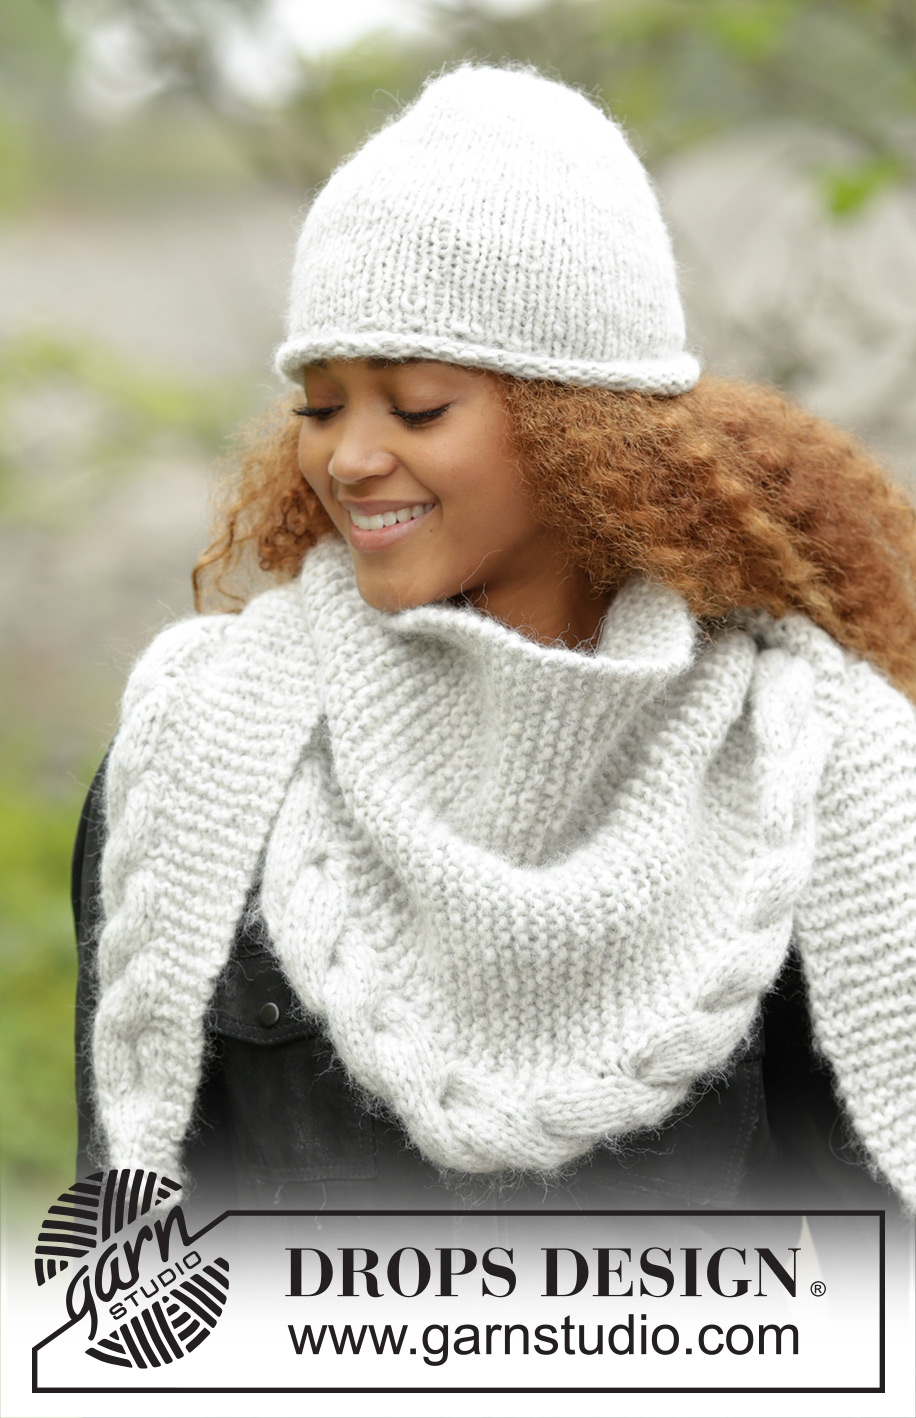
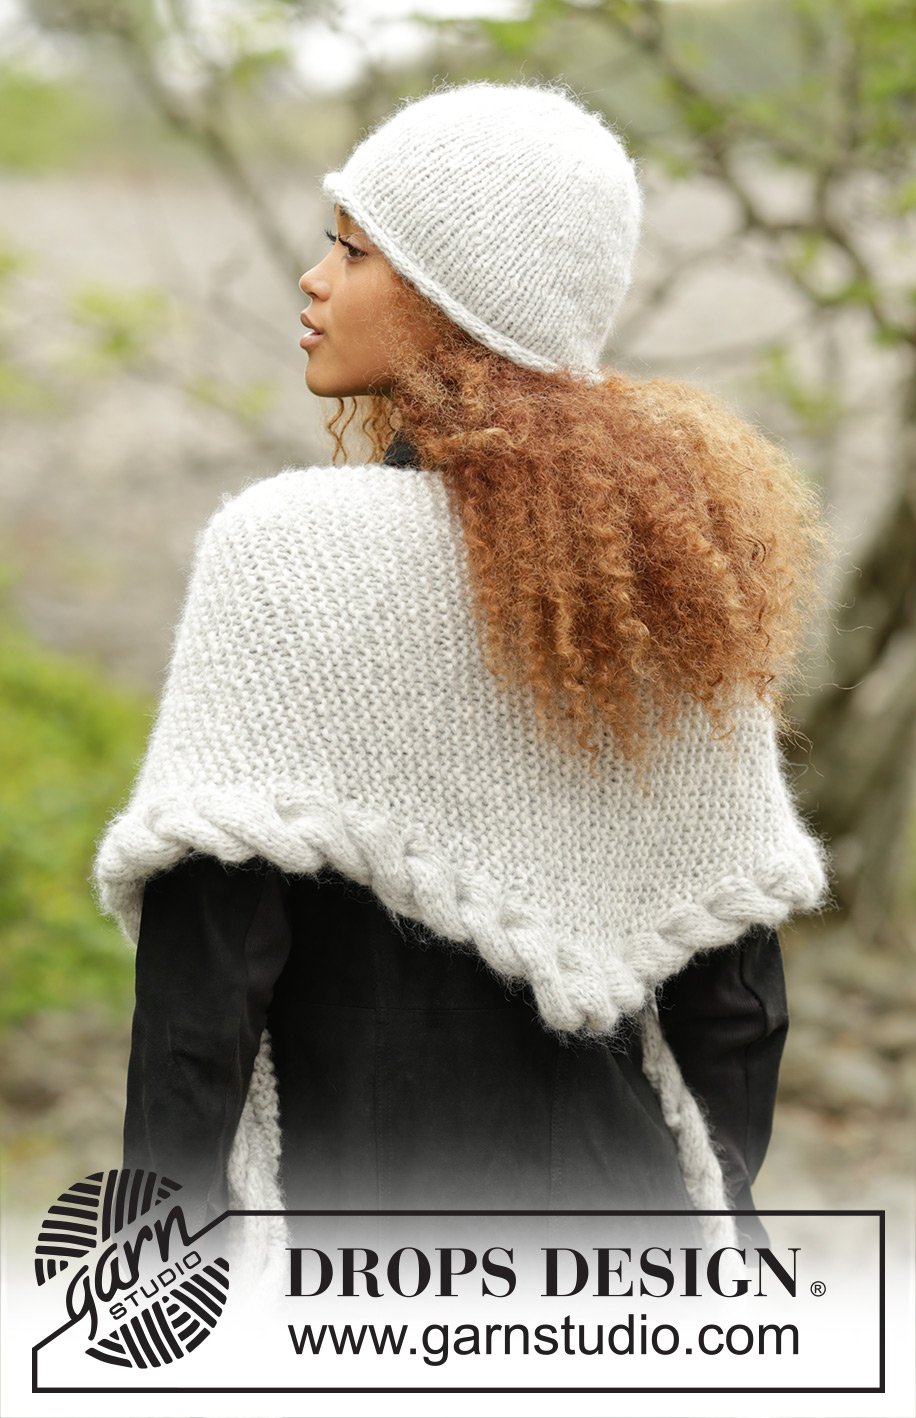
Set consists of: Knitted DROPS hat in “Cloud” or "Air" and shawl worked from side to side in garter st with cable edge in “Cloud” or "Air".
DROPS 172-10 |
|||||||
|
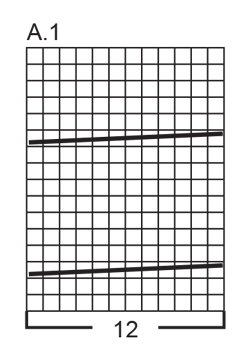
HAT: DECREASE TIP: Slip 1 st as if to K, K 1, psso. ---------------------------------------------------------- HAT: Cast on 56-60 sts on circular needle size 7 mm / US 10.75 with with Cloud or 2 threads Air. Work 4 rounds in stockinette st (= rolling edge). Work next round as follows: * K 1, P 1 *, repeat from *-* the entire round. Work 1 more round with K over K and P over P. Then continue in stockinette st until finished measurements. REMEMBER THE KNITTING GAUGE When piece measures 21-22 cm / 8¼"-8¾", insert 8-10 markers in the piece, 7-6 sts apart. On next round dec 1 st after every marker - SEE DECREASE TIP (= 8-10 sts dec). Dec like this every other round a total of 3 times, then every round a total of 2 times. On next round K all sts twisted tog two by two = 8-5 sts on needle. Cut the yarn and pull it through the remaining sts, tighten tog and fasten. Piece measures approx. 26-27 cm / 10¼"-10½" from top and down (includes rolling edge). ---------------------------------------------------------- SHAWL: KNITTING TIP: Work shawl in garter st with a cable edge along bottom edge. Work this cable edge of the outermost 12 sts. Do not work any edge st on the cable (i.e. work outermost st in A.1 as a normal st in stockinette st from both RS and WS), otherwise the cable will not roll and get the correct bounce. PATTERN: See diagram A.1. The diagrams show all rows in pattern seen from RS. MEASURING TIP: Measure shawl along the straight edge without inc/dec. ---------------------------------------------------------- SHAWL: Worked from side to side. Cast on 3 sts on circular needle size 8 mm / US 11 with with Cloud or 2 threads Air and work as follows: ROW 1 (= RS): K all sts. ROW 2 (= WS): K 2, K 1 in front and behind in next st = 4 sts on row. ROW 3 (= RS): K 1, 1 YO, K 3 = 5 sts. ROW 4 (= WS): K 3, P YO twisted, P 1. ROW 5 (= RS):K 2, 1 YO, K 3 = 6 sts. ROW 6 (= WS): K 3, P YO twisted, P 2. ROW 7 (= RS):K 3, 1 YO, K 3 = 7 sts. ROW 8 (= WS):K 3, P YO twisted, P 3. ROW 9 (= RS): K 4, 1 YO, K 3 = 8 sts. ROW 10 (= WS): K 3, P YO twisted, P 4. ROW 11 (= RS): K 5, 1 YO, K 3 = 9 sts. ROW 12 (= WS): K 3, P YO twisted, P 5. ROW 13 (= RS): K 1 in front and behind in each of the first 6 sts, insert 1 marker, K 3 = 15 sts. ROW 14 (= WS): K 3, marker, P 12. Continue to work and inc as follows - READ KNITTING TIP AND REMEMBER THE KNITTING GAUGE. ROW 1 (= RS): Work pattern according to diagram A.1 over the first 12 sts, work 2 sts in first st after marker and K the rest of row (= 1 st inc). ROW 2 (= WS): K until marker and A.1 over the last 12 sts. ROW 3 (= RS): A.1 over the first 12 sts, marker, K the rest of row. ROW 4 (= WS): K until marker and A.1 over the last 12 sts. Repeat 1st- 4th row (i.e. inc 1 st every 4th row) until there are 56 sts on row. Piece now measures approx. 81 cm / 32" - READ MEASURING TIP. Now work short rows to avoid a tight cable over the tip as follows: * Work 2 rows back and forth over the 12 sts in A.1, work 2 rows back and forth over all sts on row as before but do not inc *, repeat from *-* 3 times in total, then work 2 rows back and forth over the 12 sts A.1 again. Then work and dec as follows: ROW 1 (= RS): Work pattern according to diagram A.1 over the first 12 sts, K the 2 first sts after marker tog and K the rest of row (= 1 st dec). ROW 2 (= WS): K until marker and A.1 over the last 12 sts. ROW 3 (= RS): A.1 over the first 12 sts, marker, K the rest of row. ROW 4 (= WS): K until marker and A.1 over the last 12 sts. Repeat 1st- 4th row (i.e. dec 1 st every 4th row) until 15 sts remain on row (piece now measures approx. 159 cm / 62½"). Then work as follows: ROW 1 (= RS): K all sts in A.1 tog tog 2 by 2, marker, K 3 = 9 sts remain on needle. ROW 2 (= WS): K 3, P 6. ROW 3 (= RS): K 4, K 2 tog, K 3 = 8 sts. ROW 4 (= WS): K 3, P 5. ROW 5 (= RS):K 3, K 2 tog, K 3 = 7 sts. ROW 6 (= WS): K 3, P 4. ROW 7 (= RS):K 2, K 2 tog, K 3 = 6 sts. ROW 8 (= WS):K 3, P 3. ROW 9 (= RS): K 1, K 2 tog, K 3 = 5 sts. ROW 10 (= WS): K 3, P 2. ROW 11 (= RS): K 2 tog, K 3 = 4 sts. ROW 12 (= WS): K 4. ROW 13 (= RS): K 2 tog, K 2. ROW 14 (= WS): bind off with K. |
|||||||
Diagram explanations |
|||||||
|
|||||||
 |
|||||||
Have you finished this pattern?Tag your pictures with #dropspattern #wintercozyset or submit them to the #dropsfan gallery. Do you need help with this pattern?You'll find 24 tutorial videos, a Comments/Questions area and more by visiting the pattern on garnstudio.com. © 1982-2026 DROPS Design A/S. We reserve all rights. This document, including all its sub-sections, has copyrights. Read more about what you can do with our patterns at the bottom of each pattern on our site. |
|||||||


With over 40 years in knitting and crochet design, DROPS Design offers one of the most extensive collections of free patterns on the internet - translated to 17 languages. As of today we count 324 catalogs and 12290 patterns - 12280 of which are translated into English (US/in).
We work hard to bring you the best knitting and crochet have to offer, inspiration and advice as well as great quality yarns at incredible prices! Would you like to use our patterns for other than personal use? You can read what you are allowed to do in the Copyright text at the bottom of all our patterns. Happy crafting!
Post a comment to pattern DROPS 172-10
We would love to hear what you have to say about this pattern!
If you want to leave a question, please make sure you select the correct category in the form below, to speed up the answering process. Required fields are marked *.