
Popular categories
Looking for a yarn?


Comments / Questions (87)
![]() Galina Arnesen wrote:
Galina Arnesen wrote:
Hei. Sitter å strikke den nydelig kjolen. Lurer på at det er feil med antall økninger. Når vi setter 4 markerer og økninger gjøres på hver side av markerer, da blir det (=8 m økt). I teksten står (=6 m økt). Stemmer det?
03.03.2020 - 20:15
![]() Ann-Carola Olofsson wrote:
Ann-Carola Olofsson wrote:
Jag skickade en fråga tidigare men blev absolut inte hjälpt av den. Har med ökningarna att göra , står 4 markörer men ökas 6 masker , varför ändrar ni inte mönstret. Såg en tidigare fråga angående de detta, fick svar på den. Men jag undrar fortfarande om ökningarna det står framför markören, men menar ni framför varannan ökning och bakom markören varannan gång. Hoppas på svar denna gången.
16.02.2020 - 23:22DROPS Design answered:
Hej Ann-Carola, du har de 4 nya markörer + 1 markör i varje sida = totalt 6 markörer. Första ökningen gör du före alla 6 markörer, sedan efter 6 varv gör du en ökning till men nu gör du den efter alla 6 markörer. Sedan efter 4 varv igen före alla 6 markörer osv. Lycka till
18.02.2020 - 11:41
![]() Ann-Carola Olofsson wrote:
Ann-Carola Olofsson wrote:
Jag är nästan klar med klänningen, men har nu upptäckt jag gjort ökning hela tiden efter markören. Blir konstig nertill. Hur har ni gjort varannan gång innan och sen efter? Känner att det blir att riva.
09.02.2020 - 14:04DROPS Design answered:
Hei Ann-Carola. Slik står det i oppskriften under FRAM- OCH BAKST: LÄS ÖKNINGSTIPS. Upprepa ökningen på vart 6:e v 1 gång till, på vart 4:e v 12-12-12-12-9-8 ggr, och på vart 6:e v 2-2-2-2-4-4 ggr = 250-262-282-302-324-342 m. När arb mäter 62-64-65-67-68-70 cm ökas det 2-8-6-4-0-0 m jämnt fördelat = 252-270-288-306-324-342 m. God Fornøyelse!
10.02.2020 - 14:44
![]() Müller wrote:
Müller wrote:
Hallo, ich finde es sehr schlecht gekennzeichnet und verwirrend, daß ich in Reihe 21 mit einem Umschlag beginnen soll. Danach aber mit re M beginnen soll. Sehr Fehleranfällig die Anleitung. Wie ist es in Reihe 29? Am Anfang nur 1 Umschlag? Danach direkt immer das Triangel mit U danach?
12.07.2019 - 17:00DROPS Design answered:
Liebe Frau Müller, oops der Umschlag wird in A.2 bei 21. Reihe gestrickt, nicht bei A.1, entschuldigung. Bei der Reihe 29 in A.1 beginnen Sie die Runde mit der letzten Maschen vorrigen Runde, der Umschlag, die letzte Masche wird dann mit den 2 ersten Maschen zusammen gestrickt und der Umschlag ist jetzt die letzte Masche der Runde, Dann stricken Sie die letzte Masche in 1 A.1 zusammen mit die 2 ersten Maschen vom nächsten A.1 usw. Viel Spaß beim stricken!
15.07.2019 - 08:37
![]() Müller wrote:
Müller wrote:
Hallo, ich stricke das Diagramm A1 in L nun das 2. Mal. Wieder in Reihe 21 fügt sich durch die eine Rechts-M am Beginn das Triangel nicht über die anderen. Hier muß ein Fehler vorliegen. Bitte helfen Sie mir.
12.07.2019 - 10:11DROPS Design answered:
Liebe Frau Müller, bei Reihe 21 in A.1 fangen Sie mit 1 Umschlag, beachten Sie nur daß Sie beim vorrigen Runde die richtigen Maschenanzahl haben. Viel Spaß beim stricken!
12.07.2019 - 12:57
![]() Seda wrote:
Seda wrote:
Hello, Thanks for the beautiful dress pattern. I am making the medium size and confused about the increase part of the body. I understand that from now on there would be 48 rows and I am going to increase 4th, 6th, 8th, 12th, 16th, 18th, 20th, 24th, 28th, 30th, 32nd, 36th, 40th, 42nd, 44th, 48th rows for the medium size. Is it correct? Thank you
07.07.2019 - 19:57DROPS Design answered:
Dear Seda, in size M you increase the 2nd time 6 rows after the first increase (= work 1st row with increase, work 5 rows, then increase 2nd time on next row), then *work 3 rows, increase on next row*, repeat from *-* a total of 12 times, then *work 5 rows, increase on next row*, repeat from *-* a total of 2 times. Happy knitting!
08.07.2019 - 10:27
![]() Jette wrote:
Jette wrote:
Når arb måler fx 24 cm......, hvorfra måles der?
04.07.2019 - 09:37DROPS Design answered:
Hej Jette, jeg kan ikke finde hvor i opskriften du er... Enten måler du fra starten, eller er du kommet ned til RYG & FORSTYKKE så har vi skrevet "herfra måles arbejdet". God fornøjelse!
05.07.2019 - 12:27
![]() Jette wrote:
Jette wrote:
Der skal sættes 4 mærker og tages ud før mærkerne = 6 m taget ud? Hvordan hænger det sammen?
28.06.2019 - 11:40DROPS Design answered:
Hej Jette. Du har kvar 2 mærken från BÆRESTK (de under ærmer) + 4 nye mærker. Lycka till!
04.07.2019 - 07:37
![]() Sarah wrote:
Sarah wrote:
Where am I suppose to make the decreases when it says "When piece measures 4cm/1.5" dec 1 at n each side of the marker in the side."
01.06.2019 - 12:51DROPS Design answered:
Dear Sarah, you should decrease directly by the marker on each side - i.e. the same marker which continue from under the sleeve. For detailed instructions how to decrease, please, see DECREASE TIP above the pattern. Happy knitting!
01.06.2019 - 16:38
![]() Sarh wrote:
Sarh wrote:
I am still confused about the 13 repetitions and A.1. I assume that with A.1 each line is a row so does each row get worked 13 times or does the entire A.1 get worked 13 times. Also which way is A.1 supposed to be worked? I assume that you work from the arrow at the top down
17.05.2019 - 15:36DROPS Design answered:
Dear Sarah, diagrams are read bottom up (read more here) -the arrow means something else, see diagram key. So that on the first round in A.1 there are 10 stitches and you repeat these 10 sts a total of 13 times in width = 130 sts. You will increase in the diagram, for ex. on round 3 you make 2 yo in each A.1 = there will be 12 sts in each A.1 x 13 repeats = 156 sts. And there are 18 sts on last row in A.1 x 13 = 234 sts. Happy knitting!
20.05.2019 - 08:56
|
||||||||||||||||||||||
Beach Date#beachdatedress |
||||||||||||||||||||||
 |
 |
|||||||||||||||||||||
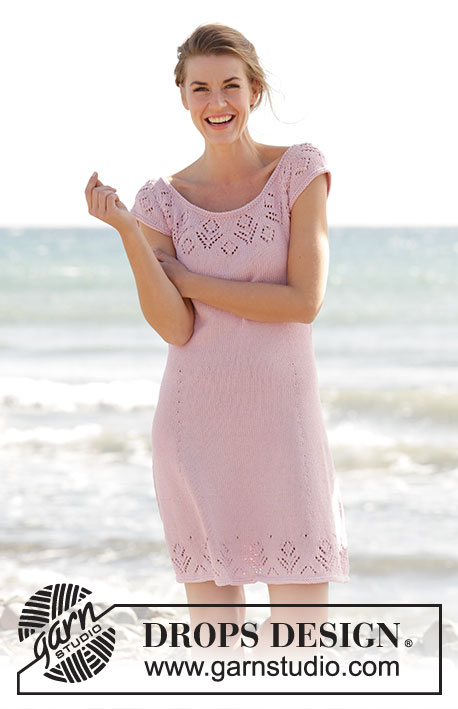
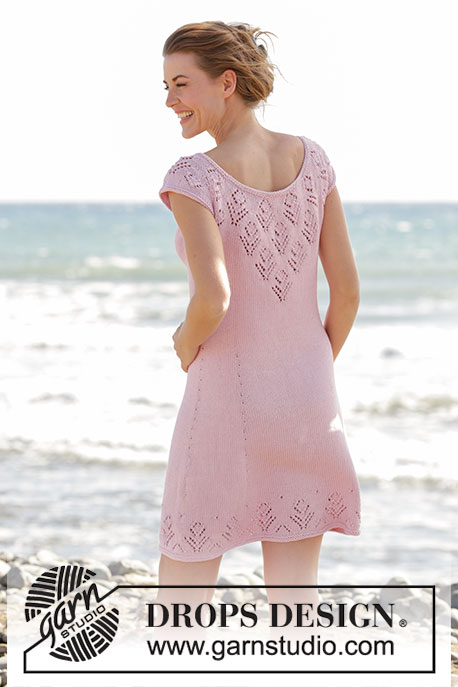
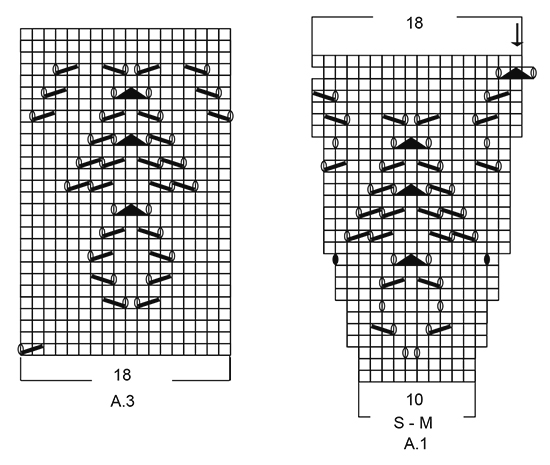
Knitted DROPS dress with round yoke and lace pattern, worked top down in ”Muskat”. Size: S - XXXL.
DROPS 167-1 |
||||||||||||||||||||||
|
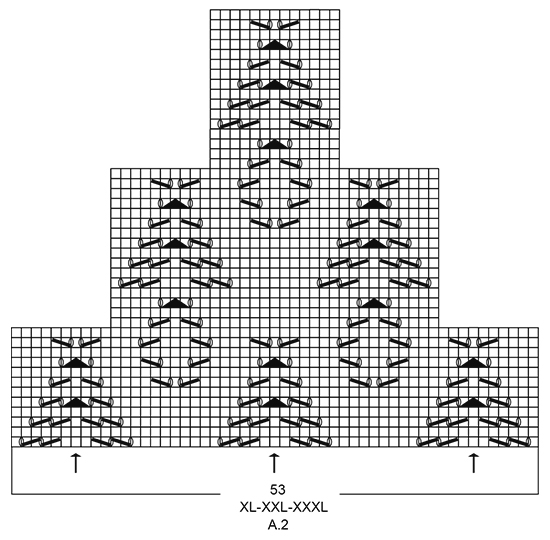
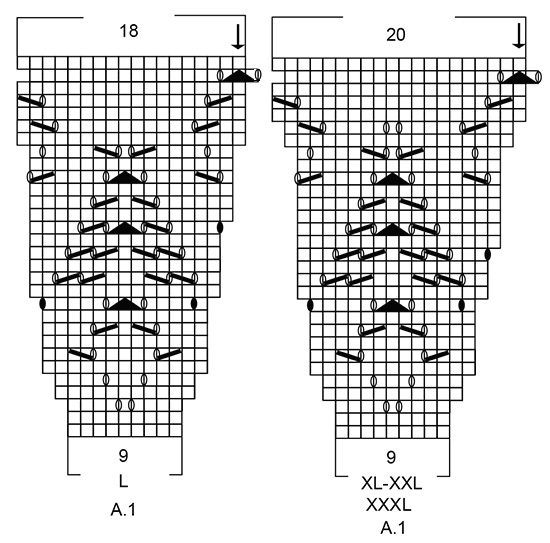
GARTER ST (worked in the round): 1 ridge = 2 rounds. * K 1 round and P 1 round *, repeat from *-*. PATTERN: See diagrams A.1 to A.3. See diagram for correct size. INCREASE TIP: Inc 1 st by making a YO. On next round K YO twisted to avoid holes. Repeat inc alternately on right and left side of the four markers. DECREASE TIP: Work until 4 sts remain before marker and work: Slip 1 st as if to K, K 1, psso, K 4, K 2 tog = 2 sts dec. Repeat in the other side. ---------------------------------------------------------- DRESS: Worked in the round, top down. YOKE: Cast on 126-132-138-140-146-150 sts on circular needle size 3.5 mm / US 4 with Muskat. Work 2 ridges in GARTER ST - see explanation above. Switch to circular needle size 4 mm / US 6. Insert a marker at the beg of the round. Work 1 round in stockinette st while inc 4-8-6-4-7-12 sts evenly = 130-140-144-144-153-162 sts. Then work 0-0-0-0-2-2 more rounds in stockinette st. On next round work pattern A.1 - see diagram for correct size, 13-14-16-16-17-18 repetitions on round. REMEMBER THE KNITTING GAUGE When entire A.1 has been worked vertically, piece measures 11-11-12-12-13-13 cm / 4⅜"-4⅜"-4¾"-4¾"-5⅛"-5⅛" and there are 234-252-288-320-340-360 sts on round. Now insert 2 markers in piece which marks transition for pattern continued down the back. Work the first 12-12-12-14-14-14 sts and insert a marker here. This is now beg of round. Then insert the second marker after 49-49-49-53-53-53 sts without working them first. Now work pattern - see diagram for correct size, as follows: Work A.2 (= 49-49-49-53-53-53 sts). NOTE: Pattern in A.2 should fit over pattern A.1. I.e. st with arrow in diagram A.2 should fit over st with arrows in diagram A.1. Then work in stockinette st over the remaining sts on round AT SAME TIME inc 20-26-14-14-30-42 sts evenly over sts in stockinette st = 254-278-302-334-370-402 sts. Work next round as follows: Work pattern as before over the first 49-49-49-53-53-53 sts, 14-17-22-25-32-38 sts in stockinette st, slip the next 50-56-58-64-68-72 sts on a stitch holder (= sleeve), cast on 8 new sts under sleeve (insert a marker in the middle of these new sts, i.e. 4 new sts on each side of marker), work the next 77-83-93-103-117-129 sts, slip the next 50-56-58-64-68-72 sts on a stitch holder for sleeve, cast on 8 new sts under sleeve (insert a marker in the middle of these sts, i.e. 4 new sts on each side of marker), work the remaining 14-17-22-25-32-38 sts on round. There are now 85-91-101-111-125-137 sts for front and back piece = 170-182-202-222-250-274 sts in total. BODY: NOW MEASURE THE PIECE FROM HERE. Continue pattern on the back as before, and work in stockinette st over the remaining sts on round. NOTE: Continue in stockinette st on the back when the pattern has been worked. When piece measures 4 cm / 1½", dec 1 st on each side of marker in each side - READ DECREASE TIP. Repeat dec every 5-5½-5½-6-6½-7 cm / 2"-2¼"-2¼"-2⅜"-2½"-2¾" 3 more times = 154-166-186-206-234-258 sts. When piece measures 24-26-27-29-30-32 cm / 9½"-10¼"-10½"-11½"-11¾"-12½", insert 4 new markers in piece, beg from marker in the right side: NOTE: Remove the 2 markers on each side of the pattern on the back piece first! Work 16-17-19-21-24-27 sts, insert 1st marker, work 45-49-55-61-69-75 sts, insert 2nd marker, work 16-17-19-21-24-27 sts, marker in left side is here, work 16-17-19-21-24-27 sts, insert 3rd marker, work 45-49-55-61-69-75 sts, insert 4th marker, work the remaining 16-17-19-21-24-27 sts until marker in the right side. Move the markers upwards when working. On next round inc 1 st before all markers (= 6 sts inc) – see INCREASE TIP. Repeat inc every 6th round 1 more time, every 4th round 12-12-12-12-9-8 times, every 6th round 2-2-2-2-4-4 times = 250-262-282-302-324-342 sts. When piece measures 62-64-65-67-68-70 cm / 24½"-25¼"-25½"26½"-26¾"-27½"', inc 2-8-6-4-0-0 sts evenly = 252-270-288-306-324-342 sts. Then work pattern A.3 (= 18 sts) 14-15-16-17-18-19 repetitions in width. When entire A,3 has been worked vertically, switch to circular needle size 3.5 mm / US 4. Work 2 ridges and bind off. SLEEVE EDGE: Slip sts from stitch holder back on double pointed needles size 4 mm / US 6 (= 50-56-58-64-68-72 sts). Pick up 1 st in each of the 8 new sts cast on under sleeve = 58-64-66-72-76-80 sts. Work 1 round in stockinette st while dec 4 sts evenly = 54-60-62-68-72-76 sts. Continue with 2 rounds in stockinette st. Switch to double pointed needles size 3.5 mm / US 4 and work 2 ridges. Bind off. Repeat on the edge of the other sleeve. |
||||||||||||||||||||||
Diagram explanations |
||||||||||||||||||||||
|
||||||||||||||||||||||
 |
||||||||||||||||||||||
 |
||||||||||||||||||||||
 |
||||||||||||||||||||||
 |
||||||||||||||||||||||
 |
||||||||||||||||||||||
Have you finished this pattern?Tag your pictures with #dropspattern #beachdatedress or submit them to the #dropsfan gallery. Do you need help with this pattern?You'll find 26 tutorial videos, a Comments/Questions area and more by visiting the pattern on garnstudio.com. © 1982-2026 DROPS Design A/S. We reserve all rights. This document, including all its sub-sections, has copyrights. Read more about what you can do with our patterns at the bottom of each pattern on our site. |
||||||||||||||||||||||


With over 40 years in knitting and crochet design, DROPS Design offers one of the most extensive collections of free patterns on the internet - translated to 17 languages. As of today we count 324 catalogs and 12291 patterns - 12281 of which are translated into English (US/in).
We work hard to bring you the best knitting and crochet have to offer, inspiration and advice as well as great quality yarns at incredible prices! Would you like to use our patterns for other than personal use? You can read what you are allowed to do in the Copyright text at the bottom of all our patterns. Happy crafting!
Post a comment to pattern DROPS 167-1
We would love to hear what you have to say about this pattern!
If you want to leave a question, please make sure you select the correct category in the form below, to speed up the answering process. Required fields are marked *.