
Popular categories
Looking for a yarn?


Comments / Questions (92)
![]() Sylvie wrote:
Sylvie wrote:
Bonjour, J’aimerais comprendre la 2e partie de l’empiècement. Quand le A1 a été tricoté une fois, on tricote 12 m, on glisse 49m et on fait le A2. On termine par des m end avec des aug. Au rang suivant, il me semble comprendre qu’on doit faire le A2 sur les 49 m glissées. Ça ne fonctionne donc pas. Il y a certainement quelque chose qui m’échappe…On tricote toujours en rond? J’ai besoin d’aide pour réussir ce beau modèle. Merci beaucoup!
03.01.2025 - 00:52DROPS Design answered:
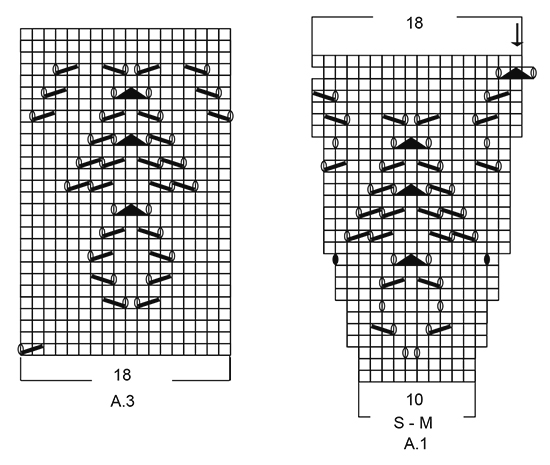
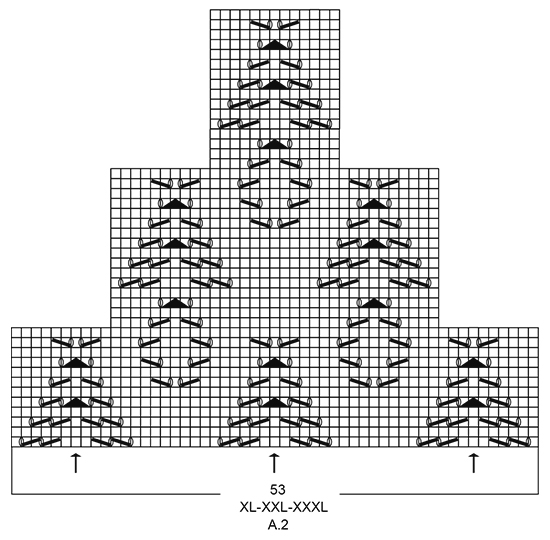
Bonjour Sylvie, lorsque A.1 est terminé, vous décalez le début du tour: tricotez les 12 premières mailles sur l'aiguille gauche et placez votre marqueur de début de tour ici, vous commencez maintenant à tricoter les 49 mailles de A.2 à partir d'ici, la maille avec la flèche dans A.2 doit être la maille avec la flèche dans A.1 (= la double diminution à la fin de A.1), après ces 49 mailles de A.2, terminez le tour en jersey - en même temps, augmentez dans les mailles jersey pour avoir le nombre de mailles indiqué pour la taille. Bon tricot!
03.01.2025 - 15:34
![]() Nina wrote:
Nina wrote:
When the two back markers before the increase does that mean we move the beginning of the round to the marker that starts the front of the dress.
08.05.2024 - 08:46DROPS Design answered:
Dear Nina, you will keep the 2 markers inserted in the middle of the new stitches cast on under sleeve and remove the 2 markers on mid back (used for the lace pattern); you can consider starting rounds on body from one of these markers, ie in the middle of the 4 new sts cast on under one sleeve. Happy knitting!
08.05.2024 - 13:02
![]() Malgorzata wrote:
Malgorzata wrote:
Przesowac markery w miare postepu robotki ktore markery i w ktora strone
30.04.2024 - 09:49DROPS Design answered:
Witaj Małgosiu, markery będą się w sumie same przesuwać :) Chodzi o to, aby nie zdejmować ich z drutów (jeśli nie jest to napisane we wzorze) i wykonywać w ich miejscu konkretne operacje, czyli zamykanie/dodawanie oczek zgodnie z opisem. Pozdrawiamy!
30.04.2024 - 12:25
![]() Malgorzata wrote:
Malgorzata wrote:
W nastepnym okrazeniu dodac 1 oczko przed kazdym markerem w sumie 6 oczek jak to mozliwe przeciez markerow jest 4 i dodawac przed markerem a za juz nie o co tu chodzi
30.04.2024 - 09:28DROPS Design answered:
Witaj Małgosiu, po usunięciu 2 markerów, które wyznaczają ścieg fantazyjny z tyłu sukienki, w robótce będzie 6 markerów: po 1 na każdym boku i po 2 na przodzie i tyle. Pozdrawiamy!
30.04.2024 - 12:22
![]() Malgorzata wrote:
Malgorzata wrote:
UWAGA: schemat A.2 powinien znajdować się ponad A.1: oczka ze strzałką w schemacie A.2 powinny być oczkami ze strzałką w schemacie A.1, przer. pozostałe o. dżersejem, W TYM SAMYM CZASIE równomiernie dodać 20-26-14-14-30-42 o. ponad o. dżersejem = O co tu chodzi
10.04.2024 - 14:08DROPS Design answered:
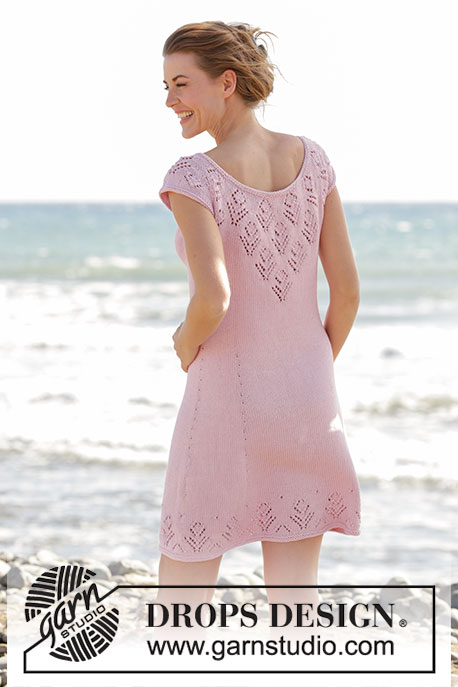
Witaj Małgosiu, chodzi i rozmieszczenie schematu A.2 ponad schematem A.1. Oczko które jest oznaczone strzałką w schemacie A.2 będzie na tym samym poziomie co jest strzałka w schemacie A.1 (jedno nad drugim). Zobacz ostatnie zdjęcie jak ażur wygląda z tyłu na sukience, to wiele rozjaśnia. Pozdrawiamy!
11.04.2024 - 08:20
![]() Malgorzata wrote:
Malgorzata wrote:
Co to znaczy dalej przerabiac dzersejem w tym samym czasie dodac 20 oczek ponad dzersejem kiedy dodac te oczka
10.04.2024 - 14:06DROPS Design answered:
Witaj Małgosiu, powinnaś dodać te 20 oczek, gdy zaczynasz przerabiać schemat A.2. Równomiernie dodajesz oczka na części dżersejem (nie tam gdzie jest ażur). Jak równomiernie dodawać oczka znajdziesz TUTAJ. Pozdrawiamy!
11.04.2024 - 08:11
![]() Petra Warburg wrote:
Petra Warburg wrote:
Har lavet en løs aflukning på ærmekant, men syntes ikke rigtigt om det. Hvilken afslutning vil i anbefale . Tænker lidt på italiensk afslutning.
01.04.2024 - 15:05DROPS Design answered:
Hej Petra, det er en smagssag, du kan prøve at lukke af med dobbelt tråd, eller så finder der mange flere måder at lukke af på. Gå ind på Tips & Hjælp - Video - Luk af
05.04.2024 - 10:53
![]() Jane Janse Van Rensburg wrote:
Jane Janse Van Rensburg wrote:
I am struggling with the rows where you have to YO between 2 stitches and then immediately slip 1, knit 1, psso. If I slip 1, knit 1, psso, I have an extra stitch, i.e. when I must have 12, I have 13 stitches. I also fail to understand how to YO between 2 stitches and then work the last knitted stitch together with the next stitch. Is there a video that I can watch somewhere that shows how to work the stitches? Or must I have extra stitches and then work half the diagram at the end of the round?
04.10.2022 - 21:43DROPS Design answered:
Hi Jane, The YO and the psso equal each other out so you have the same number of stitches. On your second question, the knitted together stitches come before the YO (the diagram is read from right to left and the symbol is a the diagonal line which goes down from right to left). After the YO it is always psso (diagonal line which goes up from right to left). Hope this helps and happy knitting!
05.10.2022 - 06:56
![]() Angela Casamassima wrote:
Angela Casamassima wrote:
Mi piace moltissimo questo modello ma non so lavorare dall'alto al basso. È possibile avere le spiegazioni dal basso verso l'alto? Grazie mille buonasera
20.07.2021 - 19:04DROPS Design answered:
Ciao Angela, hai visto la lezione DROPS Come lavorare un maglione top down (dall'alto in basso)?
20.07.2021 - 21:46
![]() Laila Sandvold wrote:
Laila Sandvold wrote:
Hei, jeg lurer på hvorfor dere ikke har omkrets str på oppskriftene deres? Dere har jo bare merket med str s- xxl, er jo ikke goldt og vite om en skal strikke L eller XL. Er det meningen at jeg må regne meg frem til riktig str, dette gjelder i allefall de oppskriftene jeg har vært og strikket og sett på. Og da må jeg regne, hadde vært fint om dere kunne legge til antatt overvidden osv. Mvh Laila Sandvold
22.06.2021 - 17:41DROPS Design answered:
Hej Laila. Längst ner på oppskriften finns det en måleskiss med mål i cm i alla storlekar. Mvh DROPS Design
23.06.2021 - 07:57
|
||||||||||||||||||||||
Beach Date#beachdatedress |
||||||||||||||||||||||
 |
 |
|||||||||||||||||||||
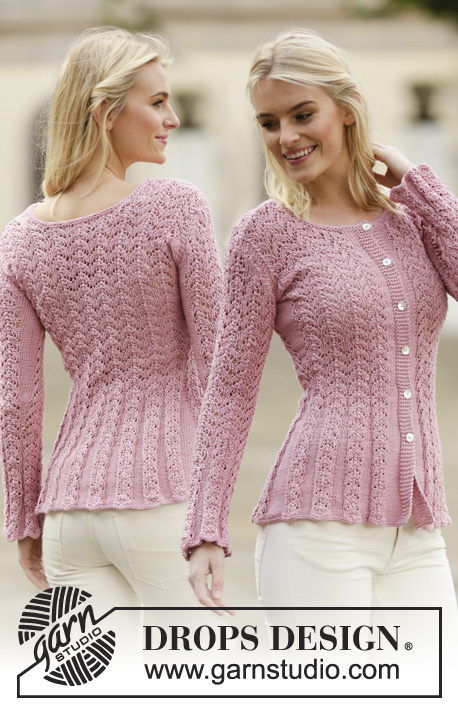
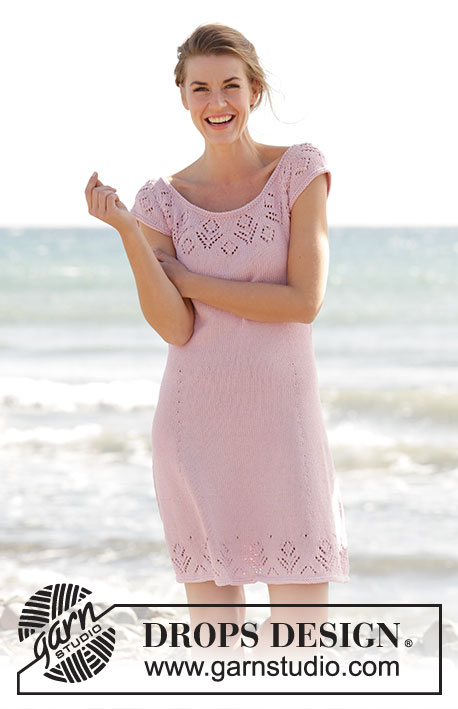
Knitted DROPS dress with round yoke and lace pattern, worked top down in ”Muskat”. Size: S - XXXL.
DROPS 167-1 |
||||||||||||||||||||||
|
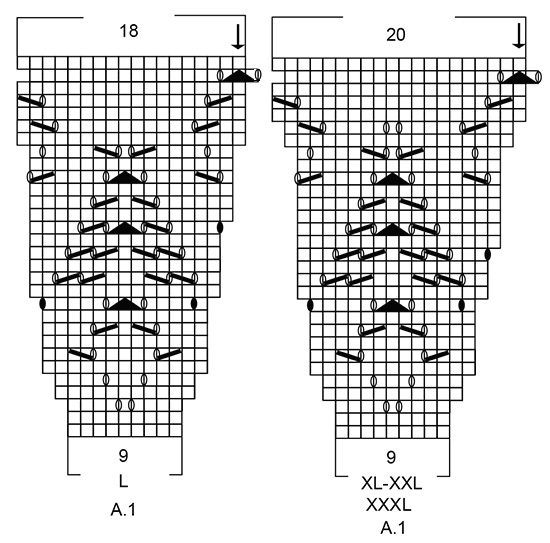
GARTER ST (worked in the round): 1 ridge = 2 rounds. * K 1 round and P 1 round *, repeat from *-*. PATTERN: See diagrams A.1 to A.3. See diagram for correct size. INCREASE TIP: Inc 1 st by making a YO. On next round K YO twisted to avoid holes. Repeat inc alternately on right and left side of the four markers. DECREASE TIP: Work until 4 sts remain before marker and work: Slip 1 st as if to K, K 1, psso, K 4, K 2 tog = 2 sts dec. Repeat in the other side. ---------------------------------------------------------- DRESS: Worked in the round, top down. YOKE: Cast on 126-132-138-140-146-150 sts on circular needle size 3.5 mm / US 4 with Muskat. Work 2 ridges in GARTER ST - see explanation above. Switch to circular needle size 4 mm / US 6. Insert a marker at the beg of the round. Work 1 round in stockinette st while inc 4-8-6-4-7-12 sts evenly = 130-140-144-144-153-162 sts. Then work 0-0-0-0-2-2 more rounds in stockinette st. On next round work pattern A.1 - see diagram for correct size, 13-14-16-16-17-18 repetitions on round. REMEMBER THE KNITTING GAUGE When entire A.1 has been worked vertically, piece measures 11-11-12-12-13-13 cm / 4 3/8''-4 3/8''-4¾''-4¾''-5 1/8''-5 1/8'' and there are 234-252-288-320-340-360 sts on round. Now insert 2 markers in piece which marks transition for pattern continued down the back. Work the first 12-12-12-14-14-14 sts and insert a marker here. This is now beg of round. Then insert the second marker after 49-49-49-53-53-53 sts without working them first. Now work pattern - see diagram for correct size, as follows: Work A.2 (= 49-49-49-53-53-53 sts). NOTE: Pattern in A.2 should fit over pattern A.1. I.e. st with arrow in diagram A.2 should fit over st with arrows in diagram A.1. Then work in stockinette st over the remaining sts on round AT SAME TIME inc 20-26-14-14-30-42 sts evenly over sts in stockinette st = 254-278-302-334-370-402 sts. Work next round as follows: Work pattern as before over the first 49-49-49-53-53-53 sts, 14-17-22-25-32-38 sts in stockinette st, slip the next 50-56-58-64-68-72 sts on a stitch holder (= sleeve), cast on 8 new sts under sleeve (insert a marker in the middle of these new sts, i.e. 4 new sts on each side of marker), work the next 77-83-93-103-117-129 sts, slip the next 50-56-58-64-68-72 sts on a stitch holder for sleeve, cast on 8 new sts under sleeve (insert a marker in the middle of these sts, i.e. 4 new sts on each side of marker), work the remaining 14-17-22-25-32-38 sts on round. There are now 85-91-101-111-125-137 sts for front and back piece = 170-182-202-222-250-274 sts in total. BODY: NOW MEASURE THE PIECE FROM HERE. Continue pattern on the back as before, and work in stockinette st over the remaining sts on round. NOTE: Continue in stockinette st on the back when the pattern has been worked. When piece measures 4 cm / 1½'', dec 1 st on each side of marker in each side - READ DECREASE TIP. Repeat dec every 5-5½-5½-6-6½-7 cm / 2"-2 1/4"-2 1/4"-2 3/8"-2½"-2 3/4" 3 more times = 154-166-186-206-234-258 sts. When piece measures 24-26-27-29-30-32 cm / 9½"-10 1/4"-10½"-11½"-11 3/4"-12½", insert 4 new markers in piece, beg from marker in the right side: NOTE: Remove the 2 markers on each side of the pattern on the back piece first! Work 16-17-19-21-24-27 sts, insert 1st marker, work 45-49-55-61-69-75 sts, insert 2nd marker, work 16-17-19-21-24-27 sts, marker in left side is here, work 16-17-19-21-24-27 sts, insert 3rd marker, work 45-49-55-61-69-75 sts, insert 4th marker, work the remaining 16-17-19-21-24-27 sts until marker in the right side. Move the markers upwards when working. On next round inc 1 st before all markers (= 6 sts inc) – see INCREASE TIP. Repeat inc every 6th round 1 more time, every 4th round 12-12-12-12-9-8 times, every 6th round 2-2-2-2-4-4 times = 250-262-282-302-324-342 sts. When piece measures 62-64-65-67-68-70 cm / 24½"-25 1/4"-25½"26½"-26 3/4"-27½"', inc 2-8-6-4-0-0 sts evenly = 252-270-288-306-324-342 sts. Then work pattern A.3 (= 18 sts) 14-15-16-17-18-19 repetitions in width. When entire A,3 has been worked vertically, switch to circular needle size 3.5 mm / US 4. Work 2 ridges and bind off. SLEEVE EDGE: Slip sts from stitch holder back on double pointed needles size 4 mm / US 6 (= 50-56-58-64-68-72 sts). Pick up 1 st in each of the 8 new sts cast on under sleeve = 58-64-66-72-76-80 sts. Work 1 round in stockinette st while dec 4 sts evenly = 54-60-62-68-72-76 sts. Continue with 2 rounds in stockinette st. Switch to double pointed needles size 3.5 mm / US 4 and work 2 ridges. Bind off. Repeat on the edge of the other sleeve. |
||||||||||||||||||||||
Diagram explanations |
||||||||||||||||||||||
|
||||||||||||||||||||||
|
||||||||||||||||||||||

|
||||||||||||||||||||||
|
||||||||||||||||||||||
|
||||||||||||||||||||||

|
||||||||||||||||||||||
Have you finished this pattern?Tag your pictures with #dropspattern #beachdatedress or submit them to the #dropsfan gallery. Do you need help with this pattern?You'll find 26 tutorial videos, a Comments/Questions area and more by visiting the pattern on garnstudio.com. © 1982-2025 DROPS Design A/S. We reserve all rights. This document, including all its sub-sections, has copyrights. Read more about what you can do with our patterns at the bottom of each pattern on our site. |
||||||||||||||||||||||


With over 40 years in knitting and crochet design, DROPS Design offers one of the most extensive collections of free patterns on the internet - translated to 17 languages. As of today we count 314 catalogs and 11822 patterns - 11812 of which are translated into English (US/in).
We work hard to bring you the best knitting and crochet have to offer, inspiration and advice as well as great quality yarns at incredible prices! Would you like to use our patterns for other than personal use? You can read what you are allowed to do in the Copyright text at the bottom of all our patterns. Happy crafting!
Post a comment to pattern DROPS 167-1
We would love to hear what you have to say about this pattern!
If you want to leave a question, please make sure you select the correct category in the form below, to speed up the answering process. Required fields are marked *.