
Popular categories
Looking for a yarn?


Comments / Questions (115)
![]() Guylaine wrote:
Guylaine wrote:
Bonjour, je suis en train de tricoter ce modèle et j’ai l’impression que les indications écrites ne correspondent pas au mesures du schéma. Je fais la taille XL et les emmanchures doivent commencer à 67cm de hauteur totale, alors que sur le schéma elles sont à 6+89 cm soit 95cm . Laquelle de ces informations dois-je suivre ? Merci pour votre aide.
12.05.2026 - 10:18DROPS Design answered:
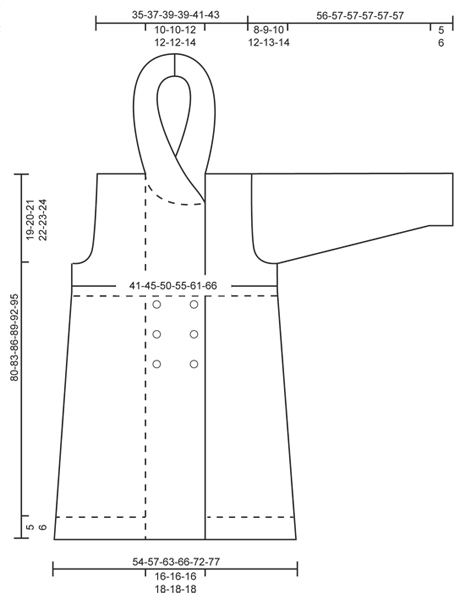
Bonjour Guylaine, la longueur indiquée à gauche dans le schéma correspond à la longueur totale, soit 89 cm en taille XL. Vous commencez les emmanchures à 67 cm et vous avez ainsi 89-67=22 cm de hauteur d'emmanchures. Les 6 cm de côtes sont compris dans les 67 cm avant les emmanchures. Bon tricot!
12.05.2026 - 14:15
![]() Severine wrote:
Severine wrote:
Je complète ma question De l emmanchure a l épaule il y a 21 cm (taille L) et pour l arrondi J ai 10cm. C’est là que je rencontre le problème. Faut il froncer le dos ou le devant pour faire correspondre l arrondi avec diminutions des emmanchures?
10.05.2026 - 18:16DROPS Design answered:
Bonjour Séverine, tout le haut de la manche doit correspondre à l'emmanchure, commencez sous la manche de sorte que la couture de la manche soit au niveau du côté de la veste, épinglez si besoin le milieu du haut de la manche au niveau de l'épaule et assemblez ainsi la manche tout autour de l'emmanchure. Bon tricot!
11.05.2026 - 09:27
![]() Severine wrote:
Severine wrote:
Bonjour Je suis à l assemblage et je ne comprends pas le montage des manches. Pour le dos et les devants il y a les diminutions pour l emmanchure, et pour les manches il n’y a que les diminutions pour l arrondi. À quel endroit de la manche faut il attacher l emmanchure du dos et devant? Merci
10.05.2026 - 17:55DROPS Design answered:
Bonjour Séverine, vous avez rabattu pour les emmanchures à la fois pour le dos/les devants et les manches , même si elles sont différentes. La couture du milieu sous la manche doit se trouver au milieu du côté de la veste, assemblez ensuite l'arrondi de la manche tout le long de l'emmanchure. Bon tricot!
11.05.2026 - 09:25
![]() Ulrike Hartmannschott wrote:
Ulrike Hartmannschott wrote:
Hallo, wieso werden beim linken Vorderteil 2 Maschen glatt rechts gestrickt und beim rechten Vorderteil nur 1 Masche glatt rechts? Sonst ist die Anleitung super. Liebe Grüße
22.10.2025 - 16:48DROPS Design answered:
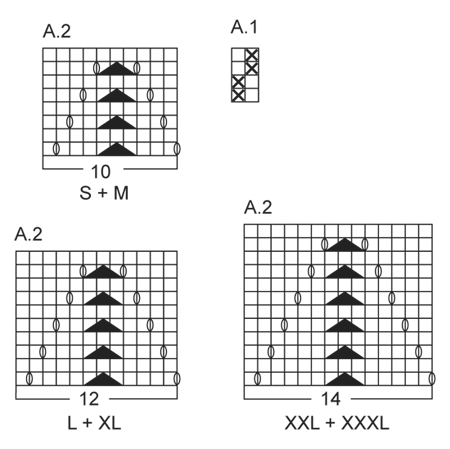
Liebe Ulrike, das liegt daran, dass A.2 am rechten Vorderteil mit 1 Umschlag nach den 2 glatt rechten Maschen beginnt, am linken Vorderteil jedoch mit 1 rechten Masche endet und dann nur noch 1 rechte Masche gestrickt werden muss, damit zwischen dem Umschlag von A.2 und der Blende 2 glatt rechte Maschen liegen. Viel Spaß beim Weiterstricken und danke für Ihr Lob! :-)
22.10.2025 - 20:11
![]() SILVIE wrote:
SILVIE wrote:
Hallo liebes Drops Team...ich bin jetzt beim ersten Vorderteil angelangt aber es sieht für mich merkwürdig aus, weil das große Perlmuster viel höher erscheint als das kraus rechts gestrickte Bündchen..gleicht sich das irgendwie noch aus? Nach 3 Reihen glatt rechts über dem kraus Bündchen beträgt die Höhendifferenz bei mir schon 2 cm...und ich denke, das könnte im Verlauf noch mehr werden...was mache ich falsch? Lg
16.12.2024 - 00:36DROPS Design answered:
Liebe Sylvie, wenn der Unterschied zwischen A.1/Perlmuster und Krausrechte untere Blende zu groß ist, dann können Sie verkürzten Reihen stricken, dh nur die Krausrechte Maschen stricken (nicht die Blende), so können Sie diesen Unterschied vermindern. Viel Spaß beim Stricken!
16.12.2024 - 11:22
![]() Katharina wrote:
Katharina wrote:
Hallo, Die Grösse xxxl entspricht welcher Grösse?mfg Katharina
21.11.2024 - 10:23DROPS Design answered:
Liebe Katharina, um die richtige Größe zu finden, messen Sie eine ähnliche Jacke, die Sie gerne tragen und vergleichen Sie die Maßnahmen mit den in der Maßskizze - hier lesen Sie mehr. Viel Spaß beim Stricken!
21.11.2024 - 15:37
![]() Irene Manuela Guerrero wrote:
Irene Manuela Guerrero wrote:
Me encantaría aprender a tejer con este sistema, sólo conozco las agujas rectas y el crochet, éste sistema sin costura me encantaría, vivo en España Gerona y no creo que consiga estas agujas, no? Gracias
18.10.2023 - 05:55
![]() Jolanda Baltus wrote:
Jolanda Baltus wrote:
Bij de beschryving van het rechtervoorpand, is de mindering voor de mouwinzet niet opgenomen. Het is even puzzelen, verder mooi patroon, nog wel twee extra knoopsgaten meegenomen :)
17.01.2023 - 10:16
![]() Lisa Robert wrote:
Lisa Robert wrote:
Rabattre maintenant pour les emmanchures au début de chaque rang de chaque côté: 1 fois 3 m, 0-0-1-2-3-4 fois 2 m et 1-2-2-3-3-3 fois 1 m = 39-41-43-43-45-47 m. A cette partie du tricot je suis a 57m si je rabats comme indiqué je ne trouve pas 43m je crois que je ne comprends pas bien cette partie du patron, pouvez-voue m'expliquer s'il vous plait?
25.10.2022 - 09:51DROPS Design answered:
Bonjour Mme Robert, en taille L, vous allez rabattre 3 m au début des 2 rangs suivants (= à la fin du rang suivant sur l'endroit + à la fin du rang suivant sur l'envers) (= 3 m de chaque côté), puis 2 mailles au début des 2 rangs suivants (= 2 m de chaque côté) et enfin 1 maille au début des 4 rangs suivants (2 m de chaque côté) vous avez ainsi rabattu 3+2+2 = 7 m de chaque côté soit: 57-14=43 mailles. Bon tricot!
25.10.2022 - 13:13
![]() Anna wrote:
Anna wrote:
Woher stammt die Wolle bzw. ist sie aus artgerechter Haltung gewonnen? Kann ich zu viel bestelltes Garn umtauschen?
22.10.2022 - 10:06DROPS Design answered:
Liebe Anna, mehr übere unsere Wollen können Sie hier und auch hier lesen - über Umtauschen wenden Sie sich bitte direkt an Ihrem DROPS Händler an, dort wird man Ihnen am besten helfen. Viel Spaß beim stricken!
24.10.2022 - 07:53
|
|||||||||||||
Into The Woods#intothewoodsjacket |
|||||||||||||
 |
 |
||||||||||||
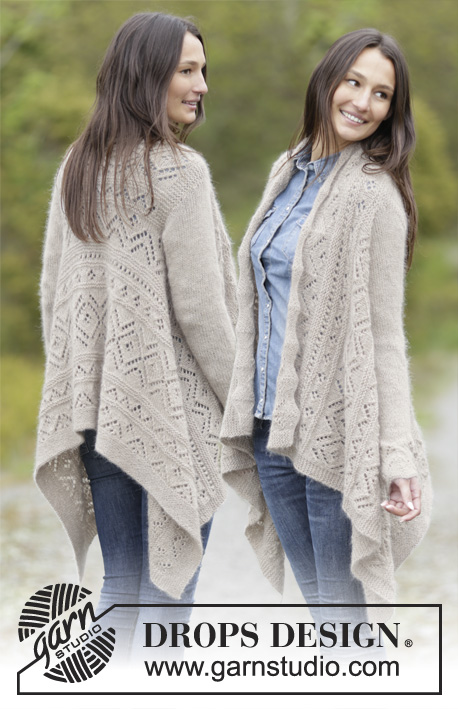
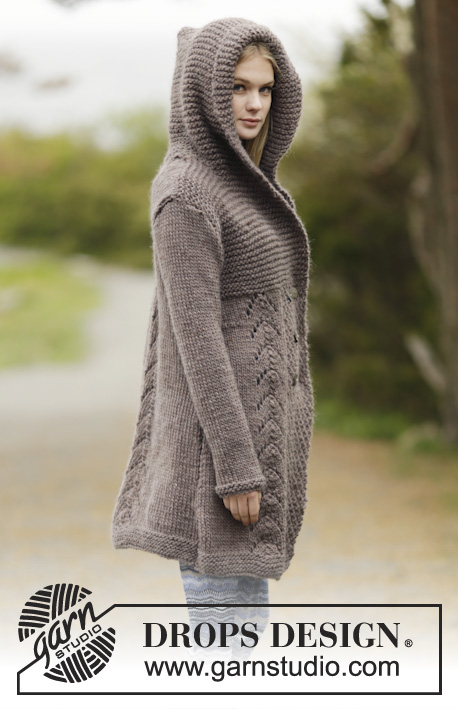
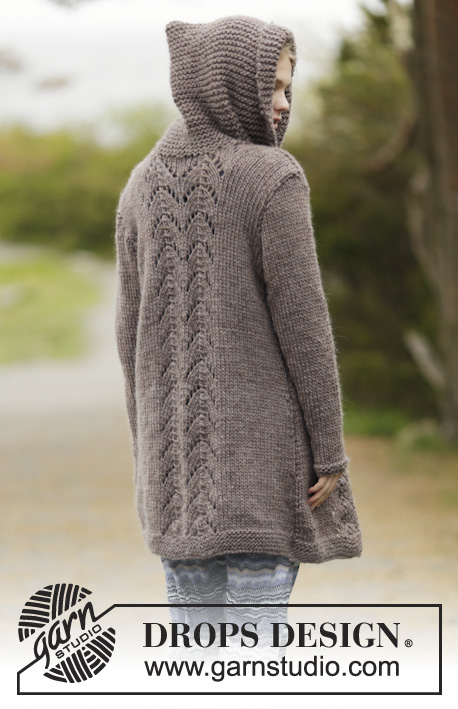
Knitted DROPS jacket in garter st, double seed st and lace pattern with hood in ”Snow”. Size: S - XXXL.
DROPS 164-1 |
|||||||||||||
|
GARTER ST (back and forth): K all rows. 1 ridge = K2 rows. PATTERN: See diagram A.1 and A.2 (choose diagram for correct size). The diagrams show all rows in pattern seen from RS. DECREASE TIP: All dec are done from RS! Dec inside 1 st K and 1 edge st in garter st. Dec as follows when 2 sts remain before 1 K st and 1 edge st in garter st: K 2 tog. Dec as follows after 1 sts in garter st and 1 sts: Slip 1 st as if to K, K 1, psso. INCREASE TIP: All inc are done from RS. Inc inside 1 edge st in garter st and 1 K by making 1 YO. On next row P YO twisted to avoid holes. MEASURING TIP 1 (applies for body and back piece): To get the correct proportions on the jacket make all length measurements when work lies flat. Because of the weight of the yarn and the garter sts on the yoke the work will stretch approx. 10 cm / 4" in total length to what is shown on the schematic drawing. MEASURING TIP 2 (applies for sleeves): Because of the weight of the yarn make all length measurements while holding the piece up. BUTTONHOLES: Dec for 6 buttonholes on right front piece (from RS): Work 4 sts, bind off 2 sts for button hole, work 6-6-6-8-8-8 sts, cast of the next 2 sts for buttonhole = 2 buttonholes on same row (4 sts remain on band). On next row cast on 2 new sts over the bind off sts. Dec for buttonholes when piece measures: SIZE S: 36, 45, 54 cm / 14¼", 17¾", 21¼" SIZE M: 38, 47, 56 cm / 15", 18½", 22" SIZE L: 40, 49, 58 cm / 15¾", 19¼", 22¾" SIZE XL: 42, 51, 60 cm / 16½", 20", 23½" SIZE XXL: 44, 53, 62 cm / 17¼", 21", 24½" SIZE XXXL: 46, 55, 64 cm / 18", 21½", 25¼" NOTE: Approx. 1 cm / ½" remains after last buttonhole before working in garter st over all sts. (on band). ---------------------------------------------------------- BACK PIECE: The piece is worked back and forth on circular needle because of no of sts. Cast on 61-65-71-75-81-87 sts (includes 1 edge st in each side) on circular needle size 7 mm / US 10.75 with Snow. Work in GARTER ST - see explanation above, for 5-5-5-6-6-6 cm / 2"-2"-2"-2⅜"-2⅜"-2⅜" (1st row = RS). Switch to circular needle size 8 mm / US 11 and work next row from RS as follows: 1 edge st in garter st, 20-22-23-25-26-29 sts in stockinette st, work pattern according to diagram A.2 2 times in total (choose diagram for correct size = 2 repetitions of 10-10-12-12-14-14 sts), work in stockinette st until 1 st remains on row and finish with 1 edge st in garter st. Continue like this with stockinette st, pattern and 1 edge st in garter st in each side. REMEMBER THE KNITTING GAUGE When piece measures 8-8-8-10-10-10 cm / 3"-3"-3"-4"-4"-4", dec 1 st in each side - READ DECREASE TIP (= 2 sts dec) and MEASURING TIP 1. Repeat dec in each side every 7-7-8-10-10-10 cm / 2¾"-2¾"-3"-4"-4"-4" a total of 7-7-7-6-6-6 times = 47-51-57-63-69-75 sts. Continue to work until piece measures 61-63-65-67-69-71 cm / 24"-24¾"-25½"-26⅜"-27⅛"-28". Now bind off for armholes at beg of every row in each side as follows: bind off 3 sts 1 time, 2 sts 0-0-1-2-3-4 times and 1 st 1-2-2-3-3-3 times = 39-41-43-43-45-47 sts. When piece measures 78-81-84-87-90-93 cm / 30¾"-32"-33"-34¼"-35½"-36½", bind off the middle 9-9-11-11-11-13 sts for neck and finish each shoulder separately. Continue to bind off 1 st on next row from neck = 14-15-15-15-16-16 sts remain on the shoulder. Loosely bind off all sts when piece measures 80-83-86-89-92-95 cm / 31½"-32¾"-33⅞"-35"-36¼"-37⅜". Repeat on the other shoulder. RIGHT FRONT PIECE: Worked back and forth on circular needle. Cast on 40-42-44-48-52-54 sts (includes 1 edge st in the side and 18-18-18-20-20-20 band sts towards mid front) on circular needle size 7 mm / US 10.75 with Snow. Work first row as follows from RS: Work A.1 over the first 18-18-18-20-20-20 sts (= band), then work in garter st over the remaining 22-24-26-28-32-34 sts. Continue with A.1 over band and garter st over the remaining sts for 5-5-5-6-6-6 cm / 2"-2"-2"-2⅜"-2⅜"-2⅜". Switch to circular needle size 8 mm / US 11 and work next row from RS as follows: A.1 over the first 18-18-18-20-20-20 sts as before, 2 sts in stockinette st, work A.2 (choose diagram for correct size = 1 repetition of 10-10-12-12-14-14 sts), work in stockinette st until 1 st remains on row and finish with 1 edge st in garter st. Continue like this with stockinette st, pattern and 1 edge st in garter st towards the side. When piece measures 8-8-8-10-10-10 cm / 3"-3"-3"-4"-4"-4", dec in the side as on back piece. Repeat dec 7-7-7-6-6-6 times in total = 33-35-37-42-46-48 sts. AT THE SAME TIME when piece measures 36-38-40-42-44-46 cm / 14¼"-15"-15¾"-16½"-17¼"-18", dec for BUTTONHOLES - see explanation above. When piece measures 55-57-59-61-63-65 cm / 21⅝"-22½"-23¼"-24"-24¾"-25½" - REMEMBER MEASURING TIP 1, work in garter st over all sts (also over the 18-18-18-20-20-20 band sts) until finished measurements. AT THE SAME TIME when piece measures 61-63-65-67-69-71 cm / 24"-24¾"-25½"-26⅜"-27⅛"-28", bind off for armhole at beg of every row from the side as on back piece = 29-30-30-32-34-34 sts on needle. When piece measures 74-77-80-82-85-88 cm / 29"-30½"-31½"-32¼"-33½"-34½", slip the outermost 11-11-11-12-13-13 sts towards mid front on 1 stitch holder for neck (work them before slipping them on stitch holder to avoid cutting the yarn). Continue to bind off for neck at beg of every row from neck as follows: bind off 2 sts 1 time and then 1 st 2-2-2-3-3-3 times in total = 14-15-15-15-16-16 sts remain on shoulder. Loosely bind off all sts when piece measures 80-83-86-89-92-95 cm / 31½"-32¾"-33⅞"-35"-36¼"-37⅜". LEFT FRONT PIECE: Cast on and work as right front piece but reversed. NOTE: Beg A.2 as follows from RS: Work 1 edge st in garter st, work in stockinette st until 29-29-31-33-35-35 sts remain on row, work pattern according to diagram A.2 (choose diagram for correct size = 1 repetition of 10-10-12-12-14-14 sts), work 1 st in stockinette st and continue A.1 over the remaining 18-18-18-20-20-20 sts (= band). Do not dec for buttonholes on left front piece. ASSEMBLY: Sew the shoulder seams. HOOD: Pick up approx. 46 to 58 sts around the neck (includes sts on stitch holders at the front) on circular needle size 8 mm / US 11 with Snow. K 1 row from WS while inc evenly to 66-68-70-72-74-76 sts - do not inc over bands. Then work in garter st back and forth over all sts until hood measures approx. 32-33-34-35-36-37 cm / 12½"-13½"-13⅜"-13¾"-14¼"-14½". Bind off. Fold the hood double and sew tog at the top with grafting/kitchener sts. SLEEVE: Worked back and forth on circular needle. Cast on 26-28-30-30-34-34 (includes 1 edge st in each side) on circular needle size 7 mm / US 10.75 with Snow. Work 2 ridges. Switch to circular needle size 8 mm / US 11 and work in stockinette st with 1 edge st in garter st in each side. When piece measures 8-8-8-8-10-12 cm / 3"-3"-3"-3"-4"-4¾", inc 1 st in each side - READ INCREASE TIP (= 2 sts inc) and MEASURING TIP 2. Repeat inc every 7½-6-6-5-4½-3½ cm / 2⅞"-2⅜"-2⅜"-2"-1¾"-1¼" 6-7-7-8-8-9 times in total = 38-42-44-46-50-52 sts. When piece measures 48-48-47-45-44-43 cm / 19"-19"-18½"-17¾"-17¼"-17" (NOTE: Shorter measurements in the larger sizes because of longer sleeve cap and wider shoulders), bind off for sleeve cap at beg of every row in each side as follows: bind off 3 sts 1 time, 2 sts 1-2-2-2-2-2 time and 1 st 2-2-3-3-3-3 times. Then bind off 2 sts at beg of every row in each side until piece measures approx. 55-56-56-56-56-56 cm / 21½"-22"-22"-22"-22"-22", then bind off 3 sts 1 time in each side. Bind off the remaining sts, piece measures approx. 56-57-57-57-57-57 cm / 22"-22½"-22½"-22½"-22½"-22½". Make another sleeve. ASSEMBLY: Sew in the sleeves inside 1 edge st. Sew underarm and side seams in one inside 1 edge st. Sew the buttons on to left front piece. |
|||||||||||||
Diagram explanations |
|||||||||||||
|
|||||||||||||
 |
|||||||||||||
 |
|||||||||||||
Have you finished this pattern?Tag your pictures with #dropspattern #intothewoodsjacket or submit them to the #dropsfan gallery. Do you need help with this pattern?You'll find 27 tutorial videos, a Comments/Questions area and more by visiting the pattern on garnstudio.com. © 1982-2026 DROPS Design A/S. We reserve all rights. This document, including all its sub-sections, has copyrights. Read more about what you can do with our patterns at the bottom of each pattern on our site. |
|||||||||||||


With over 40 years in knitting and crochet design, DROPS Design offers one of the most extensive collections of free patterns on the internet - translated to 17 languages. As of today we count 325 catalogs and 12298 patterns - 12288 of which are translated into English (US/in).
We work hard to bring you the best knitting and crochet have to offer, inspiration and advice as well as great quality yarns at incredible prices! Would you like to use our patterns for other than personal use? You can read what you are allowed to do in the Copyright text at the bottom of all our patterns. Happy crafting!
Post a comment to pattern DROPS 164-1
We would love to hear what you have to say about this pattern!
If you want to leave a question, please make sure you select the correct category in the form below, to speed up the answering process. Required fields are marked *.