
Popular categories
Looking for a yarn?


Comments / Questions (92)
![]() Rita wrote:
Rita wrote:
Salve ho problemi ad interpretare lo schemaA2A3A4, c' è un video tutorial? Grazie
13.03.2026 - 07:50DROPS Design answered:
Buongiorno Rita, non abbiamo un video specifico, ma se ci indica quale passaggio le crea difficoltà possiamo provare ad aiutarla in modo più preciso. Buon lavoro!
14.03.2026 - 10:56
![]() Rita wrote:
Rita wrote:
Avrei bisogno di chiarimenti sugli aumenti dello sprone! Vanno fatti sull'andata del rovescio? E devono avere un verso?sì devono fare uno a destra l' altro a sinistra del marca punto ma non ho ben capitGrazie rita
19.02.2026 - 13:36DROPS Design answered:
Buonasera Rita, il modello è lavorato in tondo, quindi si lavora sempre sul diritto del lavoro, e gli aumenti vanno lavorati come indicato in modo alternato a sinistra e a destra dei segnapunti. Buon lavoro!
21.02.2026 - 16:48
![]() Sandra wrote:
Sandra wrote:
Hallo, ich bin noch am Anfang der Passe, habe meine 4 Runden kraus gestrickt. Und mit A 1 begonnen. Da heißt es, gleichzeitig in der 3. Runde 32 verteilt zunehmen. Laut A1 ist die 3.Runde die erste linke Runde. Nun habe ich die Sterne im Diagramm entdeckt (Zunahme Runden). Jetzt verstehe ich nicht, da der Stern ja bei Reihe 6 und Reihe 14 steht??? Und dann soll ich nochmal bei Runde 11 zunehmen. Sorry, ich stehe auf dem Schlauch.
11.04.2025 - 17:56DROPS Design answered:
Liebe Sandra, in A.1 sind ALLE Runden eingezeichnet, d.h. A.1 beginnt mit 3 Runden rechts (glatt rechts), die 4. Runde von A.1 ist die links gestrickte Runde. Es wird in der 3. und 11. Runde von A.1 zugenommen, wie es die Sterne zeigen. Die 3. Runde ist eine rechts gestrickte Runde, erst dann kommt die links gestrickte Runde. Die 11. Runde ist ebenfalls eine rechts gestrickte Runde, danach kommt dann wieder eine links gestrickte. Viel Spaß beim Stricken!
17.04.2025 - 10:18
![]() Tiny wrote:
Tiny wrote:
Bij steken op hulpnaald voor mouw staat 10 nieuwe steken opzetten ONDER de mouw?? wat wordt bedoeld, aan het einde?begin of verdeeld?
08.12.2024 - 13:11DROPS Design answered:
Dag Tiny,
Je zet 10 steken op onder de mouw, dit zijn 10 nieuwe steken naast elkaar en zitten a.h.w. onder de oksel.
11.12.2024 - 09:17
![]() Greanecia Jyrwa wrote:
Greanecia Jyrwa wrote:
Hi. I am very confused with the Inc as my numbers don't add up.. I'm knitting a medium size. After i have completed the 167 stitiches. There is an Inc on the left and right size of the 10 markers. 1st increase 2 times(20*2=40) that would add up to 207 stitches. Next on every 4th row 10 times( left and right of marker so 20*10=200) would add up to 407. Then on every 6th row 5 times( 20*5=100) would add up to 507. I'm very confused. How do i get 337. Pls help.
23.02.2022 - 19:04DROPS Design answered:
Dear Mrs Jyrwa ,you are supposed to increase only 10 stitches on every increase round, ie first time on the right side of markers (= before markerrs), next time on the left side of markers (= after markers) (repeat alternately before and after markers) - there are 10 markers, you increase 10 sts (2 times + 10 times + 5 times) = 10x17= 170 sts + 167= 337 sts when all increases are done. Happy knitting!
24.02.2022 - 10:17
![]() Marlène wrote:
Marlène wrote:
Bonjour, Je suis à faire le diagramme A2, A3 et je ne comprends pas comment faire le 5e rang parce que le diagramme empiète sur celui de A4. Pouvez-vous m’aider? Merci
31.12.2021 - 16:46DROPS Design answered:
Bonjour Marlène, au 5ème rang des diagrammes, tricotez les 2 dernières mailles de A.2 avec la 1ère m de A.3, tricotez les 2 dernières mailles de A.3 avec la 1ère maille du A.3 suivant puis avec la 1ère maile de A.4, ainsi, le motif tombera juste tout le tour (ajustez vos marqueurs pour avoir toujours 7 m dans A.2, 6 dans chaque A.3 et dans A.4). Bon tricot!
03.01.2022 - 10:35
![]() Christine wrote:
Christine wrote:
Bonjour, Lorsque l'on monte 10 mailles sous la manche, doit-on couper le fil de la pelote avec laquelle on a travaillé ou doit-on prendre une nouvelle pelote ? Merci beaucoup pour votre réponse.
24.08.2021 - 17:26DROPS Design answered:
Bonjour Christine, ce n'est pas nécessaire, montez simplement ces 10 mailles à la suite des mailles tricotées (et avant les autres à tricoter), cette leçon montre, à partir de la photo 9. comment mettre les mailles des manches en attente et comment monter les mailles sous la manche. Bon tricot!
25.08.2021 - 07:10
![]() Jose Lendering wrote:
Jose Lendering wrote:
Dit patroon is niet meer compleet: er ontbreken telpatronen. Kunnen de telpatronen weer teruggeplaatst? Ik ben bijna klaar met t lijfgedeelte...
15.03.2021 - 17:56DROPS Design answered:
Dag José,
Als het goed is laden alle afbeeldingen nu weer goed op de site, dus zouden de telpatronen ook goed in beeld moeten komen. (Er was afgelopen week een stroring met het laden van afbeeldingen.).
21.03.2021 - 11:44
![]() Christine wrote:
Christine wrote:
Je viens de placer les 10 marqueurs. Est ce que je peux faire les augmentations avec 1 jeté ? Merci pour votre réponse.
15.03.2021 - 17:18DROPS Design answered:
Bonjour Christine, tout à fait, c'est bien ainsi que l'on va augmenter, pensez à bien tricoter les jetés torse au tour suivant pour éviter des trous. Bon tricot!
16.03.2021 - 08:28
![]() Bamalu wrote:
Bamalu wrote:
Zunahme Passe: "abwechselnd an der rechten und linken Seite aller Markierer". Bedeutet "rechte Seite" eine M zunehmen vor dem Markierer? Oder zu Beginn bzw. am Ende der M zwischen zwei Markierern?
29.12.2020 - 16:56DROPS Design answered:
Liebe Bamalu, das erste Mal nehmen Sie 1 Masche vor jeder Markierung (= an der rechten Seite der Markierung); das nächste Mal nehmen Sie 1 Masche nach jeder Markierung (= an der linken Seite der Markieurng) und so weiterstricken. Viel Spaß beim stricken!
04.01.2021 - 11:50
|
|||||||||||||||||||
Timeless Beauty#timelessbeautysweater |
|||||||||||||||||||
 |
 |
||||||||||||||||||
Knitted DROPS jumper in garter st with lace pattern and round yoke, worked top down in ”DROPS BabyAlpaca Silk” or DROPS BABYMERINO. Size: S - XXXL.
DROPS 160-7 |
|||||||||||||||||||
|
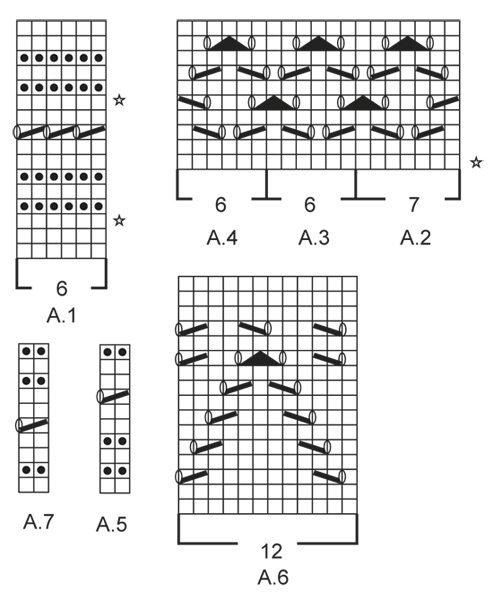
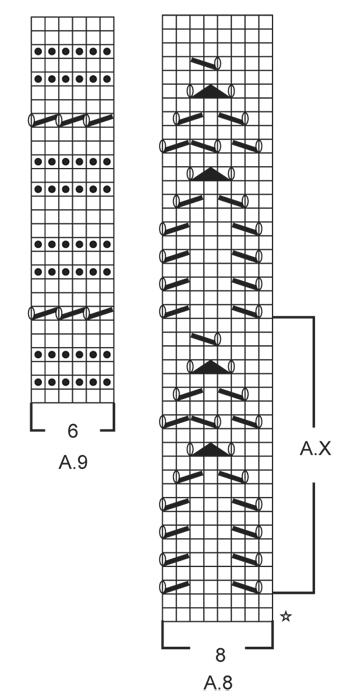
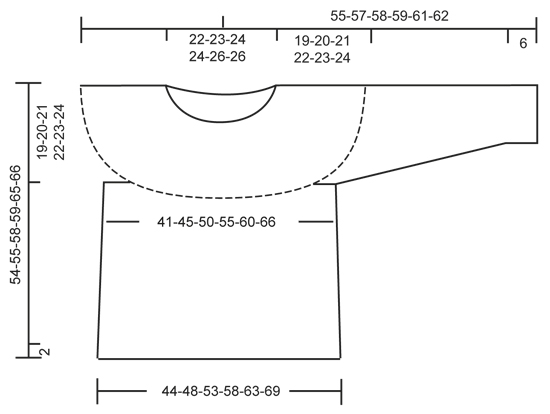
GARTER ST (worked in the round): * K 1 round and P 1 round *, repeat from *-*. 1 ridge = 2 rounds. GARTER ST (back and forth): K all rows. 1 ridge = K2 rows. PATTERN: See diagrams A.1 to A.9. INCREASE TIP: Inc 1 st by making 1 YO, on next round work YO twisted (i.e. work in back loop of st instead front) to avoid holes. ---------------------------------------------------------- JUMPER: Worked top down in the round on circular needle. Rounds start mid back. The sleeve is worked back and forth on circular needle. YOKE: Cast on 120-128-144-148-148-164 sts on circular needle size 2.5 mm / US 1.5 with BabyAlpaca Silk or BabyMerino. Work 2 ridges in GARTER ST in the round - see explanation above. Now work PATTERN A.1, AT THE SAME TIME on 3rd round inc 18-20-30-32-32-34 sts evenly - READ INCREASE TIP, and on 11th round inc 15-19-29-29-29-33 sts evenly = 153-167-203-209-209-231 sts. REMEMBER THE KNITTING GAUGE When A.1 has been worked vertically, continue in garter st and insert 10 markers in the piece as follows: Work the first 9-12-12-15-15-12 sts, insert a marker, then insert a marker 15-16-20-20-20-23 sts apart, after last marker there are 9-11-11-14-14-12 sts. On next round beg inc. Inc alternately on right and left side of markers (= 10 inc). Inc every other round 0-2-0-3-7-7 times, every 4th round 10-10-9-9-8-8 times and every 6th round 5-5-7-7-7-8 times = 303-337-363-399-429-461 sts. On next round, inc 8-4-10-2-4-10 sts evenly = 311-341-373-401-433-471 sts. Piece measures approx. 19-20-21-22-23-24 cm / 7½"-8"-8¼"-8¾"-9"-9½". Now work as follows: K the first 45-50-55-60-66-74 sts (= half back piece), slip the next 66-72-76-80-84-88 sts on a stitch holder (= sleeve), cast on 10-10-10-12-12-12 sts under sleeve, work the next 89-97-111-121-133-147 sts (= front piece), slip the next 66-72-76-80-84-88 sts on a stitch holder (= sleeve), cast on 10-10-10-12-12-12 sts under sleeve, work the remaining 45-50-55-60-66-74 sts (= half back piece). BODY: There are now 199-217-241-265-289-319 sts for body. Now switch to circular needle size 3 mm / US 2.5. Then work as follows: A.2, A.3 until 6 sts remain, A.4. When A.2-A.4 have been worked vertically, continue with A.5 (on 7th round K the last st). Continue with A.6, AT THE SAME TIME on 1st round adjust no of sts to 204-216-240-264-288-324. When A.6 has been worked vertically, continue with A.7 1 time vertically. Then work A.8, inc 4-8-8-8-8-4 sts evenly on 1st round = 208-224-248-272-296-328 sts. When A.X has been worked 1 time vertically, repeat A.X 0-0-0-0-1-1 more time before continuing with the rest of A.8. Now continue with A.7. Then work as follows: A.2, A.3 until 6 sts remain on round, AT THE SAME TIME inc 3-5-5-5-5-3 sts evenly on 1st round (over A.3), A.4 = 211-229-253-277-301-331 sts. Now work A.7 0-0-1-1-0-0 times vertically (on 5th round K last st on round). When entire diagram has been worked vertically, work 2 rounds in stockinette st while AT THE SAME TIME on last round inc 17-21-23-25-25-27 sts evenly = 228-250-276-302-326-358 sts. Switch to circular needle size 2.5 mm / US 1.5 and work in garter st for 2 cm / ¾". Bind off alternately with K 1 and P 1. Piece measures approx. 54-55-58-59-65-66 cm / 21¼"-21½"-22¾"-23¼"-25½"-26". SLEEVE: Work sleeve in GARTER ST back and forth - see explanation above, on circular needle. There are 66-72-76-80-84-88 sts for each sleeve. NOW MEASURE THE PIECE FROM HERE. Slip sts from stitch holder back on circular needle size 2.5 mm / US 1.5 and cast on 6-6-6-7-7-7 new sts at the end of the next 2 rows = 78-84-88-94-98-102 sts. When sleeve measures 4 cm / 1½", dec 1 st inside 1 edge st in each side of piece by K 2 tog. Repeat dec every 1½-2-2½-3-3½-3½ cm / ½"-¾"-⅞"-3⅛"-3¼"-3¼" 7-6-5-4-3-3 more times = 62-70-76-84-90-94 sts. When piece measures 19 cm / 7½" in all sizes, work as follows: 1 edge st in garter st, A.9 until 1 st remains, 1 edge st in garter st. When entire A.9 have been worked vertically, work 1 ridge. Loosely bind off. Make another sleeve the same way. ASSEMBLY: Sew underarm seams in outer loops of edge sts. Sew the openings under the sleeves. |
|||||||||||||||||||
Diagram explanations |
|||||||||||||||||||
|
|||||||||||||||||||
 |
|||||||||||||||||||
 |
|||||||||||||||||||
 |
|||||||||||||||||||
Have you finished this pattern?Tag your pictures with #dropspattern #timelessbeautysweater or submit them to the #dropsfan gallery. Do you need help with this pattern?You'll find 26 tutorial videos, a Comments/Questions area and more by visiting the pattern on garnstudio.com. © 1982-2026 DROPS Design A/S. We reserve all rights. This document, including all its sub-sections, has copyrights. Read more about what you can do with our patterns at the bottom of each pattern on our site. |
|||||||||||||||||||


With over 40 years in knitting and crochet design, DROPS Design offers one of the most extensive collections of free patterns on the internet - translated to 17 languages. As of today we count 324 catalogs and 12291 patterns - 12281 of which are translated into English (US/in).
We work hard to bring you the best knitting and crochet have to offer, inspiration and advice as well as great quality yarns at incredible prices! Would you like to use our patterns for other than personal use? You can read what you are allowed to do in the Copyright text at the bottom of all our patterns. Happy crafting!
Post a comment to pattern DROPS 160-7
We would love to hear what you have to say about this pattern!
If you want to leave a question, please make sure you select the correct category in the form below, to speed up the answering process. Required fields are marked *.