
Popular categories
Looking for a yarn?


Comments / Questions (37)
![]() Joan wrote:
Joan wrote:
Hi I’m confused about increase rows. If I start increase on second row and am increasing every other row don’t I automatically increase every fourth row? Or am I supposed to increase at another time too?
20.12.2025 - 12:36DROPS Design answered:
Hi Joan, You first work the increases every 2nd row (the correct number of times for your size), then when those increases are finished you increase every 4th row x 11. Merry Christmas! Regards, Drops Team.
22.12.2025 - 07:36
![]() Joan wrote:
Joan wrote:
I’m a little confused If I’m increasing on the second round and then on every other round then I’m always increasing on every fourth round already or do I need to increase somewhere else?
19.12.2025 - 12:26
![]() Martina wrote:
Martina wrote:
Guten Morgen, vielen Dank für die rasche Antwort und das Video. Das hilft. Wünsche dem gesamten Team einen schönen Tag.
20.09.2023 - 09:51
![]() Martina wrote:
Martina wrote:
Hallo, es wäre wirklich hilfreich, ein Diagramm zu erstellen, aus dem eindeutig ersichtlich ist, wo die Marker sitzen und wie genau die Zunahmen in die Muster "integriert" werden sollen. Ich habe die Beschreibung auch nach mehrmaligem Lesen nicht verstanden. Die bereits vorhandenen Fragen zeigen mir, dass ich nicht die einzige bin. Auch die vorhandenen Erklärungen helfen mir nicht weiter... Danke und viele Grüße, Martina
19.09.2023 - 19:16DROPS Design answered:
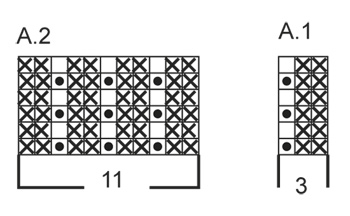
Liebe Martina, die Markierungen sollen Sie jeweils in die beschriebenen Maschen einsetzen: die 1. Mark am Ende Rückenteil, die 2. Mark in de Mitte A.2, die 3. Mark am Anfang Vorderteil, die 4. Mark am Ende Vorderteil, die 5. Mark in der Mitte A.2 und die 6. Mark am Anfang Vorderteil. Dann nehmen Sie wie unter ZUNAHMETIPP vor 1. + 4. Mark und nach 3. + 6. Markierung und gleichzeitig nehmen Sie beidseitig von der 2. und der 5. Markierung. Dieses Video zeigt, mit man mit 1 Umschlag zunimmt, und wie die Maschen nach und nach im Patentmuster gestrickt werden. Viel Spaß beim stricken!
20.09.2023 - 07:33
![]() Gudrun Winter wrote:
Gudrun Winter wrote:
Hallo, ist es richtig, dass nach den Zunahmen oben auf der Schulter (insgesamt 17x) das Patentmuster rechts und links der mittleren Masche nur eine linke Masche hat? Ansonsten müsste ich ja 18 mal zunehmen, richtig?
17.09.2021 - 14:47DROPS Design answered:
Liebe Frau Winter, ja stimmt, es sind nur 1 linke Masche beidseitig von der mittleren Maschen in A.2 (= rechte Masche). Viel Spaß beim stricken!
20.09.2021 - 10:20
![]() Marion wrote:
Marion wrote:
Nach der Halsblende soll man ja den Poncho zunächst in Runden stricken. Unter "Diagramm" stehen jedoch für die mit x gekennzeichnete Masche Angaben für Hin- und Rückreihen. Wie sticke ich diese x-Masche aber nun in Runden?
17.02.2021 - 18:32DROPS Design answered:
Liebe Marion, wenn Sie das Diagram in Runden stricken, stricken Sie immer Hinreihen, dh diese Maschen mit dem x stricken Sie immer links wenn Sie in Runden stricken - wenn Sie dann in Reihen stricken werden, stricken Sie diese Maschen rechts bei den Rückreihen. Viel Spaß beim stricken!
18.02.2021 - 09:04
![]() Josianne wrote:
Josianne wrote:
Guten Tag, Ich habe die Zunahmen vor der 1. + 4. und nach der 3. + 6. Markierung paralell zu den Zunahmen vor und nach der 2. + 5. Markierung gemacht und bin so statt auf 190 Machen auf ca 100 Maschen mehr gekommen. Muss ich zuerst die 18 + 11 x vor der 1.+3. und nach der 4. + 6. Markierung je eine Masche zunehmen und erst dann mit den Zunahmen vor und nach der 2. +. 5. Markierung (16 mal)? Mit freundlichen Grüssen
04.02.2021 - 21:00DROPS Design answered:
Liebe Josiane, die Zunahmen werden gleichezetig gestrickt, dh Sie sollen zuest 8 Maschen in jede 2. Rd zunehmen (= vor 1.+4. Mark. + nach 3. und 6. Mark und gleichzeitig beidseitig vom 2. + 5. Mark), insgesamt 16 Mal, dann wird es nicht mehr bei dem 2. + 5. Mark zugenommen und nur noch 2 x in jeder 2. Rd + 11 Mal in jeder 4. Rd vor 1.+4. und nach 3. + 6. Mark zugenommen. Viel Spaß beim stricken!
05.02.2021 - 08:27
![]() Vibeke Ahlmann Jensen wrote:
Vibeke Ahlmann Jensen wrote:
Efter at have foretaget de første udtagninger og sat mærketråde, skal jeg til at tage de generelle udtagninger først, efter mærke 1-4 og 3-6 på hver anden omgang 18 g. og derefter på hver 4 omgang 11 gange. næste afsnit begynder med udtagninger efter mærke 2 og 5 hver anden omgang 16 gange. Skal jeg skifte mellem første og andet afsnit, så der er udtagning på hver omgang 16 gange. hvor afsnit 2 afsluttes og så gøre færdig efter første afsnit.
21.01.2021 - 13:23DROPS Design answered:
Hej Vibeke, du strikker alle 8 udtagninger på hver 2. omgang 16 gange, så 2 udtagninger mere ved 4 af mærkerne hver 2.omgang og sidt på hver 4.omgang 11 gange. God fornøjelse!
27.01.2021 - 14:42
![]() Barbara wrote:
Barbara wrote:
Guten Tag, nun bin ich etwas verwirrt „Zunahmen in Muster einarbeiten“! Bedeutet dies, sobald 5 Maschen bei den Zunahmen sind, im Muster 2 Links - 1 Rechts - 2 Links Stricken? Aus dem Bild geht es nicht hervor. Ansonsten würden ja bei der Achsel breite Bahnen min Links- Maschen entstehen! Lieben Dank für eine kurze Hilfe.
03.07.2020 - 20:26DROPS Design answered:
Liebe Barbara, bei der Runde nach den Zunahmen stricken Sie die Zunahmen wie im Muster dh wie die vorrige bzw vorrige Masche im Muster, sollte es eine Patentmasche, stricken Sie sie recht, sonnst stricken Sie die Zunahmen link damit das Muster immer so wie beim A.1 bleibt (1 Patentmasche mit 2 linke Maschen). Viel Spaß beim stricken!
06.07.2020 - 07:57
![]() Jackie wrote:
Jackie wrote:
Thank you so much for the clarification and quick response!
22.10.2019 - 00:20
|
||||||||||
Shelter#shelterponcho |
||||||||||
|
|
||||||||||
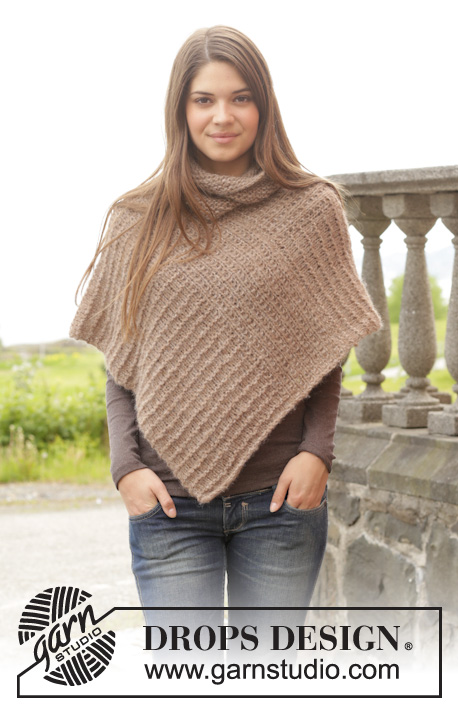
Knitted DROPS poncho in false English rib, worked top down in ”Big Merino”. Size S-XXXL.
DROPS 156-31 |
||||||||||
|
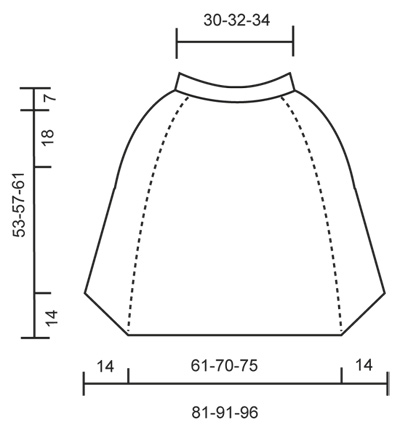
GARTER ST (back and forth on needle): K all rows. 1 ridge = K2 rows. PATTERN: See diagrams A.1 and A.2. Diagrams show all rows seen from RS. INCREASE TIP: Inc 1 st by making 1 YO, on next round work YO twisted (i.e. work in back loop of st instead front) to avoid holes. NOTE! Work the inc sts in pattern A.1/A.2. On first inc work the new sts as last st in pattern A.1 (i.e. on next round after round with inc, K YOs twisted. After the next 2 rounds with inc, P YOs twisted). DECREASE TIP: Dec inside 1 edge st in garter st. Dec before 1 edge st as follows: K 2 tog. Dec after 1 edge st as follows: Slip 1 st as if to K, K 1, psso. ---------------------------------------------------------- PONCHO: Work top down on circular needle. First work a neck edge back and forth, then work poncho in the round on circular needle, then continue back and forth on front and back piece. Cast on 96-102-108 sts on circular needle size 5.5 mm / US 9 with Big Merino. Work in GARTER ST back and forth - see explanation above - for 7 cm / 2¾''. Then work in the round. NOW MEASURE THE PIECE FROM HERE. Work 1 round in stockinette st. On next round work as follows from the back: A.1 (= 3 sts) 6-7-7 times in width, insert 1st marker in last st, A.2 (= 11 sts), insert 2nd marker in the middle st (= middle of shoulder), work last st in A.1, insert 3rd marker in this st, A.1 12-13-14 times in width, insert 4th marker in last st, A.2, insert 5th marker in the middle st (= middle of shoulder), work last st in A.1, insert 6th marker in this st, A.1 6-6-7 times in width. Continue like this, AT THE SAME TIME on next round beg inc: Work until 1st marker, 1 YO, work until 2nd marker, 1 YO on each side of this st, work until 3rd marker, work st with marker, 1 YO, work until 4th marker, 1 YO, work until 5th marker, 1 YO on each side of this st, work until 6th marker and work this st, 1 YO, work the rest of round = 104-110-116 sts. Work the inc sts in pattern A.1/A.2 - READ INCREASE TIP. REMEMBER THE GAUGE! Inc as follows before 1st and 4th marker and after 3rd and 6th marker (= 4 inc): Repeat inc every other round 12-18-21 more times, and every 4th round 11 times in all sizes. Inc on each side of 2nd and 5th marker as follows (= 4 inc): Repeat inc every other round 16 more times. When inc are done, there are 260-290-306 sts on round. When piece measures 39-43-47 cm / 15 1/4"-17"-18½", work as follows from beg of round: Work the first 62-71-74 sts (= back piece), bind off the next 5 sts, work the next 125-140-148 sts (= front piece), bind off the next 5 sts, work the remaining 63-69-74 sts (= back piece). Then finish front and back piece back and forth separately. FRONT PIECE: There are now 125-140-148 sts for front piece. Continue back and forth with pattern over front piece as before, AT THE SAME TIME work 1 edge st in garter st in each side. On next row from RS beg dec in each side of piece - READ DECREASE TIP. Repeat dec on every row from RS 13 more times = 97-112-120 sts. Piece measures 53-57-61 cm / 21"-22½"-24" - adjust so that next row is 2nd, 4th or 6th row in diagram. Bind off sts with K over K and P over P. NOTE! bind off YOs with P. Cut and fasten the yarn. BACK PIECE: Work as front piece. ASSEMBLY: Sew tog edge in garter st in the back of neck. Sew neatly tog st by st to get a nice seam. Cut the yarn and fasten. |
||||||||||
Diagram explanations |
||||||||||
|
||||||||||
 |
||||||||||
 |
||||||||||
Have you finished this pattern?Tag your pictures with #dropspattern #shelterponcho or submit them to the #dropsfan gallery. Do you need help with this pattern?You'll find 18 tutorial videos, a Comments/Questions area and more by visiting the pattern on garnstudio.com. © 1982-2026 DROPS Design A/S. We reserve all rights. This document, including all its sub-sections, has copyrights. Read more about what you can do with our patterns at the bottom of each pattern on our site. |
||||||||||


With over 40 years in knitting and crochet design, DROPS Design offers one of the most extensive collections of free patterns on the internet - translated to 17 languages. As of today we count 324 catalogs and 12290 patterns - 12280 of which are translated into English (US/in).
We work hard to bring you the best knitting and crochet have to offer, inspiration and advice as well as great quality yarns at incredible prices! Would you like to use our patterns for other than personal use? You can read what you are allowed to do in the Copyright text at the bottom of all our patterns. Happy crafting!
Post a comment to pattern DROPS 156-31
We would love to hear what you have to say about this pattern!
If you want to leave a question, please make sure you select the correct category in the form below, to speed up the answering process. Required fields are marked *.