
Popular categories
Looking for a yarn?


Comments / Questions (37)
![]() Malachi Boulahanis wrote:
Malachi Boulahanis wrote:
Also at this part AT THE SAME TIME when piece measures 48-49-50-52-53 cm / 19"-19¼"-19¾"-20½"-21", work next round as follows: bind off 3-4-4-5-5 sts for armhole, work 22-27-32-37-42 sts, bind off 23-23-25-25-27 sts for neck, work 22-27-32-37-42 sts, bind off 5-7-7-9-9 sts for armhole, work 67-77-89-99-111 sts (=, Do you have do work the pattern while binding off, or is the pattern continued in the front and back pieces, if so, after finishing which diagram do you start binding off.
04.02.2026 - 10:43DROPS Design answered:
Hi Malachi Boulahanis, while binding off I use 2 strands and keep making the pattern in the front and back pieces. Next row, we continue pattern on front/back as explained above. Happy knitting!
07.04.2026 - 10:10
![]() Malachi Boulahanis wrote:
Malachi Boulahanis wrote:
How many stitches do I need to pick up for the collar in the size medium
04.02.2026 - 09:05DROPS Design answered:
Hi Malachi, You can knit up 36 + 25 + 36 stitches for the collar in your size. Regards, Drops Team.
05.02.2026 - 06:32
![]() Esmé Heikens wrote:
Esmé Heikens wrote:
De boord van het lijf en de mouwen vind ik veel te ruim. Ik heb alle boorden met hetzelfde aantal opgezet als dat er na de mindering na de boord zouden moeten zijn (191 voor lijf en 45 voor mouw bij maat L/XL) en vervolgens niet geminderd. Boord op 4 mm en rest op 5 mm.
20.02.2025 - 14:55
![]() Deborah wrote:
Deborah wrote:
In binding off the sleeve cap (xxxl size). "AT THE SAME TIME bind off for the sleeve cap at the beginning of every row in each side: 2 sts 2-3-3-4 times. " Is this a TOTAL of 4 rows or is it a two row repeat and therefore a total of 8 rows?
14.11.2023 - 05:52DROPS Design answered:
Hi Deborah, Each bind off is worked on both sides before moving on to the next one. So, as you say, a total of 8 rows. Happy knitting!
14.11.2023 - 06:30
![]() Cathy Browning wrote:
Cathy Browning wrote:
Regarding armhole bind off. On the initial row I am binding off I am ending with 3 bind off stitches. That leaves me bound off if the middle of armhole. How do I then start to work the back if I am still half way in the middle of armhole?
18.01.2022 - 02:50DROPS Design answered:
Hi Cathy, Cut and fasten the strand, then begin on the back piece. Happy knitting!
18.01.2022 - 08:10
![]() Cathy wrote:
Cathy wrote:
I should have been more clear on my question. My question relates to the pattern at neck area. Not sure when to stop and start the chart with a crew neck jumper. I will try to find one with a pattern and a crew neck and attempt to follow those instructions. Thank you so much for getting back to me previously :)
26.12.2021 - 14:11DROPS Design answered:
Dear Cathy, you need to skip the separation for the neck in the front and continue working until 8 cm remain in the front before reaching the final measurements, which is when the round neck would begin. Happy knitting!
31.12.2021 - 19:50
![]() Cathy Browning wrote:
Cathy Browning wrote:
Is there a way to change the collar of this jumper to crew neck instead of shawl while maintaining the pattern?
22.12.2021 - 16:41DROPS Design answered:
Dear Cathy, in that case, you shouldn't bind off for the neck in the front; you should continue working over these stitches. Then you would need to make the necessary changes to make a round neck; you can see such jumpers in the Men's jumper section. Happy knitting!
25.12.2021 - 19:27
![]() Zsuzsa wrote:
Zsuzsa wrote:
Thanks so much for the additional descriptions in the comments, it helped me a lot. Just a side note: I had also more than one remaining yarn ball. And I knitted the L/XL size, and the sleeve was too long for my boyfriend, so I had to cut about ~10 cm.
13.06.2021 - 17:14
![]() Sandra wrote:
Sandra wrote:
Begrijp niet helemaal welke naalden waarvoor nodig zijn... Mouwboord, rondbreinaald 4 mm, welke lengte moet dit zijn? Rest van de mouw, 5 mm, wanneer gebruik je naalden zonder knop en wanneer rondbreinaald? En hoe lang is die rondbreinaald voor de mouw dan? Waar zijn breinaalden zonder kop, 4 mm dan voor bedoeld?
29.09.2020 - 14:44DROPS Design answered:
Dag Sandra,
Voor de boordsteek heb je 4 mm nodig en voor tricotsteek heb je 5 mm nodig. Zelf gebruik ik altijd een rondbreinaald, zowel voor de mouw als voor de panden, maar je kunt ook sokkenbreinaalden (naalden zonder knop) nemen, zodat je met 4 naalden de mouwen kunt breien. Het is maar net wat je zelf het handigst vindt.
10.10.2020 - 11:39
![]() Anne Maurer wrote:
Anne Maurer wrote:
Wird beim Modell seaman M1 39cm gestrickt oder beinhalten diese 30cm das Bündchen?
01.08.2019 - 12:18DROPS Design answered:
Liebe Anne, die 30 cm beinhalten das Bündchen, es werden also 30 cm ab dem Anschlag gemessen. Die Maßangaben beziehen sich in der Regel auf die Gesamtlänge. Viel Spaß beim Weiterstricken! :-)
02.08.2019 - 09:22
|
|||||||
Seaman#seamansweater |
|||||||
 |
 |
||||||
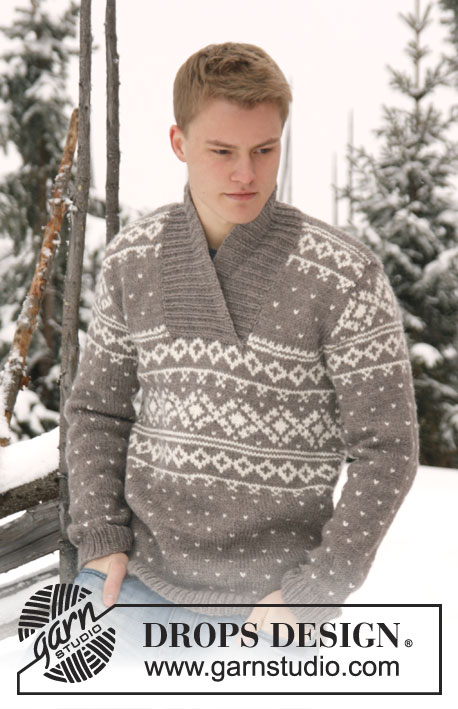
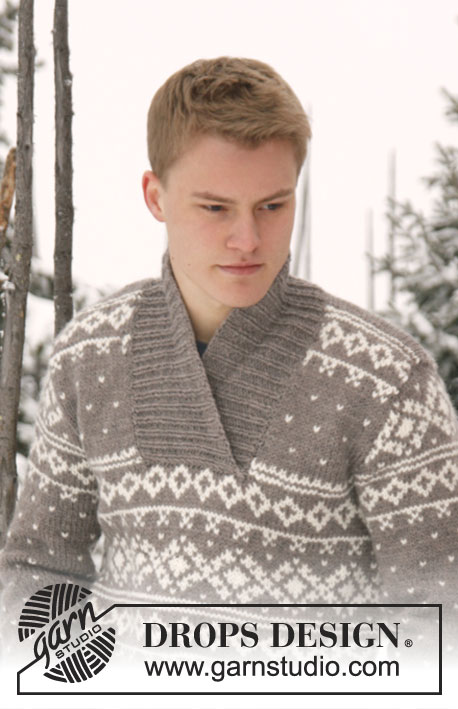
Knitted men's sweater in DROPS Alaska or DROPS Big Merino with pattern and shawl collar. Size: S - XXXL.
DROPS Extra 0-812 |
|||||||
|
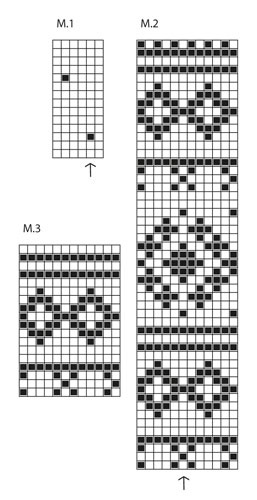
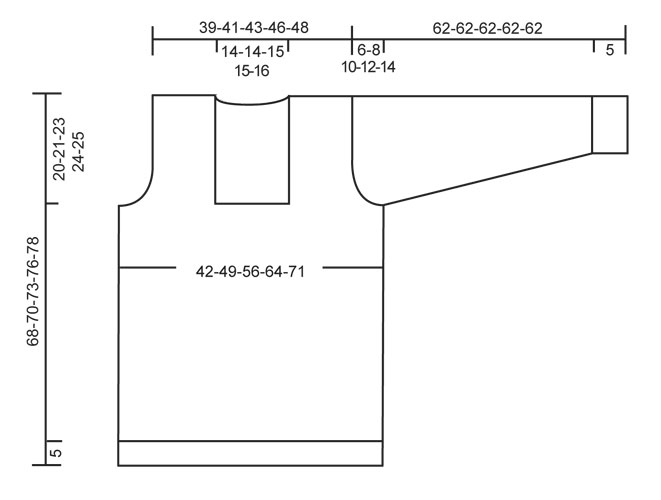
GARTER ST (back and forth on needle): K all rows. PATTERN: See diagrams M.1 to M.3 – diagrams are worked in stockinette st. -------------------------------------------------------- BODY: Worked in the round on circular needle. Cast on 171-201-231-258-288 sts on circular needle size 4 mm / US 6 with light brown Alaska. Work rib = K 1/P 2 for 5 cm / 2". Switch to circular needle size 5 mm / US 8 and K 1 round while AT THE SAME TIME dec 27-33-39-42-48 sts evenly = 144-168-192-216-240 sts. Then work diagram M.1. REMEMBER THE GAUGE! When piece measures approx. 25-27-30-33-35 cm / 9¾"-10½"-11¾"-13"-13¾" - adjust so that at least 2 rounds have been worked after 1 round with dots - work diagram M.2. After diagram M.2, work 3 rounds with light brown before working 23 rounds with diagram M.1. After diagram M.1, work diagram M.3, then work with light brown until finished measurements. AT THE SAME TIME when piece measures 48-49-50-52-53 cm / 19"-19¼"-19¾"-20½"-21", work next round as follows: bind off 3-4-4-5-5 sts for armhole, work 22-27-32-37-42 sts, bind off 23-23-25-25-27 sts for neck, work 22-27-32-37-42 sts, bind off 5-7-7-9-9 sts for armhole, work 67-77-89-99-111 sts (= back piece), bind off the last 2-3-3-4-4 sts for armhole. Finish each part separately. BACK PIECE: = 67-77-89-99-111 sts. Continue pattern as explained above. AT THE SAME TIME bind off for armholes at beg of every row in each side: 3 sts 0-0-1-1-2 times, 2 sts 0-1-1-2-3 times and 1 st 0-2-3-3-3 times = 67-69-73-79-81 sts remain on needle. When piece measures 66-68-71-74-76 cm / 26"-26¾"-28"-29⅛"-30", bind off the middle 21-21-23-23-25 sts for neck. Now finish each shoulder separately. Continue to bind off 1 st on next row from neck = 22-23-24-27-27 sts remain on the shoulder. Bind off when piece measures 68-70-73-76-78 cm / 26¾"-27½"-28¾"-30"-30¾". RIGHT FRONT PIECE: = 22-27-32-37-42 sts. Bind off for armhole in the side as on back piece = 22-23-24-27-27 sts. Bind off when piece measures approx. 68-70-73-76-78 cm / 26¾"-27½"-28¾"-30"-30¾" - NOTE: bind off on same row in pattern as on back piece. LEFT FRONT PIECE: Work as right front piece but reversed. SLEEVE: Worked in the round on double pointed needles, switch to circular needle when needed. READ ALL OF THE FOLLOWING SECTION BEFORE CONTINUING! Cast on 51-54-57-57-57 sts on circular needle size 4 mm / US 6 with light brown. Work rib = K 1/P 2 for 5 cm / 2". Switch to double pointed needles size 5 mm / US 8 and K 1 round while AT THE SAME TIME dec 10-11-12-12-12 sts evenly = 41-43-45-45-45 sts. Insert a marker at beg of round (= mid under sleeve) and a marker in the middle st on round (= mid on top of sleeve). Then work diagram M.1 – st marked with arrow in diagram should be st with marker mid on top of sleeve - count out towards the side. AT THE SAME TIME when piece measures 7-7-9-9-10 cm / 2¾"-2¾"-3½"-3½"-4", inc 1 st on each side of marker mid under sleeve. Repeat inc every 5-4½-3-2½-2 cm / 2"-1¾"-1⅛"-⅞"-¾" a total of 10-11-14-16-18 times = 61-65-73-77-81 sts – work the inc sts in pattern. AT THE SAME TIME when piece measures approx. 47 cm / 18½" in all sizes – adjust so that at least 2 rounds have been worked after 1 round with dots - work diagram M.2 until finished measurements (st marked with arrow in diagram should be st with marker mid on top of sleeve - count out towards the side). When piece measures 56-54-52-50-48 cm / 22"-21¼"-20½"-19¾"-19" (shorter measurements in the larger sizes because of longer sleeve cap and broader shoulder width), bind off 5-7-7-9-9 sts mid under sleeve (i.e. st with marker and 2-3-3-4-4 sts on each side of this st). Then continue back and forth on needle until finished measurements - AT THE SAME TIME bind off for sleeve cap at the beg of every row in each side: 2 sts 2-3-3-3-4 times and 1 st 1-2-3-4-5 times. Then bind off 2 sts in each side until piece measures 61 cm / 24", then bind off 3 sts 1 time in each side. Bind off the remaining sts, the piece measures approx. 62 cm / 24½" in all sizes. ASSEMBLY: Sew the shoulder seams. SHAWL COLLAR: Start mid front on the left side of sts bind off for neck. Pick up on circular needle size 4 mm / US 6 with light brown: 34 to 42 sts up to shoulder, then pick up 24 to 28 sts in back of neck and finally 34 to 42 sts down along left side of neck dec = 92 to 112 sts. (Do not pick up sts at the front of neck where sts were bind off.) K 1 row from WS while AT THE SAME TIME inc evenly to 123-129-138-144-150 sts. Then work rib as follows (from RS): 1 edge st which should be K on all rows, * K 1, P 2 *, repeat from *-* until 2 sts remain, finish with K 1 and 1 edge st which should be K on all rows. Continue rib like this until collar measures approx. 6 cm / 2⅜". Now inc 1 st in each of the middle 12 K-sections, seen from RS (= back of neck) = 135-141-150-156-162 sts. Continue to work until collar measures approx. 11-11-13-13-15 cm / 4½"-4½"-5"-5"-6", bind off with K over K and P over P. Place the collar double (right side over left side) at the bottom of neck opening and sew it to the neck line through both layers. Sew in sleeves. |
|||||||
Diagram explanations |
|||||||
|
|||||||
 |
|||||||
 |
|||||||
Have you finished this pattern?Tag your pictures with #dropspattern #seamansweater or submit them to the #dropsfan gallery. Do you need help with this pattern?You'll find 22 tutorial videos, a Comments/Questions area and more by visiting the pattern on garnstudio.com. © 1982-2026 DROPS Design A/S. We reserve all rights. This document, including all its sub-sections, has copyrights. Read more about what you can do with our patterns at the bottom of each pattern on our site. |
|||||||


With over 40 years in knitting and crochet design, DROPS Design offers one of the most extensive collections of free patterns on the internet - translated to 17 languages. As of today we count 324 catalogs and 12290 patterns - 12280 of which are translated into English (US/in).
We work hard to bring you the best knitting and crochet have to offer, inspiration and advice as well as great quality yarns at incredible prices! Would you like to use our patterns for other than personal use? You can read what you are allowed to do in the Copyright text at the bottom of all our patterns. Happy crafting!
Post a comment to pattern DROPS Extra 0-812
We would love to hear what you have to say about this pattern!
If you want to leave a question, please make sure you select the correct category in the form below, to speed up the answering process. Required fields are marked *.