
Popular categories
Looking for a yarn?


Comments / Questions (77)
![]() Torunn Førre wrote:
Torunn Førre wrote:
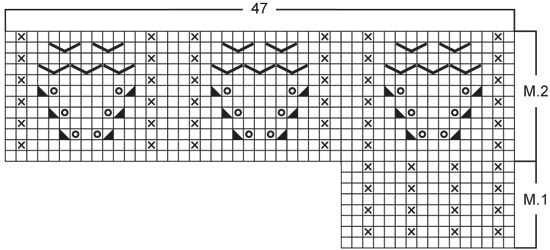
Kan dere hjelpe med mønsteret foran på brystet M 2, 9. rad nedenfra. Her skal 3 masker strikkes sammen til en uten at det legges ut nye masker etterpå ?
12.04.2013 - 18:34DROPS Design answered:
Du strikker de 3 m sammen 3 gange, derved får du 3 nye m på højre pind. Se også forklaringen her under!
03.05.2013 - 10:33
![]() Ann Lauridsen wrote:
Ann Lauridsen wrote:
Jeg sidder med opskrift 77-19 og kan ikke finde ud af linie 9 i mønster 2. jeg synes ikke det giver nogen mening
07.12.2012 - 17:12DROPS Design answered:
Det bliver som en lille knop/boble. Du har 3 m på venstre p, du strikker disse 3 masker vr sammen, de samme 3 masker strikker du r sammen og så igen en sidste gang strikker du de samme 3 m vr sammen. Nu har du 3 nye masker på højre pind og nu kan du slippe de 3 masker af venstre pind (som du har strikket i tre omgange). God fornøjelse!
13.12.2012 - 09:59
![]() Dijmphie Van Bruggen wrote:
Dijmphie Van Bruggen wrote:
Uitleg van de symbolen van drops 77-19
06.08.2012 - 10:09DROPS Design answered:
De uitleg staan onderaan het patroon naast de symbolen
20.08.2012 - 15:43Mimmi wrote:
Ann: Sticka ihop 3 maskor avigt, släpp inte maskorna av stickan. Sticka sedan 1 rät maska i samma 3 maskor och till sist 1 avig maska i de tre maskorna. Nu har du 3 nya maskor. Detta var nog inte lätt att förstå. Du kan också googla "3-into-3 star". Det finns en filmstump där detta visas.
02.08.2012 - 15:33
![]() Ann wrote:
Ann wrote:
Förstår inte hur jag ska sticka 3m.X 3 utan att släppa maskorna
19.07.2012 - 12:01
![]() Gisela Rosendahl wrote:
Gisela Rosendahl wrote:
Sidste linie i forklaring til diagram: Strik de 3sammen: 3 vr sm, 3r sm, 3vr sm? Efter at man har strikket de 3 vr sm strikker man så 3 r sm o.s.v i samme 1. maske, det er det ret vanskeligt. kan det forklares yderligere?
08.06.2012 - 21:45
![]() Alexandra Kramer wrote:
Alexandra Kramer wrote:
Hallo, was ist damit gemeint, wenn in der Anleitung steht: 6M in der Mitte unten am Ärmel abketten? Jeweils 3 M rechts und links und wo ist die Mitte unten am Ärmel? Danke schon mal im Voraus für die Beantwortung meiner Frage... LG, Alexandra
23.02.2012 - 23:43DROPS Design answered:
Sie stricken bis vor der Markierung noch 3 M. übrig sind. Jetzt 6 M. abk.
27.02.2012 - 13:22
![]() Drops Design wrote:
Drops Design wrote:
Ja selvfølgelig kan du det... men prøv og se om du ikke får svar på dine spørgsmål, hvis du klikker på Strikkehjælp (knappen ved siden af)
04.05.2009 - 14:12
![]() Lene Fredeløkke wrote:
Lene Fredeløkke wrote:
Jeg kan simpelthen ikke finde ud af at strikke det der M2 mønster..!! Kan man undlade at strikke det og bare strikke alm. mønster i stedet..??
01.05.2009 - 08:47
![]() DROPS Design NL wrote:
DROPS Design NL wrote:
Hoi Theda. Ik heb nu uitleg ontvangen. Het patroon klopt, je moet de 3 steken samen breien: 1 keer av samen breien, 1 keer r samen breien en nog 1 keer av samen breien, zonder de steken van de nld te halen. Op deze manier maak je 3 "nieuwe" steken boven de 3 samengebreide steken. Ik hoop dat je hier verder mee kunt. Succes. Gr. Tine
11.03.2009 - 09:31
|
|||||||||||||||||||
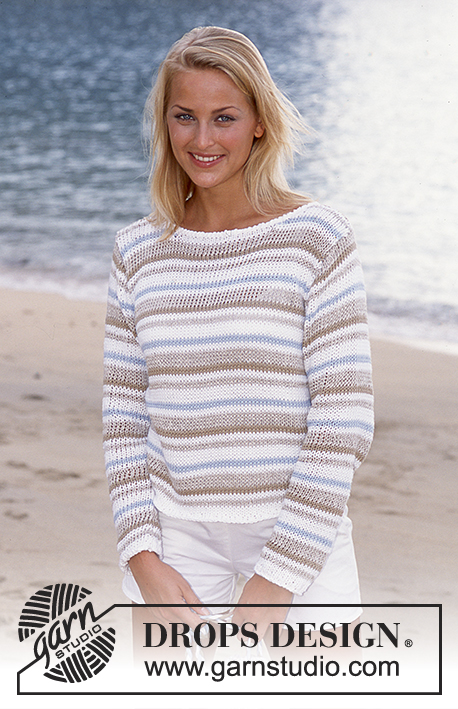
Blue Summer |
|||||||||||||||||||
|
|
|||||||||||||||||||
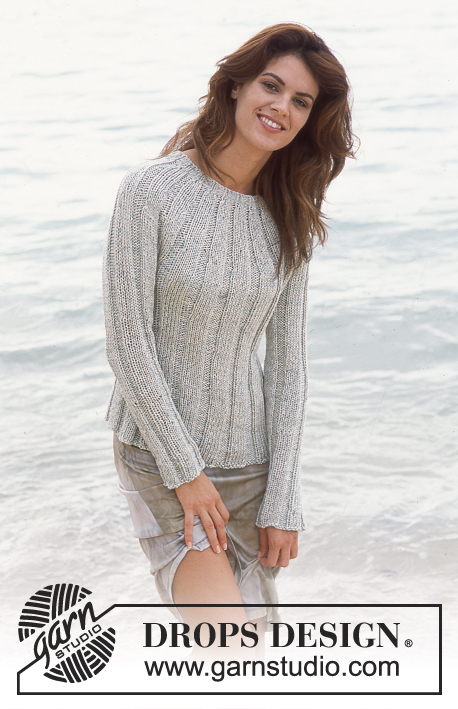
DROPS Pullover in Safran with short or long sleeves
DROPS 77-19 |
|||||||||||||||||||
|
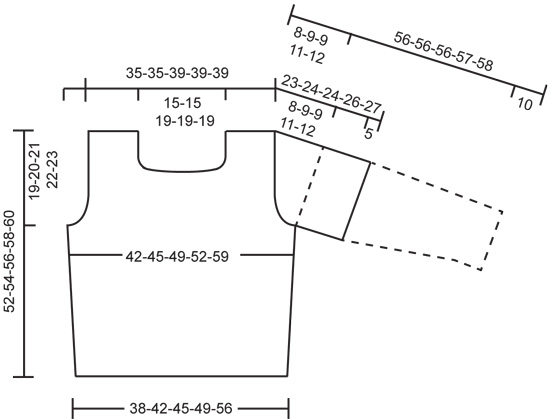
Gauge: 23 sts x 30 rows = 10 x 10 cm [4" x 4"] on larger needles in stockinette st. Rib: * K 1, P 1 *, repeat from * - *. Pattern: See chart. The pattern is seen from the right side. Garter st, when knitting flat: Knit all sts, all rows. Knitting tips (for neckband): All decs are made from right side. Dec inside 5 edge sts knit as follows from edge (seen from the right side): K 1 (edge st knit in garter st), K 1, P 1, K 1, P 1. Dec 1 st as follows:After 5 edge sts: Slip 1 st as if to knit, K 1, psso. Before 5 edge sts: K 2 tog. Body: Cast on 176-192-208-224-256 sts on smaller circular needles; join and place a marker at the join. Knit 5 rows rib. Change to larger circular needles and Pattern 1 - see that the seed st columns in the pattern are directly over the purl sts in the rib. Put a marker at each side (in the center st of a K 3 rib) – there will be 87-95-103-111-127 sts between markers. When the piece measures 12 cm [4¾"] inc 1 st at each side of sts with markers every 5 cm [2"] a total of 4 times - knit the increased sts into the pattern as you go along = 192-208-224-240-272 sts. Read the entire next section before continuing: Pattern: When the piece measures 31-32-34-36-37 cm [12¼"-12½"-13⅜"-14¼"-14½"] knit Pattern 2 over the center 47 sts on the front (knit the remaining sts as before). After Pattern 2 knit Pattern 1 over all sts again. Armhole: When the piece measures 33-34-35-36-37 cm [13"-13⅜"-13¾"-14¼"-14½"] bind off 7-9-9-11-11 sts at each side for armhole (that is, the st with the marker and 3-4-4-5-5 sts at each side st with marker). Knit each piece separately. Front: = 89-95-103-109-125 sts. Continue the pattern and bind off for armhole at each side every other row: 3 sts 0-0-0-1-2 times, 2 sts 1-2-2-2-4 times and 1 st 2-3-3-3-4 times = 81-81-89-89-89 sts. When the piece measures 40-41-42-44-45 cm [15¾"-16⅛"-16½"-17¼"-17¾"] knit 5 rows rib over the center 29-29-37-37-37 sts - start with P 1 (knit the remaining sts in pattern as before). Then bind off the center 19-19-27-27-27 sts for the neck - bind off in pattern. Keep the 5 sts at each neck edge in rib, with the outermost st in garter st, to finished dimensions. Dec 1 st at each neck edge: every other row 4 times and then every 4 rows 4 times - see knitting tips = 23 sts remain on each shoulder. Bind off when the piece measures 52-54-56-58-60 cm [20½"-21¼"-22"-22¾"-23⅝"]. Back: = 89-95-103-109-125 sts. Bind off for armhole as on front = 81-81-89-89-89 sts. When the piece measures 49-51-53-55-57 cm knit 5 rows rib over the center 45-45-53-53-53 sts - start with P 1 (knit the remaining sts in pattern as before). Then bind off the center 35-35-43-43-43 sts for the neck - bind off in rib = 23 sts remain on shoulder. Knit the 5 sts at neck edge as on front and bind off when the piece measures 52-54-56-58-60 cm [20½"-21¼"-22"-22¾"-23⅝"]. Short sleeve: Cast on 60-64-68-72-80 sts on smaller double-pointed needles; join and place a marker at the join. Knit 5 rows rib. Change to larger double-pointed needles and knit Pattern 1 to finished measurements. When the piece measures 5 cm [2"] inc 1 st each side of marker a total of 8-8-10-10-8 times: Sizes S, M and XXL: alternately every 3rd and 4th row. Sizes L and XL: alternately every other and every 3rd row = 76-80-88-92-96 sts - knit the increased sts in the pattern as you go along. When the piece measures 15 cm [6"] bind off 3 sts each side of marker. Then bind off for sleeve cap every other row: 3 sts 1 time, 2 sts 3-3-4-4-4 times and 1 st 3-3-2-5-7 times, then bind off 2 sts at each side until the piece measures 22-23-23-25-26 cm [8¾"-9"-9"-9¾"-10¼"], then bind off 3 sts at each side 1 time. Bind off the remaining sts, the piece measures approx. 23-24-24-26-27 cm [9"-9½"-9½"-10¼"-10⅝"]. Long sleeve: Cast on 48-52-52-56-56 sts on smaller double-pointed needles; join and place a marker at the join. Knit 5 rows rib. Change to larger double-pointed needles and knit Pattern 1 to finished measurements. When the piece measures 10 cm [4"] inc 1 st each side of marker every 8-8-6-6-5 rows a total of 14-14-18-18-20 times = 76-80-88-92-96 sts - knit the increased sts in the pattern as you go along. When the piece measures 48-47-47-46-46 cm [19"-18½"-18½"-18"-18"] bind off 3 sts each side of marker. Then bind off for sleeve cap every other row: 3 sts 1 time, 2 sts 3-3-4-4-4 times and 1 st 3-3-2-5-7 times, then bind off 2 sts at each side until the piece measures 55-55-55-56-57 cm [21⅝"-21⅝"-21⅝"-22"-22½"], then bind off 3 sts at each side 1 time. Bind off the remaining sts, the piece measures approx. 56-56-56-57-58 cm [22"-22"-22"-22½"-22¾"]. Assembly: Sew shoulder seams. Sew in sleeves. |
|||||||||||||||||||
Diagram explanations |
|||||||||||||||||||
|
|||||||||||||||||||
 |
|||||||||||||||||||
 |
|||||||||||||||||||
Have you finished this pattern?Tag your pictures with #dropspattern or submit them to the #dropsfan gallery. Do you need help with this pattern?You'll find 22 tutorial videos, a Comments/Questions area and more by visiting the pattern on garnstudio.com. © 1982-2026 DROPS Design A/S. We reserve all rights. This document, including all its sub-sections, has copyrights. Read more about what you can do with our patterns at the bottom of each pattern on our site. |
|||||||||||||||||||


With over 40 years in knitting and crochet design, DROPS Design offers one of the most extensive collections of free patterns on the internet - translated to 17 languages. As of today we count 324 catalogs and 12290 patterns - 12280 of which are translated into English (US/in).
We work hard to bring you the best knitting and crochet have to offer, inspiration and advice as well as great quality yarns at incredible prices! Would you like to use our patterns for other than personal use? You can read what you are allowed to do in the Copyright text at the bottom of all our patterns. Happy crafting!
Post a comment to pattern DROPS 77-19
We would love to hear what you have to say about this pattern!
If you want to leave a question, please make sure you select the correct category in the form below, to speed up the answering process. Required fields are marked *.