
Popular categories
Looking for a yarn?


Comments / Questions (286)
![]() Evi R. wrote:
Evi R. wrote:
Hallo, ich finde diese Strickjacke sehr schön und würde sie gern stricken. Leider komme ich mit dem Muster nicht klar. Ich habe es jetzt schon 5 x versucht, aber bei mir heben sich die Zöpfe einfach nicht. Ich stricke recht fest und habe deshalb meiner Mutter das Muster zum testen gegeben, aber sie hatte den gleichen Effekt. Das tolle Muster vom Rücken wird einfach nichts. Hatten schon andere User das Problem? Liebe Grüße, Evi
13.01.2015 - 09:41DROPS Design answered:
Liebe Evi, das ist seltsam. Eine Ferndiagnose, ohne Ihr Ergebnis zu sehen, ist etwas schwierig. Vielleicht fragen Sie einfach mal in dem Geschäft nach, in dem Sie die Wolle gekauft haben, was schief gelaufen sein könnte? Die Zwischenbereiche zwischen den Zöpfen haben Sie ja glatt li gestrickt? Vielleicht täuscht das Foto auch ein wenig, weil es viel Schatten wirft, die Zöpfe sind "normal" hoch.
17.01.2015 - 19:18
![]() Elisabeth Larsson wrote:
Elisabeth Larsson wrote:
Jag har en fråga om att sticka vändningar; ska man bara göra vändningen i början av varvet eller både i början och slutet? Det framgår inte av beskrivningen.
05.01.2015 - 22:15DROPS Design answered:
Hej Elisabeth, Om du stickar vändningarna enligt beskrivningen överst på mönstret, så får du bara vändningarna i ena sidan som du ska. Så här står det: VÄNDNINGAR: Det stickas vändningar för att få rundad form på arb. Det vänds också mellan flätorna i mönstret, det kan då vara lite svårt att läsa diagr - se till att det alltid blir 5 v mellan varje gång det flätas. Vändningarna stickas så här: VARV 1 och 2: Sticka 10 m i alla stl, vänd och sticka tillbaka. VARV 3 och 4: Sticka 16 m i alla stl, vänd och sticka tillbaka. osv....
04.02.2015 - 15:47
![]() Inge Peters wrote:
Inge Peters wrote:
Hallo, ik ben bezig met het rechter voorpand en ga bij 20 cm beginnen met minderen voor armsgat. Begin met 46 steken en moet ,zoals bij achterpand, 4 st. afkanten aan het begin van de volgende 2 naalden en 3 x 1 st. in elke naald ad goede kant. Verder bij 23 cm meerderen voor de kraag totaal 11 steken. Als ik dat allemaal goed heb begrepen kom ik alleen niet 49 steken uit, maar op 46...Waar gaat het fout?
31.12.2014 - 21:33DROPS Design answered:
Hoi Inge. Ik heb even teruggezocht en hierbij mijn antwoord op je vraag: Je hebt 46 st en kant af voor de armsgaten: 4 st één keer en 1 st 3 keer (= 7 st afkanten = 39 st over) Tegelijkertijd meerder je voor de kraag 1 st in totaal 10 keer = 49 st in totaal.
14.01.2015 - 15:53
![]() Sandra wrote:
Sandra wrote:
Ik brei ze nu recht op de heengaande naald en terug averechts.
22.12.2014 - 14:36
![]() Sandra wrote:
Sandra wrote:
Wordt bij de mouwen de kantsteek aan iedere kant recht gebreid?
22.12.2014 - 13:15DROPS Design answered:
Hoi Sandra. Je kan de kantsteek in ribbels breien (alle naalden rechts), maar je kan ook de kansteken breien zoals je nu doet. Het is wat jij zelf het mooiste vindt. Fijne feestdagen!
22.12.2014 - 19:44
![]() Sandra wrote:
Sandra wrote:
Dan gaat het toch goed. Bedankt!
27.11.2014 - 14:10
![]() Sandra wrote:
Sandra wrote:
Bij het 2e gedeelte: rechterkant werk/voorpand, heb ik dan op de goede kant van het werk de (in mijn maat) 22 ribbelsteken aan de linker of rechter kant op de naald?
26.11.2014 - 18:44DROPS Design answered:
Hoi Sandra. Je hebt de 22 ribbelsteken aan de linkerkant van de naald (aan het eind van de nld)
27.11.2014 - 13:39Lisa wrote:
Hi, I don't understand how to "work short rows between the cables in the pattern". Is this only for working M.2? Do you do the 5 short rows between the two cable crossings or four cable crossings (a.k.a work 2 or 4 sets of short rows for every repeat of M.2)? I suppose the short rows are always done in the garter stitch part of the piece? Thanks for any clarification you can provide me!
03.11.2014 - 14:26DROPS Design answered:
Dear Lisa, short rows have to be made as explained at the beg of the pattern (2 rows over 10 sts, 2 rows over 16 sts...), at the same time, work pattern, but take care you always work 5 rows between each cable in height when crossing the sts. Happy knitting!
03.11.2014 - 14:31
![]() Adrie wrote:
Adrie wrote:
Verder in het patroon staat dat je voor de kraag moet meerderen. Naast telpatroon m.2. Dit doe je 12 x. Komen deze meerderingen dan na de ribbelsteek en voor het patroongedeelte m2? Dit was eigenlijk mijn vraag. Groetjes Adrie
03.06.2014 - 18:07DROPS Design answered:
Hoi Adrie. Ja! :-)
04.06.2014 - 17:20
![]() Adrie wrote:
Adrie wrote:
Goedemiddag, ik ben met dit vest begonnen en ben inmiddels bij het rechtervoorpand. Bij 23 cm moeten we gaan meerderen voor de kraag. Nu staat er meerder naast telpatroon m.2 door 1 omslag te maken. Nu heb ik de volgende vraag: komt dit na de 8 steken boordsteek of na de 2 steken recht van het patroongedeelte? Het is mij niet helemaal duidelijk waar ik precies moet meerderen en op de foto kan ik het niet goed zien. Alvast bedankt! Groetjes Adrie.
02.06.2014 - 14:55DROPS Design answered:
Hoi Adrie. Je moet meerderen aan de zijkant zoals op het achterkant, dwz, door 1 omsl te maken naast de buitenste st. Je meerdert aan de korte kant van het pand (= zijkant)
03.06.2014 - 14:57
|
|||||||||||||||||||||||||
Chocolate Passion#chocolatepassioncardigan |
|||||||||||||||||||||||||
 |
 |
||||||||||||||||||||||||
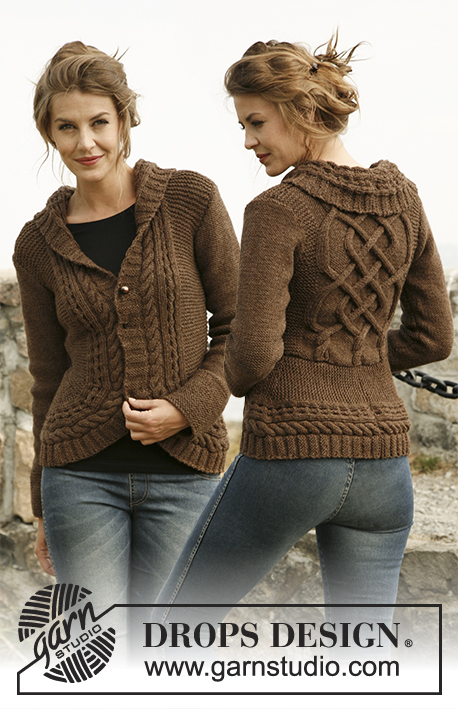
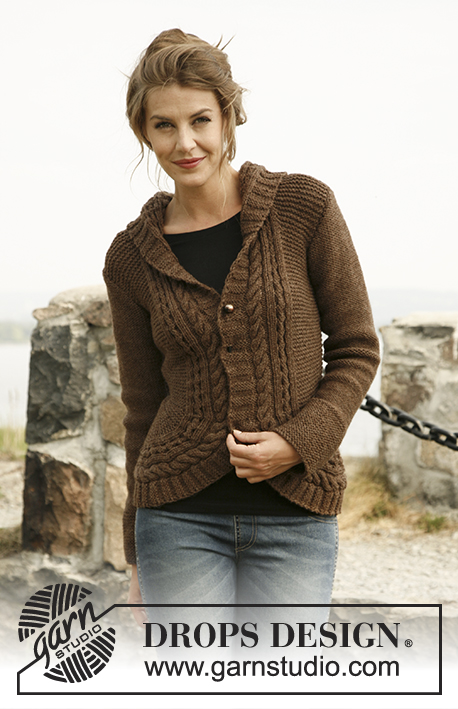
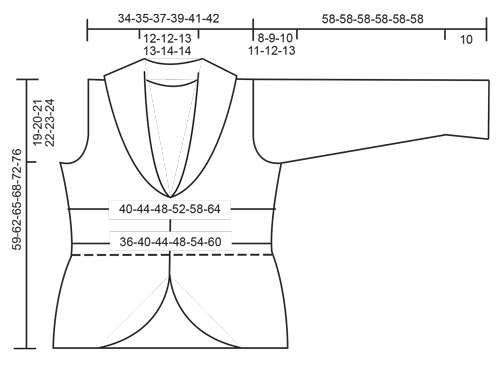
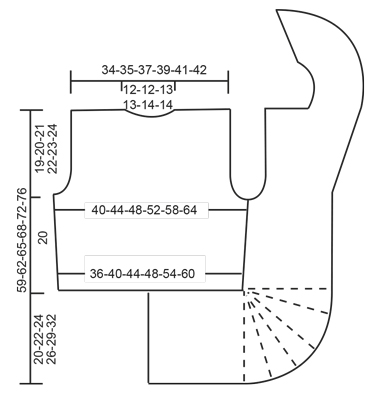
Knitted DROPS jacket with rounded front pieces and cables in ”Alaska”. Size: S to XXXL.
DROPS 134-55 |
|||||||||||||||||||||||||
|
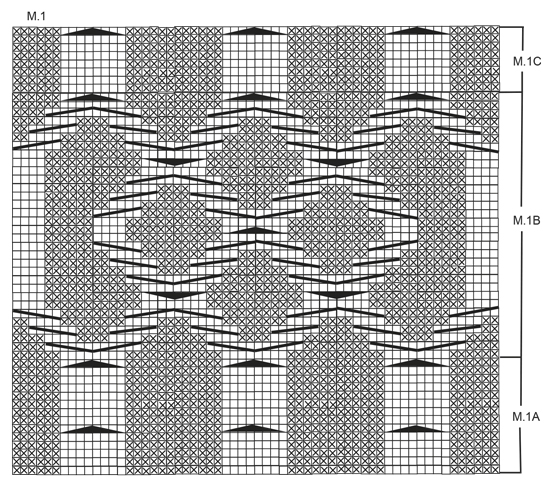
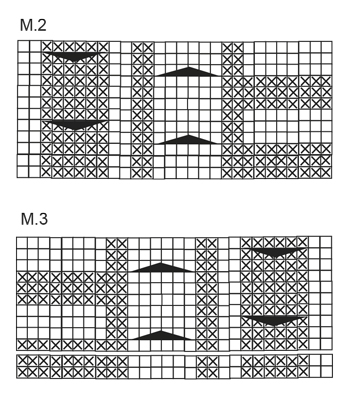
GARTER ST (back and forth on needle): K all rows. PATTERN: See diagrams M.1, M.2 and M.3 – diagrams shows all rows in pattern seen from RS. 1st row in diagrams is worked from WS. DECREASE TIP (applies to armhole): Dec from RS inside 3 sts. Dec AFTER 3 sts as follows: K 2 tog. Dec BEFORE 3 sts as follows: K 2 twisted tog. SHORT ROWS: Work short rows on front piece to get a rounded edge on the piece. Also work short rows between the cables in the pattern. This can make it difficult to read the diagram - make sure to work 5 rows between every cable. Work short rows as follows: Row 1 and 2: Work 10 sts in all sizes, turn and work back. Row 3 and 4: Work 16 sts in all sizes, turn and work back. Row 5 and 6: Work 20 sts in all sizes, turn and work back. Row 7 and 8: Work 26 sts in all sizes, turn and work back. Row 9 and 10: Work 28-28-29-29-31-30 sts, turn and work back. Row 11 and 12: Work 31-31-32-32-34-33 sts, turn and work back. Continue to work 3 sts more on every turn until all sts have been worked. 18-20-22-24-26-30 rows in garter st have been worked at the outer side and 2 rows in garter st have been worked on the inside. Repeat from 1st row a total of 5 times. The rounded edge now measures approx. 28-31-34-37-41-46 cm / 11"-12¼"-13⅜"-14½"-16⅛"-18" on the outer side and 3 cm / 1⅛" on the inside. -------------------------------------------------------- -------------------------------------------------------- BACK PIECE: Worked back and forth on needle. Cast on 68-74-80-88-98-108 sts on needle size 5 mm / US 8 with Alaska. K 1 row from WS. Work next row from RS as follows: 10-13-16-20-25-30 sts in GARTER ST – see explanation above, * P 6, K 2 sts in each of the next 4 sts (= K 8), P 6 *, repeat from *-* a total of 3 times, 10-13-16-20-25-30 sts in garter st. There are now 80-86-92-100-110-120 sts on needle. Then work as follows (1st row = WS): 10-13-16-20-25-30 sts in garter st, diagram M.1A (= 60 sts) and 10-13-16-20-25-30 sts in garter st. After M.1A continue with M.1B 2 times vertically, then repeat M.1C until finished measurements. REMEMBER THE GAUGE! When piece measures 7 cm / 2¾", inc 1 st in each side by working 1 YO inside outermost st – on next row K YO twisted (i.e. work in back loop of st instead of front) to avoid holes. Repeat inc every 5 cm / 2" a total of 3 times = 86-92-98-106-116-126 sts. When piece measures 20 cm / 8" in all sizes, bind off 3-4-5-6-7-8 sts at beg of the next 2 rows for armholes. Then dec 1 st in each side on every row from RS: 2-3-4-5-7-10 times– SEE DECREASE TIP! There are now 76-78-80-84-88-90 sts on needle. When piece measures 37-38-39-41-42-43 cm / 14½"-15"-15¼"-16⅛"-16½"-17", work the 8 sts over the middle cable tog 2 by 2. On next row bind off the middle 20-20-22-22-24-24 sts for neck = 26-27-27-29-30-31 sts remaining on each shoulder. Then work 3 rows over these as before, on next row work the 8 sts over the cable tog 2 by 2 = 22-23-23-25-26-27 sts. Then bind off all sts on next row. Piece measures approx. 39-40-41-42-43-44 cm / 15¼"-15¾"-16⅛"-16½"-17"-17¼" vertically. RIGHT EDGE PIECE/FRONT PIECE: All measurements should be done on the shorter side! Cast on 34-37-41-44-49-54 sts on needle size 5 mm / US 8 with Alaska. K 1 row from WS. Work next row from RS as follows: K 8, P 2, K 2 sts in each of the next 3 sts (= K 6), P 2, K 2, P 2 sts in each of the next 3 sts (= P 6), K 2, 12-15-19-22-27-32 sts in garter st. There are now 40-43-47-50-55-60 sts on needle. Continue like this: 12-15-19-22-27-32 sts in garter st and diagram M.2 (= 28 sts) – 1st row = WS. When piece measures 17-19-21-23-26-29 cm / 6¾"-7½"-8¼"-9"-10¼"-11⅜", work SHORT ROWS - see explanation above – 1st row is worked from RS! When all short rows have been worked, insert a marker. NOW MEASURE PIECE FROM HERE! Continue to work over all sts as before. When piece measures 7 cm / 2¾", beg to inc in the side as on back piece (i.e. the shorter side). After all inc, there are 43-46-50-53-58-63 sts on needle. When piece measures 20 cm / 8", bind off and dec for armhole in the side as on back piece (bind off and dec in same side as inc). At the same time when piece measures 23 cm / 9", beg to inc for collar. Inc inside diagram M.2 by making 1 YO, on next row K YO twisted (i.e. work in back loop of st instead of front) to avoid holes. Repeat inc every other row a total of 10-10-12-13-14-14 times - work inc sts in garter st. After all bind offs and dec for armhole and inc for collar, there are 48-49-53-55-58-59 sts on needle. When piece measures approx. 39-40-41-42-43-44 cm / 15¼"-15¾"-16⅛"-16½"-17"-17¼", adjust so that next row is worked from WS, bind off the first 22-23-23-25-26-27 sts in garter st = 26-26-30-30-32-32 sts remain on needle for collar. Continue to work as follows: * Work 2 rows over all sts, work 2 row only over the outermost 18-18-20-20-26-26 sts *, repeat from *-* until collar measures approx. 7-7-7½-7½-8-8 cm / 2¾"-2¾"-2⅞"-2⅞"-3⅛"-3⅛" on the inside (it will then be twice as long at the outer side). On next row work all 6 sts over both cables tog 2 by 2 = 20-20-24-24-26-26 sts. Bind off. LEFT EDGE PIECE/FRONT PIECE: Cast on and work as right front piece but reversed. I.e. work 2nd row as follows: 12-15-19-22-27-32 sts in garter st, K 2, P 2 sts in each of the next 3 sts (= P 6), K 2, P 2, K 2 sts in each of the next 3 sts (= K 6), P 2 and K 8. There are now 40-43-47-50-55-60 sts on needle. Continue as follows (1st row = WS): Diagram M.3 (= 28 sts), 12-15-19-22-27-32 sts in garter st. Continue as on right front piece but when working short rows work 1st row from WS! bind off shoulder sts from RS to avoid cutting the thread to work the collar. SLEEVE: Worked back and forth on needle. Cast on 42-42-44-44-46-48 sts (includes 1 edge st in each side) on needle size 5 mm / US 8 with Alaska. Work 10 cm / 4" in garter st. Continue in stockinette st. When piece measures 15 cm / 6", inc 1 st in each side. Repeat inc every 4-3-3-2½-2-2 cm / 1½"-1⅛"-1⅛"-⅞"-¾"-¾" a total of 9-11-11-13-14-15 times = 60-64-66-70-74-78 sts. When piece measures 50-49-48-47-46-45 cm / 19¾"-19¼"-19"-18½"-18"-17¾" (shorter measurements in the larger sizes because of longer sleeve cap and wider shoulder width) bind off for sleeve cap at beg of every row in each side: 3 sts 1 time, 2 sts 3 times and 1 st 1-2-3-4-5-6 times, then bind off 2 sts in each side until sleeve measures 57 cm / 22½", then bind off 3 sts 1 time in each side, bind off remaining sts. The piece measures approx. 58 cm / 22¾". ASSEMBLY: Sew cast on edge on edge pieces tog mid back - sew edge to edge to avoid a chunky seam. Then sew edge to bottom edge of back piece. Sew the shoulder seams. Sew side seam edge to edge. Sew the collar tog mid back and sew it to the neckline. Sew sleeve seams inside 1 edge st - sew so that WS is on the outside and sew sleeves on body. Close jacket with a pin or similar. |
|||||||||||||||||||||||||
Diagram explanations |
|||||||||||||||||||||||||
|
|||||||||||||||||||||||||
 |
|||||||||||||||||||||||||
 |
|||||||||||||||||||||||||
 |
|||||||||||||||||||||||||
 |
|||||||||||||||||||||||||
Have you finished this pattern?Tag your pictures with #dropspattern #chocolatepassioncardigan or submit them to the #dropsfan gallery. Do you need help with this pattern?You'll find 22 tutorial videos, a Comments/Questions area and more by visiting the pattern on garnstudio.com. © 1982-2026 DROPS Design A/S. We reserve all rights. This document, including all its sub-sections, has copyrights. Read more about what you can do with our patterns at the bottom of each pattern on our site. |
|||||||||||||||||||||||||


With over 40 years in knitting and crochet design, DROPS Design offers one of the most extensive collections of free patterns on the internet - translated to 17 languages. As of today we count 325 catalogs and 12298 patterns - 12288 of which are translated into English (US/in).
We work hard to bring you the best knitting and crochet have to offer, inspiration and advice as well as great quality yarns at incredible prices! Would you like to use our patterns for other than personal use? You can read what you are allowed to do in the Copyright text at the bottom of all our patterns. Happy crafting!
Post a comment to pattern DROPS 134-55
We would love to hear what you have to say about this pattern!
If you want to leave a question, please make sure you select the correct category in the form below, to speed up the answering process. Required fields are marked *.