
Popular categories
Looking for a yarn?


Comments / Questions (68)
![]() Sandra wrote:
Sandra wrote:
Nachtrag zu meiner Frage: Es würde sich ausgehen, wenn ich 12 M für *-* hernehme . Aber wo nehme die 2 zusätzlichen M her?
16.11.2019 - 19:25
![]() Sandra wrote:
Sandra wrote:
Frage zum Taufkleid/Blattmuster: Nach der 2. Reihe habe ich 455 M, die gehen aber nicht in der 4. Reihe aus. Da gehen weg 2 M Krausrippe jede Seite, 2 linke M am Beginn und 5 die übrig bleiben am Ende, also für *-* (dafür brauche ich ja 10 M jeweils) hätte ich 444 M. Hab ich irgendwo einen Rechenfehler? Danke
16.11.2019 - 18:35
![]() Sandra wrote:
Sandra wrote:
Hallo, eine Frage zum Taufkleid: Nach den ersten 2 Biesen soll man eine Reihe glatt stricken, wäre dann eine Hinreihe und dann mit dem Muster M2 anfangen, also wieder eine Hinreihe. Oder wird das M2 mit einer Rückreihe begonnen oder soll ich 2 Reihen glatt stricken und dann mit M2 anfangen? Danke (Kleine Anregung noch, könnte man nicht evtl. die nicht deutschen Fragen/Antworten irgendwie übersetzen).
05.11.2019 - 21:31DROPS Design answered:
Liebe Sandra, wenn Sie die 2. Biese gestrickt haben, ist die nächste Reihe eine Hinreihe (2. Biese endet mit der Rückreihe, wenn mann die Maschen von der unteren Reihe strickt). M.2 fängt dann mit einer Hinreihe an. Viel Spaß beim stricken!
06.11.2019 - 08:55
![]() Astrid wrote:
Astrid wrote:
Bei den Mustersätzen, sind die hier Hin und Rückreihen gezeichnet, oder nur die Hinreichen? Danke Astrid
24.09.2019 - 07:23DROPS Design answered:
Liebe Astrid, alle Reihen sind im Diagramme gezeigt, dh die Hin- sowie die Rückreihen. hier lesen Sie mehr über Diagramme. Viel Spaß beim stricken!
24.09.2019 - 10:40
![]() Charlotte Friis - Dastrup wrote:
Charlotte Friis - Dastrup wrote:
Tak for svar, den ene er strikket og jeg kan dts.ikke strikke... Og den anden 29-3 syntes jeg ikke om 🙂 Vh. Charlotte
01.08.2019 - 09:15
![]() Charlotte Dastrup wrote:
Charlotte Dastrup wrote:
Hej Jeg sidder lige nu og tænker på om i ikke kunne lave en dåbskjole som er hæklet helt igennem... da jeg ikke er god til at strikke... hækletdåbskjole i blødt/ let garn - dåbskjolen ikke bliver alt for tung..
28.07.2019 - 23:41DROPS Design answered:
Hei Charlotte. Du kan se på oppskrift baby 29-3 for en heklet dåpskjole. Eventuelt kan du se på 25-16 og vurdere å gjøre den lenger. God fornøyelse
31.07.2019 - 14:58
![]() KERRIE CONNORS wrote:
KERRIE CONNORS wrote:
The pattern instructions are all mixed up - part of the dress instructions are mixed in with the trousers very confusing - I am going to have to undo a fair bit now and try to work it out.
12.06.2019 - 00:40DROPS Design answered:
Dear Mrs Connors, in the written pattern you will first find some explanations to the techniques & patterns used in this set, then you will find the pattern to the dress under CHRISTENING GOWN, then the pattern to the TROUSERS and finally to the BONNET. Should you have any questions, please feel free to ask here. Happy knitting!
12.06.2019 - 07:47
![]() Regine wrote:
Regine wrote:
Im Blattmuster fehlt die 8. Reihe. Ist nur die Nummerierung falsch oder fehlt eine Musterreihe?
04.03.2019 - 22:30DROPS Design answered:
Liebe Regine, bei den 3.-5.-8.-9.-11.-13.-16. und 17. R. stricken Sie re. über re. und li. über li., die Umschläge werden li. gestrickt. Viel Spaß beim stricken!
05.03.2019 - 12:01
![]() Heidi Daguyt wrote:
Heidi Daguyt wrote:
Hallo, na de eerste naald averecht bij het naaldplooitje moeten er vier naalden tricotsteek gebreid worden. Moeten die vier naalden beginnen met een naald averecht of recht? Groetjes
23.04.2018 - 22:50DROPS Design answered:
Dag Heide, Tricosteek brei je met recht op de goede kant en averecht op de verkeerde kant. Het is dus maar net aan welke kant je begint. In dit geval begin je aan de verkeerde kant, dus brei je de eerste naald averecht.
31.05.2018 - 17:13
![]() Heidi Daguyt wrote:
Heidi Daguyt wrote:
Beste, is er een video waarin het naaldplooitje wordt uitgelegd ? groetjes
23.04.2018 - 21:08DROPS Design answered:
Dag Heidi, De video staat er wel bij, alleen heeft het een andere naam (sierzoompje) Hier is de link naar de video. Veel succes!
31.05.2018 - 17:11
|
|||||||||||||||||||||||||
Angel Kissed#angelkissedchristeninggown |
|||||||||||||||||||||||||
 |
 |
||||||||||||||||||||||||
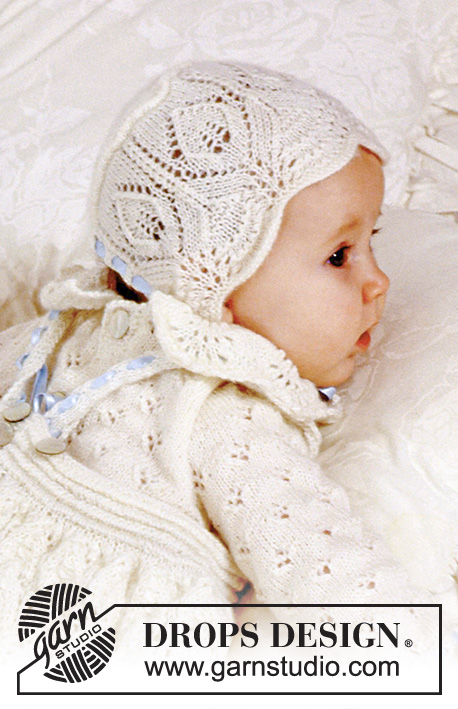
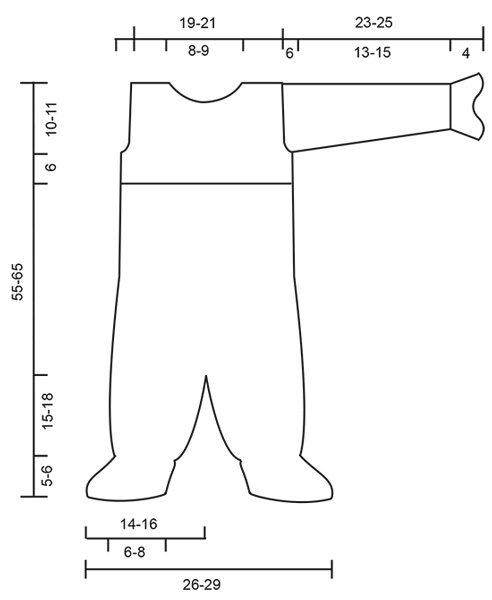
The set comprises: Christening gown, bonnet and jump suit.
DROPS Baby 11-15 |
|||||||||||||||||||||||||
|
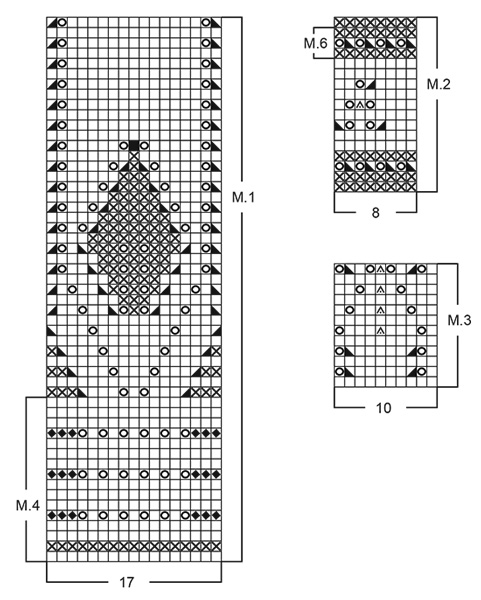
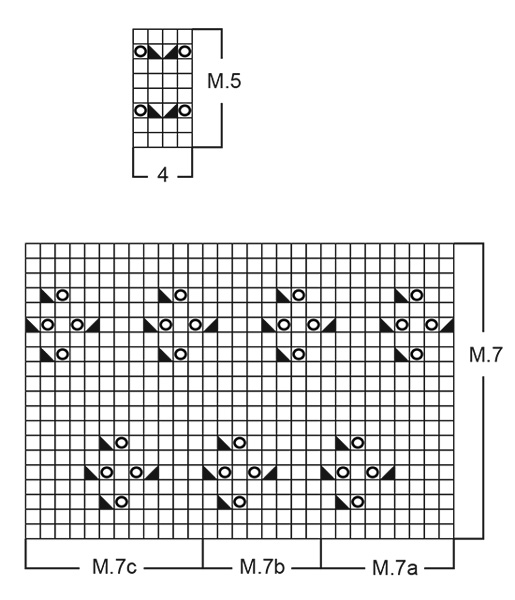
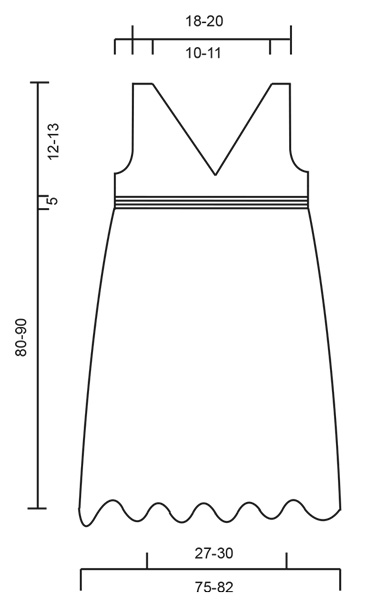
Knitting gauge: 25 sts x 34 rows on needles size 2.5 mm / US 1or2 in stockinette sts = 10 x 10 cm / 4" x 4". Note! Working in pattern will make more rows per 10 cm / 4". Garter sts (back and forth on needle): Knit all rows. Seed sts: 1st row: *K1, P1*, repeat from *-*. 2nd row: K over P, P over K. Repeat 2nd row. Pin tuck: P 1 row from the RS and then 4 rows stockinette sts. Work next row as follows from the WS: *Pick up the upper part of st under the purled row, put loop on right needle, P1, lift the loop over P st to close the loop*, repeat from *-*. Work 2 rows stockinette sts between each pin tuck. Decreasing tips I (apply to the dress yoke): Dec inside 2 edge sts in garter sts from the RS. There are two different dec, one with hole and one without. 1st dec (dec with hole): after 2 edge sts: slip 1 st as if to knit, K2 tog, psso, make a yo. before 2 edge sts: make a yo, K3 tog. 2nd dec (dec without hole): after 2 edge sts: slip 1 st as if to knit, K1, psso. before 2 edge sts: K2 tog. Decreasing tips II (apply to mid front trousers): Dec on each side of 2 K sts as follows: Before 2 sts: slip 1 st as if to knit, K 1, psso. After 2 sts: K2s tog. Leaf Pattern: 1st row: (= WS): *K5, P5*, repeat from *-* and finish with K5. 2nd row: (= RS): P2, *yo, K1, yo, P2, K5, P2*, repeat from *-* until there are 3 sts left. Work these as follows: yo, K1, yo, P2. Row 3 -5 - 8 - 9 - 11 – 13 – 16 – 17: K over K and P over P. P all yo’s. Row 4: P2, *K1, yo, K1, yo, K1, P2, sl 1 st as if to knit, K1, psso, K1, K2 tog, P2*, repeat from *-* until there are 5 sts left. Work these as follows: K1, yo, K1, yo, K1 and P2. Row 6: P2, * K2, yo, K1, yo, K2, P2, slip 1 st as if to knit, K2 tog, psso, P2*, repeat from *-* until there are 7 sts left. Work these as follows: K2, yo, K1, yo, K2 and P2. Row 7: K2, *P7, K5, *repeat from *-* until there are 9 sts left. Work these as follows: P7, K2. Row 10: P2, slip 1 st as if to knit, K1, psso, K3, K2 tog, P2, * yo, K1, yo, P2, slip 1 st as if to knit, K1, psso, K3, K2 tog, P2*, repeat from *-*. Row 12: P2, slip 1 st as if to knit, K1, psso, K1, K2 tog, P2, *K1, yo, K1, yo, K1, P2, slip 1 st as if to knit, K1, psso, K1, K2 tog, P2*, repeat from *-*. Row 14: P2, slip 1 st as if to knit, K2 tog, psso, P2, *K2, yo, K1, yo, K2, P2, slip 1 st as if to knit, K2 tog, psso, P2*, repeat from *-*. Row 15: K5, *P7, K5*, repeat from *-*. Row 18: P5, *slip 1 st as if to knit, K1, psso, K3, K2 tog, P5*, repeat from *-*. Row 19: K over K and P over P. At the same time inc in the 5 K sts between each leaf as follows: (inc by picking up st from previous row) K1, inc 1 st, K3, inc 1 st, K1. Row 20: P all sts except the sts in leaves. Work these as follows: slip 1 st as if to knit, K1, psso, K1, K2 tog. Row 21: P the 3 sts in leaves and knit all other sts. At the same time inc between each leaf as follows: (inc by picking up st from previous row) K1, inc 1 st, K5, inc 1 st. Row 22: P all sts except the sts in leaves. Work these as follows: slip 1 st as if to knit, K2 tog, psso. Pattern M.1 to M.7: See diagrams. The diagrams show the pattern from the right side. English Translations for the wording in the diagrams are given at the bottom of this pattern, and they are given in the vertical order in which they appear in the diagram. ______________________________________________________________________ CHRISTENING GOWN: Dress: Worked back and forth on circular needle from mid back. Loosely cast on 378-412 sts on circular needle size 2.5 mm / US 1 or 2. Work diagram M.1 (1st row = RS) but knit 2 edge sts each side in garter sts until finished measurements. After M.1 work 1 row stockinette sts and continue with 2 pin tucks – see explanation above. Now work the 4 first rows of M.2 whilst dec 11-13 sts evenly on row (knit sts not fitting into row of holes in stockinette). 367-399 sts. Now work the 4 first rows of M.2 (work sts not fitting into row of holes in stockinette sts). Work the next 9 rows of M.2 as follows: 2 edge sts in garter sts, *1 repeat with holes, 3 repeats without holes (= 24 sts in stockinette sts)*, repeat from *-* until there are 13 sts left. Work these as follows: 1 repeat with holes, 3 sts in stockinette sts and 2 edge sts in garter sts (in the section with 24 sts without holes you may add the names of the children christened in the gown). Now work the last 4 rows of M.2 over all sts (work sts not fitting into row of holes in stockinette sts). Continue in leaf pattern – see explanation above - at the same time dec 18-20 sts on the first row = 349-379 sts. After the leaf pattern work diagram M.2 with 2 edge sts each side in garter sts, at the same time dec 6-4 sts evenly = 343-375 sts. Work 1 row in stockinette sts, at the same time dec 18-20 sts evenly = 325-355 sts. Now work 2 pin tucks and 1 row in stockinette sts, at the same time dec 21-31 sts evenly = 304-324 sts. Continue in diagram M.3 until piece measures approx 63-72 cm / 24¾"-28⅜" – adjust after a full repeat. Work next row as follows from WS: 2 edge sts in garter sts, *P2 tog*, repeat from *-* over all sts and finish with 2 edge sts in garter sts = 154-164 sts. Work 2 rows in stockinette sts (1st row = RS), at the same time dec 18-14 sts evenly on last row = 136-150 sts. Now work 4 pin tucks and 1 row in stockinette sts. Work next row as follows from WS: K 38-42, P 60-66, K 38-42. Bind off 36-40 sts each side on next row. Piece now measures approx 68-77 cm / 26¾"-30⅜". Front piece: = 64-70 sts. Read all of the following section before starting! Work stockinette sts with diagram M.5 over the four middle sts. At the same time dec for armhole each side on every other row a total of 10 times – see Dec tips above. Alternate between 1st and 2nd dec. After all dec are complete continue making holes on every 4th row (from RS) along the armhole as follows: After 2 sts in garter sts: slip 1 st as if to knit, K1, psso, yo. Before 2 sts in garter sts: yo, K2 tog. Neckline: At the same time when piece measures approx 4 cm / 1½" from where the front piece starts (adjust to after 3 or 4 holes in M.5) bind off the middle 2 sts for neck – bind off from the RS in P sts. Put sts on left side (when worn) on a thread. Right side: Dec 1 st towards neckline on every other row a total of 11-13 times – see Dec tips above. Alternate between 1st and 2nd dec. After all dec for armhole and neckline are complete = 10-11 sts left on shoulder (= 2 sts in garter sts, 6-7 sts in stockinette sts, 2 sts in garter sts). Continue over these 11 sts (= strap) and continue making holes on every 4th row (from RS) as described for armhole. Bind off when piece measures approx 28-32 cm / 11"-12½" from where the front piece starts. Left side: Put sts from thread back on needle and work as right side. Assembly: Buttonhole loops: Crochet along the pin tucks on the right back piece as follows (start at the top and crochet towards bottom edge of dress): 9 sc. Then crochet next row as follows: *1 sl st, ch 5, skip 1 sc, 1 sl st in next st*, repeat from *-* until you have 3 loops. Sew on 3 buttons along the pin tucks on the left side. Mark the strap where it will have a suitable length for the child and crochet a loop from the right side on each strap by the mark. 1 loop = 1 sl st, ch 5 and 1 sl st in the same st (the remainder of the strap will hang inside the gown). Sew on a button at the upper edge 3-4 cm / 1"-1½" in from each side mid back. Silk ribbon: Cut 3 ribbons measuring 170 cm / 1.85 yds each in each of the upper 3 rows of holes from M.2 (i.e. 2 over and 1 under the leaf pattern). Attach the ends inside the gown. Cut 1 ribbon measuring 50 cm / 20" and pull it through the row of holes on each side of the neckline and the straps. ______________________________________________________________________ JUMPSUIT Work each leg separately, put them together, work the body and finish with the sleeves. Left leg: Cast on 32-40 sts on double pointed needles size 2.5 mm / US 1or2. Work 5-6 cm / 2"-2⅜" seed sts. K1 round, at the same time inc 8 sts evenly = 40-48 sts. Work next round as follows: *K2 tog, yo*, repeat from *-*. K1 round, at the same time inc 8 sts evenly = 48-56 sts. Now work M.2 and continue in stockinette sts. At the same time on the first round of stockinette sts inc 12 sts evenly = 60-68 sts. Insert a marker at beg of round = inside of leg. At the same time when piece measures 11-12 cm / 4⅜"-4¾" inc 1 st on each side of marker on every 4th round a total of 6 times = 72-80 sts. When piece measures 18-21 cm / 7"-8¼" split the piece by the marker and work back and forth on needles (to make it easier to put both legs on the same circular needle to knit the body). Inc 1 st each side for seam = 74-82 sts. When piece measures 20-23 cm / 8"-9" bind off 5 sts each side = 64-72 sts. Put the piece aside and work right leg the same way. Back and front piece: Put right and left leg on the same circular needle = 128-144 sts. Insert a marker in the transition between the legs mid front and mid back. Work 3 rounds in stockinette sts. Continue in stockinette sts and now inc 1 st on each side of the 2 middle sts mid back on every other round a total of 8 times, and dec 1 st on each side of the middle 2 sts mid front on every other row a total of 8 times – see Dec tips above = 128-144 sts. When piece measures 30-40 cm / 11¾"-15¾" bind off 8 sts mid back (= opening) and continue back and forth on needles = 120-136 sts. When piece measures 39-48 cm / 15¼"-19" work diagram M.6 (1st row = WS and knit 1 edge st each side in garter sts). At the same time on the last row of M.6 knit tog the 2 middle sts = 119-135 sts. Work next row as follows: 1 edge st, M.7A (= 9 sts), M.7B over 96-112 sts, M.7C (= 12 sts) and 1 edge st. At the same time when piece measures 45-54 cm / 17¾"-21¼" work next row as follows from the RS: K 25-29 sts (= left back piece), bind off 6 sts for armhole, 57-65 sts (= front piece), bind off 6 sts for armhole, 25-29 sts (= right back piece). Work each piece separately. Right back piece: = 25-29 sts. Work M.7, at the same time dec for armhole at the side on every other row: 2 sts 1-1 time and 1 st 3-4 times = 20-23 sts. Note! Work stockinette sts over sts not fitting into pattern towards armhole. When piece measures 53-63 cm / 21"-24¾" bind off the middle 5-6 sts mid back for neck and dec 1 st on neckline on every other row 2 times = 13-15 sts left on shoulder. Bind off when piece measures 55-65 cm / 21⅝"-25½". Left back piece: Work as right back piece. Front piece: = 57-65 sts. Work M.7, at the same time dec for armhole as described for back piece = 47-53 sts. When piece measures 51-60 cm / 20"-23⅝" bind off the middle 11-13 sts for neck and work each shoulder separate. Dec towards the neckline on every other row: 2 sts 1 time and 1 st 3 times = 13-15 sts left on each shoulder. Bind off when piece measures approx 55-65 cm / 21⅝"-25½" – adjust to back piece. Sleeve: Loosely cast on 68-68 sts on double pointed needles size 2.5 mm / US 1 or 2. Work M.4 and dec 28-20 sts evenly on the last round = 40-48 sts. Work M.2 and then finish the sleeve in M.7. At the same time when the piece measures 8 cm / 3⅛" inc 2 sts mid under arm on every 6-9 round a total of 5-4 times = 50-56 sts – work the inc sts in stockinette sts. When piece measures 17-19 cm / 6¾"-7½" bind off 6 sts mid under arm and finish the piece back and forth on needle. Dec for sleeve cap on every other row: 2 sts 2-3 times, 1 st 5-3 times and then 2 sts each side until piece measures 23-25 cm / 9"-9¾". Bind off. Work another sleeve. Assembly: Sew the shoulder seams. Left edge: Pick up approx 60-65 sts along left back piece on needle size 2.5 mm / US 1or2. Work back and forth as follows: K 1 row from WS, work 2.5 cm / ⅞" in seed sts, bind off. Right edge: Pick up and knit as left edge, but make 5 buttonholes evenly distributed after 1 cm / ⅜". 1 buttonhole = bind off 2 sts and cast on 2 new sts on next row. Place right edge over left edge and sew at the bottom of the slit. Lace collar: Pick up approx 55 to 65 sts from the WS round the neckline on needle size 2.5 mm / ⅞" (do not pick up over the edges on back piece). Work 4 rows garter sts and 1 row in stockinette sts, inc evenly to 123 sts on the stockinette sts row. Now work M.4 – start on the 3rd row in diagram – with 2 edge sts each side in garter sts. After M.4 bind off loosely. Crochet round the collar with hook size 2.5 mm/US C/2 as follows: 1 sl st in first st, *ch 4, skip 2 sts, 1 sl st in next st*, repeat from *-*. Sew in sleeves. Sew tog between legs and under foot. Sew on buttons. Cut 2 silk ribbons measuring 20 cm / 8" each and pull through row of holes at sleeves. Cut 2 silk ribbons measuring 60 cm / 23½" each and pull through the lower row of holes on each leg. ______________________________________________________________________ BONNET: To fit head circumference: approx 40/42 – 44/46 cm / 15¾"/16½" - 17¼"/18" Cast on 87-104 sts (incl 1 edge st each side, knitted in garter sts throughout) on pointed needles size 2.5 mm / US 1or2. Work M.1 until piece measures 10-12 cm / 4"-4¾". Now work a pin tuck – see explanation above – at the same for size 6/9 months dec 1 st on first row in pin tuck = 87 -103 sts. Now bind off 28-36 sts each side = 31 sts left (= middle piece on back). Measure piece from this point onwards! Continue as follows: 1 edge st, M.7A (= 9 sts), M.7B (= 8 sts), M.7C (=12 sts) and 1 edge st. Bind off when the middle piece measures 11-14 cm / 4⅜"-5½". Sew to side pieces. Pick up approx 86 to 98 sts (divisible by 4+2 to get an even number of holes for the silk ribbon) along the front edge on needle size 2.5 mm / US 1 and knit M.6 with 1 edge st each side. Bind off in P sts (seen from the RS). Cut a silk ribbon measuring approx 80 cm / 31½" and pull through row of holes. |
|||||||||||||||||||||||||
Diagram explanations |
|||||||||||||||||||||||||
|
|||||||||||||||||||||||||
 |
|||||||||||||||||||||||||
 |
|||||||||||||||||||||||||
 |
|||||||||||||||||||||||||
 |
|||||||||||||||||||||||||
Have you finished this pattern?Tag your pictures with #dropspattern #angelkissedchristeninggown or submit them to the #dropsfan gallery. Do you need help with this pattern?You'll find 33 tutorial videos, a Comments/Questions area and more by visiting the pattern on garnstudio.com. © 1982-2026 DROPS Design A/S. We reserve all rights. This document, including all its sub-sections, has copyrights. Read more about what you can do with our patterns at the bottom of each pattern on our site. |
|||||||||||||||||||||||||


With over 40 years in knitting and crochet design, DROPS Design offers one of the most extensive collections of free patterns on the internet - translated to 17 languages. As of today we count 325 catalogs and 12298 patterns - 12288 of which are translated into English (US/in).
We work hard to bring you the best knitting and crochet have to offer, inspiration and advice as well as great quality yarns at incredible prices! Would you like to use our patterns for other than personal use? You can read what you are allowed to do in the Copyright text at the bottom of all our patterns. Happy crafting!
Post a comment to pattern DROPS Baby 11-15
We would love to hear what you have to say about this pattern!
If you want to leave a question, please make sure you select the correct category in the form below, to speed up the answering process. Required fields are marked *.