
Popular categories
Looking for a yarn?


Comments / Questions (1)
![]() Karen wrote:
Karen wrote:
Hej, jeg skal til at starte på mønsteret, men jeg er i tvivl om hvordan jeg starter. I opskriften siger den, at jeg skal bruge farven gul i starten af mønsteret, men mønsteret starter med en “blank/hvede” runde i retstrik. Passer dette? Mange tak på forhånd og god dag :)
15.10.2024 - 14:20DROPS Design answered:
Hei Karen. Du legger opp med gult og strikker 4-5 cm, disse 4-5 cm blir på innsiden av halskanten (jakken har dobbelt halskant) og viser kun litt fra retten (en pinne rett fra vrangen = brettekanten). Nå byttes det til hvete og det strikkes med hvete fargen helt til MØNSTER A.1 starter (1. pinne av A.1 strikkes med hvete). mvh DROPS Design
22.10.2024 - 08:10
|
||||||||||
Sun Wreath Cardigan#sunwreathcardigan |
||||||||||
 |
 |
|||||||||
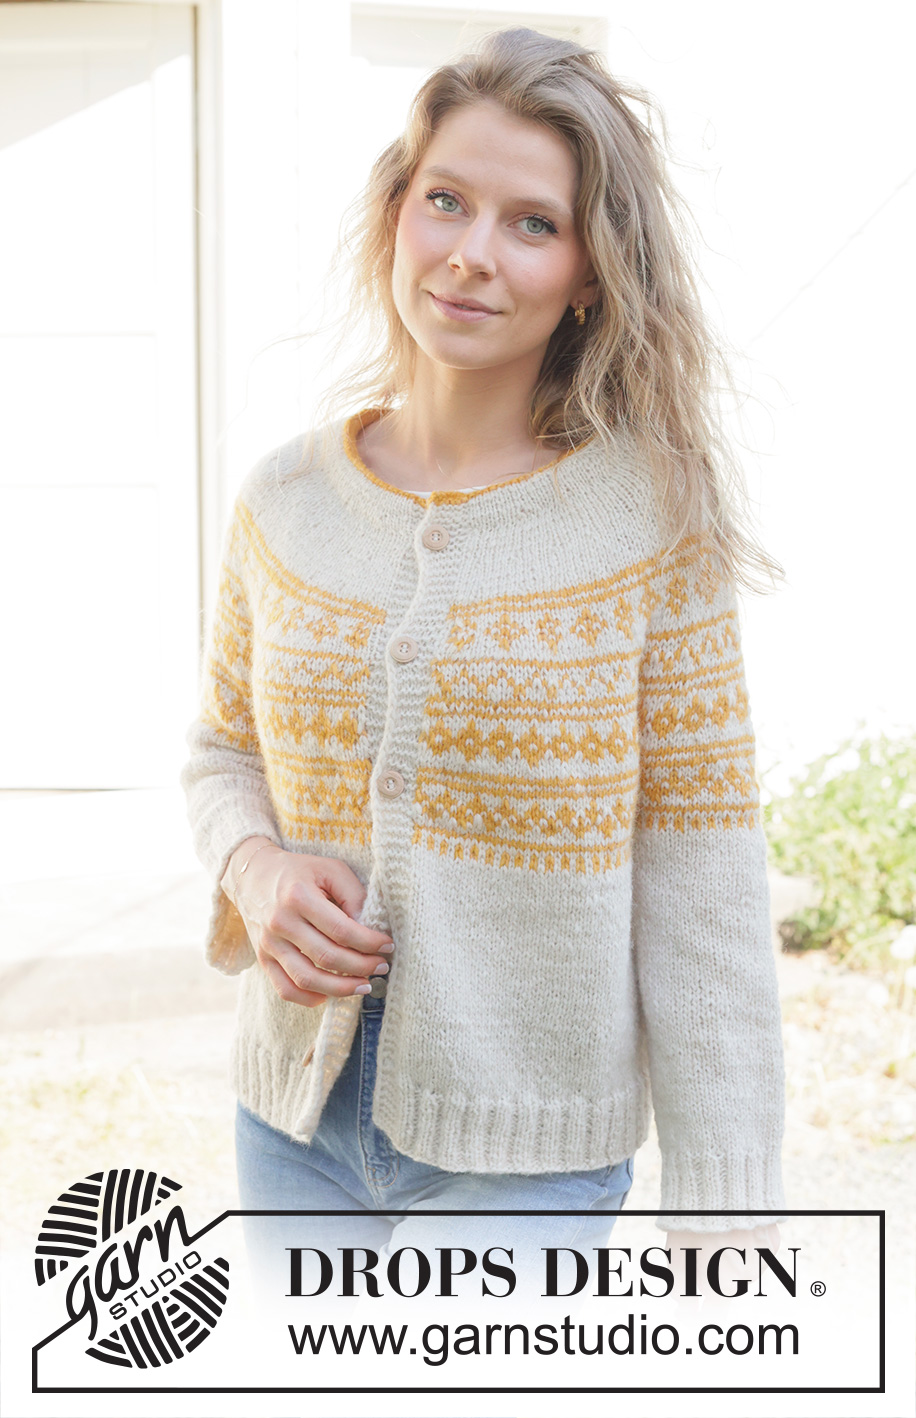
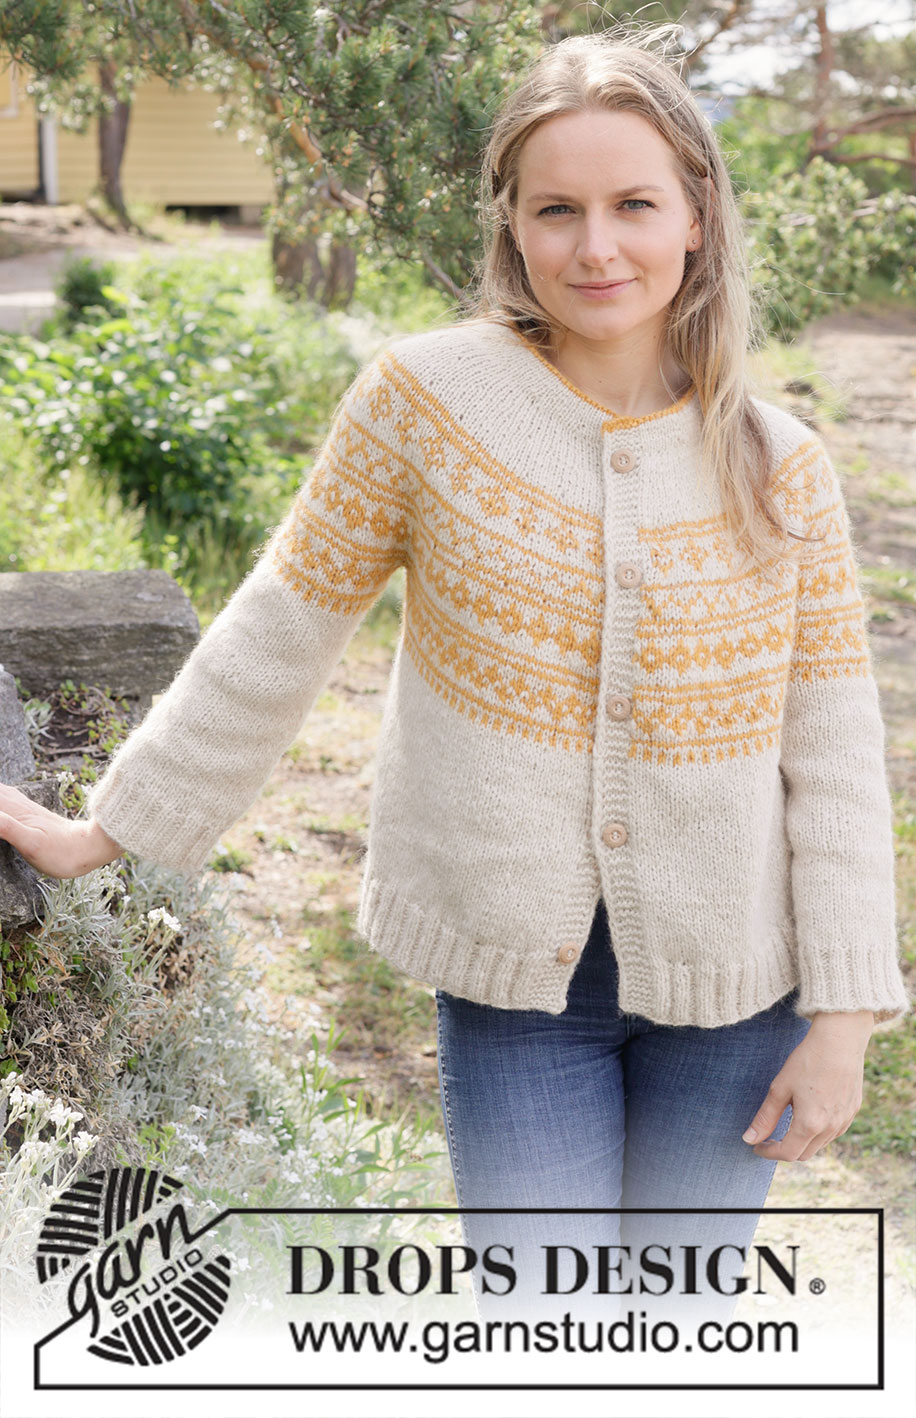
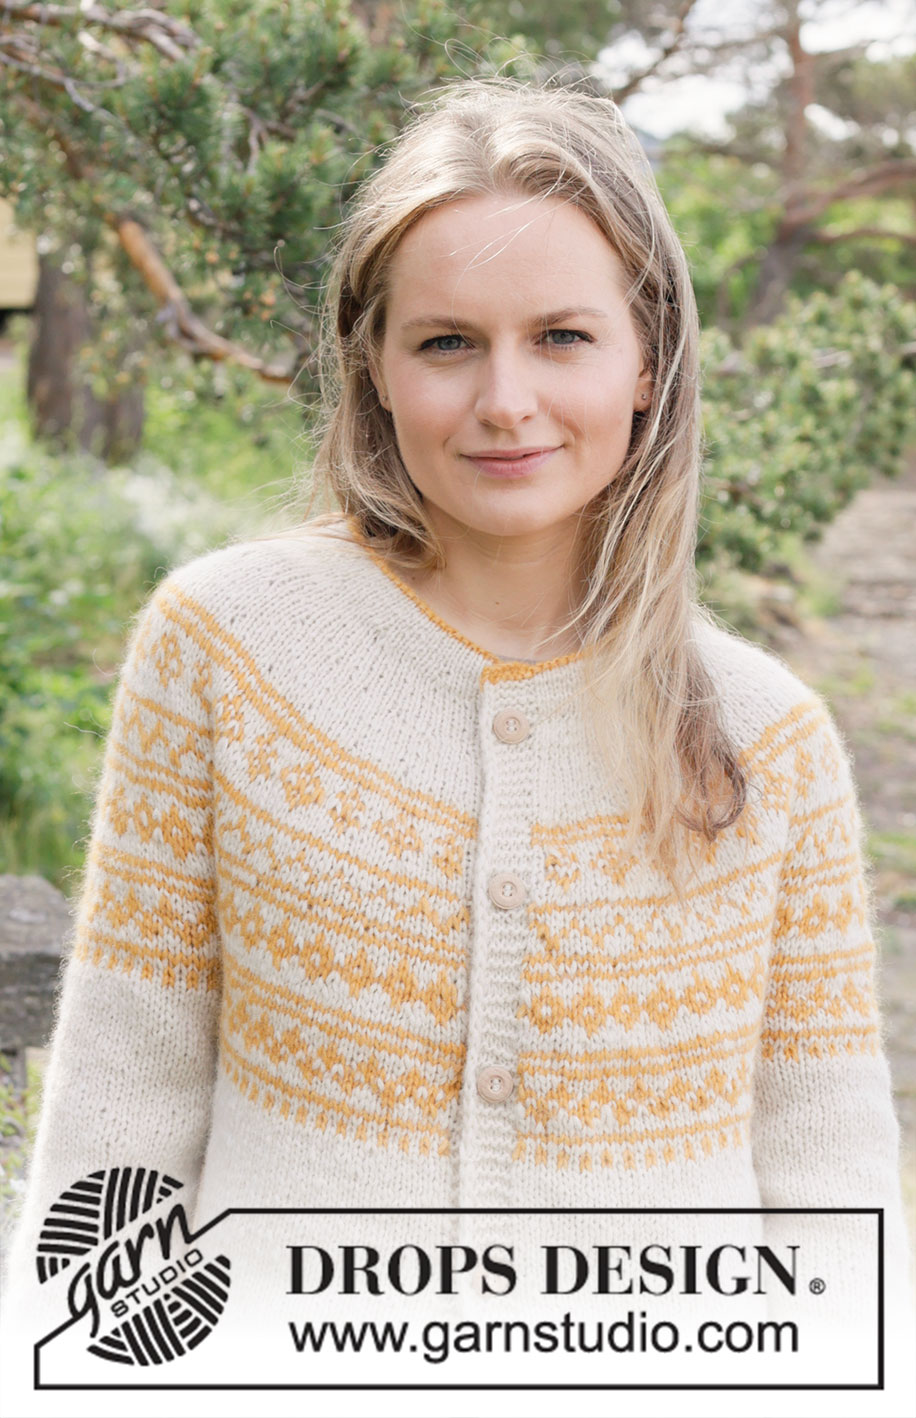
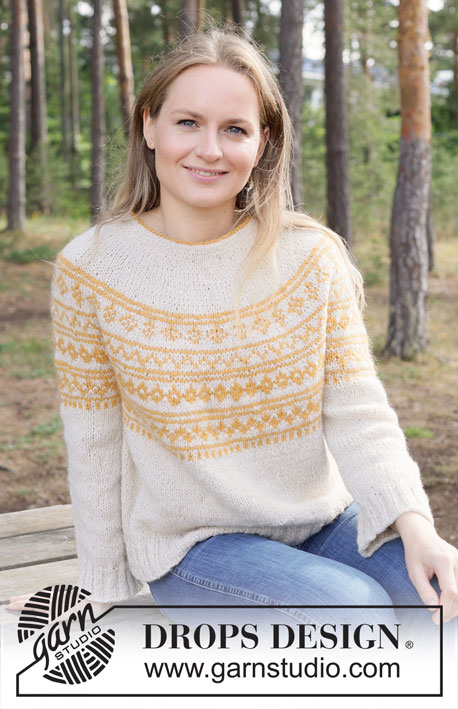
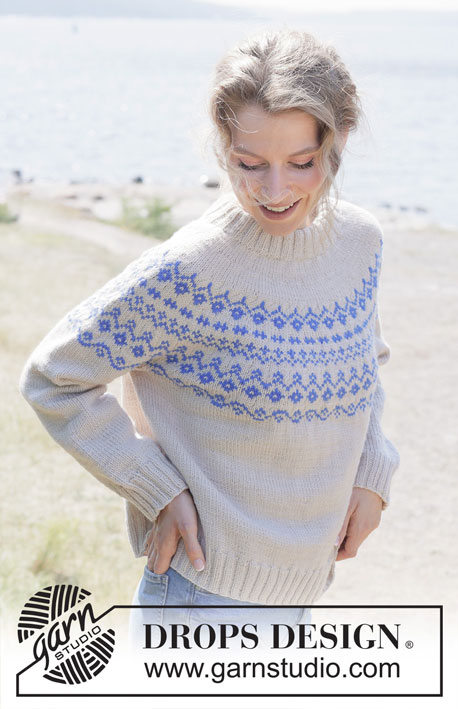
Knitted jacket in DROPS Air. Piece is knitted top down with round yoke, Nordic pattern, double neck edge and i-cord. Size: S - XXXL
DROPS 255-14 |
||||||||||
|
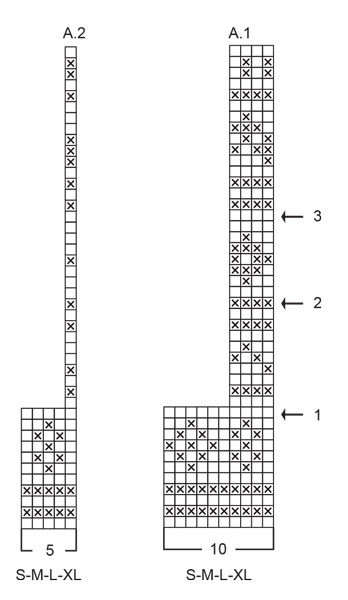
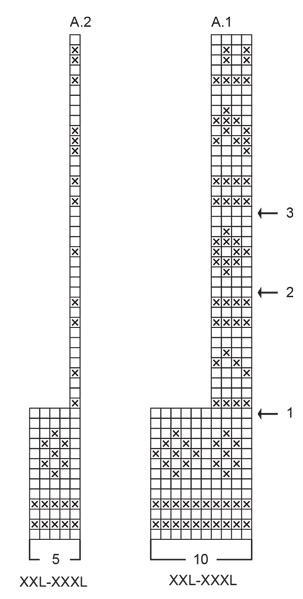
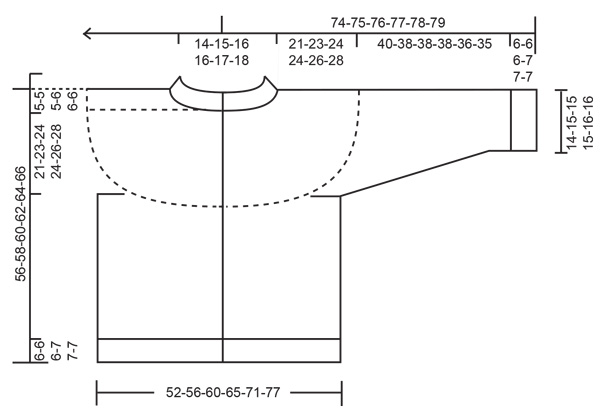
---------------------------------------------------------- EXPLANATION FOR THE PATTERN: ---------------------------------------------------------- GARTER STITCH (when working back and forth): Knit on all rows, i.e. knit from right side and knit from wrong side. 1 ridge vertically = knit 2 rows. PATTERN: See diagrams A.1 and A.2. Choose diagram for correct size. Diagrams show all rows in pattern seen from the right side. Work the entire pattern in stockinette stitch. INCREASE TIP (evenly): To calculate how to increase evenly, use the total number of stitches on row (e.g. 101 stitches), minus bands (e.g. 14 stitches) and divide the remaining stitches by number of increases to be done (e.g. 18) = 4.8. In this example increase by making 1 yarn over after approx. every 5th stitch (do not increase over bands). On next row work yarn overs twisted to avoid holes. DECREASE TIP: Decrease 1 stitch on each side of marker thread as follows: Work until 3 stitches remain before marker thread and knit 2 together, knit 2 (marker thread is in the middle of these 2 stitches), slip 1 stitch knitwise, knit 1, pass slipped stitch over stitch worked (= 2 stitches decreased). BAND WITH I-CORD: BEGINNING OF ROW: Work band as follows: Slip 1 stitch purlwise with strand in front of piece, knit 1 and work 5 stitches in garter stitch. END OF ROW: Work band as follows: Work until 7 stitches remain on row, work 5 stitches in garter stitch, slip 1 stitch purlwise with strand in front of piece, knit 1. Work the same way both from right side and wrong side. BUTTONHOLES: Decrease for buttonholes on right band (when garment is worn). Decrease from right side when 5 stitches remain on row as follows: ROW 1 (= right side): Make 1 yarn over, knit 2 together, knit 1, slip 1 stitch purlwise with strand in front of piece, knit 1. ROW 2 (= wrong side): Work band as before and knit yarn over to make a buttonhole. Decrease for first buttonhole on first row from right side after neck edge has been worked. Then decrease the next 4-4-5-5-5-5 buttonholes, approx. 11-11½-10-10-10-10½ cm = 4⅜"-4⅝"-4"-4"-4"-4⅛" apart. Place bottom buttonhole in the transition between stockinette stitch and rib. ---------------------------------------------------------- START THE PIECE HERE: ---------------------------------------------------------- JACKET - SHORT OVERVIEW OF THE PIECE: In this pattern needles of different length have been used, begin with fitting length for number of stitches and switch as needed. Work neck edge and yoke back and forth on circular needle from mid front, work top down. When yoke is done, divide piece for body and sleeves. Work body downwards back and forth on circular needle while putting the sleeves aside. Then work sleeves downwards in the round on needle. Fold the neck edge double against the wrong side and fasten. NECK EDGE: Cast on 89-93-97-101-105-109 stitches on circular needle size 5 MM = US 8 with color yellow in DROPS Air. Switch to circular needle size 3.5 MM = US 4 (cast on on a larger needle to get an elastic cast-on edge). Purl 1 row from wrong side. Then work in stockinette stitch with 1 stitch in GARTER STITCH in each side - read explanation above. Work until neck edge measures 3-3-3-4-4-4 cm = 1⅛"-1⅛"-1⅛"-1½"-1½"-1½" and next row is worked from wrong side. At the end of each of the next 2 rows cast on 6 stitches for band = 101-105-109-113-117-121 stitches on needle. Knit 1 row from wrong side (= folding edge) but work the outermost 7 stitches in each side as BAND WITH I-CORD - read explanation above. Neck edge measures now approx. 4-4-4-5-5-5 cm = 1½"-1½"-1½"-2"-2"-2" (= approx. height of neck edge when it is folded double). Switch to color wheat and work in stockinette stitch with 7 stitches band with i-cord in each side until neck edge measures 8-8-8-10-10-10 cm = 3⅛"-3⅛"-3⅛"-4"-4"-4" from cast-on edge - finish with a row from wrong side. Insert a maker on the inside of band in one side of piece, measure piece from this marker. YOKE: Switch to circular needle size 5 MM = US 8 and work first row from the right side and from mid front as follows: Work band as before, work 87-91-95-99-103-107 stitches in stockinette stitch while AT THE SAME TIME increasing 18-20-24-28-30-32 stitches evenly over these stitches – read INCREASE TIP, work band as before - remember BUTTONHOLES – read explanation above = 119-125-133-141-147-153 stitches on needle. Then work in stockinette stitch and band. Remember to follow the knitting gauge! When yoke measures 3-3-4-4-4-4 cm = 1⅛"-1⅛"-1½"-1½"-1½"-1½" from marker, increase 32-36-42-42-50-52 stitches evenly – remember INCREASE TIP (do not increase over bands) = 151-161-175-183-197-205 stitches. Continue with stockinette stitch and band until piece measures 6-7-8-8-9-9 cm = 2⅜"-2¾"-3⅛"-3⅛"-3½"-3½" from marker. On next row from right side work PATTERN – read explanation above but work band stitches in color wheat on every row onwards (if color wheat is not used in pattern twine the yarn between band stitches and stitches in pattern to avoid holes – and use a separate little ball in each side of band stitches to avoid pulling the yarn over all stitches on needle), i.e. work next row as follows - from right side: Work band as before in color wheat, work A.1 over the next 132-142-156-164-178-186 stitches AT THE SAME TIME increase 38-38-44-46-52-54 stitches evenly over these stitches, work A.2, work band as before in color wheat = 189-199-219-229-249-259 stitches (there is room for 17-18-20-21-23-24 repetitions with A.1 after this increase). Continue the pattern like this - AT THE SAME TIME on every row marked with arrow in A.1 increase stitches evenly as explained below - remember INCREASE TIP (do not increase over bands): Arrow-1: Increase 38-40-44-46-50-56 stitches evenly = 227-239-263-275-299-315 stitches. Arrow-2: Increase 32-36-40-44-48-56 stitches evenly = 259-275-303-319-347-371 stitches. Arrow-3: Increase 12-12-12-12-12-16 stitches evenly = 271-287-315-331-359-387 stitches. Work until yoke measures 21-23-24-24-26-28 cm = 8¼"-9"-9½"-9½"-10¼"-11" from marker mid front (all increases should be done and at least 5 rows should be work after last increase row). The pattern is not finished but the pattern is continued on body and sleeves. Now divide piece for body and sleeves. DIVIDING FOR BODY AND SLEEVES: AT THE SAME TIME as next row is worked divide yoke for body and sleeves as follows: Work 47-50-54-56-61-66 stitches as before (= front piece), slip the next 48-50-56-60-64-68 stitches on a thread for sleeve, cast on 8-8-8-12-12-12 new stitches on row (= in the side mid under sleeve), work 81-87-95-99-109-119 stitches as before (= back piece), slip the next 48-50-56-60-64-68 stitches on a thread for sleeve, cast on 8-8-8-12-12-12 new stitches on row (= in the side mid under sleeve) and work the last 47-50-54-56-61-66 stitches as before (= front piece). Finish body and sleeves separately. BODY: = 191-203-219-235-255-275 stitches. Continue pattern from yoke with band as before - the pattern border that is continued from yoke might not fit in the side under sleeves but work pattern as far as possible in towards each side under sleeves. The next pattern border will fit. When A.1 and A.2 have been worked vertically, work in stockinette stitch and band with color wheat until piece measures 45-47-49-49-51-53 cm = 17¾"-18½"-19¼"-19¼"-20"-21" from marker mid front. On next row from right side begin rib while AT THE SAME TIME increasing 33-37-37-41-45-49 stitches evenly on row (do not increase over bands) = 224-240-256-276-300-324 stitches, work as follows: Switch to circular needle size 3.5 MM = US 4, work band as before, work rib (= knit 2/purl 2 - remember increase) until 9 stitches remain, knit 2 and band as before stitch. When rib measures 6-6-6-7-7-7 cm = 2⅜"-2⅜"-2⅜"-2¾"-2¾"-2¾" bind off. Jacket measures 51-53-55-56-58-60 cm = 20"-21"-21⅝"-22"-22¾"-23⅝" from marker mid front and approx. 56-58-60-62-64-66 cm = 22"-22¾"-23⅝"-24⅜"-25¼"-26" from the top of shoulder. SLEEVES: Slip 48-50-56-60-64-68 sleeve stitches from one thread on to circular needle size 5 MM = US 8 and pick in addition up 1 stitch in each of the 8-8-8-12-12-12 stitches cast under sleeve = 56-58-64-72-76-80 stitches. Insert 1 marker thread in the middle of the 8-8-8-12-12-12 new stitches under sleeve - round begins at the marker thread. Continue pattern from yoke – the pattern will not fit mid under sleeve but work the pattern as far as possible mid under sleeve - AT THE SAME TIME when sleeve measures 3-3-3-2-2-2 cm = 1⅛"-1⅛"-1⅛"-¾"-¾"-¾" from division decrease mid under sleeve – read DECREASE TIP and decrease as follows: Decrease 2 stitches every 3-3-2-1½-1-1 cm = 1⅛"-1⅛"-¾"-½"-⅜"-⅜" 4-4-6-10-11-12 times in total = 48-50-52-52-54-56 stitches. Work until sleeve measures 40-38-38-38-36-35 cm = 15¾"-15"-15"-15"-14¼"-13¾" from division. Switch to double pointed needles size 3.5 MM = US 4 and work rib (= knit 2/purl 2) while AT THE SAME TIME increasing 8-10-8-12-10-12 stitches evenly on 1st round = 56-60-60-64-64-68 stitches. When rib measures 6-6-6-7-7-7 cm = 2⅜"-2⅜"-2⅜"-2¾"-2¾"-2¾" bind off. Sleeve measures approx. 46-44-44-45-43-42 cm = 18"-17¼"-17¼"-17¾"-17"-16½" from division. ASSEMBLY: Fold the neck edge at the top of neck down on the inside of garment. Fasten neck edge to get a double neck edge. To avoid a tight neck edge that sticks out it is important to keep the seam elastic. Sew opening towards mid front together on bands with neat little stitches. Sew the buttons on to the left band. |
||||||||||
Diagram explanations |
||||||||||
|
||||||||||
 |
||||||||||
 |
||||||||||
 |
||||||||||
Have you finished this pattern?Tag your pictures with #dropspattern #sunwreathcardigan or submit them to the #dropsfan gallery. Do you need help with this pattern?You'll find 37 tutorial videos, a Comments/Questions area and more by visiting the pattern on garnstudio.com. © 1982-2026 DROPS Design A/S. We reserve all rights. This document, including all its sub-sections, has copyrights. Read more about what you can do with our patterns at the bottom of each pattern on our site. |
||||||||||


With over 40 years in knitting and crochet design, DROPS Design offers one of the most extensive collections of free patterns on the internet - translated to 17 languages. As of today we count 324 catalogs and 12290 patterns - 12280 of which are translated into English (US/in).
We work hard to bring you the best knitting and crochet have to offer, inspiration and advice as well as great quality yarns at incredible prices! Would you like to use our patterns for other than personal use? You can read what you are allowed to do in the Copyright text at the bottom of all our patterns. Happy crafting!
Post a comment to pattern DROPS 255-14
We would love to hear what you have to say about this pattern!
If you want to leave a question, please make sure you select the correct category in the form below, to speed up the answering process. Required fields are marked *.