
Popular categories
Looking for a yarn?


Comments / Questions (124)
![]() Karin wrote:
Karin wrote:
Hoi, ik heb een paar vraagjes: * Als de linkervoorbies 17 cm meet (bij maat S) dan moet je de draad niet afknippen maar er 68 steken mee opzetten: is er ook een filmpje hoe dat gaat? * Hoeveel cm breed is dan het breiwerk aan de bovenkant tussen de 2 voorbiezen, dus van bies tot bies want ik snap de patroontekening hierin niet zo goed.
08.10.2025 - 14:01DROPS Design answered:
Dag Karin,
Ik heb zo123 even geen filmpje. Na de laatste naald van de bies laat je de steken gewoon op de naald steen en zet je steken je steken op. Aan het eind van de naald na het opzetten brei je over de steken van de rechter voorbies. Je hebt dan aan beide kant de 2 biezen met daartussen de opgezette steken. op het einde worden de kopse kanten van die biezen tegen elkaar genaaid en de lange kanten worden tegen de halslijn aan de achterkant genaaid (wat dus de opgezette steken zijn)
09.10.2025 - 21:31
![]() Rike wrote:
Rike wrote:
Hallo ich habe die Raglanzunahmen und V Ausschnitt gestrickt und bin auf 268 Maschen in Größe s gekommen. Aber ich habe eine Länge von 40 cm statt 24 cm. Ich hab nur in Hinreihen zugenommen. Wo kann der Fehler liegen? Und kann ich die ganze Arbeit noch weiter verwenden? Vielen Dank für eine Antwort.
05.10.2025 - 12:01DROPS Design answered:
Liebe Rike, haben Sie die Maschenprobe eingehalten? Und haben Sie die Raglanzunahmen in jeder 2. Reihe gemacht? Es ist nun schwer zu sagen, wo der Fehler genau liegt. Haben Sie das Strickstück liegend gemessen? Hängend kann es sich noch aushängen und länger werden.
23.10.2025 - 09:40
![]() Corinne wrote:
Corinne wrote:
À quel niveau Les augmentations sur les rangs raccourcis?et je ne comprends pas les 20 mailles entre le marqueur 1 et le marqueur 2 ? Merci pour votre retour
02.10.2025 - 07:20DROPS Design answered:
Bonjour Corinne, on ne tricote pas de rangs raccourcis pour ce modèle; les 20 mailles entre les fils marqueurs 1 et 2 et les fils marqueurs 3 et 4 sont pour les manches. Pour le raglan, on va d'abord augmenter 8 mailles (dos, devants et manches) puis on va augmenter alternativement 4 m (dos, devants seulement) et 8 m (dos, devants et manches). Cela répond-il à votre question? Bon tricot!
02.10.2025 - 08:55
![]() Marg wrote:
Marg wrote:
Hej! Jag har tänkt sticka tröja No nonsens cardigan i storlek L. I mönstret används Drops Air. Har valt ett annat garn i grupp C - Alpaca silk. Vad tror du om det? Blir det bra? Och så huvudfrågan: Hur mycket går åt av Alpaca silk? Tack på förhand. Marg
26.09.2025 - 09:17DROPS Design answered:
Hi Marg, technically speaking you may do it, but you will have a different look and feel to the garment in the photo, due to individual properties and qualities of each yarn, your cardigan will be much lighter and floppy. How to calculate new yarn amount you will find HERE. You can also use the yarn convertor HERE. For size L you will need approx. 250 g of DROPS Brushed Alpaca Silk. Happy knitting!
26.09.2025 - 09:35
![]() Schuler Denise wrote:
Schuler Denise wrote:
Bonjour , Pour l'encolure en V faut-il augmenter 2 mailles de chaque côté vu qu'il y a 2 marqueurs ou juste 1 maille après/avant les mailles de bordure. Merci de votre réponse.
21.09.2025 - 18:32DROPS Design answered:
Bonjour Denise, ENCOLURE-V: Augmenter pour l'encolure après/avant les mailles de bordure devant (7 mailles des bords) 11-11-11-14-14-14 fois tous les 4 rangs. Bon tricot!
21.09.2025 - 20:47
![]() Anastasia wrote:
Anastasia wrote:
When I finish the right band, should I cut the strand?
04.09.2025 - 17:25DROPS Design answered:
Hi Anastasia, yes, you cut the strand on the right band. Happy knitting!
18.09.2025 - 10:35
![]() Joanna wrote:
Joanna wrote:
Próbuje rozgryźć początek wzoru i nijak nie rozumiem - nabrać 5 oczek przerabiać aż robótka ma 17cm odłożyć robótkę. Kolejne obszycie, 5 oczek aż ma 17cm, nie odcinać nitki, narzucić x oczek. Totalnie to nie ma dla mnie sensu - wydziergać długie paski na 17 cm i potem dodawać oczka?! Albo nie umiem tego przeczytać i zrozumieć co to ma znaczyć albo jest to niejasno opisane, krok po kroku co robić.
21.08.2025 - 15:20DROPS Design answered:
Witaj Joanno, koniecznie zobacz video TUTAJ. Pamiętaj tylko we wzorze, który przerabiasz obszycia przodów są przerabiane bez rzędów skróconych. Pozdrawiamy!
25.08.2025 - 09:51
![]() Myrele wrote:
Myrele wrote:
Très beau modele et patron facile a réaliser, j’ai bien aimée le tricoter
14.08.2025 - 16:34
![]() Mati wrote:
Mati wrote:
W polskim tłumaczeniu reglanu jest błąd "Dodawać z każdej strony 2 oczek dżersejem", powinno być "Dodawać z każdej strony 2 oczka dżersejem", to spora różnica i bez wersji angielskiej ciężko zrozumieć gdzie te oczka dodać
29.07.2025 - 18:20DROPS Design answered:
Witaj Mati, nie ma tutaj błędu. Linie reglanów stanowią 2 oczka prawe (między nimi znajduje się marker). Dodajesz oczko na reglan przed tymi 2 oczkami i za tymi 2 oczkami. Pozdrawiamy!
29.07.2025 - 20:17
![]() Narelle Robinson wrote:
Narelle Robinson wrote:
I need a video for this pattern it is very confusing
23.07.2025 - 10:35
|
|
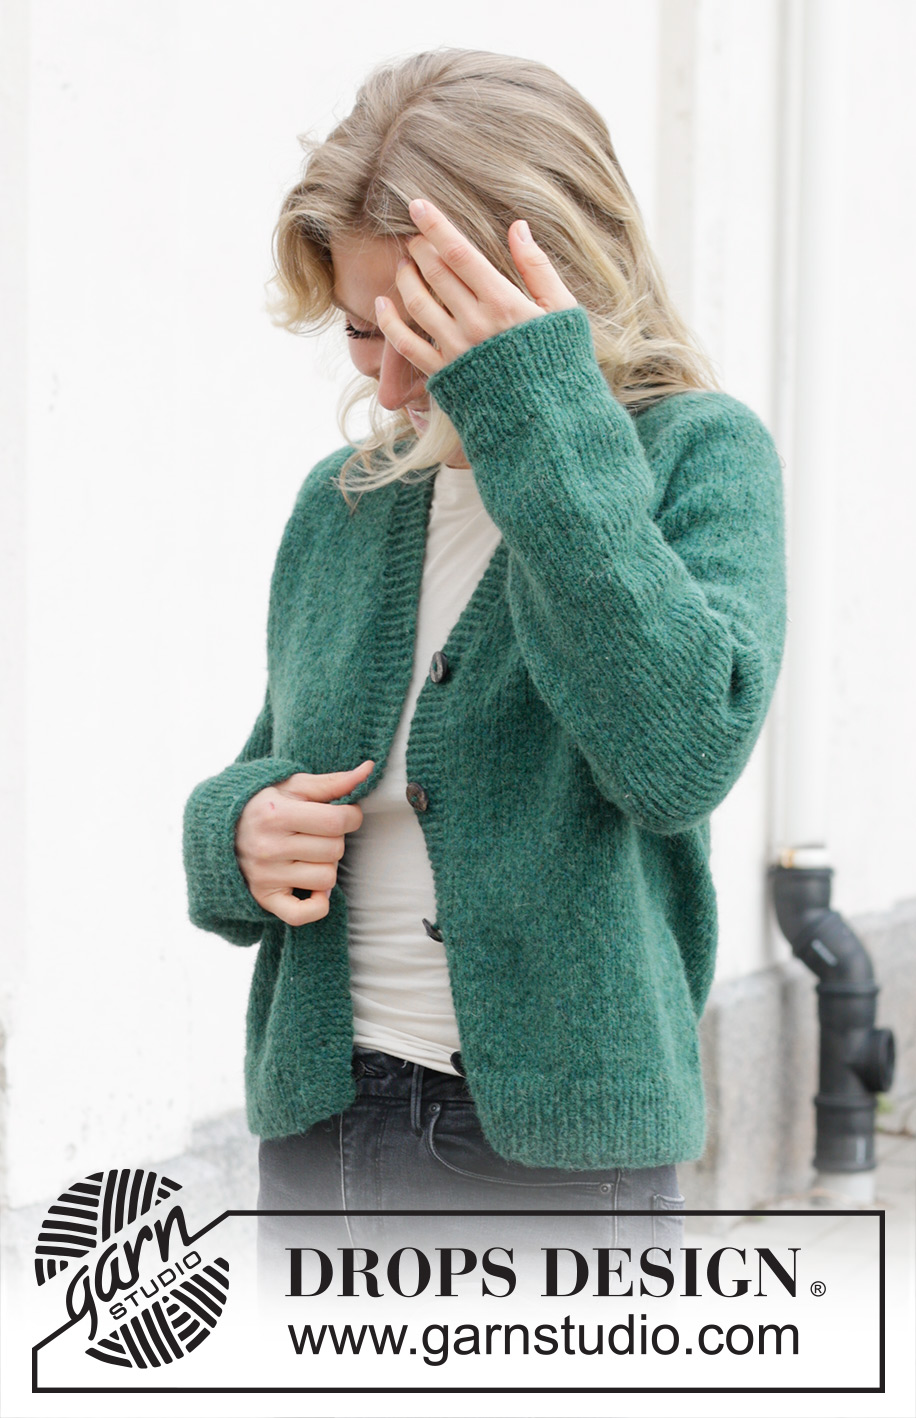
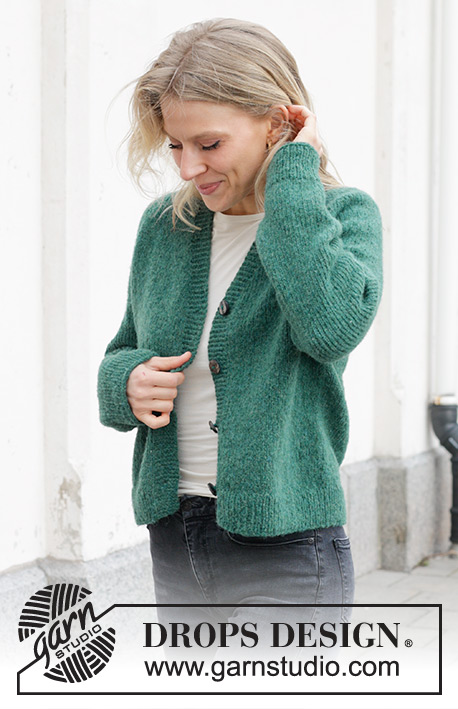
No Nonsense Cardigan#nononsensecardigan |
|
 |
 |
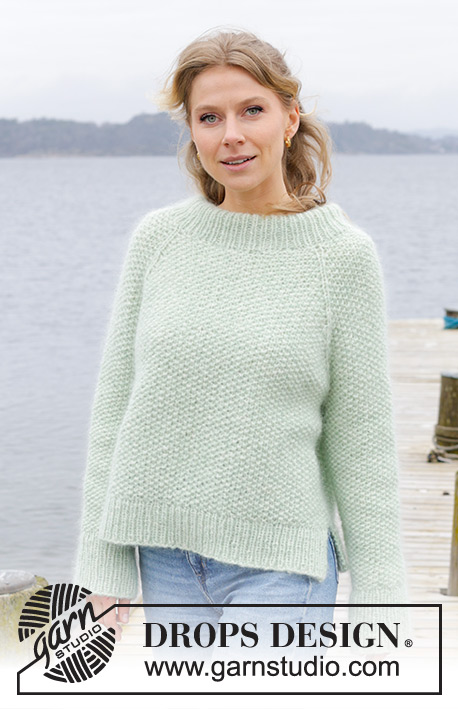
Knitted jacket in DROPS Air. The piece is worked top down with raglan and V-neck. Sizes S - XXXL.
DROPS 244-8 |
|
|
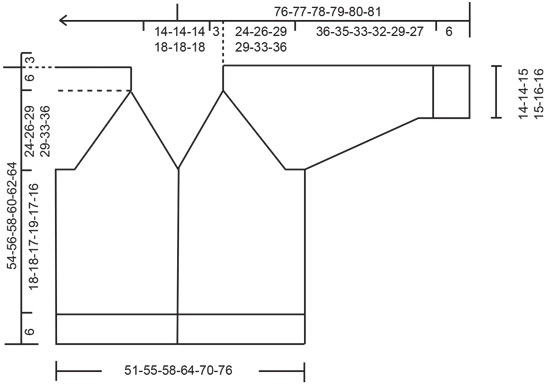
------------------------------------------------------- EXPLANATIONS FOR THE PATTERN: ------------------------------------------------------- GARTER STITCH (worked back and forth): Knit all rows. 1 ridge = knit 2 rows. RAGLAN: Increase 1 stitch before/after 2 stitches in each transition between the body and sleeves; the marker-thread sits between these 2 stitches. Increase 1 stitch by making 1 yarn over which is worked twisted on the next row/round to avoid a hole. The new stitches are then worked in stockinette stitch. BUTTONHOLES: Work buttonholes on the right band (when the garment is worn). Work from the right side when there are 4 stitches left on the row as follows: Make 1 yarn over, knit 2 together and knit 2. On the next row (wrong side), knit the yarn over to leave a hole. The first buttonhole is worked 1 cm = ⅜" after the last increase for the V-neck, then the other 3 buttonholes with approx. 7-8-8½-7½-8-9 cm = 2¾"-3⅛"-3¼"-2⅞"-3⅛"-3½" between each one. DECREASE TIP (for sleeves): Start 3 stitches before the marker-thread, knit 2 together, knit 2 (marker-thread sits between these 2 stitches), slip 1 stitch knit-wise, knit 1 and pass the slipped stitch over the knitted stitch (2 stitches decreased). ------------------------------------------------------- START THE PIECE HERE: ------------------------------------------------------- JACKET – SHORT OVERVIEW OF THE PIECE: Piece is worked back and forth, top down. Start by working 2 loose bands in garter stitch. Stitches are cast on between the 2 bands for the shoulders and back neck and the yoke continued back and forth with circular needle from mid-front. Stitches are increased for raglan and the V-neck. The yoke is divided for the body and sleeves and the body continued back and forth with circular needle. The sleeves are worked in the round with short circular needle/double pointed needles. RIGHT BAND (when the garment is worn): Cast on 7 stitches with circular needle size 5 MM = US 8 and DROPS Air. Work GARTER STITCH – read description above, until the band measures 17-17-17-19-19-19 cm = 6¾"-6¾"-6¾"-7½"-7½"-7½", finishing after a row from the wrong side. Lay the piece to one side. LEFT BAND: Cast on 7 stitches with circular needle size 5 MM = US 8 and DROPS Air. Work garter stitch until the band measures 17-17-17-19-19-19 cm = 6¾"-6¾"-6¾"-7½"-7½"-7½", finishing after a row from the right side. Do not cut the strand. Cast on 68-68-68-74-74-74 stitches at the end of this row, then knit the right band stitches = 82-82-82-88-88-88 stitches. Work 1 row with garter stitch over each band and purling the cast-on stitches. Insert 4 marker-threads (used when increasing for RAGLAN – read explanation above), without working the stitches and inserting them between 2 stitches as follows: Count 9 stitches, insert marker-thread 1, count 20 stitches, insert marker-thread 2, count 24-24-24-30-30-30 stitches, insert marker-thread 3, count 20 stitches, insert marker-thread 4, there are 9 stitches left on the row. YOKE: REMEMBER THE KNITTING GAUGE! Continue back and forth with stockinette stitch and garter stitch over each band. At the same time increase for the V-neck and raglan as described below. Read the next 2 sections before continuing. Start mid-front, from the right side. V-NECK: Increase for the neck inside the bands every 4th row 11-11-11-14-14-14 times by making 1 yarn over, which is worked twisted on the next row to avoid a hole. 1 cm = ⅜" after the last increase for the neck begin working the BUTTONHOLES – read description above. RAGLAN: Increase on each side of 2 stockinette stitches in each transition between the front/back pieces and the sleeves every 2nd row (each row from the right side = 8 increased stitches) 6 times – read description above. Continue to increase for raglan every 2nd round but every 2nd increase is only on the front/back pieces (4 increased stitches), i.e., increase on the front/back pieces every 2nd row (each row from the right side) and on the sleeves every 4th row (every 2nd row from the right side). Increase like this 18-22-26-26-30-30 times on the body (9-11-13-13-15-15 times on the sleeves). SIZES S, M, XL, XXL and XXXL (the increases in size L are finished): Continue with stockinette stitch and increase for raglan but now only increase on the body every 2nd row (the sleeve increases are finished) 2-1-1-1-5 times. ALL SIZES: You have increased a total of 26-29-32-32-37-41 times on the body and 15-17-19-19-21-21 times on the sleeves. After the last increase there are 268-288-308-324-348-364 stitches. Continue with stockinette stitch and the bands in garter stitch until the yoke measures 24-26-29-29-33-36 cm = 9½"-10¼"-11⅜"-11⅜"-13"-14¼", measured mid-back. Divide for the body and sleeves as follows: Work the first 46-49-52-56-60-64 stitches (front piece), place the next 50-54-58-58-62-62 stitches on a thread for the sleeve, cast on 10-10-10-12-14-16 stitches (in side under sleeve), work 76-82-88-96-104-112 stitches (back piece), place the next 50-54-58-58-62-62 stitches on a thread for the sleeve, cast on 10-10-10-12-14-16 stitches (in side under sleeve), work the last 46-49-52-56-60-64 stitches (front piece). BODY: = 188-200-212-232-252-272 stitches. Continue with stockinette stitch and the bands in garter stitch for a further 18-18-17-19-17-16 cm = 7"-7"-6¾"-7½"-6¾"-6¼". Knit 1 row from the right side and increase 19-21-21-23-25-27 stitches evenly spaced (do not increase over the bands) = 207-221-233-255-277-299 stitches. Change to circular needle size 4 MM = US 6 and work as follows from the wrong side: 7 band stitches in garter stitch, * purl 1, knit 1 *, work from *-* until there are 8 stitches left, purl 1 and 7 band stitches in garter stitch. Continue this rib for 6 cm = 2⅜". Bind off. The jacket measures approx. 54-56-58-60-62-64 cm = 21¼"-22"-22¾"-23⅝"-24⅜"-25¼" from the shoulder. SLEEVES: Place the 50-54-58-58-62-62 stitches from the thread on the one side of the piece on short circular needle/double pointed needles size 5 MM = US 8 and knit up 1 stitch in each of the 10-10-10-12-14-16 stitches cast on under the sleeve = 60-64-68-70-76-78 stitches. Insert a marker-thread in the middle of the new stitches under the sleeve. Work stockinette stitch in the round. When the sleeve measures 4 cm = 1½", decrease 2 stitches under the sleeve – read DECREASE TIP. Decrease like this every 5-3½-2½-2½-2-1½ cm = 2"-1¼"-1"-1"-¾"-½" a total of 6-8-9-10-11-11 times = 48-48-50-50-54-56 stitches. Continue working until the sleeve measures 36-35-33-32-29-27 cm = 14¼"-13¾"-13"-12½"-11⅜"-10⅝" from the division. Knit 1 round and increase 8-8-10-10-10-12 stitches evenly spaced = 56-56-60-60-64-68 stitches. Change to double pointed needles size 4 MM = US 6 and work rib (knit 1, purl 1) for 6 cm = 2⅜". Bind off. The sleeve measures approx. 42-41-39-38-35-33 cm = 16½"-16⅛"-15¼"-15"-13¾"-13" from the division. Work the other sleeve in the same way. ASSEMBLY: Sew the buttons onto the left band. Sew together the 2 loose bands mid-back and sew them to the neckline. |
|
 |
|
Have you finished this pattern?Tag your pictures with #dropspattern #nononsensecardigan or submit them to the #dropsfan gallery. Do you need help with this pattern?You'll find 27 tutorial videos, a Comments/Questions area and more by visiting the pattern on garnstudio.com. © 1982-2026 DROPS Design A/S. We reserve all rights. This document, including all its sub-sections, has copyrights. Read more about what you can do with our patterns at the bottom of each pattern on our site. |
|


With over 40 years in knitting and crochet design, DROPS Design offers one of the most extensive collections of free patterns on the internet - translated to 17 languages. As of today we count 324 catalogs and 12245 patterns - 12235 of which are translated into English (US/in).
We work hard to bring you the best knitting and crochet have to offer, inspiration and advice as well as great quality yarns at incredible prices! Would you like to use our patterns for other than personal use? You can read what you are allowed to do in the Copyright text at the bottom of all our patterns. Happy crafting!
Post a comment to pattern DROPS 244-8
We would love to hear what you have to say about this pattern!
If you want to leave a question, please make sure you select the correct category in the form below, to speed up the answering process. Required fields are marked *.