
Popular categories
Looking for a yarn?


Comments / Questions (73)
![]() Diane wrote:
Diane wrote:
I have aquestio regarding bind ING off on the front piece. First, is the bind off one by knitting 2 stitches together 2 times and then 1 stitch 3 times? And is this done across the row for one row only while still doing lace pattern? Or is done at the beginning of each row till you have the number of desired stitches? I am lost in how to continue the front piece at this point. Thanks
30.04.2026 - 12:29
![]() Chris wrote:
Chris wrote:
Skulle man kunna avsluta arbetet innan den höga kragen? Alltså inte ha kragen alls? Mvh
21.04.2026 - 19:10DROPS Design answered:
Hej Chris, ja absolut :) du kan eventuelt følge ett mönster med önskad krage :)
22.04.2026 - 14:20
![]() Diane wrote:
Diane wrote:
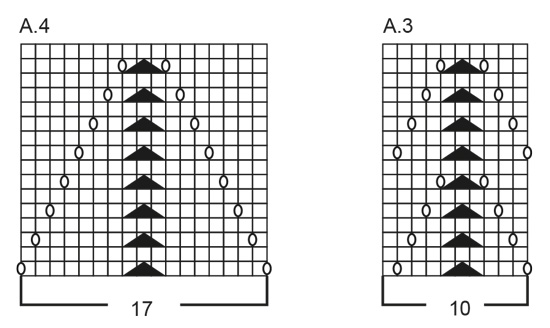
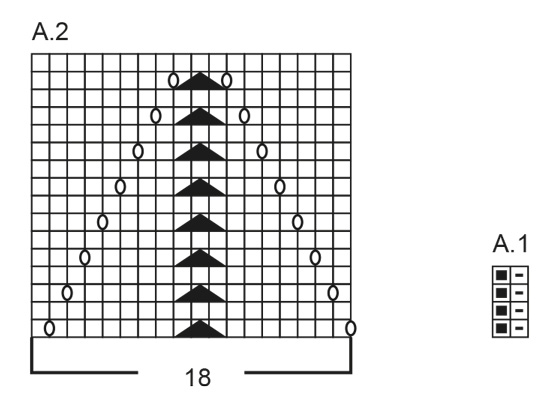
In this part of pattern,(see below) is it correct that chart A.2 is only worked at beginning of roadwork? I am confused as to the wording; it seems that chart A.2 should be worked before the stockinette at the end of row as well. Am I reading pattern incorrectly? Thanks Work pattern as follows: 1 stitch in garter stitch, 3-7-10-9-9-15 stitches in stockinette stitch, A.2, work A.3 4-4-4-5-6-6 times, A.4, then 3-7-10-9-9-15 stitches in stockinette stitch and 1 stitch in garter stitch.
06.03.2026 - 12:36DROPS Design answered:
Dear Diane, the lace pattern starts after the stitches in stocking stitch with A.2, then you repeat A.3 and finish the lace pattern working A.4, and finish with the stocking stitches (and edge stitch). So this is right so, pattern will be symmetrical starting with A.2 and ending with A.4 repeating A.3 in between. Happy knitting!
06.03.2026 - 16:47
![]() Marianela Ribó Dinator wrote:
Marianela Ribó Dinator wrote:
Los felicito sus patrones son maravillosos, todo funciona. Estéticamente son unas belleza 😍 💕 💖 ✨️ ♥️
27.01.2026 - 18:30
![]() Valentina wrote:
Valentina wrote:
Buongiorno, non capisco bene i diagrammi essendo la prima volta che provo un modello simile. Come procedo nelle righe pari dato che da come ho capito nelle righe dispari il "passare 1 maglia a diritto senza lavorarla, 2 maglie insieme a diritto, accavallare la maglia passata sopra quelle appena lavorate insieme" portano a una diminuzione dei punti? Ringrazio per l'aiuto
23.01.2026 - 12:02DROPS Design answered:
Buonasera Valentina, deve utilizzare la legenda per il diagramma. Il quadratino bianco indica 1 maglia a diritto sul diritto del lavoro e 1 maglia a rovescio dal rovescio del lavoro. Nelle righe dispari le diminuzioni sono bilanciate dai gettati (aumenti). Buon lavoro!
27.01.2026 - 20:34
![]() Lily wrote:
Lily wrote:
Ik begrijp niets van de volgorde van de patronen. Ik kan de uitleg gewoon niet volgen. Als ik kijk naar de foto's van de resultaten zie ik eerst a2, dan een aantal maal iets smaller, a3? , wat is het verschil tussen a2 en A4. En waarom moet je eerst 10 steken trico doen? Ik heb geen ervaring met dit soort patronen. Op een proeflapje is het wel gelukt om A4 te breien.
11.01.2026 - 21:08DROPS Design answered:
Dag Lily,
A.2 heeft 1 tricotsteek extra op het einde van het patroon. Als je de beschrijving volgt en precies doet wat er staat, komen de patronen mooi symmetrisch en in het midden op het voorpand.
14.01.2026 - 19:32
![]() Alexia wrote:
Alexia wrote:
Come faccio a realizzare questo maglione con i ferri normali in piano, e non con i ferri circolari? Grazie
27.12.2025 - 17:52DROPS Design answered:
Hi Alexia, please see the lesson DROPS HERE. Happy knitting!
28.12.2025 - 20:29
![]() Susanne wrote:
Susanne wrote:
Mønster
08.12.2025 - 18:38
![]() Isabelle CROUZOULON wrote:
Isabelle CROUZOULON wrote:
Bonjour, pour démarrer le dos, il faut utiliser des aiguilles simples et non circulaires ?
09.11.2025 - 14:56DROPS Design answered:
Bonjour Mme Crouzolon, pour ce modèle, on tricote chaque partie séparément en allers et retours sur aiguille circulaire pour avoir suffisamment de place pour y loger toutes les mailles (seul le col sera tricoté en rond). Vous pouvez donc utiliser des aiguilles droites, vos mailles seront juste plus serrées; retrouvez plus d'infos sur les aiguilles circulaires ici. Bon tricot!
10.11.2025 - 07:43
![]() Eve wrote:
Eve wrote:
When casting off for the neck on the front, do I cast off from the knit or purl side or both? Thank you :)
11.09.2025 - 13:55DROPS Design answered:
Hi Eve, you have to cast off at the beginning of each row from the neck: it will be from the right side for right shoulder, and from the wrong side for left shoulder. It means you decrease every second row. Happy knitting!
12.09.2025 - 08:57
|
|||||||||||||||||||
Forest Embrace#forestembracesweater |
|||||||||||||||||||
 |
 |
||||||||||||||||||
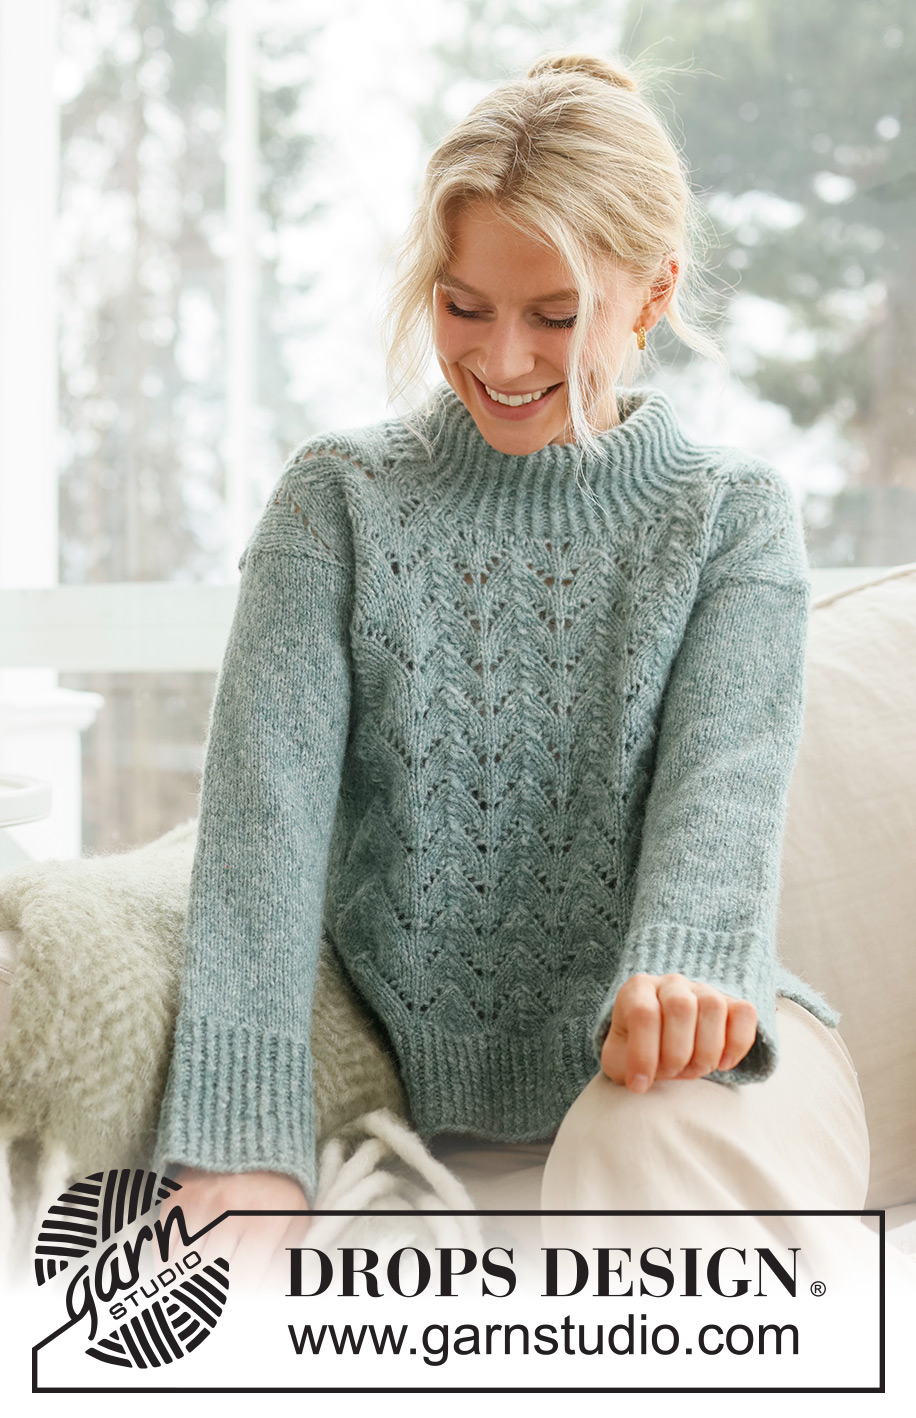
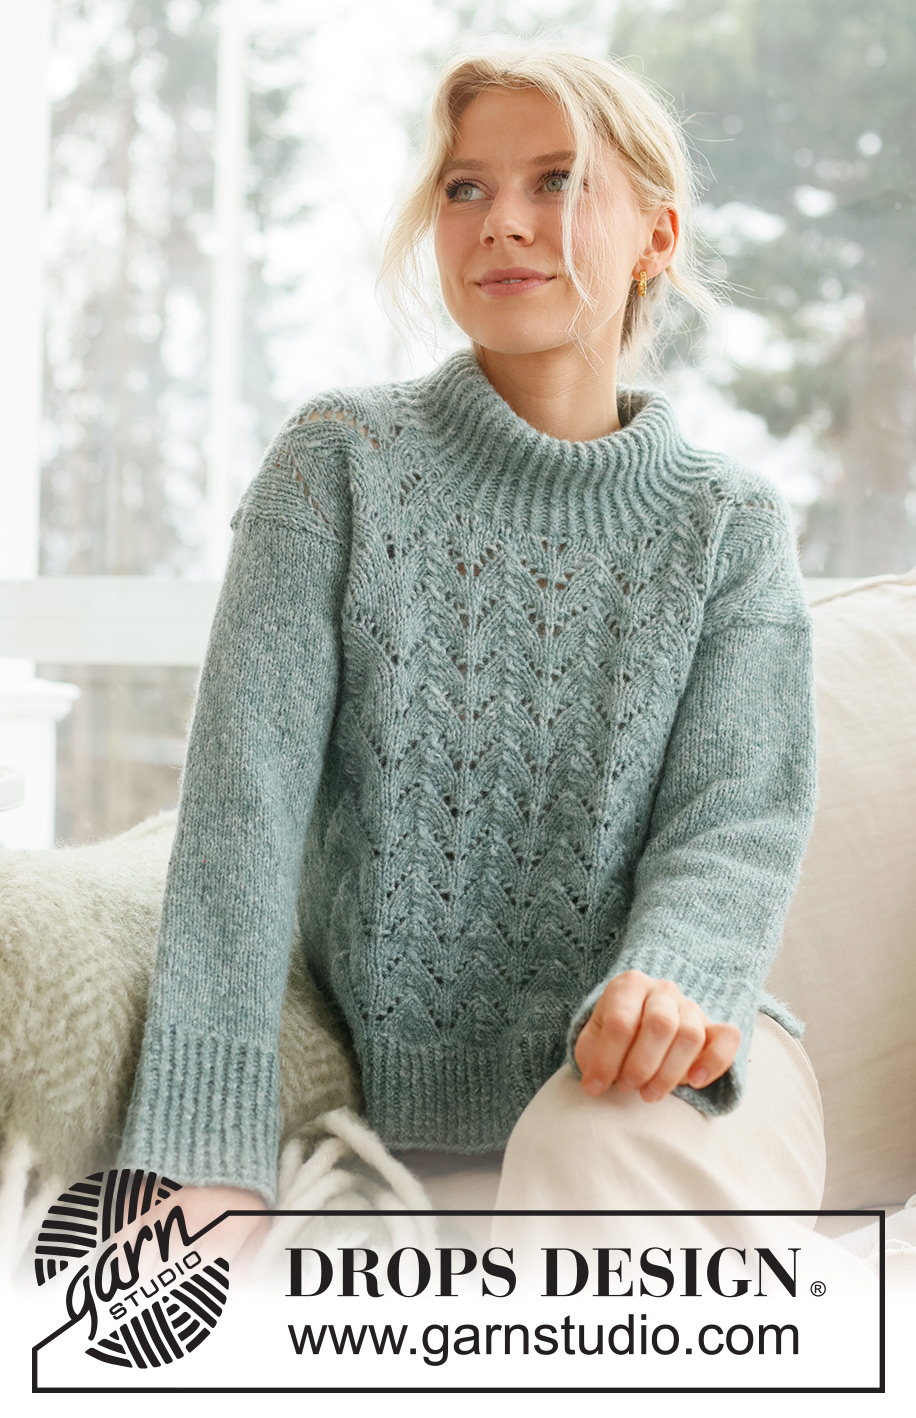
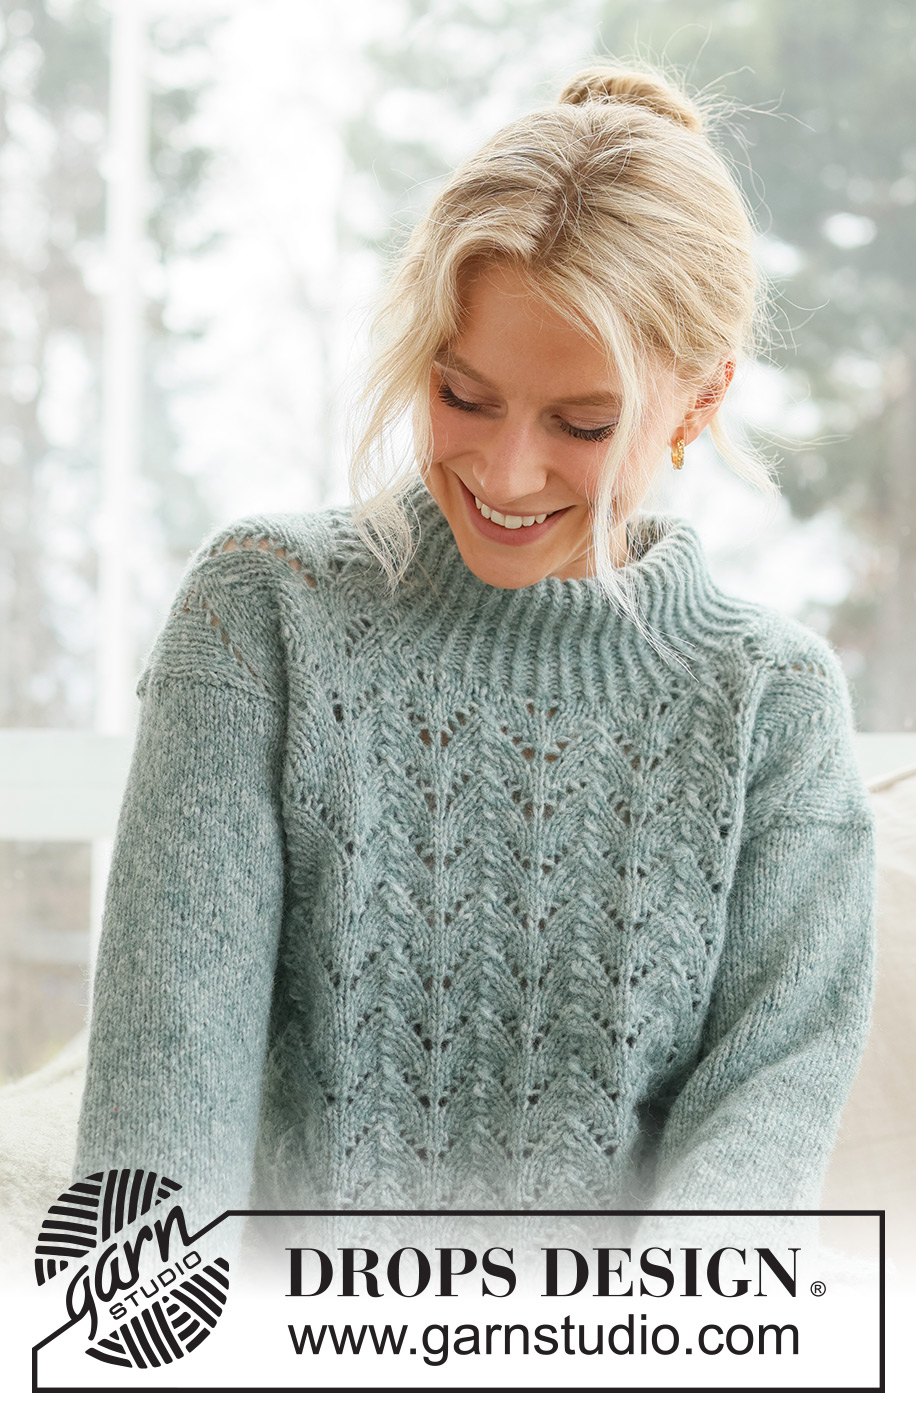
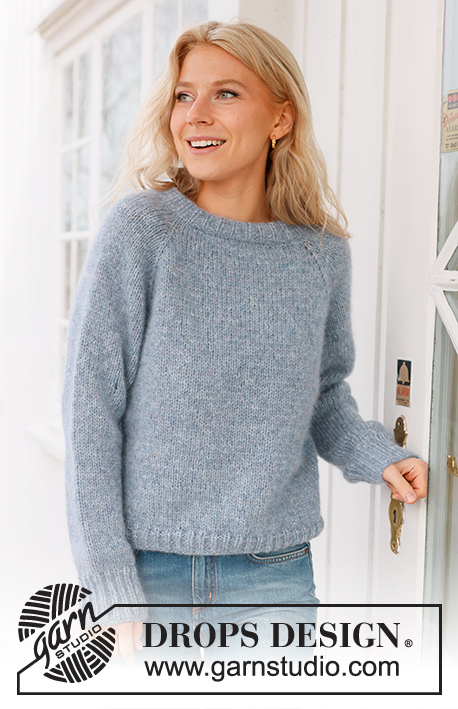
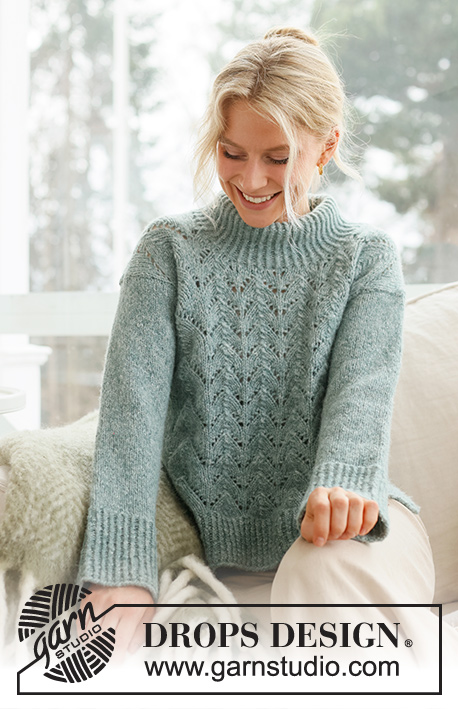
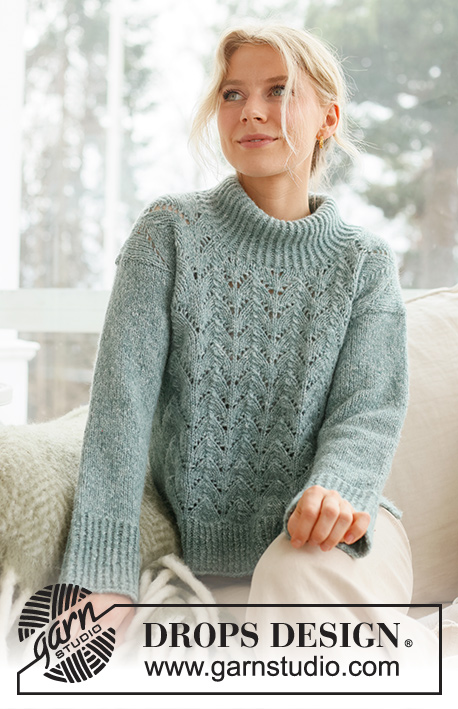
Knitted sweater in DROPS Air. The piece is worked bottom up, with lace pattern, split in the sides and high neck. Sizes S - XXXL.
DROPS 237-1 |
|||||||||||||||||||
|
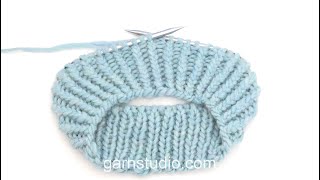
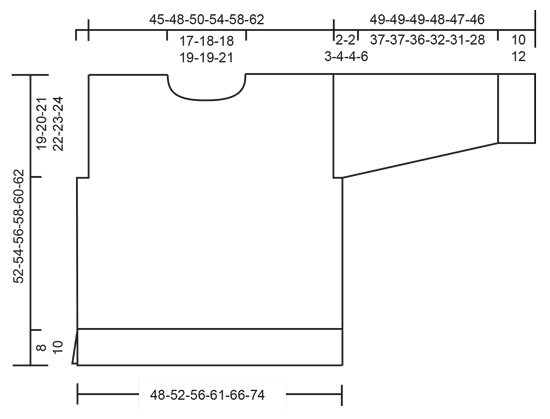
------------------------------------------------------- EXPLANATIONS FOR THE PATTERN: ------------------------------------------------------- RIDGE/GARTER STITCH (worked back and forth): Knit all rows. 1 ridge = knit 2 rows. PATTERN: See diagrams A.1 to A.4. The diagrams show all rows in the pattern from the right side. KNITTING TIP: When decreasing for the neck, the lace pattern will be affected. Take care to count the yarn overs and decreases in the lace pattern when working the neck so the number of stitches is correct. If the decrease ends up in a symbol which covers 3 stitches, replace this symbol with ‘knit 2 twisted together’. Then keep the one yarn over. ------------------------------------------------------- START THE PIECE HERE: ------------------------------------------------------- SWEATER- SHORT OVERVIEW OF THE PIECE: The sections are worked separately, back and forth with circular needle, bottom up. The piece is sewn together and the neck worked to finish. BACK PIECE: Cast on 101-111-119-129-141-157 stitches with circular needle size 3.5 MM = US 4 and DROPS Air. Purl 1 row from the wrong side. Work as follows from the right side: 1 stitch in GARTER STITCH – read description above, work A.1 until there are 2 stitches left, work the first stitch in A.1 (so the pattern is symmetrical) and 1 stitch in garter stitch. Continue this rib for 8-8-8-10-10-10 cm = 3⅛"-3⅛"-3⅛"-4"-4"-4" – finish after a row from the wrong side. Knit 1 row and decrease 20-22-24-26-28-32 stitches evenly spaced = 81-89-95-103-113-125 stitches. Cast on 1 stitch at the end of the row. Change to circular needle size 5 MM = US 8, purl 1 row from the wrong side and cast on 1 stitch at the end of the row = 83-91-97-105-115-127 stitches. Work pattern as follows: 1 stitch in garter stitch, 3-7-10-9-9-15 stitches in stockinette stitch, A.2, work A.3 4-4-4-5-6-6 times, A.4, then 3-7-10-9-9-15 stitches in stockinette stitch and 1 stitch in garter stitch. Continue this pattern. REMEMBER THE KNITTING GAUGE! When the piece measures 33-34-35-36-37-38 cm = 13"-13⅜"-13¾"-14¼"-14½"-15", bind off 3-5-6-7-8-11 stitches at the beginning of the next 2 rows for the armholes = 77-81-85-91-99-105 stitches. Continue the pattern, with 1-3-5-3-2-5 stitches in stockinette stitch on each side. NOTE: Stop working the lace pattern after a complete repeat in height, when the piece is nearly finished (see measurement chart), continue with stockinette stitch to finished length. When the piece measures 50-52-54-56-58-60 cm = 19¾"-20½"-21¼"-22"-22¾"-23⅝", bind off the middle 27-29-29-31-31-33 stitches for the neck and finish each shoulder separately – read KNITTING TIP (if you haven’t already finished the lace pattern). Bind off 1 stitch on the next row from the neck = 24-25-27-29-33-35 stitches on the shoulder. Work until the piece measures 52-54-56-58-60-62 cm = 20½"-21¼"-22"-22¾"-23⅝"-24⅜". Bind off. Work the other shoulder in the same way. FRONT PIECE: Cast on and work in the same way as the back until the front piece measures 45-47-48-50-51-53 cm = 17¾"-18½"-19"-19¾"-20"-21". Place the middle 15-17-17-19-19-21 stitches on a thread for the neck and finish each shoulder separately. NOTE: Stop working the lace pattern after a complete repeat in height, when the piece is nearly finished (in the same way as the back), continue with stockinette stitch to finished length. Bind off at the beginning of each row from the neck as follows – remember KNITTING TIP: 2 stitches 2 times and 1 stitch 3 times = 24-25-27-29-33-35 stitches on the shoulder. Work until the piece measures 52-54-56-58-60-62 cm = 20½"-21¼"-22"-22¾"-23⅝"-24⅜". Bind off. Work the other shoulder in the same way. SLEEVES: Cast on 56-58-60-64-66-66 stitches with circular needle size 3.5 MM = US 4 and DROPS Air. Purl 1 row from the wrong side. Work as follows from the right side: 1 stitch in garter stitch, work A.1 until there are 2 stitches left, work the first stitch in A.1 (so the pattern is symmetrical) and 1 stitch in garter stitch. Continue this rib for 10-10-10-12-12-12 cm = 4"-4"-4"-4¾"-4¾"-4¾" – finish after a row from the wrong side. Knit 1 row and decrease 10-10-10-12-12-12 stitches evenly spaced = 46-48-50-52-54-54 stitches. Change to circular needle size 5 MM = US 8. Work stockinette stitch with 1 stitch in garter stitch on each side. When the sleeve measures 12-13-11-13-15-15 cm = 4¾"-5⅛"-4⅜"-5⅛"-6"-6" from the cast-on edge, increase 1 stitch each side on the next row from the right side (increase by making 1 yarn over inside the 2 outermost stitches on each side – on the next row purl the yarn overs twisted to avoid holes). Increase like this every 3½-3-3-2½-2-1½ cm = 1¼"-1⅛"-1⅛"-1"-¾"-½" a total of 10-11-12-12-13-15 times = 66-70-74-76-80-84 stitches. When the sleeve measures 47-47-46-44-43-40 cm = 18½"-18½"-18"-17¼"-17"-15¾", insert 1 marker in each side – they mark the bottom of the armholes. Continue working until the sleeve measures 49-49-49-48-47-46 cm = 19¼"-19¼"-19¼"-19"-18½"-18". Bind off a little loosely. Work the other sleeve in the same way. ASSEMBLY: Sew the shoulder seams. Sew in the sleeves and sew the bottom of the armholes – The markers on the sleeves should match the sides of the body – see sketch. Sew the sleeve and side seams in one go, inside the 1 edge stitch, down to where the new stitches were cast on in each side (8-8-8-10-10-10 cm = 3⅛"-3⅛"-3⅛"-4"-4"-4" split). HIGH NECK: Knit up 70 to 86 stitches around the neck (including the stitches on the thread in front) with short circular needle size 3.5 MM = US 4. Knit 1 round and increase evenly to 90-92-94-98-100-108 stitches. Work A.1 in the round for 14-14-15-15-16-16 cm = 5½"-5½"-6"-6"-6¼"-6¼" – or to desired length. Loosely bind off. You can fold the neck to the inside if you wish and fasten with a stitch at each shoulder seam. |
|||||||||||||||||||
Diagram explanations |
|||||||||||||||||||
|
|||||||||||||||||||
 |
|||||||||||||||||||
 |
|||||||||||||||||||
 |
|||||||||||||||||||
 |
|||||||||||||||||||
Have you finished this pattern?Tag your pictures with #dropspattern #forestembracesweater or submit them to the #dropsfan gallery. Do you need help with this pattern?You'll find 30 tutorial videos, a Comments/Questions area and more by visiting the pattern on garnstudio.com. © 1982-2026 DROPS Design A/S. We reserve all rights. This document, including all its sub-sections, has copyrights. Read more about what you can do with our patterns at the bottom of each pattern on our site. |
|||||||||||||||||||


With over 40 years in knitting and crochet design, DROPS Design offers one of the most extensive collections of free patterns on the internet - translated to 17 languages. As of today we count 324 catalogs and 12290 patterns - 12280 of which are translated into English (US/in).
We work hard to bring you the best knitting and crochet have to offer, inspiration and advice as well as great quality yarns at incredible prices! Would you like to use our patterns for other than personal use? You can read what you are allowed to do in the Copyright text at the bottom of all our patterns. Happy crafting!
Post a comment to pattern DROPS 237-1
We would love to hear what you have to say about this pattern!
If you want to leave a question, please make sure you select the correct category in the form below, to speed up the answering process. Required fields are marked *.