
Popular categories
Looking for a yarn?


Comments / Questions (62)
![]() Gillian Foster wrote:
Gillian Foster wrote:
What size is small and medium i am a size 14 but I am wondering what size to do can you help please.?
06.05.2025 - 19:47DROPS Design answered:
Hi Gillian, There is a measurements chart at the bottom of the pattern, giving all the measurements for the different sizes. Regards, Drops Team
07.05.2025 - 06:44
![]() Tervoli Aurora wrote:
Tervoli Aurora wrote:
Per avere la spiegazione del maglione cosa devo fare
09.03.2025 - 10:50DROPS Design answered:
Buonasera Aurora, le spiegazioni del maglione sono già nella pagina del modello. Buon lavoro!
10.03.2025 - 00:13
![]() Luisa Pietta wrote:
Luisa Pietta wrote:
Buongiorno, purtroppo ho sbagliato il lavaggio e la maglia si è infeltrita. E' possibile riportare il filato alla consistenza originale e come ? Grazie Luisa
22.02.2025 - 12:22DROPS Design answered:
Buonasera Luisa, per un'assistenza così personalizzata può rivolgersi al suo rivenditore DROPS di fiducia. Buon lavoro!
24.02.2025 - 00:14
![]() Hanneke Broekman wrote:
Hanneke Broekman wrote:
Ik wil dit prachtige patroon breien in alpaca en kid silk, maar dan heb ik een hele andere stekenverhouding, nl 19 steken op 10 cm. Dikkere naalden geven geen mooi resultaat. Kan ik het patroon dan in maat L breien ipv maat M? Alvast bedankt voor je antwoord, Groet, Hanneke
09.02.2025 - 13:56DROPS Design answered:
Dag Hanneke,
Dit zou je om kunnen rekenen aan de hand van de stekenverhouding. Als je dan op dezelfde breedte komt als maat S, dan zou je dit kunnen doen.
11.02.2025 - 21:17
![]() Nicole Chapdelaine wrote:
Nicole Chapdelaine wrote:
Bonjour Avez vous des video sur la règle de trois Je connais le nombre de mailles je dois augmenter mais comment fais t'on pour savoir a combien de rangs nous le faisons lorsque nous avons un échantillons différent du patron Dans les patrons ils disent à tous les 7 rangs et 8 rangs comment je fais pour le savoir Merci
05.02.2025 - 19:40DROPS Design answered:
Bonjour Mme Chapdelaine, nous recommandons d'utiliser la même tension que pour le modèle indiqué pour que ce soit plus simple, sinon il s'agit donc d'une autre modèle si l'échantillon diffère. Vous trouverez probablement sur internet des explications sur la règle de 3; votre magasin de laine peut fort probablement également vous aider, même par mail ou téléphone. Bon tricot!
06.02.2025 - 09:11
![]() Maria Sozzi wrote:
Maria Sozzi wrote:
Possibile avere una spiegazione migliore per il punto centrale? E se possibile iniziare il lavoro con ferri normali? Ve ne sarei molto grata. Con ferri circolari non riesci. Ringrazio in anticipo!
29.01.2025 - 16:38DROPS Design answered:
Buonasera Maria, il punto centrale si lavora con il diagramma, che si legge dal basso verso l'alto e da destra verso sinistra per i ferri di andata. Il modello è lavorato in piano, quindi può lavorare anche con i ferri normali. Buon lavoro!
29.01.2025 - 22:59
![]() Katka Macháčková wrote:
Katka Macháčková wrote:
Děkuji za skvělý návod. Začínám s pletením a je srozumitelný i pro začátečníka. Jen jsem narazila, dle mého názoru, na chybu. Počet ok u rukávu by měl být na začátku také lichý jako u předního a zadního dílu, aby patent vyšel správně. Při sudém počtu ok návod nesedí.
28.01.2025 - 15:18
![]() Sheila Lebleu wrote:
Sheila Lebleu wrote:
Ja ik heb daar rekening mee gehouden. Misschien ligt het aan de manier van innaaien? Ik volg de instructies van jullie video. Ik heb trouwens alle panden nog eens nagemeten en alle afmetingen kloppen. Vreemd.
01.01.2025 - 18:03
![]() Sheila Lebleu wrote:
Sheila Lebleu wrote:
Deze trui heb ik in tricot gebreid. Alle stukken zijn af maar bij het aan elkaar naaien merkte ik dat de mouwkoppen 3 cm te SMAL zijn. Wat nu?
28.12.2024 - 09:38DROPS Design answered:
Dag Sheila,
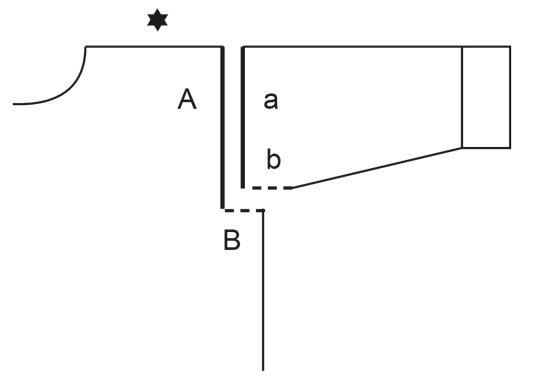
Heb je er rekening mee gehouden dat er een stukje van de zijnaad van de mouw als het ware in het pand wordt geschoven? Zie ook de tekening helemaal onderaan.
01.01.2025 - 16:24
![]() Sheila wrote:
Sheila wrote:
Deze trui heb ik in tricot gebreid. Alle stukken zijn af maar bij het aan elkaar naaien merkte ik dat de mouwkoppen 3 cm te kort zijn. Wat nu?
23.12.2024 - 16:08
|
|||||||||||||||||||
Forest Embrace#forestembracesweater |
|||||||||||||||||||
 |
 |
||||||||||||||||||
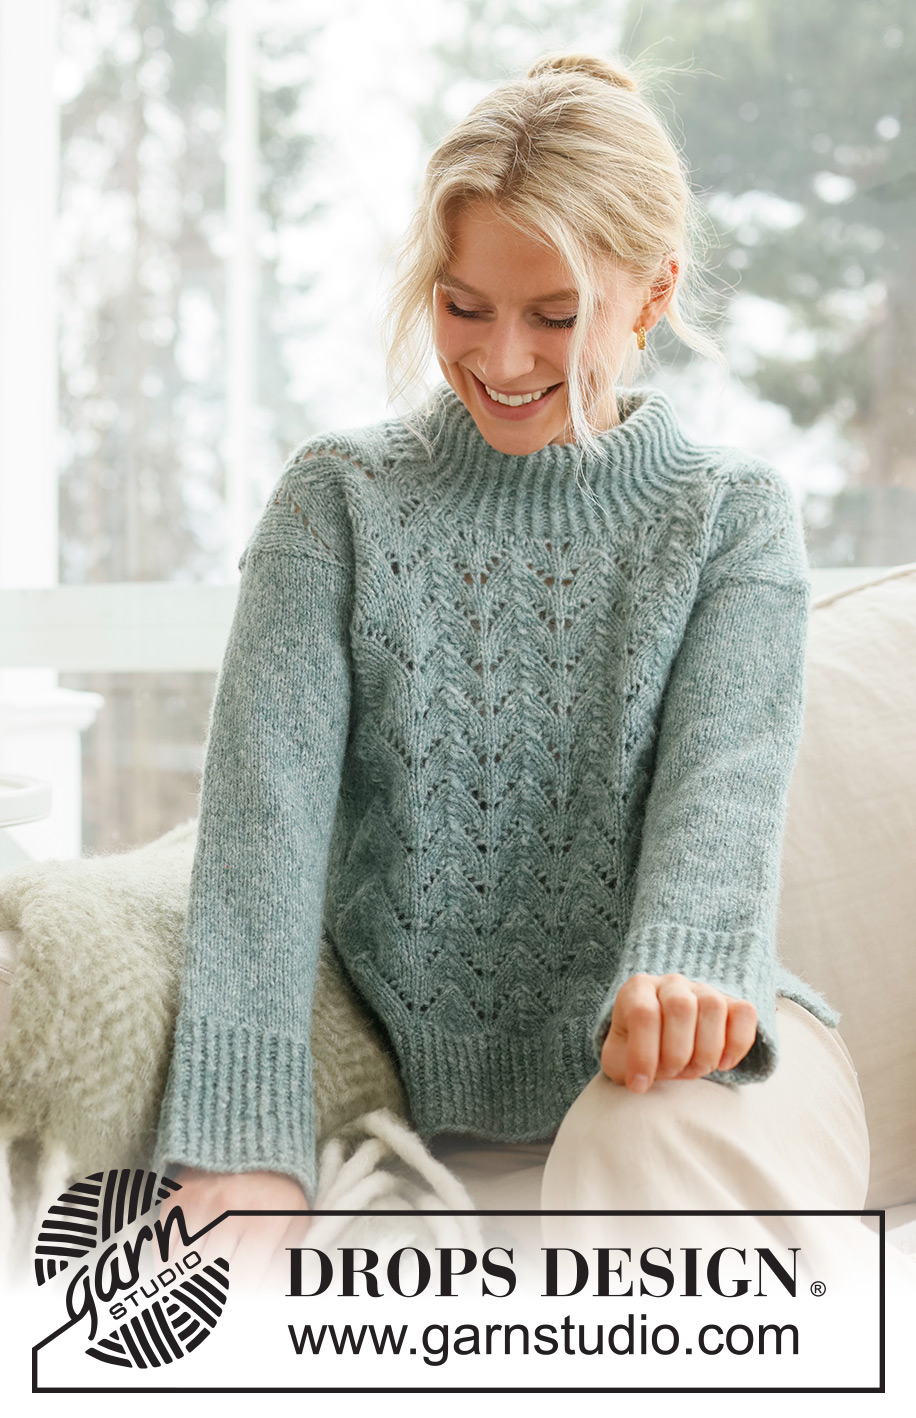
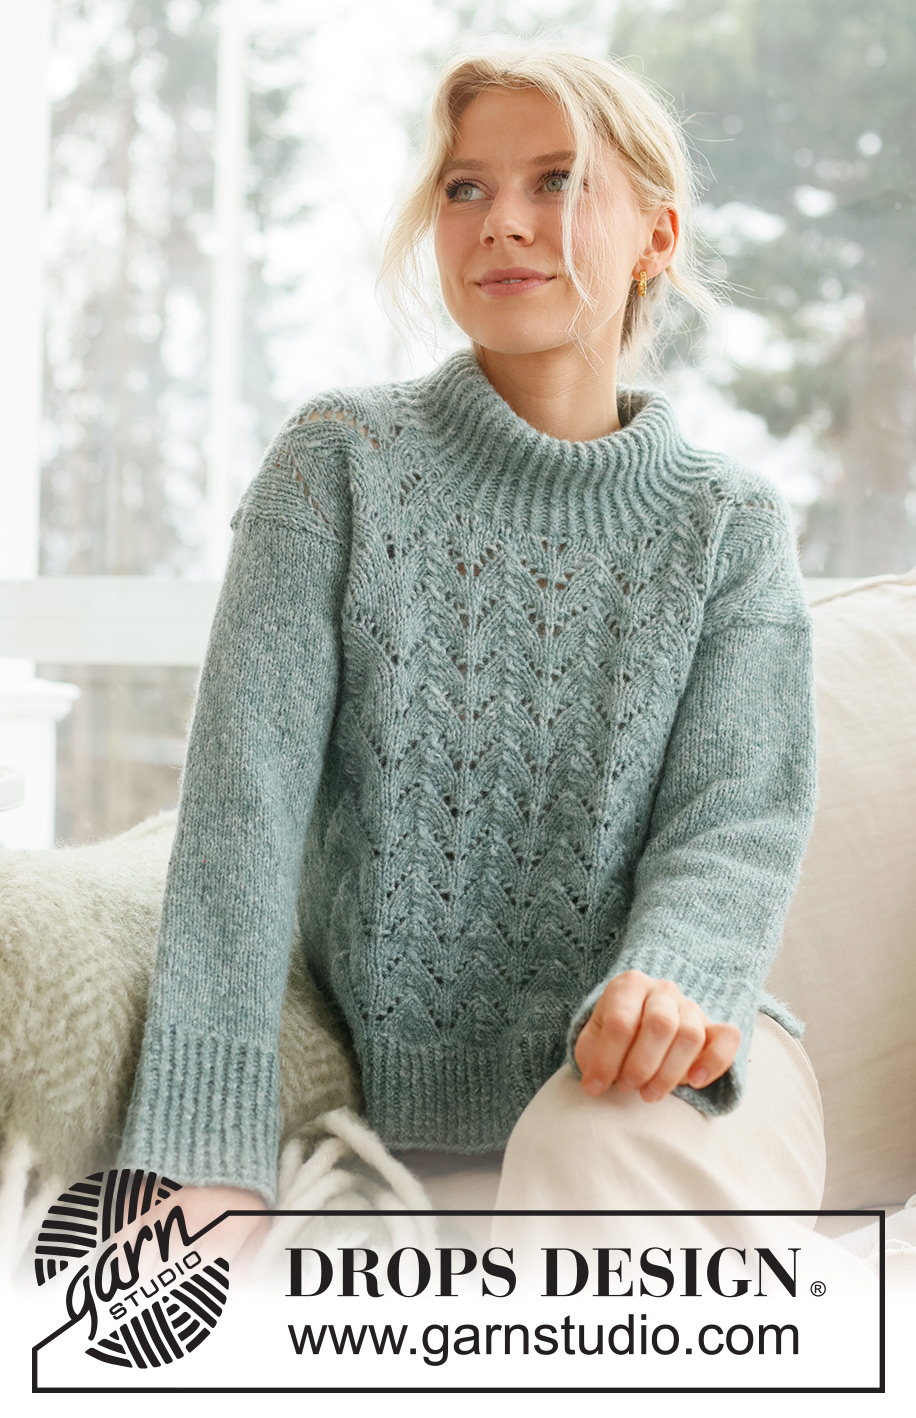
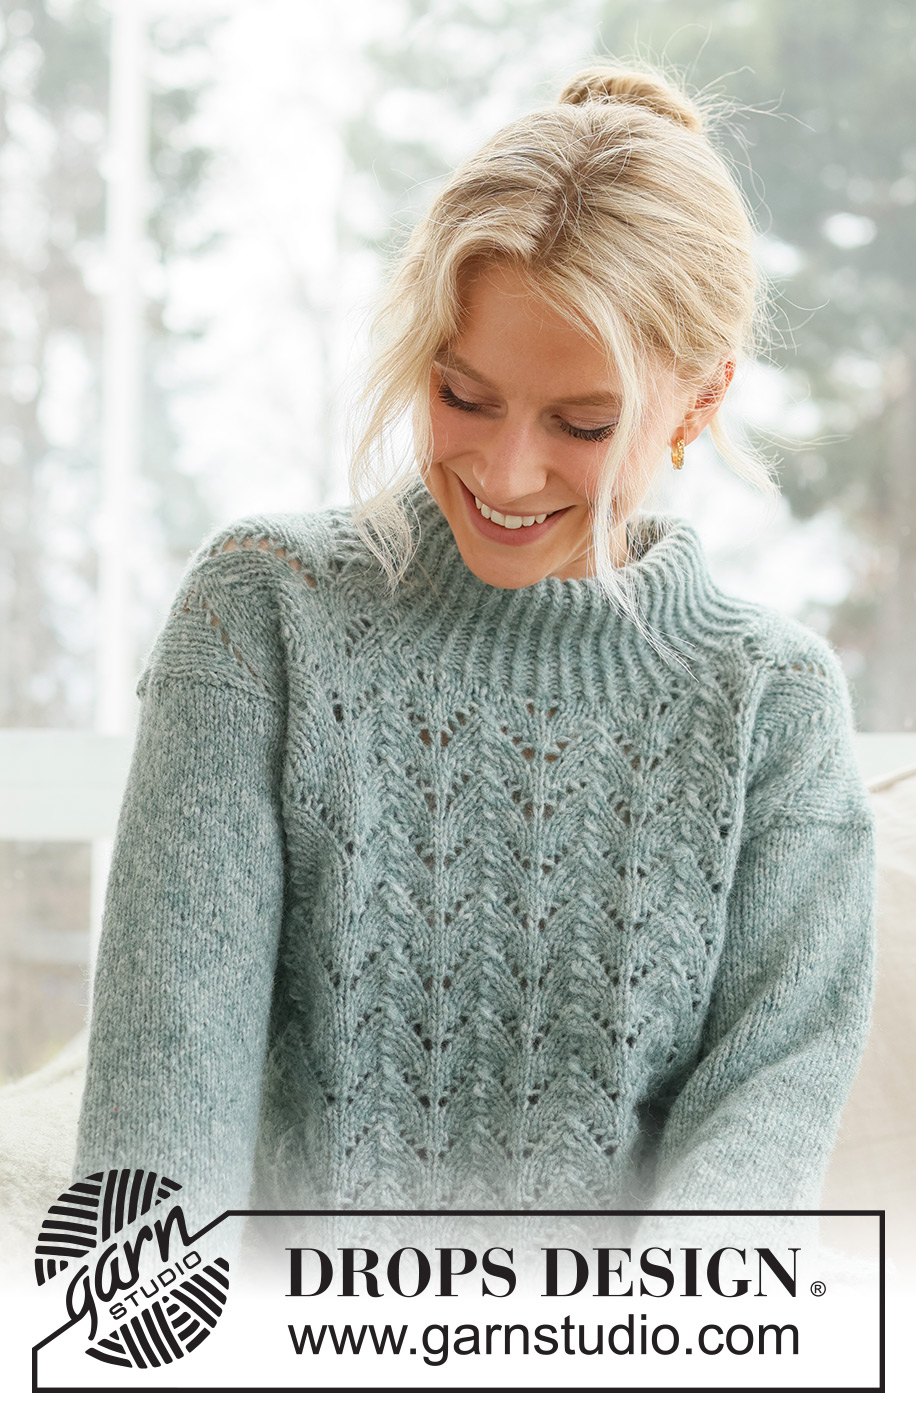
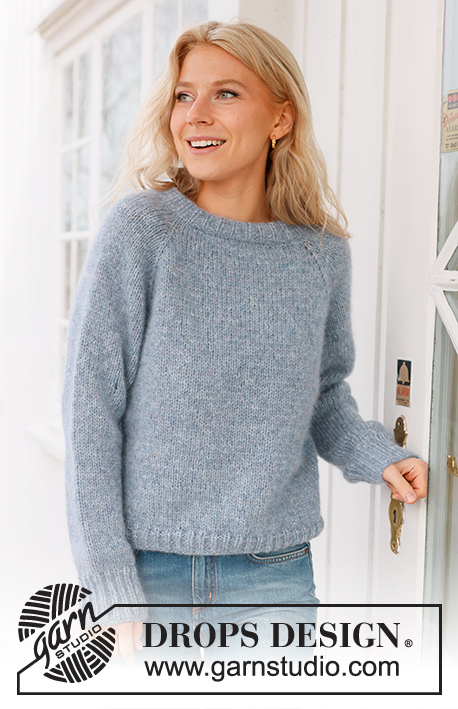
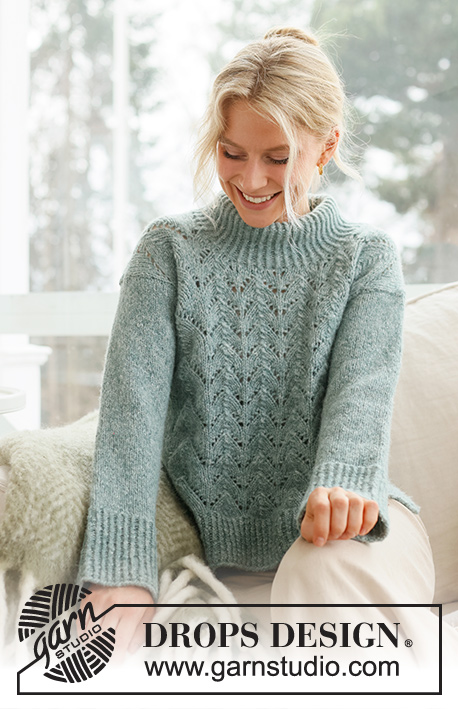
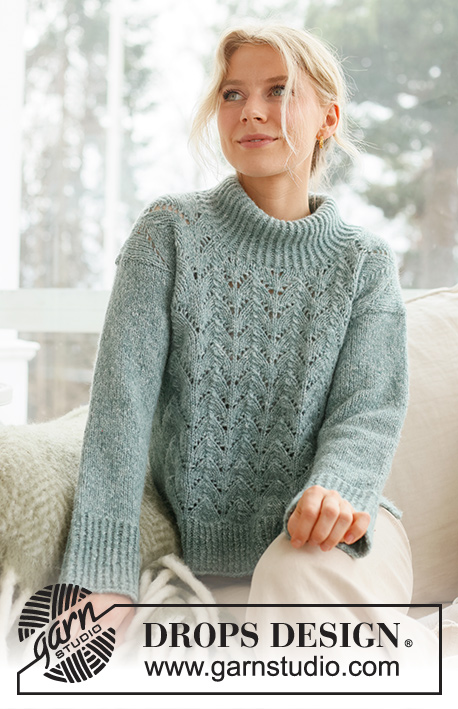
Knitted jumper in DROPS Air. The piece is worked bottom up, with lace pattern, split in the sides and high neck. Sizes S - XXXL.
DROPS 237-1 |
|||||||||||||||||||
|
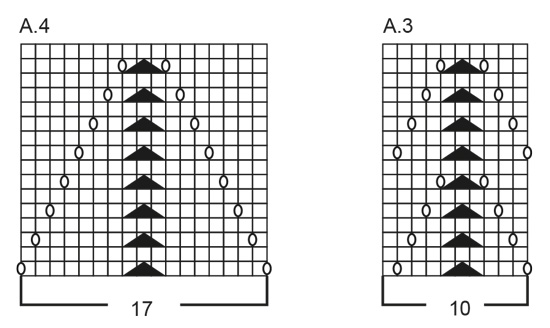
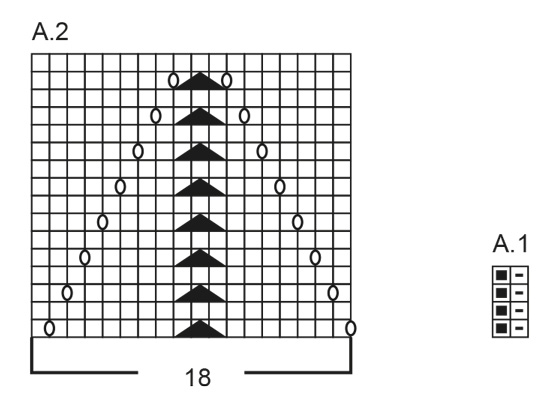
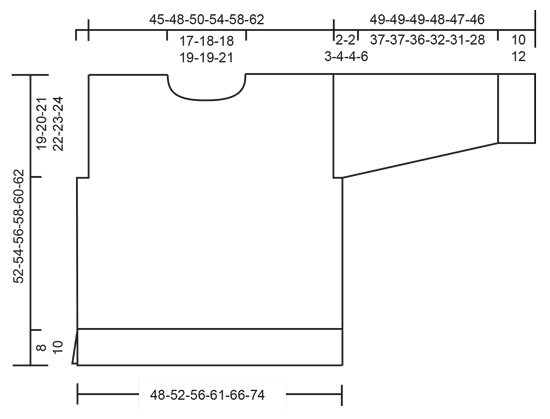
------------------------------------------------------- EXPLANATIONS FOR THE PATTERN: ------------------------------------------------------- RIDGE/GARTER STITCH (worked back and forth): Knit all rows. 1 ridge = knit 2 rows. PATTERN: See diagrams A.1 to A.4. The diagrams show all rows in the pattern from the right side. KNITTING TIP: When decreasing for the neck, the lace pattern will be affected. Take care to count the yarn overs and decreases in the lace pattern when working the neck so the number of stitches is correct. If the decrease ends up in a symbol which covers 3 stitches, replace this symbol with ‘knit 2 twisted together’. Then keep the one yarn over. ------------------------------------------------------- START THE PIECE HERE: ------------------------------------------------------- JUMPER- SHORT OVERVIEW OF THE PIECE: The sections are worked separately, back and forth with circular needle, bottom up. The piece is sewn together and the neck worked to finish. BACK PIECE: Cast on 101-111-119-129-141-157 stitches with circular needle size 3.5 mm and DROPS Air. Purl 1 row from the wrong side. Work as follows from the right side: 1 stitch in GARTER STITCH – read description above, work A.1 until there are 2 stitches left, work the first stitch in A.1 (so the pattern is symmetrical) and 1 stitch in garter stitch. Continue this rib for 8-8-8-10-10-10 cm – finish after a row from the wrong side. Knit 1 row and decrease 20-22-24-26-28-32 stitches evenly spaced = 81-89-95-103-113-125 stitches. Cast on 1 stitch at the end of the row. Change to circular needle size 5 mm, purl 1 row from the wrong side and cast on 1 stitch at the end of the row = 83-91-97-105-115-127 stitches. Work pattern as follows: 1 stitch in garter stitch, 3-7-10-9-9-15 stitches in stocking stitch, A.2, work A.3 4-4-4-5-6-6 times, A.4, then 3-7-10-9-9-15 stitches in stocking stitch and 1 stitch in garter stitch. Continue this pattern. REMEMBER THE KNITTING TENSION! When the piece measures 33-34-35-36-37-38 cm, cast off 3-5-6-7-8-11 stitches at the beginning of the next 2 rows for the armholes = 77-81-85-91-99-105 stitches. Continue the pattern, with 1-3-5-3-2-5 stitches in stocking stitch on each side. NOTE: Stop working the lace pattern after a complete repeat in height, when the piece is nearly finished (see measurement chart), continue with stocking stitch to finished length. When the piece measures 50-52-54-56-58-60 cm, cast off the middle 27-29-29-31-31-33 stitches for the neck and finish each shoulder separately – read KNITTING TIP (if you haven’t already finished the lace pattern). Cast off 1 stitch on the next row from the neck = 24-25-27-29-33-35 stitches on the shoulder. Work until the piece measures 52-54-56-58-60-62 cm. Cast off. Work the other shoulder in the same way. FRONT PIECE: Cast on and work in the same way as the back until the front piece measures 45-47-48-50-51-53 cm. Place the middle 15-17-17-19-19-21 stitches on a thread for the neck and finish each shoulder separately. NOTE: Stop working the lace pattern after a complete repeat in height, when the piece is nearly finished (in the same way as the back), continue with stocking stitch to finished length. Cast off at the beginning of each row from the neck as follows – remember KNITTING TIP: 2 stitches 2 times and 1 stitch 3 times = 24-25-27-29-33-35 stitches on the shoulder. Work until the piece measures 52-54-56-58-60-62 cm. Cast off. Work the other shoulder in the same way. SLEEVES: Cast on 56-58-60-64-66-66 stitches with circular needle size 3.5 mm and DROPS Air. Purl 1 row from the wrong side. Work as follows from the right side: 1 stitch in garter stitch, work A.1 until there are 2 stitches left, work the first stitch in A.1 (so the pattern is symmetrical) and 1 stitch in garter stitch. Continue this rib for 10-10-10-12-12-12 cm – finish after a row from the wrong side. Knit 1 row and decrease 10-10-10-12-12-12 stitches evenly spaced = 46-48-50-52-54-54 stitches. Change to circular needle size 5 mm. Work stocking stitch with 1 stitch in garter stitch on each side. When the sleeve measures 12-13-11-13-15-15 cm from the cast-on edge, increase 1 stitch each side on the next row from the right side (increase by making 1 yarn over inside the 2 outermost stitches on each side – on the next row purl the yarn overs twisted to avoid holes). Increase like this every 3½-3-3-2½-2-1½ cm a total of 10-11-12-12-13-15 times = 66-70-74-76-80-84 stitches. When the sleeve measures 47-47-46-44-43-40 cm, insert 1 marker in each side – they mark the bottom of the armholes. Continue working until the sleeve measures 49-49-49-48-47-46 cm. Cast off a little loosely. Work the other sleeve in the same way. ASSEMBLY: Sew the shoulder seams. Sew in the sleeves and sew the bottom of the armholes – The markers on the sleeves should match the sides of the body – see sketch. Sew the sleeve and side seams in one go, inside the 1 edge stitch, down to where the new stitches were cast on in each side (8-8-8-10-10-10 cm split). HIGH NECK: Knit up 70 to 86 stitches around the neck (including the stitches on the thread in front) with short circular needle size 3.5 mm. Knit 1 round and increase evenly to 90-92-94-98-100-108 stitches. Work A.1 in the round for 14-14-15-15-16-16 cm – or to desired length. Loosely cast off. You can fold the neck to the inside if you wish and fasten with a stitch at each shoulder seam. |
|||||||||||||||||||
Diagram explanations |
|||||||||||||||||||
|
|||||||||||||||||||
|
|||||||||||||||||||
|
|||||||||||||||||||
|
|||||||||||||||||||
|
|||||||||||||||||||
Have you finished this pattern?Tag your pictures with #dropspattern #forestembracesweater or submit them to the #dropsfan gallery. Do you need help with this pattern?You'll find 30 tutorial videos, a Comments/Questions area and more by visiting the pattern on garnstudio.com. © 1982-2025 DROPS Design A/S. We reserve all rights. This document, including all its sub-sections, has copyrights. Read more about what you can do with our patterns at the bottom of each pattern on our site. |
|||||||||||||||||||


With over 40 years in knitting and crochet design, DROPS Design offers one of the most extensive collections of free patterns on the internet - translated to 17 languages. As of today we count 314 catalogues and 11822 patterns translated into English (UK/cm).
We work hard to bring you the best knitting and crochet have to offer, inspiration and advice as well as great quality yarns at incredible prices! Would you like to use our patterns for other than personal use? You can read what you are allowed to do in the Copyright text at the bottom of all our patterns. Happy crafting!
Post a comment to pattern DROPS 237-1
We would love to hear what you have to say about this pattern!
If you want to leave a question, please make sure you select the correct category in the form below, to speed up the answering process. Required fields are marked *.