
Popular categories
Looking for a yarn?


Comments / Questions (48)
![]() Iris Down wrote:
Iris Down wrote:
Thanks for your reply. I cannot believe how long I looked at this chart and still did not see the answer! As you say there is no increase on this row the increase rows are further up the chart.
14.02.2024 - 11:25
![]() Iris Down wrote:
Iris Down wrote:
This has been asked before but I do not understand your reply. Row10 of the pattern is k1, 1 over, k3, s1, k2tog, slip 1 over, (1 stitch left) k3, 1 over. So that is 2 overs and 2 stitches lost so over the 10 worked stitches there are still 10 at the end. But the pattern indicates an increase of 105 stitches over the 20 rows which is 21 per pattern row. It can’t be s1, k1 slip stitch over as this leaves a spare stitch not on the pattern picture. What should it be please?
13.02.2024 - 20:53DROPS Design answered:
Dear Mrs Down, the even numbered rows are rows without decreases/yarn overs in the diagrams, this means on row 10 in A.1, S,M,L you have 12 sts (you increased 2 sts on row 9) and in A.1 XL, XXL, XXXL, you have still 12 sts (you will increase on next row). Or which round 10 do you mean here? I might misunderstand your question, then sorry in advance., please try again. Thanks for your comprehension.
14.02.2024 - 08:12
![]() Sharon Hunt wrote:
Sharon Hunt wrote:
Trying to finish the sleeves on this sweater. A question about the sleeve decreases. When I knit til last 3 sts k2 together then k1 sl 1 pass sl sts over this is the 6th round when I continue this round to the marker would this be the begynning of the 1 round again. I guess what I sm asking is when do I start counting for the next sett of decreases. When does 1 round begin and the other ends. Thanks for your help. Sharon
29.10.2023 - 18:05DROPS Design answered:
Dear Sharon, you should count in cm or inches, not in rounds. When the piece measures enough, regardless of the round or if it is the end of one round and the beginning of the next one you work the decreases. It doesn't matter that the decreases start in one round and end in the next one. Happy knitting!
29.10.2023 - 23:46
![]() Sharon Hunt wrote:
Sharon Hunt wrote:
Hi When the piece measures 2 cm = 3/4" from the division in all size… what is this referring to? Between yoke and body. 🤔 thanks for your response. Sharon
11.09.2023 - 18:07DROPS Design answered:
Hi Sharon, Yes, the body is measured from where you divided for the body and sleeves (between the yoke and the body). Happy knitting!
12.09.2023 - 06:49
![]() Peggy wrote:
Peggy wrote:
After sending my last question and studying the pattern I realize that the actual design features split sides - not evident in photos. As I prefer my sweaters without slits do you have any advice on how pattern could be adapted to be all one piece? Meaning, no slits. Since i've ordered the yarn I am determined to knit up this gorgeous sweater. Thanks so much!
08.09.2023 - 00:53DROPS Design answered:
Dear Peggy, you can of course decide to continue working in the round without split on the sides, just adjust the number of sts increased to get an even number of stitches for ribbing edge. Happy knitting!
08.09.2023 - 08:14
![]() Peggy wrote:
Peggy wrote:
I'm a bit confused as to working front piece/back piece. From my understanding these sections are worked back and forth straight, where the top is worked circular. Is this correct? Pattern refers to using circular, yet refers to "rows" rather than "rounds". I understand knitting back and forth on a circular. Is this what I would be doing here? Thanks!
07.09.2023 - 22:10DROPS Design answered:
Dear Peggy, neck edge, yoke and body are worked in the round, but then you will work front and back piece separately back and forth to create vents on each side of jumper. Happy knitting!
08.09.2023 - 08:10
![]() René wrote:
René wrote:
Thank you for your prompt reply! Kind regards.
26.07.2023 - 20:09
![]() René wrote:
René wrote:
This is my very first top down sweater. I am knitting size large. My body and sleeves have now been separated. I am now in the centre back where the cast on commenced. How do I now get to "Start the round at the marker thread on he right side (when the garment is worn)??? Do I break the yarn and slip the stitches to the marker thread and start there afresh? Hope my question is understood. Thank you!
25.07.2023 - 21:10DROPS Design answered:
Hi Rene, Yes, you cut the strand and begin again under the sleeve on the right side. This is so the slight jump where the rounds finish and begin is under the sleeve and is there fore least noticeable. Happy knitting!
26.07.2023 - 06:47
![]() Sharon Hunt-Edwards wrote:
Sharon Hunt-Edwards wrote:
Hello! I have dividend the sweater, and am now knitting from armhole down. The pattern says ti knit 17 cm before ribbing. Isn’t this too short or am I missing something? I know I can knit to desired length. Thanks for responding. Sharon
12.07.2023 - 07:17DROPS Design answered:
Dear Sharon, as you can see in the measurements schematic the pattern is correct; from the armhole to the side splits/ribbing there are 17cm. Take into account that there are 6 cm of ribbing later, so the body will measure 23 cm in total from the armhole. This model also has a lower armhole than usual (by 4cm), which makes the body seem shorter. However, you can always work up to your desired measurements; you can make the body longer if you prefer it. Happy knitting!
17.07.2023 - 10:07
![]() Sharon Hunt wrote:
Sharon Hunt wrote:
Please explain: After the 4 rounds of stockinette stitch, work A.1 in the round (= 19-20-21-19-20-21 repeats of 10-10-10-12-12-12 stitches). Continue this pattern. Thank you
05.07.2023 - 19:07DROPS Design answered:
Dear Mrs Hunt, for yoke you will first knit 4 rounds increasing on 3rd round 15 - 35 sts (see size) evenly spaced, then you will work the pattern repeating diagram A.1, A.1 is either 10 or 12 sts (see size) and you will repeat the diagram a total of 19 - 21 sts in the round depending on the size. Read more about diagrams here; Happy knitting!
06.07.2023 - 10:12
|
|||||||||||||
December Bloom#decemberbloomsweater |
|||||||||||||
 |
 |
||||||||||||
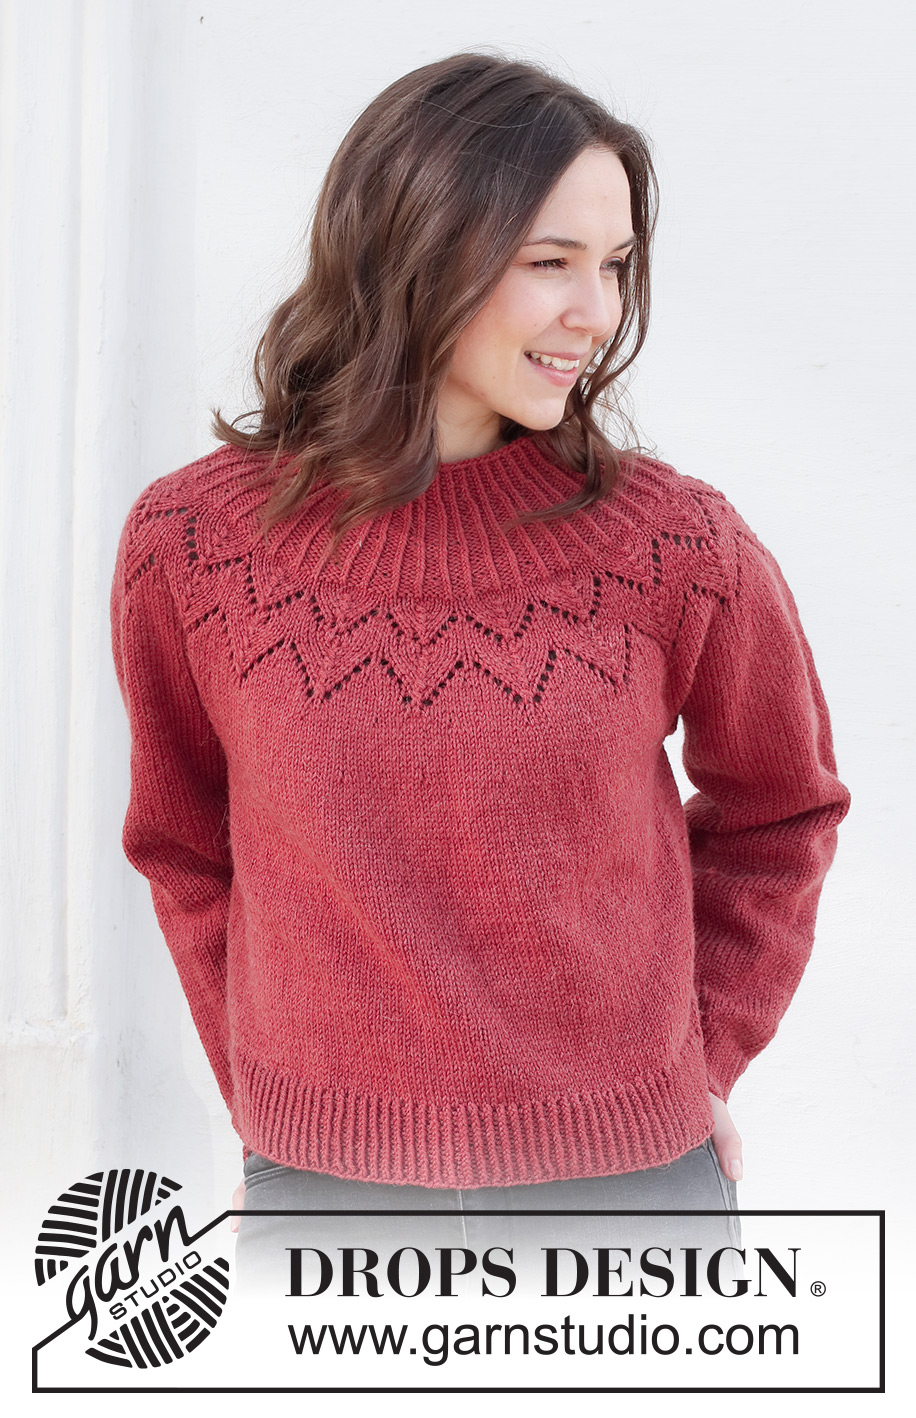
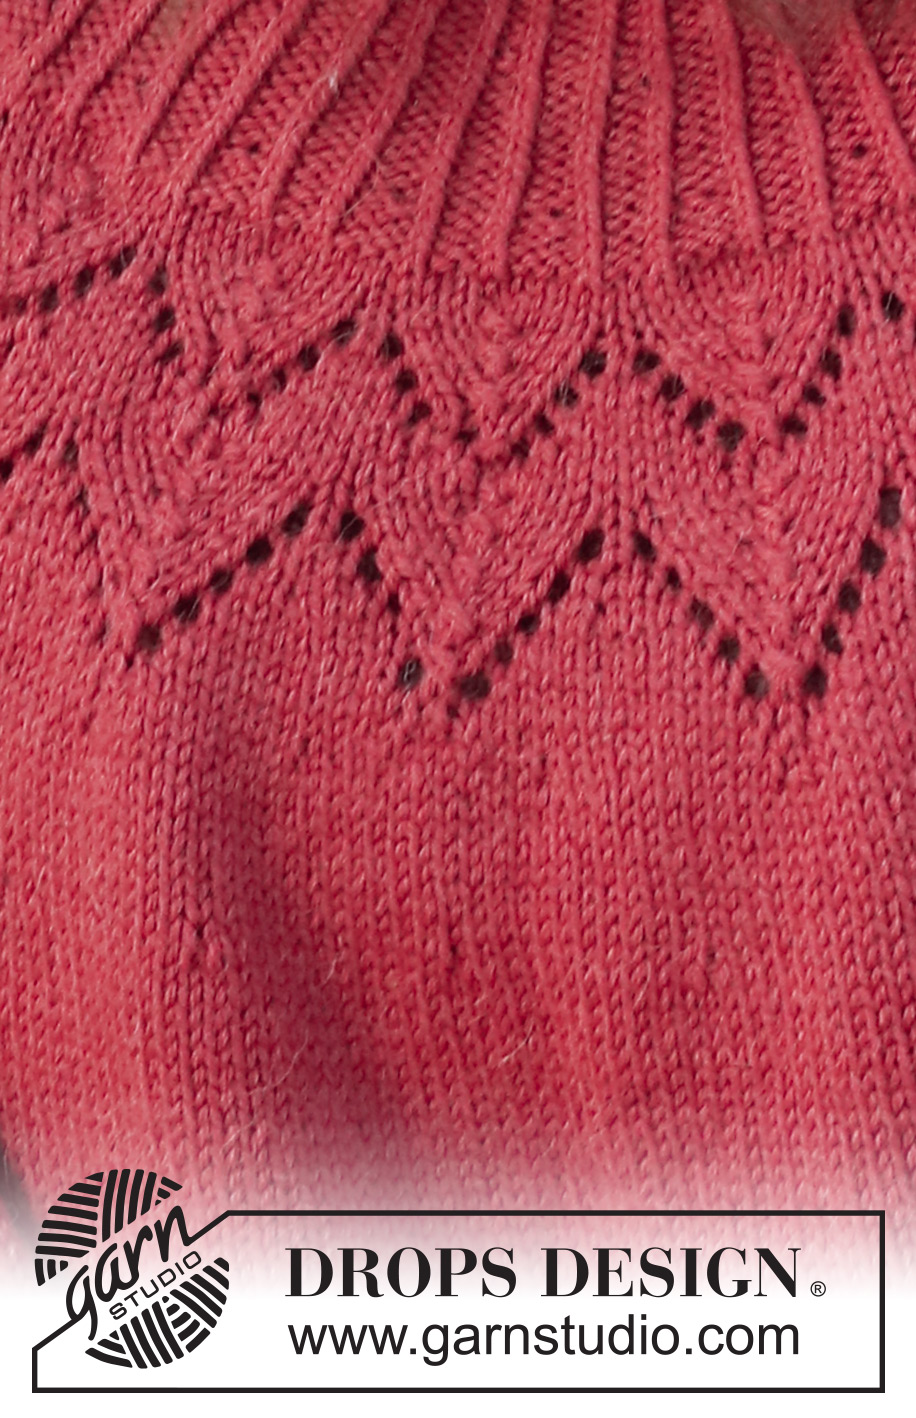
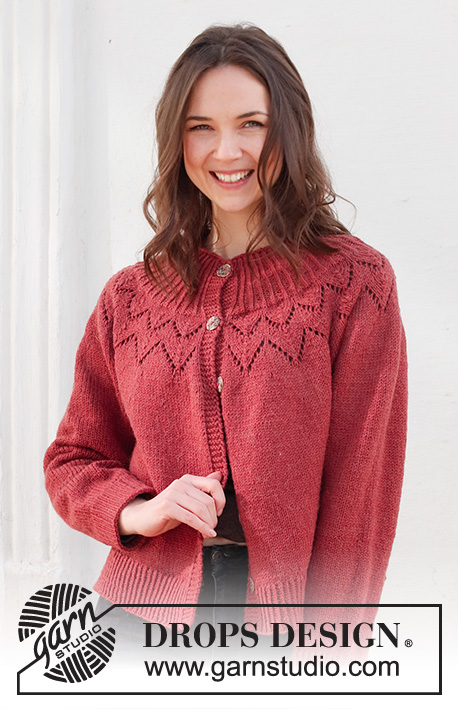
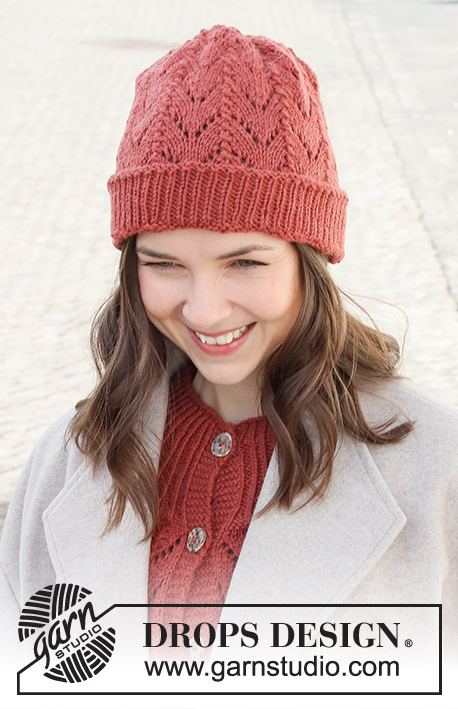
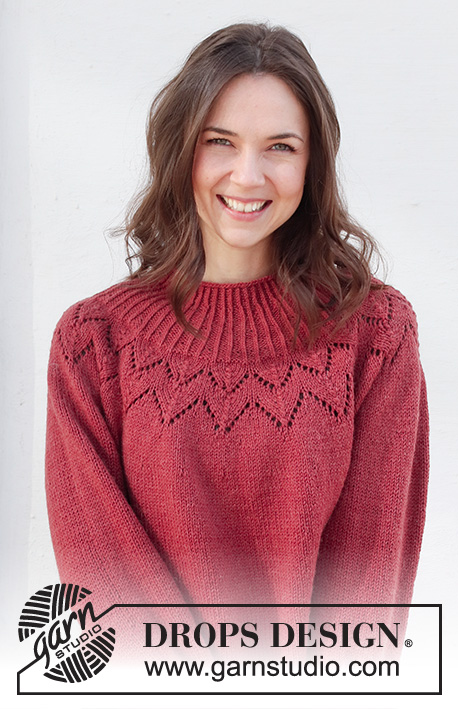
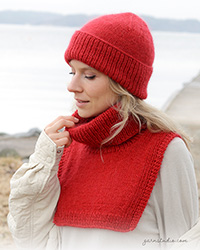
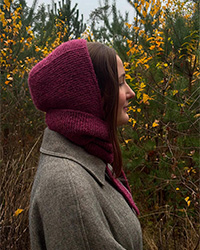
Knitted sweater in DROPS Lima or DROPS Karisma. The piece is worked top down, with round yoke, lace pattern, ribbed edges and split in the sides. Sizes S - XXXL.
DROPS 228-46 |
|||||||||||||
|
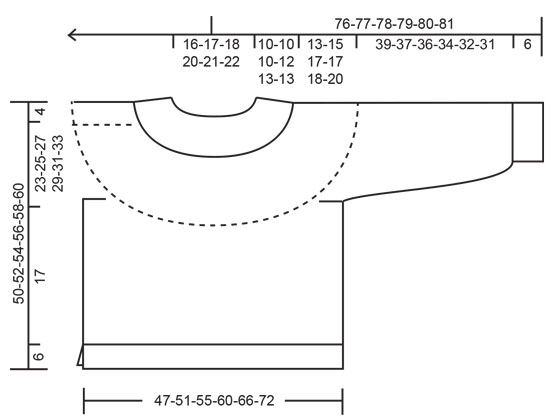
------------------------------------------------------- EXPLANATIONS FOR THE PATTERN: ------------------------------------------------------- RIDGE/GARTER STITCH (worked back and forth): Knit all rows. 1 ridge = knit 2 rows. INCREASE TIP-1: Increase by making 1 yarn over after every other purled section. On the next round purl the yarn overs twisted to avoid holes. INCREASE TIP-2 (evenly spaced): To work out how to increase evenly, count the total number of stitches on the needle (e.g. 175 stitches) and divide by the number of increases to be made (e.g. 15) = 11.7. In this example, increase by making 1 yarn over after approx. each 12th stitch. On the next round work the yarn overs twisted to avoid holes. PATTERN: See diagram A.1. Choose diagram for your size. DECREASE TIP (for sleeves): Decrease 1 stitch on either side of the marker thread as follows: Work until there are 3 stitches left before the marker thread, knit 2 together, knit 2 (marker thread sits between these 2 stitches), slip 1 stitch as if to knit, knit 1 and pass the slipped stitch over the knitted stitch. BINDING-OFF TIP: To avoid the bind-off edge being tight you can bind off with a larger size needle. If the edge is still tight, make 1 yarn over after approx. each 6th stitch at the same time as binding off; the yarn overs are bind off as normal stitches. ------------------------------------------------------- START THE PIECE HERE: ------------------------------------------------------- SWEATER – SHORT OVERVIEW OF THE PIECE: The neck and yoke are worked in the round with circular needle, from mid back and top down. The yoke is divided for body and sleeves and the body is continued in the round with circular needle. The sleeves are worked in the round with short circular needle/double pointed needles, top down. NECK: Cast on 100-104-108-116-120-124 stitches with short circular needle size 3.5 MM = US 4 and DROPS Lima or DROPS Karisma. Knit 1 round, then work rib in the round (knit 1 twisted, purl 1) for 3-3-3-3-4-4 cm = 1⅛"-1⅛"-1⅛"-1⅛"-1½"-1½". Now increase every other purl-1 to purl-2 – read INCREASE TIP-1 = 125-130-135-145-150-155 stitches. When the rib measures 6-6-6-7-8-8 cm = 2⅜"-2⅜"-2⅜"-2¾"-3⅛"-3⅛", increase the remaining purl-1 to purl-2 = 150-156-162-174-180-186 stitches. When the rib measures 9-9-9-11-12-12 cm = 3½"-3½"-3½"-4⅜"-4¾"-4¾", increase every other purl-2 to purl-3 = 175-182-189-203-210-217 stitches. Continue working until the rib measures 10-10-10-12-13-13 cm = 4"-4"-4"-4¾"-5⅛"-5⅛". YOKE: Change to circular needle size 4 MM = US 6 and work 4 rounds of stockinette stitch – AT THE SAME TIME, on round 3, increase 15-18-21-25-30-35 stitches evenly spaced – read INCREASE TIP-2 = 190-200-210-228-240-252 stitches. After the 4 rounds of stockinette stitch, work A.1 in the round (= 19-20-21-19-20-21 repeats of 10-10-10-12-12-12 stitches). Continue this pattern. REMEMBER THE KNITTING GAUGE! When A.1 has been completed in height there are 285-300-315-342-360-378 stitches and the piece measures approx. 19-19-19-23-24-24 cm = 7½"-7½"-7½"-9"-9½"-9½" from the cast-on edge. Continue with stockinette stitch – AT THE SAME TIME on the first round increase 18-24-30-32-34-40 stitches evenly spaced = 303-324-345-374-394-418 stitches. When the piece measures 21-21-21-25-26-26 cm = 8¼"-8¼"-8¼"-9¾"-10¼"-10¼", increase 13-16-19-22-25-28 stitches evenly spaced = 316-340-364-396-419-446 stitches. The increases are finished in S, M and L – go to ALL SIZES. SIZES XL, XXL and XXXL: Continue working until the piece measures 27-28-29 cm = 10⅝"-11"-11⅜". On the next round increase 8-9-14 stitches evenly spaced = 404-428-460 stitches. The increases are finished in XL, XXL and XXXL – go to ALL SIZES. ALL SIZES: = 316-340-364-404-428-460 stitches. Continue with stockinette stitch (without further increases) until the piece measures 23-25-27-29-31-33 cm = 9"-9¾"-10⅝"-11⅜"-12¼"-13" from the cast-on edge. Now divide the yoke for the body and sleeves on the next round as follows: Work 46-50-53-59-64-70 stitches in stockinette stitch (= ½ back piece), place the next 66-70-76-84-86-90 stitches on a thread for the sleeve, cast on 6-6-8-8-10-10 stitches (= in side under sleeve), work 92-100-106-118-128-140 stitches in stockinette stitch (= front piece), place the next 66-70-76-84-86-90 stitches on a thread for the sleeve, cast on 6-6-8-8-10-10 stitches (= in side under sleeve), work 46-50-53-59-64-70 stitches in stockinette stitch (= ½ back piece). Body and sleeves are finished separately. THE PIECE IS NOW MEASURED FROM HERE! BODY: = 196-212-228-252-276-300 stitches. Insert marker threads in the middle of the 6-6-8-8-10-10 stitches cast on under each sleeve. Allow the threads to follow your work onwards; they are used when dividing for the split in each side. Start the round at the marker thread on the right side (when the garment is worn) and work stockinette stitch in the round for 17 cm = 6¾". There is approx. 6 cm = 2⅜" left to finished length. Try the sweater on and work to desired length. Now divide for the split in each side. Keep the first 98-106-114-126-138-150 stitches on the needle and place the other stitches on a thread or extra needle. FRONT PIECE: To avoid the following rib being tight, stitches are increased as described below. Knit 1 row from the right side where you increase 29-31-35-37-41-45 stitches evenly spaced – remember INCREASE TIP-2 = 127-137-149-163-179-195 stitches. Change to circular needle size 3.5 MM = US 4 and work rib as follows: ROW 1 (wrong side): 1 edge stitch in garter stitch, * purl 1 twisted, knit 1 *, work from *-* until there are 2 stitches left, purl 1 twisted and 1 edge stitch in garter stitch. ROW 2 (right side): 1 edge stitch in garter stitch, * knit 1 twisted, purl 1 *, work from *-* until there are 2 stitches left, knit 1 twisted and 1 edge stitch in garter stitch. Repeat rows 1 and 2 until the rib measures 6 cm = 2⅜". Bind off from the right side with garter stitch over garter stitch, knit twisted over knit twisted and purl over purl – read BINDING-OFF TIP! The sweater measures approx. 50-52-54-56-58-60 cm = 19¾"-20½"-21¼"-22"-22¾"-23⅝" from the shoulder down. BACK PIECE: Place the 98-106-114-126-138-150 stitches from the thread/extra needle on circular needle size 4 MM = US 6. Knit 1 row from the right side where you increase 29-31-35-37-41-45 stitches evenly spaced = 127-137-149-163-179-195 stitches. Change to circular needle size 3.5 MM = US 4 and work rib as follows: ROW 1 (wrong side): 1 edge stitch in garter stitch, * purl 1 twisted, knit 1 *, work from *-* until there are 2 stitches left, purl 1 twisted and 1 edge stitch in garter stitch. ROW 2 (right side): 1 edge stitch in garter stitch, * knit 1 twisted, purl 1 *, work from *-* until there are 2 stitches left, knit 1 twisted and 1 edge stitch in garter stitch. Repeat rows 1 and 2 until the rib measures 6 cm = 2⅜". Bind off from the right side with garter stitch over garter stitch, knit twisted over knit twisted and purl over purl. SLEEVES: Place the 66-70-76-84-86-90 stitches from the thread on the one side of the piece on double pointed needles/short circular needle size 4 MM = US 6 and knit up 1 stitch in each of the 6-6-8-8-10-10 stitches cast on under the sleeve = 72-76-84-92-96-100 stitches. Insert a marker thread in the middle of the 6-6-8-8-10-10 stitches under the sleeve. Allow the thread to follow your work onwards; it will be used when decreasing under the sleeve. Start at the marker thread and work stockinette stitch in the round. When the piece measures 2 cm = ¾" from the division in all sizes, decrease 2 stitches under the sleeve – read DECREASE TIP. Decrease like this every 3½-3-2½-1½-1½-1½ cm = 1¼"-1⅛"-1"-½"-½"-½" a total of 11-12-14-18-19-20 times = 50-52-56-56-58-60 stitches. Continue working until the sleeve measures 39-37-36-34-32-31 cm = 15¼"-14½"-14¼"-13⅜"-12½"-12¼" from the division (shorter measurements in larger sizes due to wider neck and longer yoke). There is approx. 6 cm = 2⅜" left to finished length. Try the sweater on and work to desired length. Knit 1 round where you increase 2-4-2-4-4-6 stitches evenly spaced = 52-56-58-60-62-66 stitches. Change to double pointed needles size 3.5 MM = US 4 and work rib (knit 1 twisted, purl 1) for 6 cm = 2⅜". Bind off with knit twisted over knit twisted and purl over purl – remember BINDING-OFF TIP! The sleeve measures approx. 45-43-42-40-38-37 cm = 17¾"-17"-16½"-15¾"-15"-14½" from the division. Work the other sleeve in the same way. |
|||||||||||||
Diagram explanations |
|||||||||||||
|
|||||||||||||
 |
|||||||||||||
 |
|||||||||||||
Have you finished this pattern?Tag your pictures with #dropspattern #decemberbloomsweater or submit them to the #dropsfan gallery. Do you need help with this pattern?You'll find 33 tutorial videos, a Comments/Questions area and more by visiting the pattern on garnstudio.com. © 1982-2026 DROPS Design A/S. We reserve all rights. This document, including all its sub-sections, has copyrights. Read more about what you can do with our patterns at the bottom of each pattern on our site. |
|||||||||||||
With over 40 years in knitting and crochet design, DROPS Design offers one of the most extensive collections of free patterns on the internet - translated to 17 languages. As of today we count 324 catalogs and 12126 patterns - 12116 of which are translated into English (US/in).
We work hard to bring you the best knitting and crochet have to offer, inspiration and advice as well as great quality yarns at incredible prices! Would you like to use our patterns for other than personal use? You can read what you are allowed to do in the Copyright text at the bottom of all our patterns. Happy crafting!
Post a comment to pattern DROPS 228-46
We would love to hear what you have to say about this pattern!
If you want to leave a question, please make sure you select the correct category in the form below, to speed up the answering process. Required fields are marked *.