
Categorie popolari
State cercando un filato?


Lasciare un commento sul modello DROPS 228-46
Noi saremmo felici di ricevere i tuoi commenti e opinioni su questo modello!
Se vuoi fare una domanda, fai per favore attenzione a selezionare la categoria corretta nella casella qui sotto per velocizzare il processo di risposta. I campi richiesti sono indicati da *.
|
|||||||||||||
December Bloom |
|||||||||||||
 |
 |
||||||||||||
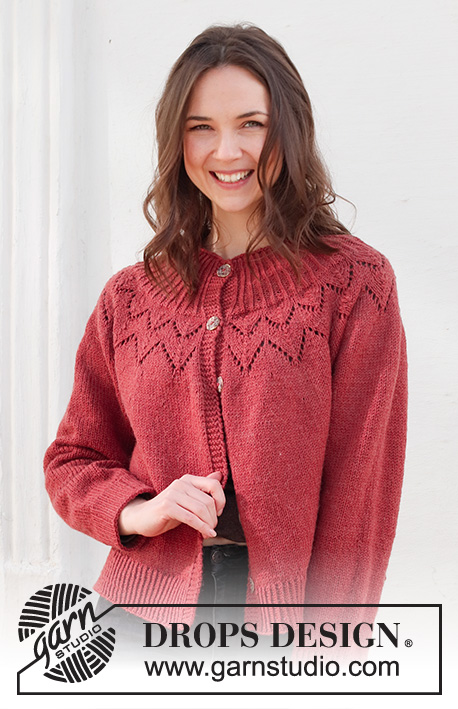
Maglione lavorato ai ferri in DROPS Lima o DROPS Karisma. Lavorato dall'alto in basso, con sprone rotondo, motivo traforato, bordi a coste e spacchi laterali. Taglie: S - XXXL.
DROPS 228-46 |
|||||||||||||
|
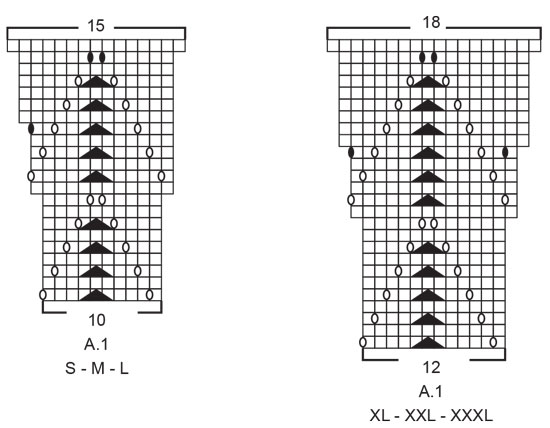
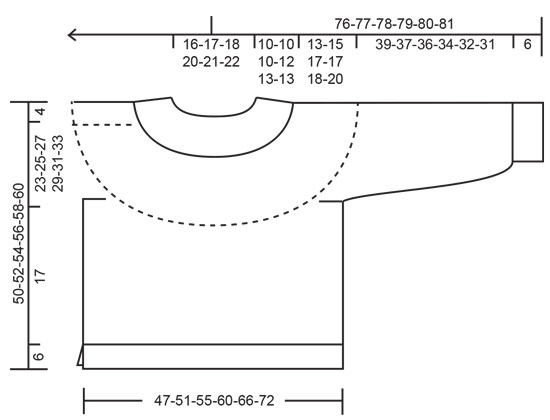
------------------------------------------------------- TECNICHE IMPIEGATE: ------------------------------------------------------- COSTA/MAGLIA LEGACCIO (avanti e indietro): Lavorare tutti i ferri a diritto. 1 costa in altezza = 2 ferri diritto. SUGGERIMENTO PER GLI AUMENTI-1: Aumentare facendo 1 gettato dopo ogni sezione a rovescio, a sezioni alterne. Sul giro successivo lavorare i gettati a rovescio ritorto per evitare buchi. SUGGERIMENTO PER GLI AUMENTI-2 (distribuiti in modo uniforme): Per stabilire ogni quanto aumentare in modo uniforme, prendere il n° totale di maglie sul ferro (ad esempio 175 maglie) e dividerlo per il n° di aumenti da fare (ad esempio 15) = 11,7. In questo esempio, aumentare facendo 1 gettato dopo ogni 12° maglia. Sul giro successivo lavorare i gettati a ritorto per evitare buchi. MOTIVO: Vedere il diagramma A.1. Scegliere il diagramma per la vostra taglia. SUGGERIMENTO PER LE DIMINUZIONI (applicato alle maniche): Diminuire 1 maglia a ogni lato del segnapunti come segue: Lavorare fino a quando rimangono 3 maglie prima del segnapunti, 2 maglie insieme a diritto, 2 maglie diritto (il segnapunti è al centro di queste 2 maglie), passare 1 maglia a diritto senza lavorarla, 1 maglia diritto, accavallare la maglia passata sopra quella appena lavorata. SUGGERIMENTO PER LA CHIUSURA: Per evitare che il bordo di chiusura sia tirato potete intrecciare con un ferro di una misura più grande. Se il bordo risulta ancora tirato, fare 1 gettato dopo circa 6 maglie durante la chiusura e intrecciare i gettati come maglie normali. ------------------------------------------------------- INIZIO DEL LAVORO: ------------------------------------------------------- MAGLIONE – BREVE RIASSUNTO DEL LAVORO: Lavorare il collo e lo sprone in tondo con i ferri circolari, dal centro dietro e dall'alto in basso. Dividere lo sprone per il corpo e le maniche e continuare il corpo in tondo con i ferri circolari. Lavorare le maniche in tondo con i ferri circolari corti/ferri a doppia punta, dall'alto in basso. COLLO: Avviare 100-104-108-116-120-124 maglie con i ferri circolari n° 3,5 mm e DROPS Lima o DROPS Karisma. Lavorare 1 giro diritto, poi lavorare a coste in tondo (1 maglia a diritto ritorto, 1 maglia rovescio) per 3-3-3-3-4-4 cm. Ora aumentare nelle sezioni con 1 maglia rovescio a 2 maglie rovescio, a sezioni alterne – leggere il SUGGERIMENTO PER GLI AUMENTI-1 = 125-130-135-145-150-155 maglie. Quando le coste misurano 6-6-6-7-8-8 cm, aumentare nelle sezioni rimaste con 1 maglia rovescio a 2 maglie rovescio = 150-156-162-174-180-186 maglie. Quando le coste misurano 9-9-9-11-12-12 cm, aumentare nelle sezioni con 2 maglie rovescio a 3 maglie rovescio a sezioni alterne = 175-182-189-203-210-217 maglie. Continuare a lavorare fino a quando le coste misurano 10-10-10-12-13-13 cm. SPRONE: Passare ai ferri circolari n° 4 mm e lavorare 4 giri a maglia rasata – ALLO STESSO TEMPO sul giro 3, aumentare 15-18-21-25-30-35 maglie in modo uniforme – leggere il SUGGERIMENTO PER GLI AUMENTI-2 = 190-200-210-228-240-252 maglie. Alla fine dei 4 giri a maglia rasata, lavorare A.1 in tondo (= 19-20-21-19-20-21 ripetizioni di 10-10-10-12-12-12 maglie). Continuare questo motivo. FARE ATTENZIONE ALLA TENSIONE DEL LAVORO! Alla fine di A.1 ci sono 285-300-315-342-360-378 maglie e il lavoro misura circa 19-19-19-23-24-24 cm dal bordo di avvio. Continuare a maglia rasata - ALLO STESSO TEMPO sul 1° giro aumentare 18-24-30-32-34-40 maglie in modo uniforme = 303-324-345-374-394-418 maglie. Quando il lavoro misura 21-21-21-25-26-26 cm, aumentare 13-16-19-22-25-28 maglie in modo uniforme = 316-340-364-396-419-446 maglie. Gli aumenti sono finiti per le taglie S, M e L – passare al paragrafo TUTTE LE TAGLIE. TAGLIE XL, XXL e XXXL: Continuare a lavorare fino a quando il lavoro misura 27-28-29 cm. Sul giro successivo aumentare 8-9-14 maglie in modo uniforme = 404-428-460 maglie. Gli aumenti sono finire per le taglie XL, XXL e XXXL – passare al paragrafo TUTTE LE TAGLIE. TUTTE LE TAGLIE: = 316-340-364-404-428-460 maglie. Continuare a maglia rasata (senza ulteriori aumenti) fino a quando il lavoro misura 23-25-27-29-31-33 cm dal bordo di avvio. Ora dividere lo sprone per il corpo e le maniche sul giro successivo come segue: lavorare 46-50-53-59-64-70 maglie a maglia rasata (= ½ dietro), mettere in sospeso le 66-70-76-84-86-90 maglie successive per la manica, avviare 6-6-8-8-10-10 maglie (= a lato sotto la manica), lavorare 92-100-106-118-128-140 maglie a maglia rasata (= davanti), mettere in sospeso le 66-70-76-84-86-90 maglie successive per la manica, avviare 6-6-8-8-10-10 maglie (= a lato sotto la manica), lavorare 46-50-53-59-64-70 maglie a maglia rasata (= ½ dietro). Finire il corpo e le maniche in modo separato. ORA MISURARE IL LAVORO DA QUI! CORPO: = 196-212-228-252-276-300 maglie. Inserire i segnapunti al centro delle 6-6-8-8-10-10 maglie avviate sotto ogni manica. Lasciare che i segnapunti seguano il lavoro; verranno usati durante la divisione per gli spacchi ad ogni lato. Iniziare il giro all’altezza del segnapunti sul lato destro (con il capo indossato) e lavorare a maglia rasata in tondo per 17 cm. Mancano circa 6 cm alla fine del lavoro. Provare il maglione e lavorare fino alla lunghezza desiderata. Ora dividere il lavoro per lo spacco a ogni lato. Tenere le prime 98-106-114-126-138-150 maglie sui ferri e mettere le altre maglie in sospeso. DAVANTI: Per evitare che le coste seguenti risultino tirate, aumentare le maglie come descritto sotto. Lavorare 1 ferro diritto dal diritto del lavoro in cui aumentare 29-31-35-37-41-45 maglie in modo uniforme – ricordarsi del SUGGERIMENTO PER GLI AUMENTI-2 = 127-137-149-163-179-195 maglie. Passare ai ferri circolari n° 3.5 mm e lavorare a coste come segue: FERRO 1 (rovescio del lavoro): 1 maglia di vivagno a maglia legaccio, * 1 maglia a rovescio ritorto, 1 maglia diritto *, lavorare *-* fino a quando rimangono 2 maglie, 1 maglia a rovescio ritorto e 1 maglia di vivagno a maglia legaccio. FERRO 2 (diritto del lavoro): 1 maglia di vivagno a maglia legaccio, * 1 maglia a diritto ritorto, 1 maglia rovescio *, lavorare *-* fino a quando rimangono 2 maglie, 1 maglia a diritto ritorto e 1 maglia di vivagno a maglia legaccio. Ripetere i ferri 1 e 2 fino a quando le coste misurano 6 cm. Intrecciare dal diritto del lavoro con maglia legaccio su maglia legaccio, diritto ritorto su diritto ritorto e rovescio su rovescio – leggere il SUGGERIMENTO PER LA CHIUSURA! Il maglione misura circa 50-52-54-56-58-60 cm dalla spalla in giù. DIETRO: Rimettere le 98-106-114-126-138-150 maglie in sospeso sui ferri circolari n° 4 mm. Lavorare 1 ferro diritto dal diritto del lavoro in cui aumentare 29-31-35-37-41-45 maglie in modo uniforme = 127-137-149-163-179-195 maglie. Passare ai ferri circolari n° 3,5 mm e lavorare a coste come segue: FERRO 1 (rovescio del lavoro): 1 maglia di vivagno a maglia legaccio, * 1 maglia a rovescio ritorto, 1 maglia diritto *, lavorare *-* fino a quando rimangono 2 maglie, 1 maglia a rovescio ritorto e 1 maglia di vivagno a maglia legaccio. FERRO 2 (diritto del lavoro): 1 maglie di vivagno a maglia legaccio, * 1 maglia a diritto ritorto, 1 maglia rovescio *, lavorare *-* fino a quando rimangono 2 maglie, 1 maglia a diritto ritorto e 1 maglia di vivagno a maglia legaccio Ripetere i ferri 1 e 2 fino a quando le coste misurano 6 cm. Intrecciare dal diritto del lavoro con maglia legaccio su maglia legaccio, diritto ritorto su diritto ritorto e rovescio su rovescio MANICHE: Riportare le 66-70-76-84-86-90 maglie in sospeso a un lato del lavoro sui ferri a doppia punta/ferri circolari corti n° 4 mm e riprendere 1 maglia in ognuna delle 6-6-8-8-10-10 maglie avviate sotto la manica = 72-76-84-92-96-100 maglie. Inserire un segnapunti al centro delle 6-6-8-8-10-10 maglie sotto la manica. Lavorare che il segnapunti segua il lavoro, verrà usato durante le diminuzioni sotto la manica. Iniziare all’altezza del segnapunti e lavorare a maglia rasata in tondo. Quando il lavoro misura 2 cm dalla divisione per tutte le taglie, diminuire 2 maglie sotto la manica – leggere il SUGGERIMENTO PER LE DIMINUZIONI. Diminuire in questo modo ogni 3½-3-2½-1½-1½-1½ cm per un totale di 11-12-14-18-19-20 volte = 50-52-56-56-58-60 maglie. Continuare a lavorare fino a quando la manica misura 39-37-36-34-32-31 cm dalla divisione (misure più piccole per le taglie più grandi a causa del collo più ampio e dello sprone più lungo). Mancano circa 6 cm alla fine del lavoro. Provare il maglione e lavorare fino alla lunghezza desiderata. Lavorare 1 giro diritto in cui aumentare 2-4-2-4-4-6 maglie in modo uniforme = 52-56-58-60-62-66 maglie. Passare ai ferri a doppia punta n° 3,5 mm e lavorare a coste (1 maglia diritto ritorto, 1 maglia rovescio) per 6 cm. Intrecciare con diritto ritorto su diritto e rovescio su rovescio – ricordarsi del SUGGERIMENTO PER LA CHIUSURA! La manica misura circa 45-43-42-40-38-37 cm dalla divisione. Lavorare l’altra mancia nello stesso modo. |
|||||||||||||
Spiegazioni del diagramma |
|||||||||||||
|
|||||||||||||
|
|||||||||||||
|
|||||||||||||
|
Avete realizzato questo o un altro dei nostri modelli? Taggate le vostre foto nei social media con #dropsdesign in modo che possiamo vederle! Avete bisogno di aiuto con questo modello?Troverete video tutorial, una sezione per i commenti/domande e molto altro guardando il modello su www.garnstudio.com © 1982-2024 DROPS Design A/S. Ci riserviamo tutti i diritti. Questo documento, compreso tutte le sue sotto-sezioni, è protetto dalle leggi sul copyright. Potete leggere quello che potete fare con i nostri modelli alla fine di ogni modello sul nostro sito. |
|||||||||||||


Con oltre 40 anni di esperienza nel design di modelli di maglia e uncinetto, DROPS Design offre la più estesa collezione di modelli gratuiti su internet - tradotti in 17 lingue. Ad oggi vi possiamo fornire 304 cataloghi e 11422 modelli - 8666 dei quali sono tradotti in Italiano.
Ci stiamo impegnando molto per darvi il meglio che vi possiamo offrire in termini di maglia e uncinetto, ispirazioni e consigli così come filati di grande qualità ad un prezzo incredibile! Volete utilizzare i nostri modelli per qualcosa d'altro oltre al vostro uso personale? Potete leggere tutto ciò che è consentito nel testo sul Copyright in basso su tutte le pagine dei nostri modelli. Buon lavoro!
Commenti / Domande (38)
Thanks for your reply. I cannot believe how long I looked at this chart and still did not see the answer! As you say there is no increase on this row the increase rows are further up the chart.
14.02.2024 - 11:25This has been asked before but I do not understand your reply. Row10 of the pattern is k1, 1 over, k3, s1, k2tog, slip 1 over, (1 stitch left) k3, 1 over. So that is 2 overs and 2 stitches lost so over the 10 worked stitches there are still 10 at the end. But the pattern indicates an increase of 105 stitches over the 20 rows which is 21 per pattern row. It can’t be s1, k1 slip stitch over as this leaves a spare stitch not on the pattern picture. What should it be please?
13.02.2024 - 20:53DROPS Design answered:
Dear Mrs Down, the even numbered rows are rows without decreases/yarn overs in the diagrams, this means on row 10 in A.1, S,M,L you have 12 sts (you increased 2 sts on row 9) and in A.1 XL, XXL, XXXL, you have still 12 sts (you will increase on next row). Or which round 10 do you mean here? I might misunderstand your question, then sorry in advance., please try again. Thanks for your comprehension.
14.02.2024 - 08:12Trying to finish the sleeves on this sweater. A question about the sleeve decreases. When I knit til last 3 sts k2 together then k1 sl 1 pass sl sts over this is the 6th round when I continue this round to the marker would this be the begynning of the 1 round again. I guess what I sm asking is when do I start counting for the next sett of decreases. When does 1 round begin and the other ends. Thanks for your help. Sharon
29.10.2023 - 18:05DROPS Design answered:
Dear Sharon, you should count in cm or inches, not in rounds. When the piece measures enough, regardless of the round or if it is the end of one round and the beginning of the next one you work the decreases. It doesn't matter that the decreases start in one round and end in the next one. Happy knitting!
29.10.2023 - 23:46Hi When the piece measures 2 cm = 3/4" from the division in all size… what is this referring to? Between yoke and body. 🤔 thanks for your response. Sharon
11.09.2023 - 18:07DROPS Design answered:
Hi Sharon, Yes, the body is measured from where you divided for the body and sleeves (between the yoke and the body). Happy knitting!
12.09.2023 - 06:49After sending my last question and studying the pattern I realize that the actual design features split sides - not evident in photos. As I prefer my sweaters without slits do you have any advice on how pattern could be adapted to be all one piece? Meaning, no slits. Since i've ordered the yarn I am determined to knit up this gorgeous sweater. Thanks so much!
08.09.2023 - 00:53DROPS Design answered:
Dear Peggy, you can of course decide to continue working in the round without split on the sides, just adjust the number of sts increased to get an even number of stitches for ribbing edge. Happy knitting!
08.09.2023 - 08:14I'm a bit confused as to working front piece/back piece. From my understanding these sections are worked back and forth straight, where the top is worked circular. Is this correct? Pattern refers to using circular, yet refers to "rows" rather than "rounds". I understand knitting back and forth on a circular. Is this what I would be doing here? Thanks!
07.09.2023 - 22:10DROPS Design answered:
Dear Peggy, neck edge, yoke and body are worked in the round, but then you will work front and back piece separately back and forth to create vents on each side of jumper. Happy knitting!
08.09.2023 - 08:10Thank you for your prompt reply! Kind regards.
26.07.2023 - 20:09This is my very first top down sweater. I am knitting size large. My body and sleeves have now been separated. I am now in the centre back where the cast on commenced. How do I now get to "Start the round at the marker thread on he right side (when the garment is worn)??? Do I break the yarn and slip the stitches to the marker thread and start there afresh? Hope my question is understood. Thank you!
25.07.2023 - 21:10DROPS Design answered:
Hi Rene, Yes, you cut the strand and begin again under the sleeve on the right side. This is so the slight jump where the rounds finish and begin is under the sleeve and is there fore least noticeable. Happy knitting!
26.07.2023 - 06:47Hello! I have dividend the sweater, and am now knitting from armhole down. The pattern says ti knit 17 cm before ribbing. Isn’t this too short or am I missing something? I know I can knit to desired length. Thanks for responding. Sharon
12.07.2023 - 07:17DROPS Design answered:
Dear Sharon, as you can see in the measurements schematic the pattern is correct; from the armhole to the side splits/ribbing there are 17cm. Take into account that there are 6 cm of ribbing later, so the body will measure 23 cm in total from the armhole. This model also has a lower armhole than usual (by 4cm), which makes the body seem shorter. However, you can always work up to your desired measurements; you can make the body longer if you prefer it. Happy knitting!
17.07.2023 - 10:07Please explain: After the 4 rounds of stockinette stitch, work A.1 in the round (= 19-20-21-19-20-21 repeats of 10-10-10-12-12-12 stitches). Continue this pattern. Thank you
05.07.2023 - 19:07DROPS Design answered:
Dear Mrs Hunt, for yoke you will first knit 4 rounds increasing on 3rd round 15 - 35 sts (see size) evenly spaced, then you will work the pattern repeating diagram A.1, A.1 is either 10 or 12 sts (see size) and you will repeat the diagram a total of 19 - 21 sts in the round depending on the size. Read more about diagrams here; Happy knitting!
06.07.2023 - 10:12