
Popular categories
Looking for a yarn?


Comments / Questions (33)
![]() Marilor wrote:
Marilor wrote:
Bonjour, Au début Quand vous dites « A.1 au-dessus des 12 mailles suivantes (= manche) » : cela signifie que l’on tricote le premier rang du motif A1 trois fois pour couvrir les 12 mailles de la première manche. C’est bien ça? C’est le « au-dessus » qui me perturbe. Il me semble que vous pourriez juste dire « tricoter A1 pour les 12 m suivantes » ou « répéter A1 pour les 12 m suivantes ». Merci
15.01.2026 - 22:27DROPS Design answered:
Bonjour Marilor, c'est tout à fait ainsi que l'on tricote A.1 au-dessus des 12 mailles suivantes: on répète 3 fois les 4 mailles de A.1. Bon tricot!
19.01.2026 - 07:11
![]() Karina wrote:
Karina wrote:
Virkelig ærgerligt at antallet af ribber i halsen, ikke passer med raglan udtagning. Selvom man forskyder, så passer det ikke i den ene side. Kan ses på billedet.
07.12.2025 - 16:55
![]() Giovanna Chuquipiondo wrote:
Giovanna Chuquipiondo wrote:
En el patrón dice disminuir 4 veces cada 8 cm. Pero el la talla L se tienen 188 puntos. Luego de las disminuciones serian 180. Pero el patrón indica q quedan 172. Por favor indícame si esta equivocado el patrón o hay q hacer más disminuciones. Gracias por la respuesta.
24.09.2025 - 21:45DROPS Design answered:
Hola Giovanna, disminuyes 4 puntos (1 vez a cada lado del marcapuntos) 4 veces cada 8 cm. La 1ª vez es a los 4cm desde la división, después cada 8 cm 3 veces más. 4x4 =16 puntos. 188-16 = 172 pts
06.10.2025 - 00:11
![]() Giovanna Chuquipiondo wrote:
Giovanna Chuquipiondo wrote:
Hola. En las disminuciones de la talla L. Dice por 4 veces y se empieza con 188 puntos y luego dice q quedan 172. Pero no es así quedarían 180. Son muchos puntos de diferencia. Les agradeceré me respondan si son más disminuciones o está equivocado el patrón. Muchas gracias
24.09.2025 - 21:43DROPS Design answered:
Hola Giovanna, disminuyes 4 puntos (1 vez a cada lado del marcapuntos) 4 veces cada 8 cm. La 1ª vez es a los 4cm desde la división, después cada 8 cm 3 veces más. 4x4 =16 puntos. 188-16 = 172 pts
06.10.2025 - 00:12
![]() Ulla Jul wrote:
Ulla Jul wrote:
Ingen kommentarer
12.09.2025 - 22:11
![]() Mette Grøntoft wrote:
Mette Grøntoft wrote:
Finner ikke noe mål på overvidde her? Synes det blir vanskelig å velge str. når jeg ikke vet overvidden? Er det noen annen måte å beregne på eller noe jeg overser?
20.02.2025 - 20:27DROPS Design answered:
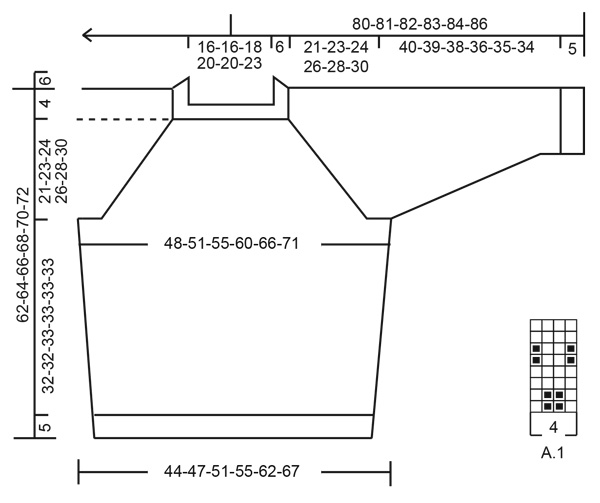
Hei Mette, Du finner en målskisse på bunnen av oppskriften, med alle mål til de forskjellige størrelsene. God fornøyelse!
21.02.2025 - 06:50
![]() Jazzy wrote:
Jazzy wrote:
For the sleeves for size L, pattern states to decrease every 2cm 15 times (after the first decrease at 4cm), which yields a total of 40 stitches. But my calculations has 40 stitches at the 14th decrease. Could you please confirm?
13.12.2024 - 05:38DROPS Design answered:
Dear Jazzy, you decrease 15 times in total 2 stitches each time. The first of the 15 is the decrease at 4cm. Then, you repeat this decrease every 2cm 14 more times, for 28cm in total. Once you reach the necessary number of stitches continue straight until sleeve measures 38cm. Happy knitting!
15.12.2024 - 20:13
![]() Rikke wrote:
Rikke wrote:
Skal jeg strikke mønsteret henover udtagningerne på den måde, at jeg holder “pause” i mønsteret - eller vil udtagningen erstatte en maske i mønsteret? Fx: jeg er nået til 1 måske for markør. Ifølge diagrammet er jeg kommet til 1 r, 2 vr, 1 r. Skal jeg så strikke: 1 r, slå om, 2 vr, slå om, 1 r ELLER 1 r, slå om, 1 vr, 1 r, slå om 1 vr? Og på anden omgang når der skal strikkes dr r, er det så også en erstatning eller en pause/afbrydelse i mønsteret?
18.11.2024 - 14:12
![]() Jazzy wrote:
Jazzy wrote:
After the first decrease for body at 4cm from the arm division, are the next decreases occurring at 8cm, 16cm and 24cm OR 12cm, 20cm and 28cm?
31.10.2024 - 16:51DROPS Design answered:
Dear Jazzy, if you have to increase on every 8th cm, the next decrease will be after 12 cm (4+8), then after 20 cm (12+8) and so on. Happy knitting!
01.11.2024 - 08:02
![]() Suzana Schiestel wrote:
Suzana Schiestel wrote:
Guten Morgen Da ich noch nie einen Pullover vom Hals aus begonnen habe....gibt es dieses Strickanleitung auch vom Bund aus ? Vielen Dank
24.03.2024 - 14:25
|
|||||||
Lightkeeper#lightkeepersweater |
|||||||
 |
 |
||||||
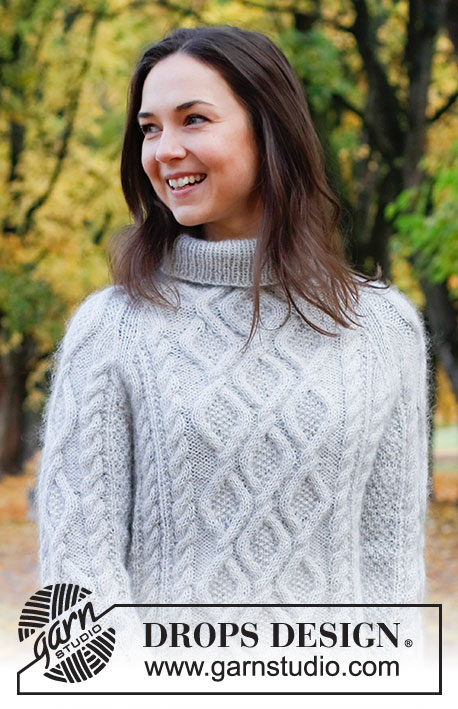
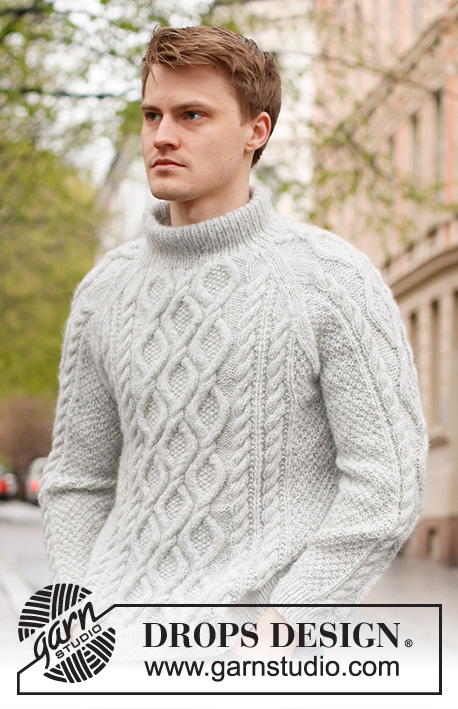
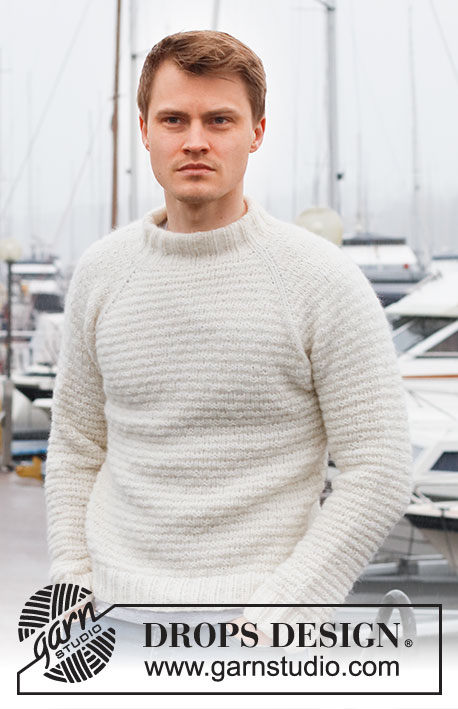
Knitted sweater for men in DROPS Air. The piece is worked top down, with raglan and textured pattern. Sizes S - XXXL.
DROPS 224-2 |
|||||||
|
------------------------------------------------------- EXPLANATIONS FOR THE PATTERN: ------------------------------------------------------- PATTERN: See diagram A.1. RAGLAN: Increase to raglan on each side of the 2 stockinette stitches at each marker as follows: Work 1 stitch past the marker, 1 yarn over. Work until there is 1 stitch left before the next marker, 1 yarn over. The increased stitches are knitted twisted on the next round, then subsequently worked into the pattern. DECREASE TIP: Decrease 1 stitch on each side of the marker as follows: Work until there are 3 stitches left before the marker, knit 2 together, knit 2 (marker thread sits between these 2 stitches), slip 1 stitch as if to knit, knit 1 and pass the slipped stitch over the knitted stitch. BINDING-OFF TIP: To avoid the bind-off edge being tight you can bind off with a larger size needle. If the edge is still tight, make 1 yarn over after approx. each 4th stitch at the same time as binding off; the yarn overs are bind off as normal stitches. ------------------------------------------------------- START THE PIECE HERE: ------------------------------------------------------- SWEATER – SHORT OVERVIEW OF THE PIECE: The neck and yoke are worked in the round with circular needle top down. The yoke is divided for body and sleeves and the body is continued in the round with circular needle. The sleeves are worked with double pointed needles/short circular needle. NECK: Cast on 80-80-88-96-96-104 stitches with circular needle size 4.5 MM = US 7 and Air. Work rib in the round (knit 2, purl 2) for 12 cm = 4¾" (the neck is later folded double and sewn down to the wrong side). Knit 1 round. YOKE: Change to circular needle size 5 MM = US 8 and insert a marker on this round, to be used when measuring the yoke. Insert 4 other markers, AT THE SAME TIME as you work, as follows: Insert 1 marker at the beginning of the round, work 1 stitch in stockinette stitch, A.1 over 12 stitches (= sleeve), work 2 stitches in stockinette stitch and insert 1 marker between these 2 stitches, A.1 over 24-24-28-32-32-36 stitches (= front piece), work 2 stitches in stockinette stitch and insert 1 marker between these 2 stitches, A.1 over 12 stitches, work 2 stitches in stockinette stitch and insert 1 marker between these 2 stitches and A.1 over 24-24-28-32-32-36 stitches (= back piece), work 1 stitch in stockinette stitch. READ THE NEXT SECTION BEFORE CONTINUING! On the next round start to increase to RAGLAN – read description above and continue with A.1. REMEMBER THE KNITTING GAUGE! Continue the pattern and increase to raglan every 2nd round a total of 21-24-26-28-31-33 times = 248-272-296-320-344-368 stitches. Continue the pattern without further increases until the piece measures 21-23-24-26-28-30 cm = 8¼"-9"-9½"-10¼"-11"-11¾" from the marker on the neck. Now divide the yoke for the body and sleeves as follows (the start of the round is the transition between back piece and sleeve): Work 4-3-2-2-4-4 stitches (= back piece), place the next 48-56-62-66-68-72 stitches on a thread (= sleeve), cast on 6-6-8-8-8-8 new stitches (= side under sleeve), work 76-80-86-94-104-112 stitches (= front piece), place the next 48-56-62-66-68-72 stitches on a thread (= sleeve), cast on 6-6-8-8-8-8 new stitches (= side under sleeve), work the last 72-77-84-92-100-108 stitches (= rest of back piece; a total of 76-80-86-94-104-112 stitches on the back piece). BODY: = 164-172-188-204-224-240 stitches. Insert 1 marker in the middle of the new stitches cast on in each side. Continue A.1 in the round; the pattern might not fit completely onto the round, the 2 stitches on each side of both markers are worked in stockinette stitch and the other stitches are worked in pattern to fit with the front and back piece. When the piece measures 4 cm = 1½" from the division, decrease 1 stitch on each side of both markers – read DECREASE TIP – continue the pattern on the front and back pieces and adjust the pattern in the sides as you decrease. Repeat the decrease every 6-8-8-8-8-6 cm = 2⅜"-3⅛"-3⅛"-3⅛"-3⅛"-2⅜" a total of 4-3-4-4-3-4 times = 148-160-172-188-212-224 stitches. Continue working until the piece measures approx. 32-32-33-33-33-33 cm = 12½"-12½"-13"-13"-13"-13" from the division (or to desired length; there is approx. 5 cm = 2" left to finished length) – adjust so you finish after 2 rounds of stockinette stitch. Change to circular needle size 4.5 MM = US 7 and work rib (knit 2, purl 2) for 5 cm = 2". Loosely bind off with knit over knit and purl over purl. The piece measures approx. 62-64-66-68-70-72 cm = 24⅜"-25¼"-26"-26¾"-27½"-28⅜" from the shoulder down. SLEEVE: Place the 48-56-62-66-68-72 stitches from the thread on the one side of the piece on double pointed needles/short circular needle size 5 MM = US 8 and knit up 1 stitch in each of the 6-6-8-8-8-8 stitches cast on under the sleeve = 54-62-70-74-76-80 stitches. Insert a marker in the middle of the 6-6-8-8-8-8 new stitches under the sleeve = beginning of round. Continue A.1 in the round; the pattern might not fit completely onto the round, the 2 stitches on each side of the marker are worked in stockinette stitch and the other stitches are work in the pattern as before. When the sleeve measures 4 cm = 1½" from the division, decrease 1 stitch on each side of the marker – remember DECREASE TIP. Repeat the decrease every 2-3-2-2-2-2 cm = ¾"-1⅛"-¾"-¾"-¾"-¾" a total of 7-11-15-15-16-18 times = 40-40-40-44-44-44 stitches. Continue working until the sleeve measures approx. 40-39-38-36-35-34 cm = 15¾"-15¼"-15"-14¼"-13¾"-13⅜" from the division (or to desired length; there is approx. 5 cm left to finished length) – adjust so you finish after 2 rounds of stockinette stitch. Change to double pointed needles size 4.5 MM = US 7 and work rib (knit 2, purl 2) for 5 cm = 2". Loosely bind off with knit over knit and purl over purl. Work the other sleeve in the same way. ASSEMBLY: Fold the neck double to the wrong side. Sew the cast-on edge to the neckline, with long, loose stitches from the wrong side (making sure the seam is invisible on the right side and that it is not tight). |
|||||||
Diagram explanations |
|||||||
|
|||||||
 |
|||||||
Have you finished this pattern?Tag your pictures with #dropspattern #lightkeepersweater or submit them to the #dropsfan gallery. Do you need help with this pattern?You'll find 25 tutorial videos, a Comments/Questions area and more by visiting the pattern on garnstudio.com. © 1982-2026 DROPS Design A/S. We reserve all rights. This document, including all its sub-sections, has copyrights. Read more about what you can do with our patterns at the bottom of each pattern on our site. |
|||||||


With over 40 years in knitting and crochet design, DROPS Design offers one of the most extensive collections of free patterns on the internet - translated to 17 languages. As of today we count 324 catalogs and 12290 patterns - 12280 of which are translated into English (US/in).
We work hard to bring you the best knitting and crochet have to offer, inspiration and advice as well as great quality yarns at incredible prices! Would you like to use our patterns for other than personal use? You can read what you are allowed to do in the Copyright text at the bottom of all our patterns. Happy crafting!
Post a comment to pattern DROPS 224-2
We would love to hear what you have to say about this pattern!
If you want to leave a question, please make sure you select the correct category in the form below, to speed up the answering process. Required fields are marked *.