
Looking for a yarn?


Comments / Questions (27)
![]() Asdf wrote:
Asdf wrote:
Meine Güte, muß man es dermaßen kompliziert machen? Andauernd muß man hoch und runterscrollen, sucht entweder die Zeile oder die Strickschrift und verliert beim Hin- und Herspringen völlig das Konzept. Dann noch: "Stricken Sie A2" anstatt einfach zu schreiben "x Reihen 2re2li und nehmen sie da und dort je 1M zu" etc. . Ich habe keinen Bock mehr auf diese blöden Armstulpen. Ätzender geht es nicht.
21.11.2024 - 22:39
![]() Dorota Mazurek wrote:
Dorota Mazurek wrote:
Czien dobry czy rozrysowane wzory sa pokazane co 2gi rzad tzn 1/3/5 czy sa pokazane po kolei?
09.10.2024 - 13:30DROPS Design answered:
Witaj Doroto, schemat przedstawia wszystkie rzędy, widok na prawej stronie robótki. Więcej na ten temat znajdziesz TUTAJ. Pozdrawiamy!
09.10.2024 - 14:08
![]() Isabella Sørensen wrote:
Isabella Sørensen wrote:
Puls varmer har 2 str. hvad er det færdige mål på de forskellige str?
27.09.2024 - 21:01DROPS Design answered:
Hei Isabella. Lengde forskjellen er ca 1 cm (str. S/M: ca 21 cm & str. L: ca 22 cm). Bredden vil også være på ca 1 cm, men bredden er også ganske tøyelig. mvh DROPS Design
07.10.2024 - 13:20
![]() Veronica Righi wrote:
Veronica Righi wrote:
Buongiorno Mi interessa il modello scaldacollo , indica di usare i ferri circolari da 40 cm , ma non credo che si possano avviare 310 m ; come posso risolvere ? Ringrazio VR
10.12.2022 - 12:31DROPS Design answered:
Buonasera Veronica, può eventualmente utilizzare un cavo da 60 cm. Buon lavoro!
11.12.2022 - 21:55
![]() Katrin wrote:
Katrin wrote:
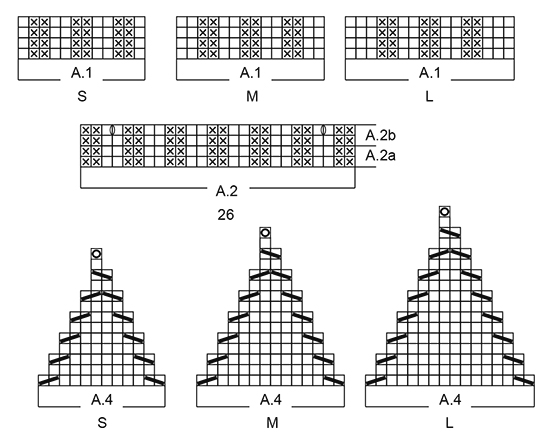
Hello! I am knitting the hat. I chose the S size (small) with 114 sts. How do I knit the first few rounds working A.1, because 12 sts don't add up to 114 sts?
22.01.2021 - 23:32DROPS Design answered:
Dear Katrin, work as follows in size S: *A.1a (= 12 sts)=), A.2a (= 26 sts)*, repeat these (12+26= 38 sts) in width a total of 3 times (3 x 38= 114). Read more about diagrams here. Happy knitting!
25.01.2021 - 08:28
![]() Undine wrote:
Undine wrote:
Wie soll ich denn 350 Maschen auf einer nur 40cm langen Rundnadel stricken? Das muß doch ein Fehler sein? Wenn ich Recht habe, bitte korrigieren!
06.12.2020 - 11:35
![]() Carla wrote:
Carla wrote:
The last two rows of motif A.11 have ten stitches less than all the previous motif rows (missing five in each side). Where did they go? How are those last two rows to be worked? Thanks.
17.02.2020 - 23:41DROPS Design answered:
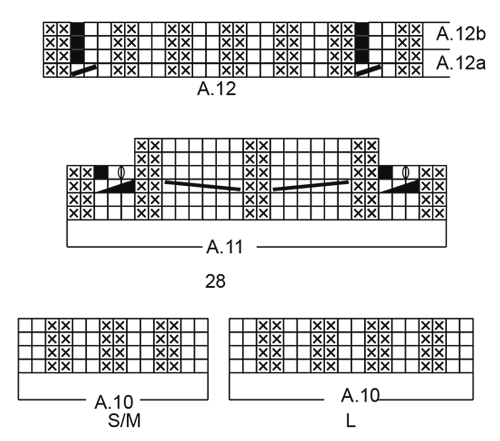
Dear Carla, when you work the lace patterns over 3 sts on each side of A.11 you will have only 2 sts on row 3 and again 2 stitches on row 4 - so just remember that the "missing" stitch in each of these place is matching the lace pattern (see here). After you have worked the first 4 rows in A.11, repeat A.11 from row 1 over the first 5 stitches and last 5 stitches and work the last 2 rows in A.11 over the middle stitches, the repeats are worked over a different number of rows. Happy knitting!
18.02.2020 - 10:05
![]() Eli wrote:
Eli wrote:
Nå har jeg strikket de fire cm. på halsen, men da blir dette uforståelig. Jeg har strikket mye, men denne oppskriften er vanskelig, og dårlig forklart. Jeg har strikket ei lue, men det ble frihåndsstrikking. Hals og felling, eller hva jeg gjør etter de 4 cm. Kan jeg få ei forklaring som er forståelig? Rekket opp 3 ganger
31.01.2020 - 07:51DROPS Design answered:
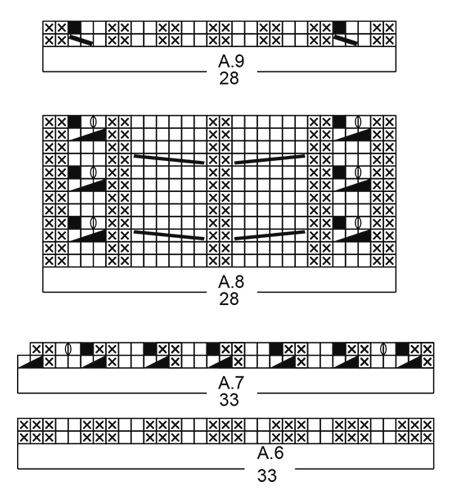
Hei Eli, Neste omgang er slik: Strikke A.7 over A.6 og 2 rett. Etter det er det et parti som gjentas bortover = (2 masker vrang sammen, 1 maske vrang, 2 masker rett). Dette utgjør 5 masker (med 1 maske felt hver gang), gjentatt fram til du har strikket 120-130-140 masker, eller slutten av omgangen. Du fortsetter med dette mønster til A.7 har blitt strikket ferdig 1 gang i høyden; og har 252-268-284 masker igjen på pinnen. Håper dette hjelper og god fornøyelse!
31.01.2020 - 08:46
![]() Fanny Deflandre wrote:
Fanny Deflandre wrote:
Bonjour,pour le tour de cou pour les diminutions après A8 il est indiqué glisser une maille endroit ,1 maille à l'endroit,une maille endroit passé la maille glissé par dessus la maille la maille tricoté.je ne comprend pas car il y a 2 mailles endroit alors comment fait t'on merci
23.11.2019 - 15:22DROPS Design answered:
Bonjour Mme Deflandre, vous parlez du 1er rang de A.9? on diminue b ien 1 m endroit au 1er rang de A.9 (et à 2 reprises), au 2ème rang de A.9, on a 2 m end dans chaque section en mailles endroit du diagramme. Bon tricot!
25.11.2019 - 11:22
![]() PLRD wrote:
PLRD wrote:
I am knitting the neck warmer and am working on the A8 chart in the pattern. I am working on row 3 of the pattern. For the " slip 1 stitch as if to K, K2, psso" does K2 mean that I simply knit 2 stitches or does it mean that I knit 2 stitches in the next stitch? Is there a video to demonstrate this? Thank you.
29.04.2019 - 21:13DROPS Design answered:
Hi PLRD, You knit 2 stitches and pass the slipped stitch over these 2 stitches. Happy knitting!
30.04.2019 - 07:43
|
|||||||||||||||||||||||||||||||||||||
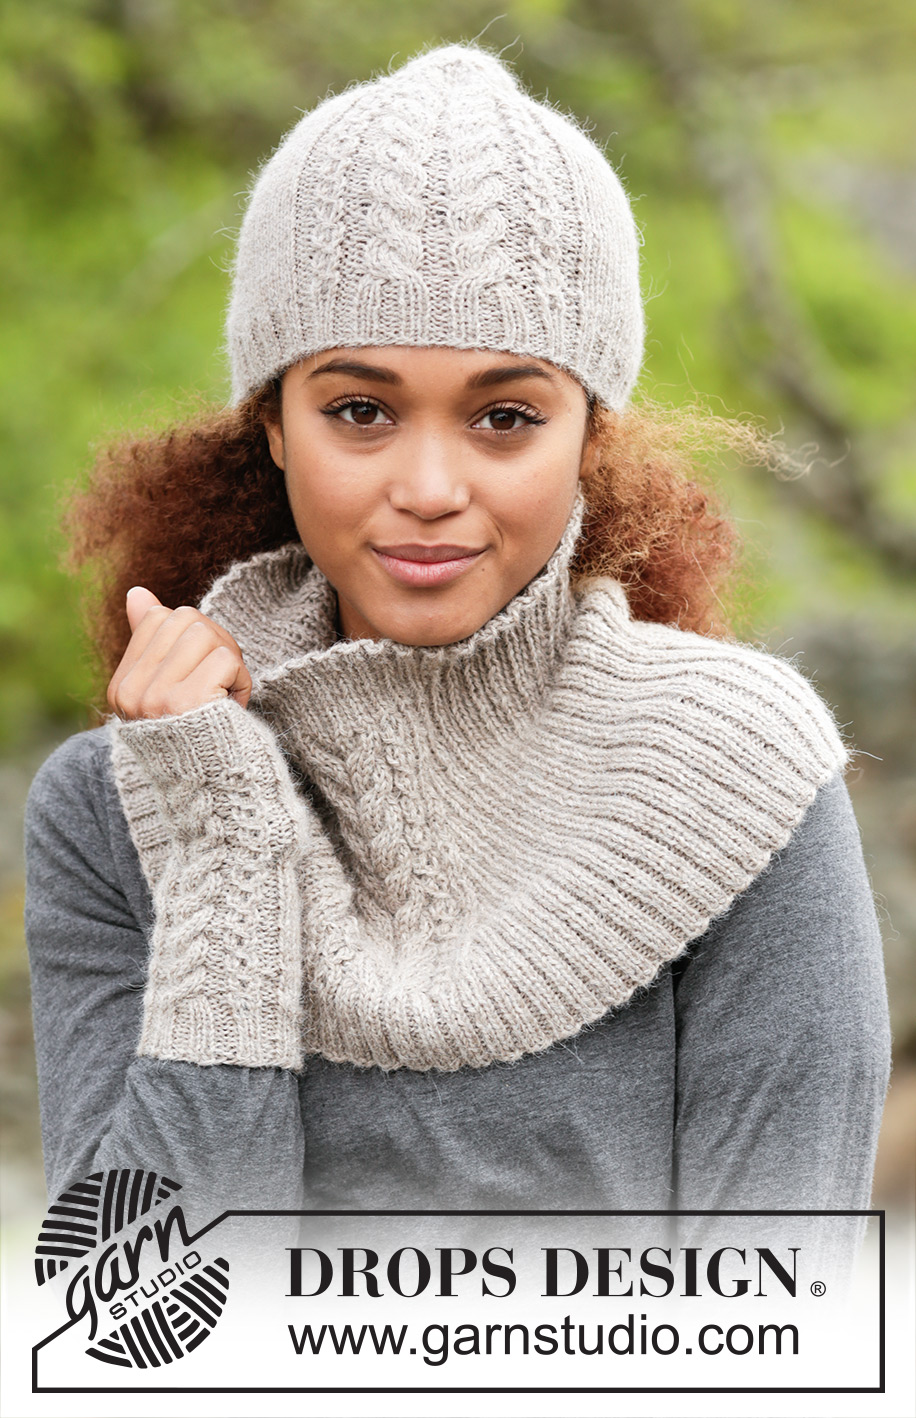
Winter Wired#winterwiredset |
|||||||||||||||||||||||||||||||||||||
 |
 |
||||||||||||||||||||||||||||||||||||
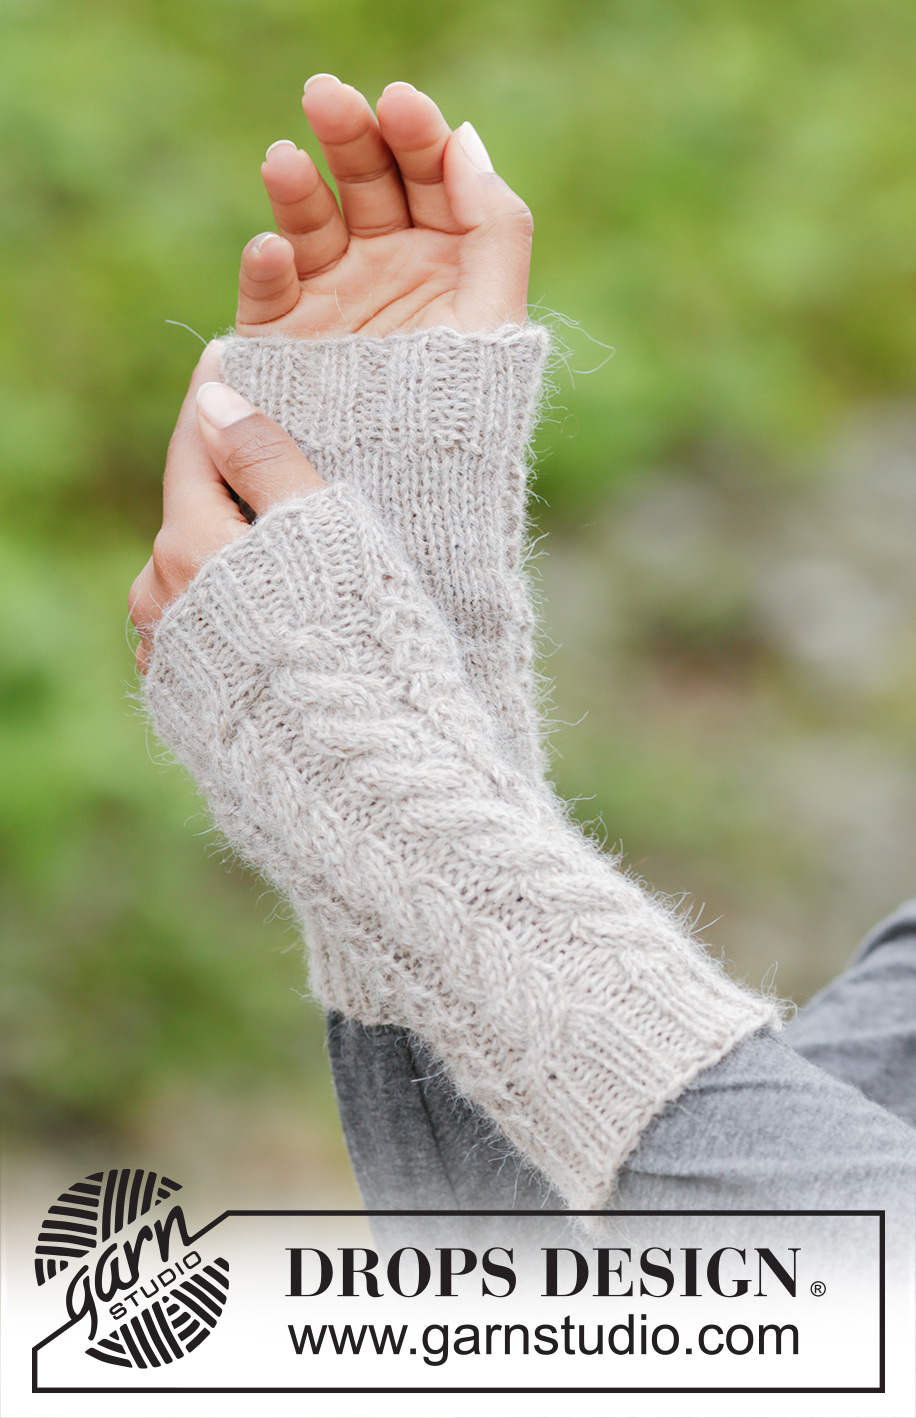
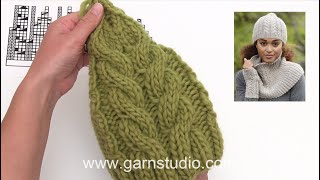
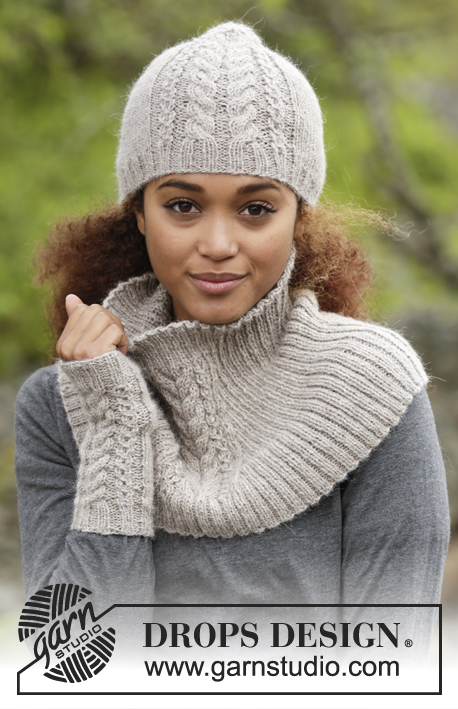
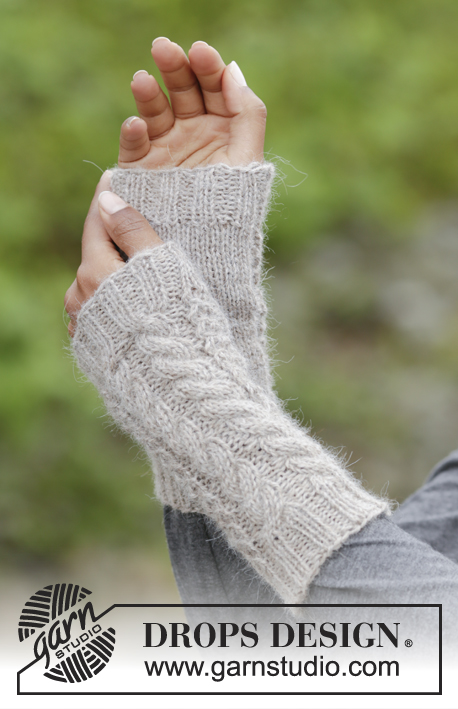
Knitted DROPS hat, neck warmer and wrist warmers with cables in ”Puna”.
DROPS 173-21 |
|||||||||||||||||||||||||||||||||||||
|
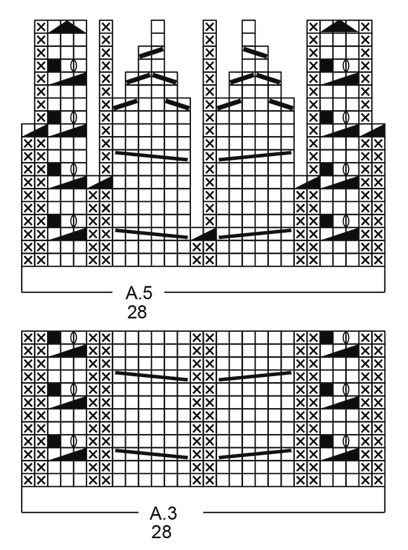
HAT: PATTERN: See diagrams A.1 to A.5. See diagram for correct size. ---------------------------------------------------------- HAT: Worked in the round on circular needle, switch to double pointed needles when needed. Cast on 114-120-126 sts on circular needle size 3.5 mm / US 4 with Puna. Work * A.1 (see diagram for correct size = 12-14-16 sts), A.2a (= 26 sts) *, repeat from *-* 3 times in total in width. When piece measures 3-3-4 cm / 1"-1"-1½", work A.2b over A.2a, work remaining sts in pattern as before. REMEMBER THE KNITTING GAUGE When A.2b has been worked 1 time vertically, there are 120-126-132 sts on needle. Switch to circular needle size 4 mm / US 6. Work * 12-14-16 sts in stockinette st, A.3 (= 28 sts) over A.2 *, repeat from *-* 3 times in total in width. Repeat A.3 3 times in total vertically. Piece measures approx. 17-17-18 cm / 6 3/4"-6 3/4-7''. * Work and dec as A.4 (see diagram for correct size = 12-14-16 sts) over the sts in stockinette st and work and dec as A.5 over A.3 *, repeat from *-* 3 times in total in width. When A4 and A.5 have been worked 1 time vertically, there are 27 sts on needle. K 2 and 2 sts tog until 1 st remains, K 1 = 14 sts. Cut the yarn and pull it through the remaining sts, tighten tog and fasten. Hat measures approx. 25-25-26 cm / 9 3/4"-9 3/4"-10 1/4"'. ---------------------------------------------------------- NECK WARMER: PATTERN: See diagrams A.6 to A.9. DECREASE TIP: Dec as follows before A.8: Work until 3 sts remain before A.8, K 2 tog, K 1. Dec as follows after A.8: K 1, slip 1 st as if to K, K 1, psso ---------------------------------------------------------- NECK WARMER: Worked in the round. Cast on 310-330-350 sts on circular needle size 4 mm / US 6 with Puna. Work A.6 (= 33 sts), K 2, work rib (= P 3/K 2) over the next 120-130-140 sts, A.6 over the next 33 sts, K 2, work rib (= P 3/K 2) over the last 120-130-140 sts. Continue like this until piece measures 4 cm / 1½''. Switch to circular needle size 4.5 mm / US 7. REMEMBER THE KNITTING GAUGE Work next round as follows: Work A.7 over A.6, K 2, * P 2 tog, P 1, K 2 *, repeat from *-* over the next 120-130-140 sts (= 24-26-28 sts dec), A.7 over A.6, K 2, * P 2 tog, P 1, K 2 *, repeat from *-* over the next 120-130-140 sts (= 24-26-28 sts dec). When A.7 has been worked 1 time vertically, there are 252-268-284 sts on needle. Work next round as follows: Work A.8 (= 28 sts), K 2, work rib (= P 2/K 2) over the next 96-104-112 sts, A.8 over the next 28 sts, K 2, work rib (= P 2/K 2) over the last 96-104-112 sts. Continue pattern like this AT THE SAME TIME on every other round dec 1 st on each side of each A.8 (= 4 sts dec on every other round) – READ DECREASE TIP. Continue dec like this until piece measures 22-23-24 cm / 8 3/4"-9"-9½" = approx. 160-168-180 cm / 63"-64"-70". Adjust so that next round is 1 round where there are 28 sts in diagram A.8. Switch to circular needle size 4 mm / US 6 and A.9 (= 28 sts) over A.8. When A.9 has been worked 1 time vertically, there are approx. 156-164-176 sts on needle. Then work P over P and K over K until piece measures 27-28-29 cm / 10½"-11"-11½". Bind off sts with K over K and P over P. ---------------------------------------------------------- WRIST WARMERS: PATTERN: See diagram A.10 to A.12 and A.2. See diagram for correct size. ---------------------------------------------------------- WRIST WARMER: Worked in the round on double pointed needles. Cast on 40-44 sts on double pointed needles size 3.5 mm / US 4 with Puna. Work A.10 (see diagram for correct size = 14-18 sts), then A.2 (= 26 sts). When piece measures 3 cm / 1'', work A.2b over A.2a, work remaining sts as before. REMEMBER THE KNITTING GAUGE When A.2b has been worked 1 time vertically, there are 42-46 sts on needle. Switch to double pointed needles size 4 mm / US 6. Work 14-18 sts in stockinette st and A.11 over A.2. Repeat A.11 vertically. When piece measures 17-18 cm / 6 3/4-7'', adjust so that next round is 1 round where there are 28 sts in diagram A.11. Switch to double pointed needles size 3.5 mm / US 4. Work A.10 over the first 14-18 sts and work A.12a over A.11. When A.12a has been worked 1 time vertically, there are 40-44 sts on needle. Then repeat A.12b over A.12a until piece measures 21-22 cm / 8 1/4"-8 3/4". Bind off sts with K over K and P over P. Work another wrist warmer the same way. |
|||||||||||||||||||||||||||||||||||||
Diagram explanations |
|||||||||||||||||||||||||||||||||||||
|
|||||||||||||||||||||||||||||||||||||
 |
|||||||||||||||||||||||||||||||||||||
 |
|||||||||||||||||||||||||||||||||||||
 |
|||||||||||||||||||||||||||||||||||||
 |
|||||||||||||||||||||||||||||||||||||
Have you finished this pattern?Tag your pictures with #dropspattern #winterwiredset or submit them to the #dropsfan gallery. Do you need help with this pattern?You'll find 21 tutorial videos, a Comments/Questions area and more by visiting the pattern on garnstudio.com. © 1982-2025 DROPS Design A/S. We reserve all rights. This document, including all its sub-sections, has copyrights. Read more about what you can do with our patterns at the bottom of each pattern on our site. |
|||||||||||||||||||||||||||||||||||||

With over 40 years in knitting and crochet design, DROPS Design offers one of the most extensive collections of free patterns on the internet - translated to 17 languages. As of today we count 319 catalogs and 12042 patterns - 12032 of which are translated into English (US/in).
We work hard to bring you the best knitting and crochet have to offer, inspiration and advice as well as great quality yarns at incredible prices! Would you like to use our patterns for other than personal use? You can read what you are allowed to do in the Copyright text at the bottom of all our patterns. Happy crafting!
Post a comment to pattern DROPS 173-21
We would love to hear what you have to say about this pattern!
If you want to leave a question, please make sure you select the correct category in the form below, to speed up the answering process. Required fields are marked *.