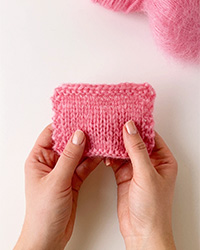
Jak odczytywać schematy w robótce na drutach

Schemat dla robótki wykonywanej na drutach składa się z pól/kwadracików. 1 kwadracik = 1 oczko - opis symbolu znajduje się w legendzie, gdzie jest pokazane jak przerabiać oczko. Schemat pokazuje wszystkie oczka, widok na prawej stronie robótki (o ile nie określono inaczej).

Schemat wygląda następująco:
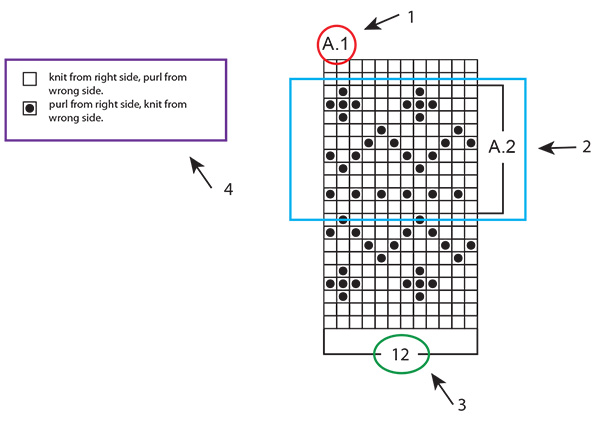
  1. A.1 to nazwa schematu i odnosi się do całego schematu.
  2. A.2 w nawiasie kwadratowym jest tylko częścią schematu.
  3. Ta liczba odpowiada liczbie oczek w 1-szym rzędzie schematu.
  4. To jest opis symbolu: wyjaśnia jak jest przerabiane każde oczko, albo w jakim kolorze (w wielokolorowych wzorach).

Schemat jest odczytywany, odwrotnie do czytania np. książki: od prawej do lewej strony, od dołu do góry. Inaczej mówiąc, zaczynamy od symbolu w prawym dolnym rogu i dalej w lewą stronę i w górę (patrz CZERWONE oznaczenia w schemacie poniżej). Jeżeli będziesz musiała zacząć na innej wysokości/od innego oczka, będzie to doprecyzowane - np.: można zacząć ten sam schemat od różnych miejsc, w zależności od rozmiaru (patrz NIEBIESKIE oznaczenia w schemacie poniżej).

Jeżeli należy powtórzyć kilka razy ten sam schemat (tzn. przerabiać ten sam schemat kilka razy na szerokość), będziemy go przerabiać do końca rzędu i zaczynać kolejny motyw ponownie od pierwszego oczka.

W tę i z powrotem:

Gdy przerabiamy w tę i z powrotem, co drugi rząd będzie przerabiany na prawej stronie robótki i co drugi rząd będzie przerabiany na lewej stronie robótki. Skoro w schemacie są pokazane wszystkie oczka, widok na prawej stronie robótki, należy go odczytywać w przeciwnym kierunku na lewej stronie robótki (patrz NIEBIESKIE strzałki w schemacie poniżej): czyli czytamy rząd od lewej do prawej, oczka prawe będą przerabiane na lewo, a lewe na prawo, itd. (w legendzie do schematu często widzimy: "1 oczko prawe na prawej stronie robótki, oczko lewe na lewej stronie robótki").

Na okrągło:

Gdy przerabiamy na okrągło, wszystkie okrążenia są przerabiane na prawej stronie robótki, a schemat jest czytany tylko na prawej stronie robótki, więc jest czytany tylko od prawej do lewej strony. Gdy zaczynamy nowe okrążenie, zaczynamy je ponownie od pierwszego symbolu następnego rzędu w schemacie.

Kilka różnych schematów przerabianych jeden po drugim w rzędzie/okrążeniu:

Aby przerobić kilka różnych schematów jeden za drugim w tym samym rzędzie/okrążeniu, postępujemy następująco: przerabiamy 1-szy rząd schematu 1, dalej 1-szy rząd schematu 2, następnie 1-szy rząd schematu 3, itd. UWAGA: Jeżeli przerabiasz w tę i z powrotem, na lewej stronie robótki trzeba będzie czytać schematy w przeciwnym kierunku, tzn.: zacząć od schematu 3, dalej 2 i wreszcie 1. Są przerabiane w odwrotnym układzie jak zwykle.

W opisie czasami widzimy: "przerobić schemat A.1, schemat A.2, a następnie w sumie 1-1-2-3-4 razy schemat A.3”. To oznacza, że najpierw musimy wykonać schemat A.1, następnie A.2 i wreszcie w sumie 1-1-2-3-4 razy schemat A.3 (liczba powtórzeń zależy od wykonywanego rozmiaru). Będziemy powtarzać TYLKO schemat A.3, schematy A.1 i A.2 będą przerobione tylko po jednym razie.

Gdy liczba oczek nie zgadza się z liczbą powtórzeń schematu:

Czasami liczba oczek nie jest podzielna przez liczbę oczek pojedynczego całego motywu schematu na szerokość. Na przykład: schemat A.1 jest przerabiany ponad 12 oczkami i będziemy go powtarzać ponad 40 oczkami. W takim przypadku, powtórzymy schemat A.1 w sumie 3 razy na szerokość (= 36 oczek), a następnie przerobimy 4 pierwsze oczka schematu ponad pozostałymi oczkami (patrz CZERWONA linia poniżej). To częsty przypadek, gdy motyw schematu jest powtarzany, dzięki temu nawet jeżeli nie przerobimy całego schematu na szerokość, będzie on spójny.

Komentarze (632)

Anne napisała:

Is there a video to show how the pattern in Lazy Sunday afternoon jumper is worked? I am struggling to understand the instructions. Thanks

01.10.2024 - 14:01

Odpowiedź DROPS Design

Dear Anne, there is no specific video to this pattern but feel free to ask your question using the form at the bottom of the written pattern/diagrams so that we can try to help you. Happy knitting!

01.10.2024 - 16:37

Susanne napisała:

Hej Är nybörjare på mönsterstickning och förstår inte hur jag ska sticka när det är inte är några rutor i diagrammet. Så här ser det ut: Färg A (=en ruta) Färg B (= en ruta) ingen ruta, ingen ruta, Färg A (= en ruta) Färg B. ( = en ruta) Vad ska jag sticka där det är tomma rutor? Svårt att förklara i ord men hoppas ni förstår. Stickar Anne Wentzel Super Selene Vänligen Susanne

27.09.2024 - 11:10

Odpowiedź DROPS Design

Hei Susanne. Om du oppgir hvilken DROPS oppskrift du strikker etter, så skal vi hjelpe deg så godt vi kan med å forklare. Er det andre oppskrifter / designere, må du nesten kontakte de som har skrevet den. Vi har dessverre ikke mulighet til å svare på andre sine design og vite at vi gir et riktig svar. mvh DROPS Design

30.09.2024 - 07:05

Barbara napisała:

On pattern Billowing Rose #188-22 - I am new to diagrams - I seem to understand them but I don't understand the written instructions on A1 - is the instruction for just one row? Or do I do 6 rows i.e. R1 K, R2 K, R3 K2tog 4x, yo (6x) K2tog 4x, R4 K, R5 K, R6K? When I do just one row with the 2 edge stitches my count is 17 st short -- 132 vs 149. I have tried everything. If you could help me here, I am sure I could get on with the rest of this lovely bolero. Thank you for any help.

21.09.2024 - 05:15

Odpowiedź DROPS Design

Dear Barbara, the first row of each chart for the yoke is as follows: A.1 (= 1 yarn over, knit 2 together, 1 yarn over), A.2 (= knit 1, 1 yarn over, slip 1 stitch knitwise, knit 1, pass slipped stitch over stitch worked, knit 1, knit 2 together, 1 yarn over) A.3 (= knit 1, 1 yarn over, slip 1 stitch knitwise, knit 1, pass slipped stitch over stitch worked, 1 yarn over). Work these charts as stated in the pattern, repeating the charts as many times as necessary for your size. On the next round, continue with the next round of the charts (in this case, you knit all stitches, since that is what you have in all charts). Happy knitting!

22.09.2024 - 23:19

June napisała:

Hei. Jeg strikker en genser hvor str M begynner mitt i diagrammet, strikker jeg da fra M’en og ut til venste for så å starte helt i starten av diagrammet? Eller skal man kun strikke fra M’en og til enden og starte ved M’en igjen ? På forhånd takk Mvh June

20.09.2024 - 22:55

Odpowiedź DROPS Design

Hei June. Mest sannsynnlig er det slik du først skriver (fra M’en og ut til venste for så å starte helt i starten av diagrammet). Men siden det ikke er oppgitt hvilken oppskrift det gjelder, får jeg ikke dobbeltsjekke med hva / og om det står noe spesielt i den oppskriften. mvh DROPS Design

23.09.2024 - 08:54

Tim napisała:

I am working the Lucky Wish pattern and have reached the 114 stitches stage of the yoke, but can\'t figure out the next stage to reach 304 stitches. Apologies if I am not understanding something obvious.

12.09.2024 - 11:12

Tim napisała:

I am working the Lucky Wish pattern and have reached the 114 stitches stage of the yoke, but can\'t figure out the next stage to reach 304 stitches. Apologies if I am not understanding something obvious.

12.09.2024 - 11:12

Odpowiedź DROPS Design

Dear Tim, you will work following the diagram A.1 a total of 19 times (6 stitches in each A.1 x 19 repeats in the round = 114 sts); increase in each A.1 just as shown in diagram so that you get 16 sts in each A.1 when diagram is done, so that you have 16 stitches in each A.1 x 19 repeats in the round = 304 stitches. Happy knitting!

13.09.2024 - 09:41

Anna Melnick napisała:

Hi, I am working the Snow Baby pattern and have just started the jacket. For some reason I’m not figuring out the M.1 pattern. I keep increasing with every yo row. On the 4th row it says to knit 2 together 3x -yo 6 times- knit 2 together 3x. By the next row I have added a ton of stitches…. What am I missing? Don’t the two actions cancel each other out? Can you help me on this? Thank you!!

24.08.2024 - 06:19

Odpowiedź DROPS Design

Dear Anna, in the first row of M.1, since you work the charts from the bottom up, you have 6 decreases and 6 yarn overs/increases, so they should be cancelling each other out. The number of stitches remains the same, as you can see on the next rows, rows 2 to 4, working upwards. Check as you work M.1 each time in the row to see if you have worked all necessary decreases and increases each time. Happy knitting!

26.08.2024 - 00:02

Yvonne napisała:

I'm looking to knit pattern Diamond Delight no. 196-15. On reaching the end of neck edge with 88 stitches on needle. I then get to yoke but am stuck when it says work A1 in the round (=22 repetitions of 4 stitches). I don't understand this. Continue with A1 once worked I should have 264 stitches - how is that when it doesn't say increase anywhere? Can you explain this please

21.08.2024 - 19:24

Odpowiedź DROPS Design

Dear Yvonne, read diagrams from bottom up, so that you start working A.1 over 4 sts (increasing 1 st on first round in each A.1) a total of 22 times in the round (22 times 4 sts = 88 sts), at the end of first round you get 5 sts in each A.1 (22x5=110 sts); continue working A.1 increasing as shown in diagram; when all increases are done you get 12 sts in each A.1 x 22 repeats = 264 sts; continue diagram as shown to the end. Happy knitting!

22.08.2024 - 08:48

Sheila Hartley napisała:

Thanks so much for your help and the quick response.

16.08.2024 - 00:28

Lore Hewson napisała:

I would like to knit the Running Circle cardigan. As I read it, A.1 and A.2 charts are for the button/buttonhole bands. I am assuming that the swiggly line on row 8 is indicating a button hole row. However, I do not see any instructions on how to make a button hole here. Can you help me?

11.08.2024 - 22:27

Odpowiedź DROPS Design

Dear Lore, in the pattern it explains that you don't work buttonholes. In the SHORT OVERVIEW OF THE PIECE, it indicates: "Buttonholes are not worked, as the buttons are buttoned in the lace pattern on the band." There is no "swiggly line"; it's actually a sequence of yarn over + k2tog. You can see in the picture that you will have 3 yarn overs in specific rows of the lace pattern, through which you will be able to pass a button. Happy knitting!

11.08.2024 - 23:47

Sheila Hartley napisała:

I need some help with your knit cloth with lace pattern in Paris pattern w-486 . Are the 3 chart diagrams worked together over the 17 sts and repeated? What happens with A.1B where you say work over the next 24 sts? As there are 8 sts in A.1B does this mean to repeat 3 times for the whole chart. Are all rows read from left to right? All wrong side rows are purl? Do you knit 3 sts at the beginning and end of all right side rows? That's so much for any help on this?

06.08.2024 - 13:34

Odpowiedź DROPS Design

Dear Mrs Hartley, you should only repeat A.1B part, this means work from RS: 3 sts in garter stitch, A.1A (-= 4 times), repeat A.1B until 8 sts remain (see number of repeats depending on number of sts), work the 5 last stitches A.1C and finish with 3 sts in garter stitch; from WS knit 3, purl until 3 sts remain and knit 3. Happy knitting!

07.08.2024 - 08:22

Marie Granhagen napisała:

I diagrammet jag stickar efter står det att jag ska börja fyra maskor in för min storlek. Ska jag göra det vid varje mönstersekvens/-rapport på varvet eller bara vid början av varje varv?

21.07.2024 - 19:04

Odpowiedź DROPS Design

Hei Marie. Står det noe spesifisert om 1. omgang / når du starter på diagrammet i den oppskriften du strikker etter? Som regl er det bare første gang. mvh DROPS Design

12.08.2024 - 08:21

Kaja Iversen napisała:

Skal jeg lese motsatt retning om jeg strikker venstrehendt?🥲😅

18.07.2024 - 23:34

Odpowiedź DROPS Design

Hei Kaja. Da følger du diagrammet fra fra venstre til høyre :) mvh DROPS Design

12.08.2024 - 08:18

Guillotin napisała:

Bonjour,\r\nJe commence le modèle Agnès en 11/12 ans.Je ne comprends pas le diagramme n°1: tricoter une maille A.1 au dessus de la maille suivante .Merci pour votre réponse . Cordialement

11.07.2024 - 15:43

Odpowiedź DROPS Design

Bonjour Mme Guillotin, le diagramme A.1 se tricote sur 1 maille (pour permettre au motif d'être symétrique), ainsi, vous allez simplement tricoter cette maille comme indiqué dans le diagramme A.1.. Bon tricot!

30.07.2024 - 09:09

Doris napisała:

Ich komme mit ihrer Beschreibung für die Vorderteile nicht zurecht. Verstehe es nicht.

05.07.2024 - 19:31

Odpowiedź DROPS Design

Liebe Doris, vielliecht könnnen Sie uns sagen, welches Modell Sie mal stricken? Oder einfach die Frage bei dem Modell stellen, so kann man Ihnen am besten helfen. Danke im voraus für Ihr Verständnis.

30.07.2024 - 09:06

Carmen napisała:

Las líneas de los diagramas muestran solo el derecho o muestran en una línea lado derecho y la línea siguiente lado izquierdo del tejido?

28.06.2024 - 04:51

Odpowiedź DROPS Design

Hola Carmen, a no ser de que se indique lo contrario en el texto muestra todas las filas del patrón (tanto por el lado derecho como por el lado revés) vistas por el lado derecho. Por lo tanto, las filas por el lado revés se leen en la dirección contraria y los símbolos también pueden tener significados opuestos. Por ejemplo, en las abreviaturas del diagrama te dirán: Trabajar de derecho por el lado derecho, de revés por el lado revés. Por lo tanto, según en qué fila esté el símbolo se trabaja de una u otra forma.

07.07.2024 - 22:06

Yvette napisała:

Bonjour j’essaye de faire le modèle Sweet Fall mais je ne comprends pas comment commencer avec le diagramme A1 car il est marqué qu’on commence sur un rang envers. Donc on commence a lire le diagramme de gauche à droite ? Et comment sait-on quels points seront à l’endroit et quels a l’envers ? Merci

26.06.2024 - 18:00

Odpowiedź DROPS Design

Bonjour Yvette, nous avons pu répondre à votre question posée sur la page du modèle, n'hésitez pas à nous dire si ce n'est toujours pas clair. Merci pour votre compréhension.

27.06.2024 - 09:03

Edith Pedersen napisała:

Hvad betyde det at man skal tage ind men i hver 2 rapport

21.06.2024 - 18:51

Odpowiedź DROPS Design

Hei Edith. Fint om du kan opplyse hvor i teksten til DROPS Lektioner, Læs en opskrift og Hvordan læses strikkediagrammer du er slik at vi kan gi et mer nøyaktig svar. Mener du tekst i en oppskrift, husk å oppgi DROPS nr og gjerne hvilken str. du strikker/hekler og hvor i oppskriften du er. mvh DROPS Design

24.06.2024 - 07:22

Lotte Kongsted napisała:

Hvordan får jeg mønstret til at passe, når jeg skal tage en maske ud, midt i mønstret (Little Missy).

20.06.2024 - 14:56

Odpowiedź DROPS Design

Hei Lotte. Er det Little Missy genser eller Little Missy jakke du strikker? Vi skal hjelpe deg så godt vi kan, men fint om du kan opplyse hvilken str strikker du (slik at vi kan se hvilket diagam du skal følge). Hvor i diagrammet er du / hvilken rad? Om du følger økningene i diagrammet, så skal det stemme. Bruk maskemarkører mellom hver rapport av diagrammet, så har du en bedre oversikt. mvh DROPS Design

24.06.2024 - 07:15

Maes napisała:

Bonjour,je souhaite faire le modèle 228-1,mais je ne comprends pas quand il est écrit tricoter A2 sur A1! Je comprends le graphique,prouvez vous m'aider car je suis bloqué. Merci à vous.

17.06.2024 - 10:52

Odpowiedź DROPS Design

Bonjour Mme Maes, lorsque vous avez terminé A.1, vous avez 10 m dans chaque A.1, vous tricotez maintenant simplement A.2 (=10 m au 1er rang) au lieu de chaque A.1. Bon tricot!

17.06.2024 - 15:31

Napisz komentarz lub pytanie do tej lekcji

Twój adres email nie będzie opublikowany. Pola obowiązkowe są oznaczone *.