
Looking for a yarn?


Comments / Questions (12)
![]() Michèle Lévis wrote:
Michèle Lévis wrote:
J'ai reçu un courriel de votre part me disant que j'avais une réponse à ma question mais elle n'y est pas. Quand la verrais-je affiché suite à ma question.
20.01.2025 - 13:48DROPS Design answered:
Bonjour Mme Lévis, elle devrait être maintenant visible ci-dessous. Bon tricot!
21.01.2025 - 09:54
![]() Michèle Lévis wrote:
Michèle Lévis wrote:
Je fais le modèle en XL j'ai bien mes 247 mailles mais le A2 - 4e rang après la flèche 7 ça n'arrive pas. J'ai séparé mes mailles pour les devants, dos et manches. J'ai vérifié et revérifié. Y aurait-il une erreur dans le patron. Jusqu'à maintenant tout allait très bien. Merci de me répondre le plus tôt possible. Bonne journée!
18.01.2025 - 17:38DROPS Design answered:
Bonjour Mme Lévis, après la division des manches, le motif A.2 ne tombe plus juste sur les côtés, c'est normal, tricotez simplement autant de mailles que possible pour chaque devant et pour le dos (y compris les mailles montées sous les manches: chacune moitié pour le devant, moitié pour le dos). Bon tricot!
20.01.2025 - 07:51
![]() Gunilla Stavenow wrote:
Gunilla Stavenow wrote:
Finns någon storleksguide där man ser bröstbild, hel längd etc. för olika storlekar?
02.10.2024 - 16:10DROPS Design answered:
Hej Gunilla. Du hittar en måttskiss med plaggets mått i cm i samtliga storlekar längst ner på mönstret. Mvh DROPS Design
03.10.2024 - 09:19
![]() Adrie Verdaasdonk wrote:
Adrie Verdaasdonk wrote:
Hoe kan je van halsdeelmarkeerder tot 30cm komen als je op die hoogte nog niet de juiste aantal steken voor je indeling armen en lijf komt? Je bent over de 30cm als je ter hoogte van de pijl 7 van A.2 patroon als je de juiste aantal steken hebt. Ik zie op de foto dat de indeling veel eerder zit dan wat uitgelegd is.
15.08.2023 - 12:23DROPS Design answered:
Dag Adrie,
Het model op de afbeelding heeft maat S aan. Als je een andere maat breit, kan de indeling ietsje anders zijn. Heb je de stekenverhouding gecontroleerd en kan het zijn dat je minder steken in de hoogte hebt op 10 cm, dan aangegeven bij de stekenverhouding in het patroon?
16.08.2023 - 19:23
![]() Evie wrote:
Evie wrote:
Hoe brei je patroon A3 heen en terug zonder elke keer een witte draad te moeten afknippen. De naturel steek zit nu steeds in de averechtse naald. Het begin van de natureldraad staat dan klaar voor de rechte naald, maar in het patroon staat de naturelsteek voor de averechtse naald. Dan moet je dus steeds de draad afknippen om verder te kunnen, of lees ik het verkeerd?
11.01.2023 - 09:51DROPS Design answered:
Dag Evie,
De draad die je niet gebruikt kun je inderdaad meenemen, ook op een averechte naald. Dit kun je doen door afwisselen de rechter naald boven en onder de niet gebruikte draad te steken. In deze video kun je ook een beetje zien hoe dat werkt (hoewel er in deze video ook gebreid wordt met de andere draad.
12.01.2023 - 20:08
![]() Andreas wrote:
Andreas wrote:
Hello. I am making the XL size, but I made it longer. From the end of neck until the end down measures 80cm. Is there a specific formula to count the stitches I have to pick up for the side bands? For example , 1 stitch for every horizontal row? or something else?
14.11.2022 - 09:28DROPS Design answered:
Dear Andreas, this video shows how to pick up sts along the sides - but since you will work here ribbing K2, P2, you might require more sts - it might be wise to make first a small swatch with ribbing edge and then calculate how many stitches you require to avoid rib to tighten piece. Happy knitting!
14.11.2022 - 10:29
![]() Yvonne Havelaar wrote:
Yvonne Havelaar wrote:
Hallo, ik ben de Scandinavische vest voor mijn aan het breien. Ik heb de hals en de pas nu gebreid en kom nu op het punt van de mouwgaten, maar ik kom veelste veel steken te kort. Dus mijn vraag is nu zijn de patronen alleen heen gaan getekend of ook teruggaan? Nu brei ik ze alleen heengaand en dan terug zoals ze zich voordoen.
01.06.2022 - 12:24DROPS Design answered:
Dag Yvonne,
In de telpatronen zijn alle steken aangegeven, dus zowel van de heengaande als de teruggaande naald.
04.06.2022 - 21:56
![]() Connie Enghoff wrote:
Connie Enghoff wrote:
Hej, Jeg har strikket hele cardigan 219-13 og skal til forkanter. Min mand prøver den da det er en herretrøje. Men knaphuller er i den forkerte side. Dette kan jeg ikke ændre da der er lavet et knaphul i halskanten. Det står meget tydeligt at knaphuller skal være i højre side. ??? Er det ikke en fejl? Meget ærgerligt da det er en model til min forretning!
26.11.2021 - 09:01DROPS Design answered:
Hej Connie, det kan jeg godt se. Knaphullet er også på højre side på billedet. Det er samme model som 217-9 til dame, så det må være derfor.
29.11.2021 - 14:53
![]() Anita wrote:
Anita wrote:
Auf den Bildern ist der Kragen länger als 3 cm, wie in der Beschreibung angeben. Scheint auch eine Reihe dazwischen gestrickt zu sein. Jedenfalls passt die Beschreibung nicht zum Bild.können Sue mir da helfen. Danke.
17.10.2021 - 13:54DROPS Design answered:
Liebe Anita, oh ja stimmt, es git ein Typo in die deutsche Anleitung, Rippenmuser beim kragen soll 5 cm sein - Korrektur erfolgt. Danke für den Hinweis. Viel Spaß beim stricken!
18.10.2021 - 09:11
![]() Martin wrote:
Martin wrote:
Bei "Material" ist von 8 Knöpfen für XL-XXL-XXXL die Rede. Nun soll in der Halsblende ein Knopfloch gemacht werden, in der rechten Blende sollen noch 8 Knopflöcher gemacht werden, insgesamt also 9 Knopflöcher. Auf den Fotos (vmtl Größe M) sehe ich nur 7 Knöpfe. Ich vermute, dass die Anleitung im Bereich "rechte Blende" fehlerhaft ist (ein Knopfloch zu viel) - können Sie dies bestätigen, bzw. mir die korrekte Anzahl an Knöpfen für Größe XXL nennen? Vielen Dank!
09.10.2021 - 15:56DROPS Design answered:
Lieber Martin, danke für den Hinweis, unser Designteam wird die Knopflöcher mal prüfen.
11.10.2021 - 07:24
|
|||||||||||||
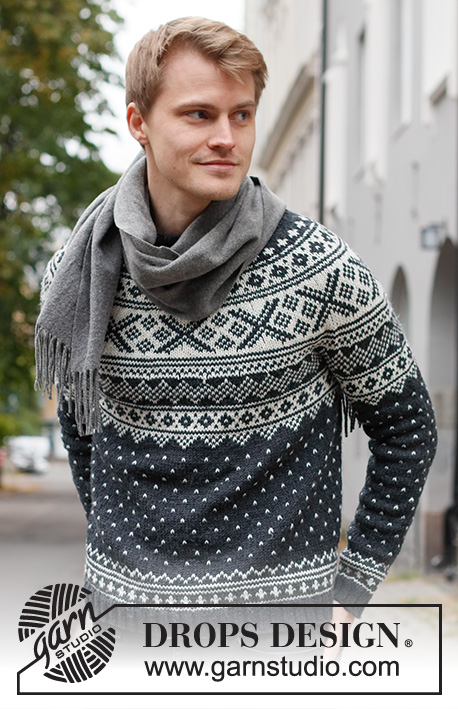
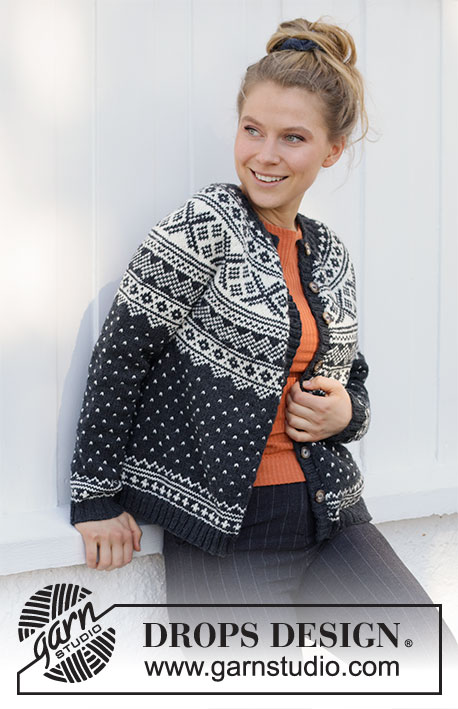
Winter's Night Enchantment Jacket#wintersnightenchantmentjacket |
|||||||||||||
 |
 |
||||||||||||
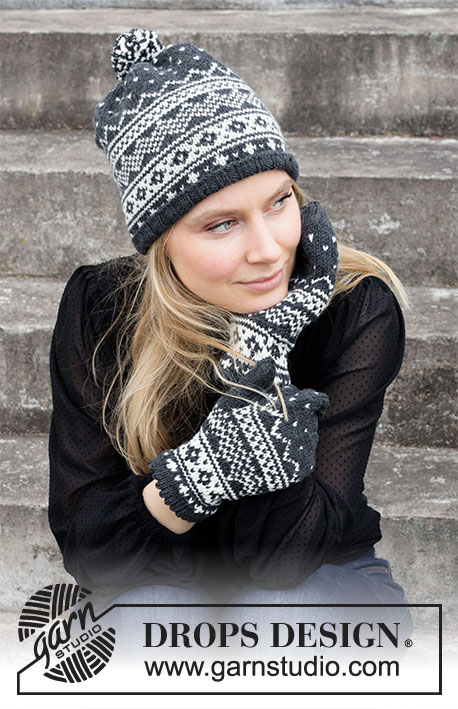
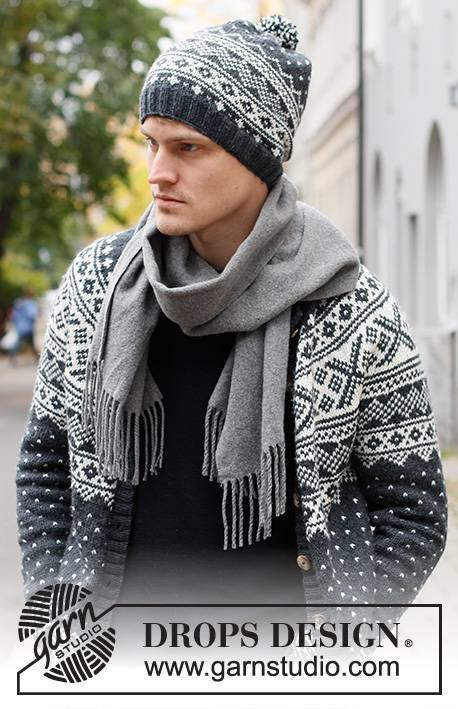
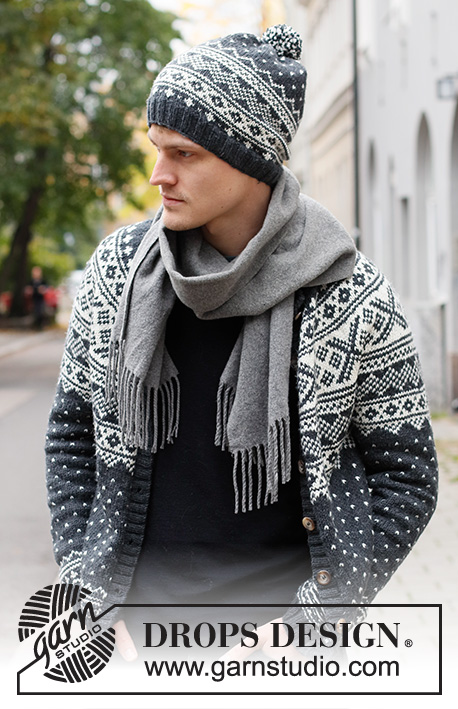
Knitted jacket for men in DROPS Karisma. The piece is worked top down with round yoke and Nordic pattern. Sizes S - XXXL.
DROPS 219-13 |
|||||||||||||
|
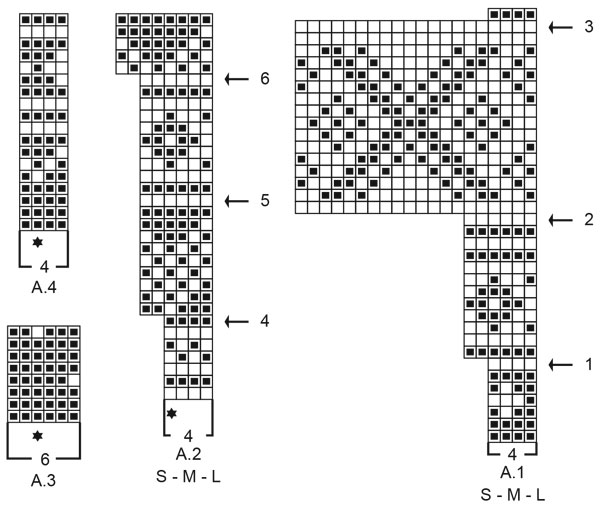
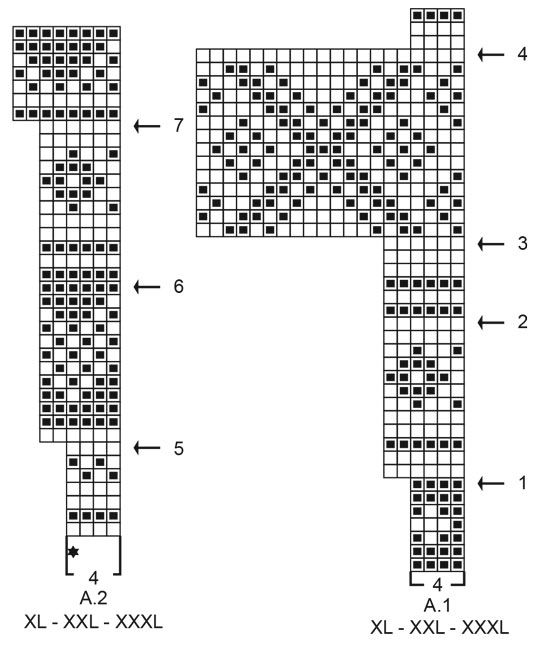
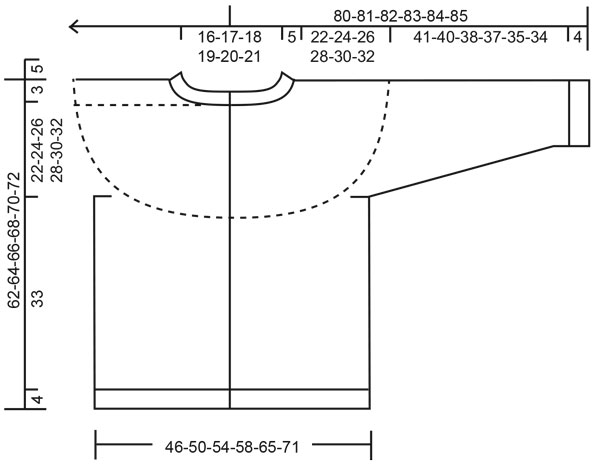
------------------------------------------------------- EXPLANATIONS FOR THE PATTERN: ------------------------------------------------------- RIDGE/GARTER STITCH (worked back and forth): Knit all rows. 1 ridge in height = Knit 2 rows. INCREASE/DECREASE TIP (evenly spaced): To work out how to increase/decrease evenly, count the total number of stitches on needle (e.g. 104 stitches), minus edge + band stitches (e.g. 2 + 10 stitches) and divide the remaining stitches by the number of increases/decreases to be made (e.g. 29) = 3.2. In this example, increase by making 1 yarn over after approx. each 3rd stitch (do not increase over the edge stitches). On the next row work the yarn overs twisted to avoid holes. When decreasing, knit together approx. each 2nd and 3rd stitch (do not decrease over the edge stitches). ELEVATION (back of neck): To make the back of the neck slightly higher when working the yoke, you can work an elevation as described here. Skip this section if you do not want an elevation. Insert 1 marker in the middle stitch on the row. Start from the right side with anthracite and knit 12-13-14-15-15-16 stitches past the marker-stitch, turn, tighten strand and purl 25-27-29-31-31-33 stitches back. Turn, tighten strand and knit 37-40-43-46-46-49 stitches, turn, tighten strand and purl 49-53-57-61-61-65 stitches back. Turn, tighten strand and knit 61-66-71-76-76-81 stitches, turn, tighten strand and purl 73-79-85-91-91-97 stitches back. Turn, tighten the strand and knit to end of row (band worked in garter stitch). Work 1 row from the wrong side. Then work YOKE as described in the text. PATTERN: See diagrams A.1 to A.4. Choose diagram for your size (applies to A.1 and A.2). The whole pattern is worked in stockinette stitch. KNITTING TIP: To avoid the knitting gauge becoming tighter when working pattern it is important that the strands at the back are not tight. Use a size larger needle when working pattern if this is a problem. If the knitting gauge is too tight in height, the garment will be short and the armholes too small – you can correct this by regularly working an extra row in the one-colored sections. If your work is loose, the garment will be too long and the armholes too big – you can correct this by regularly working one less row in the one-colored sections. DECREASE TIP (for sleeves): Decrease 2 stitches mid-under the sleeve as follows: S: Work until there are 2 stitches left before the marker under the sleeve, knit 2 together with anthracite, marker, knit 2 twisted together with anthracite (= 2 stitches decreased). M, L, XL, XXL and XXXL: Work until there are 2 stitches left before the marker-stitch under the sleeve, knit 2 together with anthracite, knit the marker stitch with anthracite and knit 2 twisted together with anthracite (= 2 stitches decreased). BUTTONHOLE ON NECK: When the neck measures 2 cm = ¾", work 1 buttonhole on the right-hand side (when the garment is worn). Work from the right side when there are 5 stitches left as follows: 1 yarn over, purl 2 together, knit 2 and finish with 1 edge stitch in garter stitch. On the next row (wrong side) knit the yarn over to leave a hole. BINDING-OFF TIP: To avoid the bind-off edge being tight you can bind off with a larger size needle. If the edge is still tight, make 1 yarn over after approx. each 4th stitch at the same time as binding off; the yarn overs are bind off as normal stitches. ------------------------------------------------------- START THE PIECE HERE: ------------------------------------------------------- JACKET – SHORT OVERVIEW OF THE PIECE. The neck and yoke are worked back and forth with circular needle, from mid front and top down. The yoke is divided for body and sleeves and the body continued back and forth with circular needle. The sleeves are worked in the round with double pointed needles/short circular needle, top down. The bands are worked at the end. NECK: Cast on 104-108-112-116-120-124 stitches (including 6 band stitches on each side towards mid front) with circular needle size 3 mm = US 2,5 and anthracite. Purl 1 row (= wrong side). The next row is worked as follows from the right side: 1 edge stitch in GARTER STITCH – read description above, * knit 2, purl 2 *, work from *-* until there are 3 stitches left on the row, knit 2 and finish with 1 edge stitch in garter stitch. Continue this rib for 5 cm = 2" – remember the BUTTONHOLE on the right-hand side – read description above. Change to circular needle size 4 mm = US 6. The next row is worked as follows from the right side: Bind off the first 6 stitches (the band is sewn on here later), make 1 yarn over, knit 92-96-100-104-108-112 AT THE SAME TIME as you increase 29-29-33-33-37-41 stitches evenly over these stitches – read INCREASE/DECREASE TIP, work rib as before over the next 5 stitches and finish with 1 edge stitch in garter stitch. Turn and bind off the first 6 stitches, make 1 yarn over (on next row, knit yarn over twisted to avoid hole) and purl the rest of the stitches, apart from the yarn overs which are purled twisted (avoid holes) and edge stitches (the outermost stitch on each side of the piece) which are worked in garter stitch = 123-127-135-139-147-155 stitches. Insert 1 marker after the edge stitch at the beginning of the row; the yoke is measured from this marker! Now you can work an ELEVATION at the back of the neck – read description above. If you do not want an elevation, go straight to YOKE. YOKE: Work 0-0-2-2-4-6 rows of stockinette stitch with anthracite and 1 edge stitch in garter stitch on each side. Read KNITTING TIP and work the next row from the right side as follows: 1 edge stitch in garter stitch, work A.1 until there are 2 stitches left (= 30-31-33-34-36-38 repeats of 4 stitches), work the first stitch in A.1 (so the pattern matches on both front pieces) and finish with 1 edge stitch in garter stitch. Continue this pattern. When A.1 has been completed in height, work A.2 in the same way. REMEMBER THE KNITTING GAUGE! AT THE SAME TIME, on each row marked with an arrow in A.1 and A.2, increase as described below – remember INCREASE/DECREASE TIP: SIZES S, M and L: Arrow-1: Increase 36-38-42 stitches evenly spaced = 159-165-177 stitches (there is now room for 26-27-29 repeats of 6 stitches). Arrow-2: Increase 64-58-66 stitches evenly spaced = 223-223-243 stitches (there is now room for 11-11-12 repeats of 20 stitches). Arrow-3: Increase 32-40-36 stitches evenly spaced = 255-263-279 stitches (there is now room for 63-65-69 repeats of 4 stitches). Arrow-4: Increase 30-34-36 stitches evenly spaced = 285-297-315 stitches (there is now room for 47-49-52 repeats of 6 stitches). Arrow-5: Increase 24-30-36 stitches evenly spaced = 309-327-351 stitches (there is now room for 51-54-58 repeats of 6 stitches). Arrow-6 (only in sizes M and L, because in S the piece is divided for the body and sleeves before this section starts): Increase 4-4 stitches evenly spaced = 309-331-355 stitches (there is now room for 41-44 repeats of 8 stitches in sizes M and L). SIZES XL, XXL and XXXL: Arrow-1: Increase 44-48-52 stitches evenly spaced = 183-195-207 stitches (there is now room for 30-32-34 repeats of 6 stitches). Arrow-2: Increase 42-48-54 stitches evenly spaced = 225-243-261 stitches (there is now room for 37-40-43 repeats of 6 stitches). Arrow-3: Increase 18-20-22 stitches evenly spaced = 243-263-283 stitches (there is now room for 12-13-14 repeats of 20 stitches). Arrow-4: Increase 60-64-68 stitches evenly spaced = 303-327-351 stitches (there is now room for 75-81-87 repeats of 4 stitches). Arrow-5: Increase 54-54-60 stitches evenly spaced = 357-381-411 stitches (there is now room for 59-63-68 repeats of 6 stitches). Arrow-6: Increase 30-30-30 stitches evenly spaced = 387-411-441 stitches (there is now room for 64-68-73 repeats of 6 stitches). Arrow-7: Increase 8-8-10 stitches evenly spaced = 395-419-451 stitches (there is now room for 49-52-56 repeats of 8 stitches. ALL SIZES: Continue working until the piece measures 22-24-26-28-30-32 cm = 8¾"-9½"-10¼"-11"-11¾"-12½" from the marker on the neck. NOTE: In some sizes there will be a number of rows left in A.2 when you divide for the body and sleeves – the rest of A.2 will be worked on the body and sleeves. Now divide for the body and sleeves as follows: Work 46-50-53-58-64-70 stitches as before (= front piece), place the next 63-66-72-82-82-86 stitches on 1 thread for the sleeve, cast on 6-6-8-8-10-10 new stitches on the needle (= in side under sleeve), work 91-99-105-115-127-139 stitches as before (= back piece), place the next 63-66-72-82-82-86 stitches on 1 thread for the sleeve, cast on 6-6-8-8-10-10 new stitches on the needle (= in side under sleeve) and work the remaining 46-50-53-58-64-70 stitches as before (= front piece). Body and sleeves are finished separately. THE PIECE IS NOW MEASURED FROM HERE! BODY: = 195-211-227-247-275-299 stitches. Finish A.2 with 1 edge stitch in garter stitch on each side – make sure the pattern matches the A.2 on the yoke, but be aware that the pattern does not fit under the sleeves in all sizes when working the last rows in A.2. When A.2 has been completed, work from the right side as follows: 1 edge stitch in garter stitch, work A.3 until there are 2 stitches left on the row, increasing at the same time 0-2-4-2-4-4 stitches evenly over these stitches, work the first stitch in A.3 (so the pattern matches on both front pieces) and finish with 1 edge stitch in garter stitch = 195-213-231-249-279-303 stitches. There is now room for 32-35-38-41-46-50 repeats of A.3 with 6 stitches. Repeat A.3 in height until the piece measures approx. 27 cm = 10⅝" from the division in all sizes, finishing after a row with «spots». There is approx. 10 cm = 4" left to finished length; try the jacket on and continue A.3 to desired length. The next row is worked as follows from the wrong side: 1 edge stitch in garter stitch, work the first stitch in A.4 (seen from the right side), work A.4 until there is 1 stitch left on the row (the diagram is read from left to right when working from the wrong side) and decrease at the same time 0-2-4-2-4-4 stitches evenly over these stitches, finish with 1 edge stitch in garter stitch = 195-211-227-247-275-299 stitches. There is now room for 48-52-56-61-68-74 repeats of A.4 with 4 stitches. When A.4 has been completed, the piece measures approx. 33 cm =13" from the division. The body is finished with anthracite. Purl 1 row from the wrong side where you increase 41-45-45-49-57-61 stitches evenly spaced = 236-256-272-296-332-360 stitches; this is done to avoid the rib being tight. Change to circular needle size 3 mm = US 2,5 and work the first row from the right side as follows: 1 edge stitch in garter stitch, * knit 2, purl 2 *, work from *-* until there are 3 stitches left, knit 2 and finish with 1 edge stitch in garter stitch. Continue this rib for 4 cm = 1½". Bind off with garter stitch over garter stitch, knit over knit and purl over purl – read BINDING-OFF TIP! The jacket measures approx. 62-64-66-68-70-72 cm = 24⅜"-25¼"-26"-26¾"-27½"-28⅜" from the shoulder down. SLEEVE: Place the 63-66-72-82-82-86 stitches from the thread on the one side of the piece on double pointed needles/short circular needle size 4 mm = US 6 and knit up 1 stitch in each of the 6-6-8-8-10-10 stitches cast on under the sleeve = 69-72-80-90-92-96 stitches. Insert 2 markers in the piece without working the stitches: S: Insert 1 marker mid-under the sleeve in the middle of the middle 6 stitches, count 34 stitches, insert 1 marker in the next stitch = 34 stitches left to end of round. M, L, XL, XXL and XXXL: Start mid-under the sleeve, between in the middle of the 6-8-8-10-10 stitches, insert 1 marker in the first stitch after the middle, count 35-39-44-45-47 stitches, insert 1 marker in the next stitch = 35-39-44-45-47 stitches left to end of round. ALL SIZES: Allow the markers to follow your work onwards; the marker under the sleeve is used when decreasing under the sleeve. The marker on top is when positioning the start of the pattern. Continue with PATTERN at the same time as you DECREASE mid-under the sleeve as described below – read the rest of the sleeve section before continuing: PATTERN: Start the round mid-under the sleeve and finish A.2 in the same way as on the body; count from the marker on top of the sleeve to the start of the pattern – the marker-stitch matches the stitch with the star in A.2 (decrease under the sleeve at the same time as you work the pattern). When A.2 has been completed, work A.3 in the round in the same way. Repeat A.3 in height until the sleeve measures approx. 35-34-32-31-29-28 cm = 13¾"-13⅜"-12½"-12¼"-11⅜"-11" from the division, finishing after a round of "spots". NOTE: Shorter measurements in larger sizes due to wider neck and longer yoke. There is approx. 10 cm = 4" left to finished length; try the jacket on and continue A.3 to desired length. Then work A.4 in the round. DECREASING: At the same time, when the sleeve measures 3 cm = 1⅛" from the division in all sizes, decrease 2 stitches mid-under the sleeve – read DECREASE TIP. Decrease like this every 4-3½-2½-2-1½-1½ cm = 1½"-1¼"-1"-¾"-½"-½" a total of 9-10-13-17-18-19 times = 51-52-54-56-56-58 stitches. When A.4 has been completed and the decreases are finished, the sleeve measures approx. 41-40-38-37-35-34 cm = 16⅛"-15¾"-15"-14½"-13¾"-13⅜" from the division. Continue with anthracite. Knit 1 round where you increase 9-8-10-8-8-10 stitches evenly spaced = 60-60-64-64-64-68 stitches. Change to double pointed needles size 3 mm = US 2,5 and work rib (knit 2, purl 2) for 4 cm = 1½". Bind off with knit over knit and purl over purl – remember BINDING-OFF TIP. The sleeve measures approx. 45-44-42-41-39-38 cm = 17¾"-17¼"-16½"-16⅛"-15¼"-15" from the division. Work the other sleeve in the same way. LEFT BAND (when the garment is worn): Knit up from the right side, inside the 1 edge stitch, approx. 148-156-160-164-168-172 stitches along the front piece, using circular needle size 3 mm = US 2,5 and anthracite (number of stitches divisible by 4). The first row is worked as follows from the wrong side: 1 edge stitch in garter stitch, * purl 2, knit 2 *, work from *-* until there are 3 stitches left, purl 2 and finish with 1 edge stitch in garter stitch. Continue this rib for 3 cm = 1⅛" – adjust so the width of the band is the same as the width of the bind-off stitches on the neck. Bind off with garter stitch over garter stitch, knit over knit and purl over purl. RIGHT BAND: Work in the same way as the left band, but after 1 = ⅜" to 1½ cm = ½" work 7-7-7-8-8-8 buttonholes evenly spaced. The bottom buttonhole is worked 8 cm = 3⅛" from the bottom edge, the top buttonhole 7-7-7-8-8-8 cm = 2¾"-2¾"-2¾"-3⅛"-3⅛"-3⅛" from the buttonhole on the neck. NOTE: It is neatest to work the buttonholes in purled sections (seen from the right side) by making 1 yarn over, then purling 2 together. On the next row knit the yarn overs to leave a hole. ASSEMBLY: Sew the top edge of both bands neatly to the neck inside the 1 edge stitch, with the seam to the wrong side. Sew the buttons onto the left band. |
|||||||||||||
Diagram explanations |
|||||||||||||
|
|||||||||||||
|
|||||||||||||
|
|||||||||||||
|
|||||||||||||
Have you finished this pattern?Tag your pictures with #dropspattern #wintersnightenchantmentjacket or submit them to the #dropsfan gallery. Do you need help with this pattern?You'll find 33 tutorial videos, a Comments/Questions area and more by visiting the pattern on garnstudio.com. © 1982-2025 DROPS Design A/S. We reserve all rights. This document, including all its sub-sections, has copyrights. Read more about what you can do with our patterns at the bottom of each pattern on our site. |
|||||||||||||


With over 40 years in knitting and crochet design, DROPS Design offers one of the most extensive collections of free patterns on the internet - translated to 17 languages. As of today we count 314 catalogs and 11821 patterns - 11811 of which are translated into English (US/in).
We work hard to bring you the best knitting and crochet have to offer, inspiration and advice as well as great quality yarns at incredible prices! Would you like to use our patterns for other than personal use? You can read what you are allowed to do in the Copyright text at the bottom of all our patterns. Happy crafting!
Post a comment to pattern DROPS 219-13
We would love to hear what you have to say about this pattern!
If you want to leave a question, please make sure you select the correct category in the form below, to speed up the answering process. Required fields are marked *.