
Looking for a yarn?


Comments / Questions (184)
![]() Bonnie Joffe wrote:
Bonnie Joffe wrote:
Thank you for your answer. One more question… Is everything connected at this point and you're just casting on to complete the piece as instructed i.e. front panels, and sleeves?
30.04.2025 - 16:13DROPS Design answered:
Dear Mrs Joffe, when you have joined legs together you work first body back and forth from the mid front then you will work each part separately, first right front piece casting on new stitches for sleeve at every end of row from right side and shaping neck on the other side, then work back piece casting on new stitches for sleeves at the end of each row on each side; then left front piece casting on new stitches for sleeve at the end of each row from wrong side for sleeve and shaping neck on the other side. Finally you'll pick up stitches round neck to work hood. Happy knitting!
02.05.2025 - 07:57
![]() Bonnie Joffe wrote:
Bonnie Joffe wrote:
Hi, I am a bit confused about the legs. When I put the 2 on one needle and cast on the 3 and 4 stitches, should I be knitting the legs together as I move onto the next row or do they remain separated? I am at the start of the body and when it says to separate the sides, I am not sure what this means if the legs are already knitted together. thx!
30.04.2025 - 14:43DROPS Design answered:
Dear Mrs Joffe, body is worked back and forth from mid front starting from the right side with the right leg and ending with the left leg. The new stitches cast on towards mid back should be in the middle of the row. Then you will divde piece in 3 to work front pieces and back piece separately as new stitches will be cast on at the side for sleeves. Happy knitting!
30.04.2025 - 15:51
![]() Kelly Falzon wrote:
Kelly Falzon wrote:
Is this knit flat or join in the round?
12.04.2025 - 01:11DROPS Design answered:
Hi Kelly Falzon! It is knit flat and sewn together later. Happy knitting!
12.04.2025 - 18:06
![]() Annalena wrote:
Annalena wrote:
Hittar inte hur många nystan som behövs till denna sparkdräkt.
05.04.2025 - 05:56
![]() Marie Claude Jalabert wrote:
Marie Claude Jalabert wrote:
Bonjour Quand je reprends les 2 jambes sur la même aiguille je me retrouve à la jonction des 2 jambes (milieu dos)avec 4 mailles endroit à la suite si je veux qu'ensuite le point fantaisie continue comme avant. Est ce normal? Merci de votre aide.😊 J'ai commencé par
07.03.2025 - 11:54DROPS Design answered:
Bonjour Mme Jalabert, vous avez normalement 2 x 3-5-7 mailles montées côté milieu dos, ces mailles vont permettre de tricoter le point fantaisie sur toutes les mailles, sans interruption. - notez que les mailles lisières doivent avoir été rabattues. Bon tricot!
07.03.2025 - 14:01
![]() Jacotte40 wrote:
Jacotte40 wrote:
Modèle et qualité de laine super sympa à travailler. Seul petit bémol, je trouve que la longueur des jambes est disproportionnée par rapport à l'ensemble.
26.02.2025 - 04:28
![]() Kenny wrote:
Kenny wrote:
Hei,strikker str 1/3 mnd. Forstår ikke helt hvor mange ganger det skal felles ved hals,jeg felte som beskrevet på første pinne og fikk maske antall 53 som stemmer,skal jeg ikke felle flere ganger da?
23.02.2025 - 13:26
![]() Annika wrote:
Annika wrote:
Blir inte klok på hur långa benen ska bli i storlek 0/1
15.10.2024 - 21:20DROPS Design answered:
Hej Annika. Du stickar benen tills de mäter 12 cm från uppläggningskanten. När du är färdig med dressen sen så viker du upp benen nederst så de blir då ca 9 cm.
17.10.2024 - 11:15
![]() Gudrun wrote:
Gudrun wrote:
Nachdem dieser süße Einteiler mein 1. Werk nach 35 Jahren ist, kann ich sagen, dass es zwar ein ein bisschen gebraucht hat, die Anleitung zu interpretieren, aber es ist alles sehr gut beschrieben und der Einteiler ist wirklich sehr hübsch geworden. Die Videos waren schon sehr wichtig ;)
20.09.2024 - 11:26
![]() Aisha wrote:
Aisha wrote:
Hi thank you so much for your reply. Does that mean that the right sleeve is worked first? Or would that become the left sleeve since when we invert the work so that the right side is shown on the outside. When I’m making the sleeve, its being stitched towards the back as opposed to the side so I’m unsure how it all comes together in the end.
02.09.2024 - 10:28DROPS Design answered:
Dear Aisha, after dividing piece you will first work the right front piece, adding the new stitches for sleeves at the end of the rows from RS, work neckline (slip first sts on a thread, used later for hood then cast off sts at the beg of every row from RS = from neck); then cast off for shoulder the stis for sleeve/shoulder. Then work back piece casting on new sts for sleeve at the end of row from RS (= left sleeve) and from WS (= right sleeve), work to the neck, cast off middle stitches for neck and finish each shoulder separately. Then work left front piece casting off the new sts for sleeve at the end of row from WS (mirrored to right front piece). Happy knitting!
03.09.2024 - 09:19
|
|||||||
Truly Wooly#trulywoolyonesie |
|||||||
 |
 |
||||||
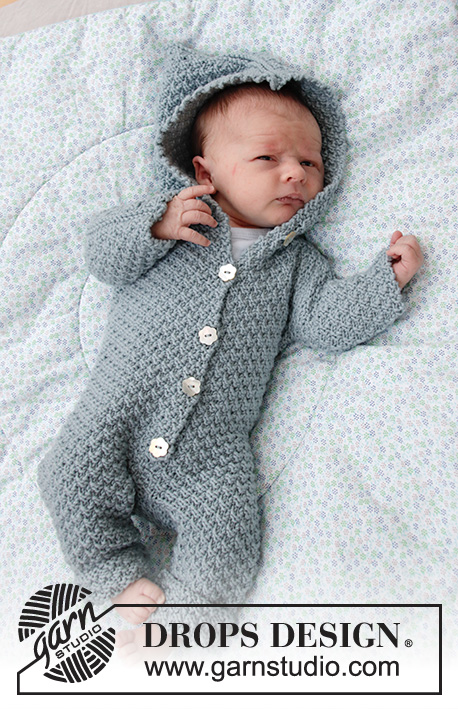
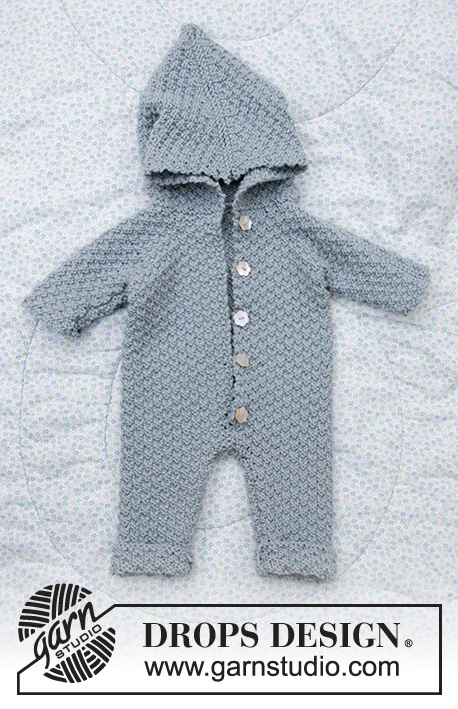
Knitted suit for baby in DROPS Merino Extra Fine. Piece is knitted with textured pattern and hood. Size premature - 4 years
DROPS Baby 33-8 |
|||||||
|
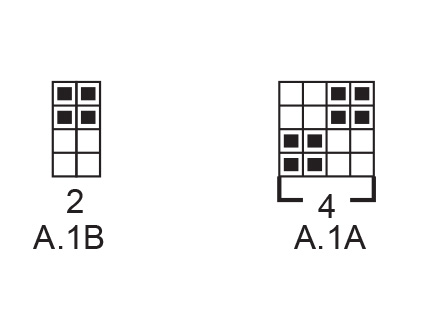
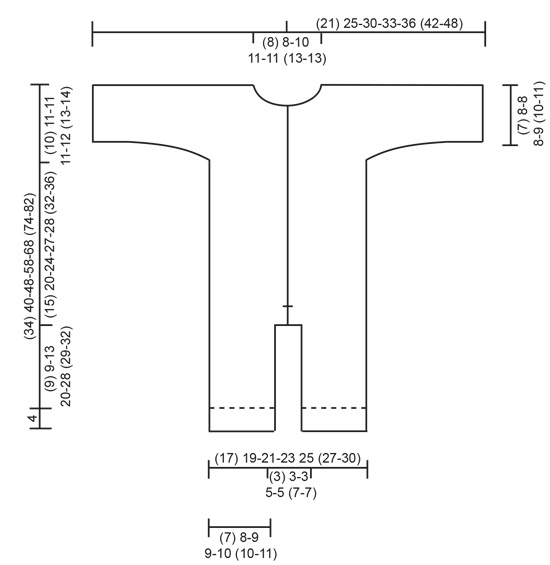
---------------------------------------------------------- EXPLANATION FOR THE PATTERN: ---------------------------------------------------------- GARTER STITCH (back and forth): 1 ridge = knit 2 rows. 1 edge stitch in garter stitch = knit stitch from right side and knit stitch from wrong side. PATTERN: See diagram A.1. Diagrams show all rows in pattern seen from the right side. INCREASE TIP-1 (applies to legs in size 3/4 years): Increase 1 stitch inside 1 edge stitch in garter stitch by making 1 yarn over. On next row work yarn overs twisted to avoid holes. Work the increased stitches in A.1. INCREASE TIP-2 (evenly): To calculate how to increase evenly, use the total number of stitches on row (e.g. 44 stitches) and divide stitches by number of increases to be done (e.g. 14) = 3.1. In this example increase by making 1 yarn over after approx. every 3rd stitch. On next row knit yarn overs twisted to avoid holes. BUTTONHOLES (bottom up): Decrease for buttonholes on right band. 1 BUTTONHOLE = knit third and fourth stitch from edge together and make 1 yarn over. On next row purl or knit yarn over (depending on where in the diagram you are) to make holes. Decrease for buttonholes when piece measures (measured from where legs where put together): (<0): 5, 10, 15 and 20 cm = 2", 4", 6" and 8" 0/1 months: 6, 11, 16, 21 and 26 cm = 2⅜",4⅜", 8¼" and 10¼" 1/3 months: 5, 10, 15, 20, 25 and 30 cm = 2", 4", 6", 8", 9¾" and 11¾" . 6/9 months: 6, 12, 17, 22, 27 and 32 cm = 2⅜", 4¾", 6¾", 8¾", 10⅝" and 12½". 12/18 months: 6, 12, 17, 23, 28 and 34 cm = 2⅜", 4¾", 6¾", 9", 13⅜". 2 years: 9, 15, 21, 27, 33 and 39 cm = 3½", 6", 8¼", 9½", 10⅝" and 15¼". 3/4 years: 7, 13, 19, 25, 31, 37 and 43 cm = 2¾", 5⅛", 7½", 9¾", 12¼", 14½" and 17" ---------------------------------------------------------- START THE PIECE HERE: ---------------------------------------------------------- SUIT - SHORT OVERVIEW OF THE PIECE: Work each leg back and forth on circular needle, bottom up. Place legs together and work back and forth on circular needle from mid front up to sleeves. Then cast on new stitches for sleeves in each side and finish front pieces and back piece separately. Sew piece together on the shoulder. Finish by picking up stitches around the neck and work a hood. RIGHT LEG (when suit is worn): Cast on (32) 36-40-40-44 (44-48) stitches on circular needle size 4 mm = US 6 with Merino Extra Fine. Work first row as follows from right side: 1 edge stitch in GARTER STITCH – read explanation above, work A.1A until 3 stitches remain on row (= 7-8-9-9-10 (10-11) repetitions of 4 stitches), work A.1B (= 2 stitches) and finish with 1 edge stitch in garter stitch. Continue pattern like this. REMEMBER THE KNITTING GAUGE! When piece measures 4 cm = 1½", insert 1 marker in piece (marks fold). When piece measures 14 cm = 5½" (only applies to size 3/4 years) increase 1 stitch in each side – read INCREASE TIP-1 (do not increase in the other sizes). Repeat increase in size 3/4 years when piece measures 24 cm = 9½" = (32) 36-40-40-44 (44-52) stitches on needle. Work until piece measures (12) 12-16-23-31 (32-35) cm = (4¾") 4¾"-6¼"-9"-12¼" (12½"-12¾") from cast-on edge, adjust so that next row is worked from right side. Bind off 1 stitch at beginning of the next 2 rows (i.e. bind off edge stitches) = (30) 34-38-38-42 (42-50) stitches. Then work the next 2 rows as follows, begin from right side: Work as before over all stitches and cast on (3) 3-3-5-5 (7-7) new stitches at the end of row (= mid back). Turn piece, work A.1 as before over all stitches, but make sure to continue pattern correctly, then cast on (4) 4-4-6-6 (8-8) stitches at the end of row from wrong side (= mid front). There are now (37) 41-45-49-53 (57-65) stitches on needle and piece measures approx. (13) 13-17-24-32 (33-36) cm = (5⅛") 5⅛"-6¾"-9½"-12½" (13"-14¼") from cast-on edge. Put piece aside and work left leg as explained below. LEFT LEG (when suit is worn): Cast on (32) 36-40-40-44 (44-48) stitches on circular needle size 4 mm = US 6 and work first row as follows from right side: 1 edge stitch in garter stitch, work A.1A until 3 stitches remain on row (= 7-8-9-9-10 (10-11) repetitions of 4 stitches), work A.1B (= 2 stitches) and finish with 1 edge stitch in garter stitch. Continue pattern like this. When piece measures 4 cm = 1½", insert 1 marker in piece (marks fold). When piece measures 14 cm = 5½" (only applies to size 3/4 years) increase 1 stitch in each side – remember INCREASE TIP-1 (do not increase in the other sizes). Repeat increase in size 3/4 years when piece measures 24 cm = 9½" = (32) 36-40-40-44 (44-52) stitches on needle. Work until piece measures (12) 12-16-23-31 (32-35) cm = (4¾") 4¾"-6¼"-9"-12¼" (12½"-12¾") from cast-on edge, adjust so that next row is worked from right side. Bind off 1 stitch at beginning of the next 2 rows (i.e. bind off edge stitches) = (30) 34-38-38-42 (42-50) stitches. Then work the next 2 rows as follows, begin from right side: Work as before over all stitches and cast on (4) 4-4-6-6 (8-8) new stitches at the end of row (= mid front). Turn piece, work A.1 as before over all stitches, but make sure to continue pattern correctly, then cast on (3) 3-3-5-5 (7-7) stitches at the end of row from wrong side (= mid back). There are now (37) 41-45-49-53 (57-65) stitches on needle and piece measures approx. (13) 13-17-24-32 (33-36) cm = (5⅛") 5⅛"-6¾"-9½"-12½" (13"-14¼") from cast-on edge. Cut the yarn. Now place the parts together as explained below. BODY: Place right leg and left leg on same circular needle with right leg first. Begin from right side on right leg, work 1 edge stitch in garter stitch, continue A.1 as before over the remaining stitches on right leg (make sure to continue pattern correct according to finish on leg), then continue pattern over the first (36) 40-44-48-52 (56-64) stitches on left leg (make sure to continue pattern correct) and finish with 1 edge stitch in garter stitch = (74) 82-90-98-106 (114-130) stitches on needle. Insert another marker in piece! NOW MEASURE PIECE FROM THIS MARKER! Continue A.1 back and forth with 1 edge stitch in garter stitch in each side towards mid front. When piece measures (3) 3-3-3-4 (5-5) cm = (1⅛") 1⅛"-1⅛"-1⅛"-1½" (2"-2") from marker (adjust to work next row from right side) bind off 1 stitch at beginning of the next 2 rows (i.e. bind off edge stitches). Then work the next 2 rows as follows, begin from right side: Work as before over all stitches and cast on 3 new stitches at the end of row (= left band at the front). Turn piece, work A.1 as before over all stitches (make sure to continue pattern correctly) and cast on 3 new stitches at the end of row from wrong side (= right band at the front). There are now (78) 86-94-102-110 (118-134) stitches on needle. Continue A.1 back and forth over all stitches (i.e. do not work edge stitches in garter stitch). Remember BUTTONHOLES on right band - read explanation above. When piece measures (15) 20-24-27-28 (32-36) cm = (6") 8"-9½"-10⅝"-11" (12½"-12¼") from the new marker, i.e. (28) 33-41-51-60 (65-72) cm = (11") 12"-16⅛"-20"-23⅝" (25½"-28¾") from cast-on edge, divide the piece in each side. Finish front pieces and back piece separately as explained below. RIGHT FRONT PIECE: Begin from right side and work as before over the first (21) 23-25-27-29 (31-35) stitches, then cast on (9) 13-13-17-17 (21-25) new stitches for sleeve. Slip the remaining stitches on 1 stitch holder for back piece and left front piece. Continue A.1 back and forth as before but make sure that pattern fits over all stitches. AT THE SAME TIME cast on (8) 10-14-14-16 (20-22) new stitches for sleeve at the end of the next 2 rows from right side = (46) 56-66-72-78 (92-104) stitches on needle. Continue pattern back and forth over all stitches until piece measures (22) 28-32-35-36 (41-45) cm = (8¾") 11"-12½"-12¾"-14¼" (16⅛"-17¾") from marker, i.e. (35) 41-49-59-68 (74-81) cm = (13¾") 16⅛"-19¼"-23¼" (29⅛"-32" from cast-on edge. At the beginning of next row from right side slip the first (8) 8-9-11-11 (12-12) stitches on 1 stitch holder for neck but to avoid cutting the yarn work them before slipping them on the stitch holder. Continue pattern back and forth as before and bind off for neck at the beginning of every row from mid front as follows: Bind off 2 stitches 1 time and 1 stitch (1) 1-2-2-2 (3-3) times = (35) 45-53-57-63 (75-87) stitches remain on needle. Then work until the entire suit measures approx. (24) 30-34-37-39 (44-49) cm = (9½") 11⅜"-13⅜"-14½"-15¼" (17¼"-19¼") from marker, i.e. (37) 43-51-61-71 (77-85) cm = (14½") 17"-20"-24"-28" (30⅜"-33½") from cast-on edge, but adjust so that next row is worked from right side. Work 1 ridge back and forth over all stitches. Then bind off by knitting from the right side. The entire suit measures approx. (38) 44-52-62-72 (78-86) cm = (15") 17¼"-20½"-24⅜"-28⅜" (30¾"-33⅞") from cast-on edge. Now work back piece as explained below. BACK PIECE: Slip the first (36) 40-44-48-52 (56-64) stitches on stitch holder (seen from right side) on circular needle size 4 mm = US 6 and continue A.1 back and forth over these stitches as before. AT THE SAME TIME cast on new stitches for sleeves at the end of every row in each side as follows: Cast on (9) 13-13-17-17 (21-25) stitches 1 time in each side and then (8) 10-14-14-16 (20-22) stitches 2 times in each side = (86) 106-126-138-150 (178-202) stitches on needle. Continue pattern back and forth over all stitches until piece measures (23) 29-33-36-38 (43-48) cm = (9") 11⅜"-13"-14¼"-15" (17"-19") from marker). On next row bind off the middle (12) 12-16-20-20 (24-24) stitches for neck and finish each shoulder/sleeve separately. Then bind off 2 stitches on next row from neck = (35) 45-53-57-63 (75-87) stitches remain on needle for shoulder/sleeve. Then work until the entire suit measures approx. (24) 30-34-37-39 (44-49) cm = (9½") 11¾"-13⅜"-14½"-15¼" (17¼"-19¼") from marker, but adjust according to front piece and make sure that next row is from right side. Work 1 ridge back and forth over all stitches. Then bind off by knitting from the right side. Work the other shoulder/sleeve the same way. Then work left front piece as explained below. LEFT FRONT PIECE: Slip the remaining (21) 23-25-27-29 (31-35) stitches on stitch holder back on needle size 4 mm = US 6. Begin from right side and continue A.1 back and forth as before. AT THE SAME TIME cast on new stitches for sleeve at the end of the next 3 rows from wrong side as follows: Cast on (9) 13-13-17-17 (21-25) stitches 1 time and then (8) 10-14-14-16 (20-22) stitches 2 times = (46) 56-66-72-78 (92-104) stitches on needle. Continue pattern back and forth over all stitches until piece measures the same as right front piece. At the beginning of next row from wrong side slip the first (8) 8-9-11-11 (12-12) stitches on 1 stitch holder for neck but to avoid cutting the yarn work them before slipping them on the stitch holder. Continue pattern back and forth as before and bind off for neck at the beginning of every row from mid front as follows: Bind off 2 stitches 1 time and 1 stitch (1) 1-2-2-2 (3-3) times = (35) 45-53-57-63 (75-87) stitches remain on needle. Then work until the entire suit measures approx. (24) 30-34-37-39 (44-49) cm = (9½") 11¾"-13⅜"-14½"-15¼" (17¼"-19¼") from marker, i.e. (37) 43-51-61-71 (77-85) cm = (14½") 17"-20"-24"-28" (30⅜"-33½") from cast-on edge, but measure so that next row is worked from right side. Work 1 ridge back and forth over all stitches. Then bind off by knitting from the right side. The entire suit measures approx. (38) 44-52-62-72 (78-86) cm = (15") 17¼"-20½"-24⅜"-28⅜" (30¾"-33⅞") from cast-on edge. ASSEMBLY: Sew shoulder seams inside bind-off edges. Sew the seams under the sleeve. Sew seam on inside of both legs inside 1 edge stitch in each side. Sew seam mid front from bottom of band and down inside 1 edge stitch in each side. Sew together the opening between the legs. Fold the end of legs at the marker. Sew the buttons on to the left band. HOOD: Pick up from right side approx. 44 to 70 stitches around the neck (including stitches on stitch holders at the front). Knit 1 row from wrong side while increasing evenly to (58) 70-74-74-78 (86-86) stitches – read INCREASE TIP-2. Knit 1 row from right side and knit 1 row from wrong side. Work next row as follows from right side: Work A.1A until 2 stitches remain on needle and finish with A.1B (= 2 stitches). Continue pattern like this until piece measures (17) 18-19-20-21 (22-23) cm = (6¾") 7"-7½"-8"-8¼" (8¼"-9") from ridge in the neck, but adjust so that next row is from right side. Work 1 ridge back and forth over all stitches. Then bind off by knitting from the right side. Place the hood double and sew seam at the top inside bind-off edge. |
|||||||
Diagram explanations |
|||||||
|
|||||||
|
|||||||
|
|||||||
Have you finished this pattern?Tag your pictures with #dropspattern #trulywoolyonesie or submit them to the #dropsfan gallery. Do you need help with this pattern?You'll find 28 tutorial videos, a Comments/Questions area and more by visiting the pattern on garnstudio.com. © 1982-2025 DROPS Design A/S. We reserve all rights. This document, including all its sub-sections, has copyrights. Read more about what you can do with our patterns at the bottom of each pattern on our site. |
|||||||


With over 40 years in knitting and crochet design, DROPS Design offers one of the most extensive collections of free patterns on the internet - translated to 17 languages. As of today we count 314 catalogs and 11821 patterns - 11811 of which are translated into English (US/in).
We work hard to bring you the best knitting and crochet have to offer, inspiration and advice as well as great quality yarns at incredible prices! Would you like to use our patterns for other than personal use? You can read what you are allowed to do in the Copyright text at the bottom of all our patterns. Happy crafting!
Post a comment to pattern DROPS Baby 33-8
We would love to hear what you have to say about this pattern!
If you want to leave a question, please make sure you select the correct category in the form below, to speed up the answering process. Required fields are marked *.