
Looking for a yarn?


Comments / Questions (42)
![]() Cindy wrote:
Cindy wrote:
Under the Yoke section: Increase every 2nd row (each row from the right side) but every 2nd increase is only on the front/back pieces, i.e., increase on the front/back pieces every 2nd row, increase on the sleeves every 4th row (increase alternately 4 and 8 stitches). Increase like this 12-14-18-18-20-20 times on the front/back pieces and 6-7-9-9-10-10 times on the sleeves = 173-185-217-223-233-243 stitches. The increases on the sleeves are finished.
27.06.2025 - 17:56
![]() Cindy wrote:
Cindy wrote:
I am attempting to add 4 stitches to the sleeves. I have added them but they disrupt the garter pattern. I end up with either two knit sts or two purl sts next to each other. How do I add sts without disrupting the garter sts row?
27.06.2025 - 02:28DROPS Design answered:
Hi Cindy, There are no increases of 4 stitches on the sleeves. You decrease mid-under the sleeve according to the Decrease Tip, and either knit 2 together or purl 2 together on either side of the marker-thread, depending on the next stitch in A.1. Kind regards, Drops team.
27.06.2025 - 06:56
![]() Mérien Van Den Brûle wrote:
Mérien Van Den Brûle wrote:
Halslijn: naald 1: ik moet dus 17 steken breien ( tot 2 steken na raglansteek 1) en dan keren. (En draad aantrekken) Dan is naald 2 toch maar 17 steken lang ( vanwege het keren) en kan ik nooit bij de aangegeven 4 raglansteken meerderen? Graag uitleg. Alvast dank
27.05.2025 - 19:14DROPS Design answered:
Dag Mérien,
De eerste naald brei je aan de verkeerde kant en je breit tot na de 1e markeerdraad. Je komt dus eerst nog markeerdraad 4, 3 en 2 tegen.
29.05.2025 - 13:45
![]() Linda wrote:
Linda wrote:
Hei, når slutter jeg med de rette raglanmaskene på ryggen?
03.03.2025 - 23:49DROPS Design answered:
Hei Linda. De kan du slutte med nå du er ferdig med raglanøkningene, men om du må strikke noen cm før oppgitt mål (19-21-22-22-25-26 cm), kan du fortsette å strikke rettmaskene. Uansette vil disse omgangene komme under ermet og ikke vise (om strikkefastheten stemmer i høyden). mvh DROPS Design
10.03.2025 - 10:24
![]() Ximena wrote:
Ximena wrote:
Thank u! I’m knitting size M and I’m doing the first 8 decreases after the collar. The pattern says, after the decreases, I should have 14 for the front piece, 15 for the sleeve, 15 for the back, 15 for the second sleeve and 14 for the other front piece and that I should have then 77 stitches. I do have 77 stitches after the decreases but I have 14 +15+19+15+15+14 = 77. What the pattern says: 14+15+15+15+14 would be 73. Is there a mistake in the pattern?
21.12.2024 - 14:43DROPS Design answered:
Dear Ximena, take into account that the stitches are inserted in markers and not counted in these totals, when stating: "There are 15 stitches between markers 1 and 2 and markers 3 and 4 (sleeves) and 15 stitches between markers 2 and 3 (back piece)", "Count 14-14-16-17-16-19 stitches (front piece)" and "There are 14 stitches left after the last marker (front piece)." So you have 14 +1 + 15 + 1 +15 + 1+15+1+ 14 = 77 stitches. Happy knitting!
22.12.2024 - 20:08
![]() Heleen wrote:
Heleen wrote:
Hallo, ik heb een vraag over Drops 243-4. Bij de ‘halslijn’ moet er bij ‘naald 1 - verkeerde kant’ gebreid worden tot voorbij raglansteek 1. Wil dit zeggen dat ik na de 7 ribbelsteken en 7 reguliere steken en na de eerste raglansteek en na 2 steken erna al moet keren? Hoe moet ik dan ‘naald 2 - goede kant’ breien met zo weinig steken?
03.12.2024 - 20:54DROPS Design answered:
Dag Heleen,
Ja, dat klopt , je keert nadat je 2 steken na de raglansteek hebt gebreid. Bij naald 2 brei je dus weer vanaf dat punt op de goede kant en je meerdert bij alle raglansteken. Je breit tot 2 steken voorbij raglansteek 4 en dan keer je het werk weer om aan de verkeerde kant terug te breien (3e naald).
05.12.2024 - 20:04
![]() Ximena wrote:
Ximena wrote:
Thank you for your help! Would you happen to know the chest measurements / height of the model and which size of the cardigan she’s wearing? Would love a similar fit to hers and I’m debating between S and M (my chest is 94cm and I’m 166cm). Many thanks! :)
01.11.2024 - 06:08DROPS Design answered:
Dear Ximena, to find out the most appropriate size measure a similar garment you have and like the size and compare them to the measurements in the chart - read more here - you can then either use a S if you like a somewhat fitting ease or a size M for a looser fit. Happy knitting!
01.11.2024 - 10:01
![]() Agnès wrote:
Agnès wrote:
Empiècement : Taille XL si on augmente 9 x 8 mailles et 18 x 4 mailles on obtient 144 mailles et non 108 comme indiqué (soit 115 auparavant et 223 après augmentations) merci!!
24.10.2024 - 14:16DROPS Design answered:
Bonjour Agnès, en taille XL, vous avez bien 115 m après l'encolure, vous augmentez ensuite 18x4 m (dos/devant tous les 2 rangs) + 9x 4 m (manches tous les 4 rangs), vous avez ainsi: 115+(18x4)+(9x4)=223 m. Notez que les 9x ne concernent que les manches, donc vous augmentez 9 fois 2 m tous les 4 rangs pour chaque manche et 18 fois 2 m pour les devants + autant pour le dos tous les 2 rangs pour les devants et le dos. Bon tricot!
24.10.2024 - 15:11
![]() Brigitte Fawer wrote:
Brigitte Fawer wrote:
Est-il possible de tricoter ce modèle avec des aiguilles droites? Je ne maitrise pas encore très bien l'aiguille circulaire pour ce genre de travail un peu plus compliqué . Merci
21.10.2024 - 11:44DROPS Design answered:
Bonjour Mme Fawer, le col et l'empiècement (avant la division donc) se tricotent en allers et retours sur aiguille circulaire pour avoir suffisamment de place pour y loger toutes les mailles; après la division, on continue le dos et les devants en allers et retours, les manches se tricotent en rond, cette leçon pourra vous aider à faire les ajustements nécessaires. Bon tricot!
21.10.2024 - 15:37
![]() Ucume wrote:
Ucume wrote:
I’d love to make this pattern in one of your yarns that doesn’t contain synthetic materials (this is because I want to dye it with botanicals myself and synthetic thread doesn’t take up natural dye). Would Brushed Alpaca Silk be a good substitute and, if so, would I still add an extra thread of kid silk? And how many grams of the substitute yarn would I need for a size M, please? Thank you so, so much!
17.09.2024 - 15:09DROPS Design answered:
Dear Ucume, use the yarn converter to see all possible alternatives for both Air and Kid-Silk (you have to work with 1 strand yarn group C (or 2 strands yarn group A) + 2 strands yarn group A (or 1 strand yarn group C) so even 2 strands yarn group C or 1 strand yarn group E. Read more about alternatives and calculate new amount here. Happy knitting!
17.09.2024 - 16:29
|
|||||||
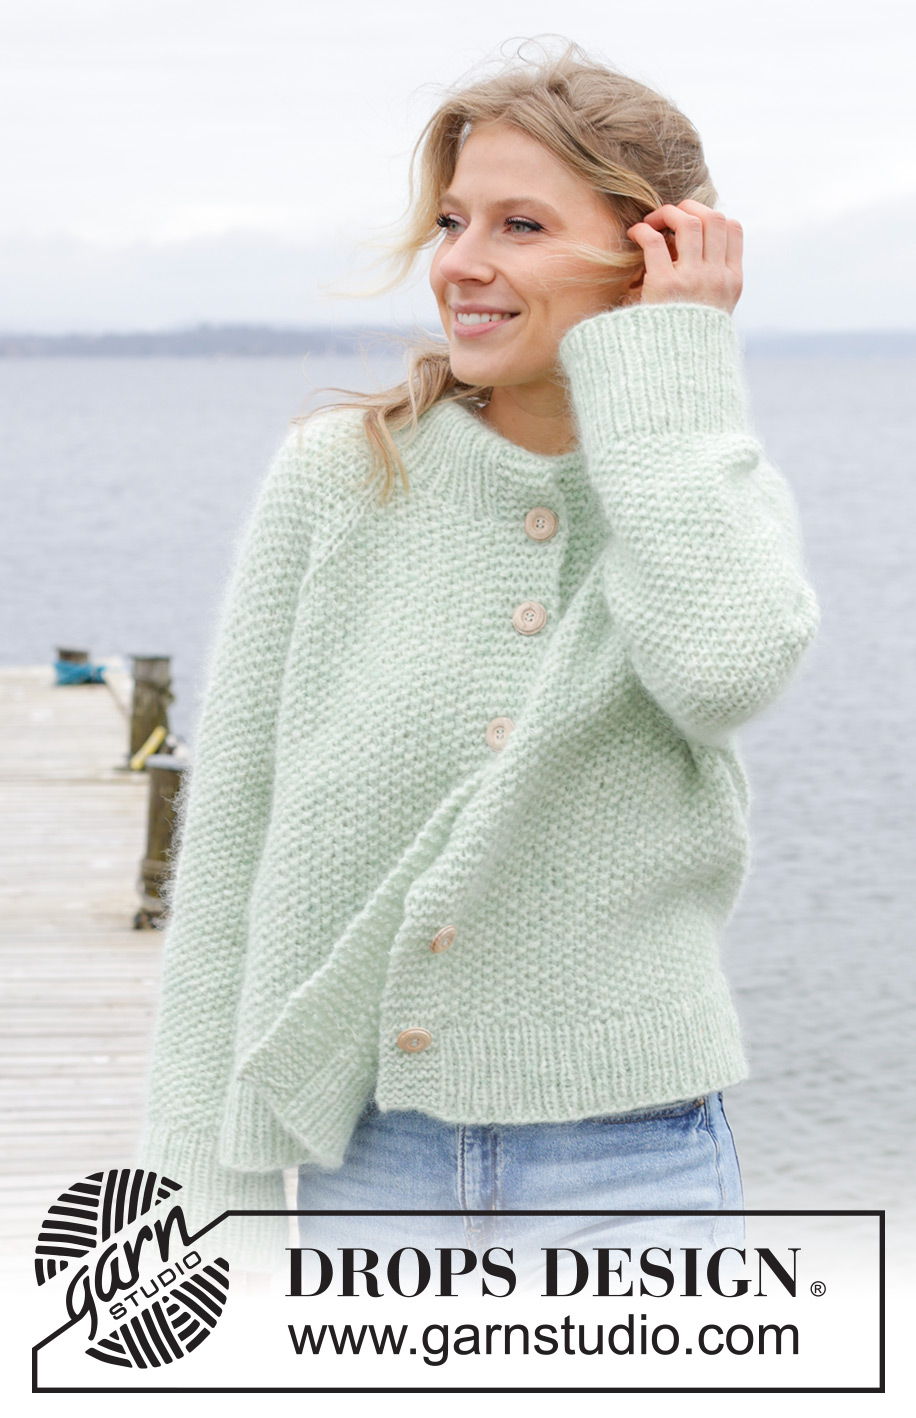
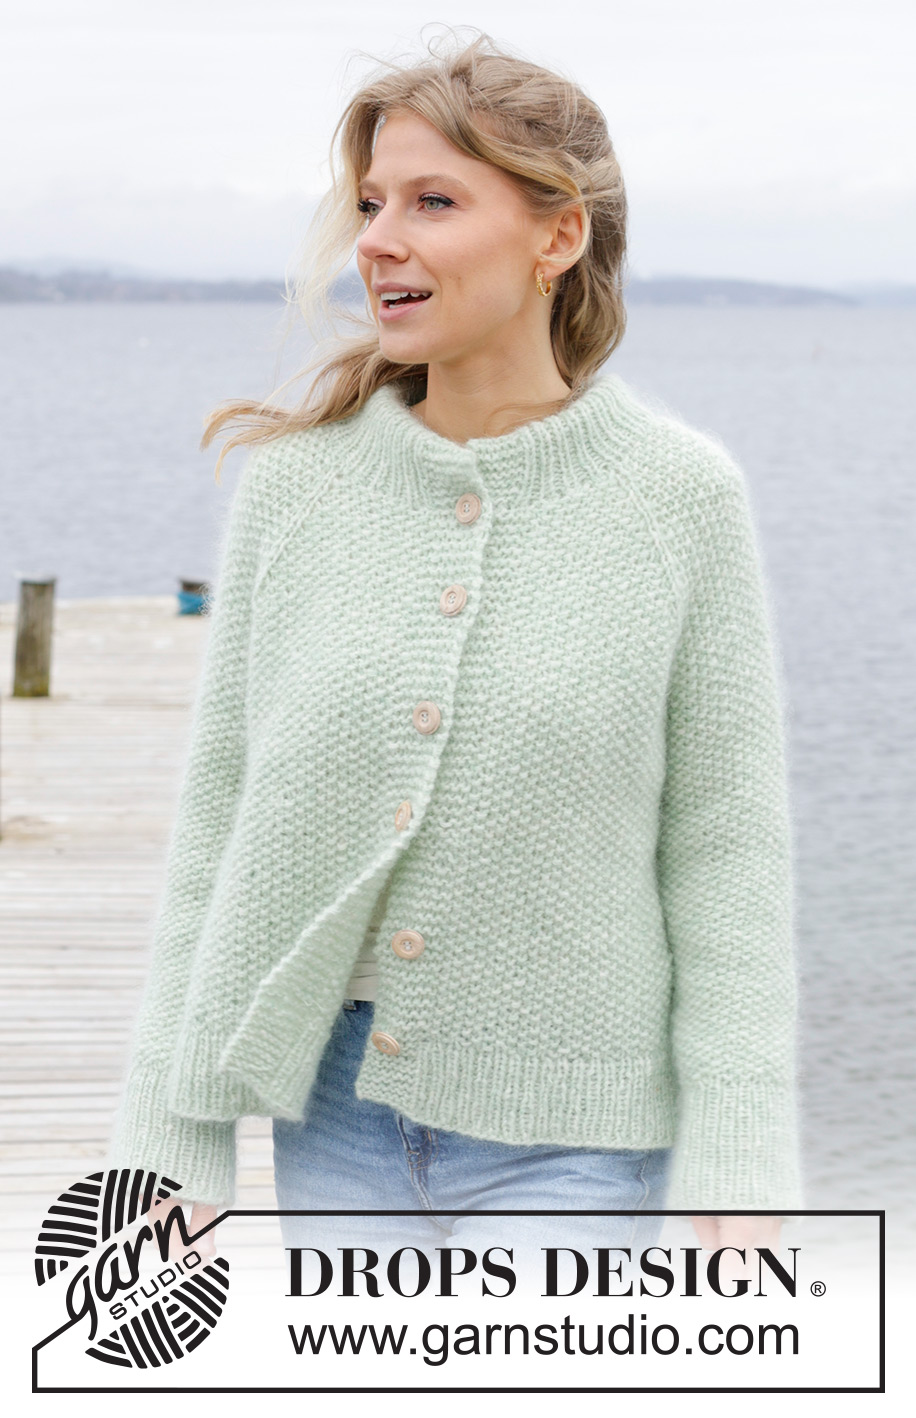
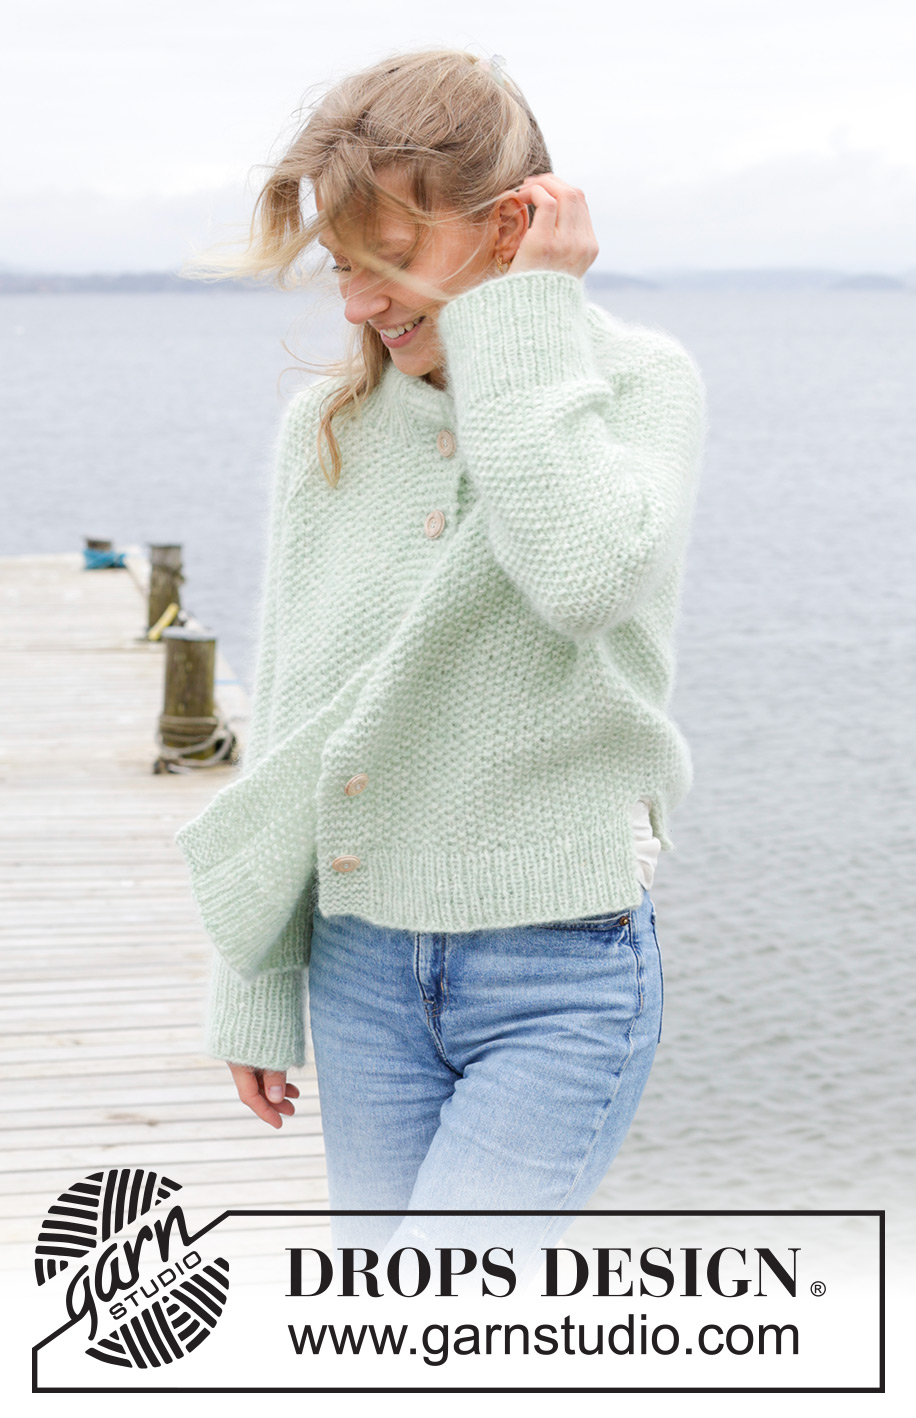
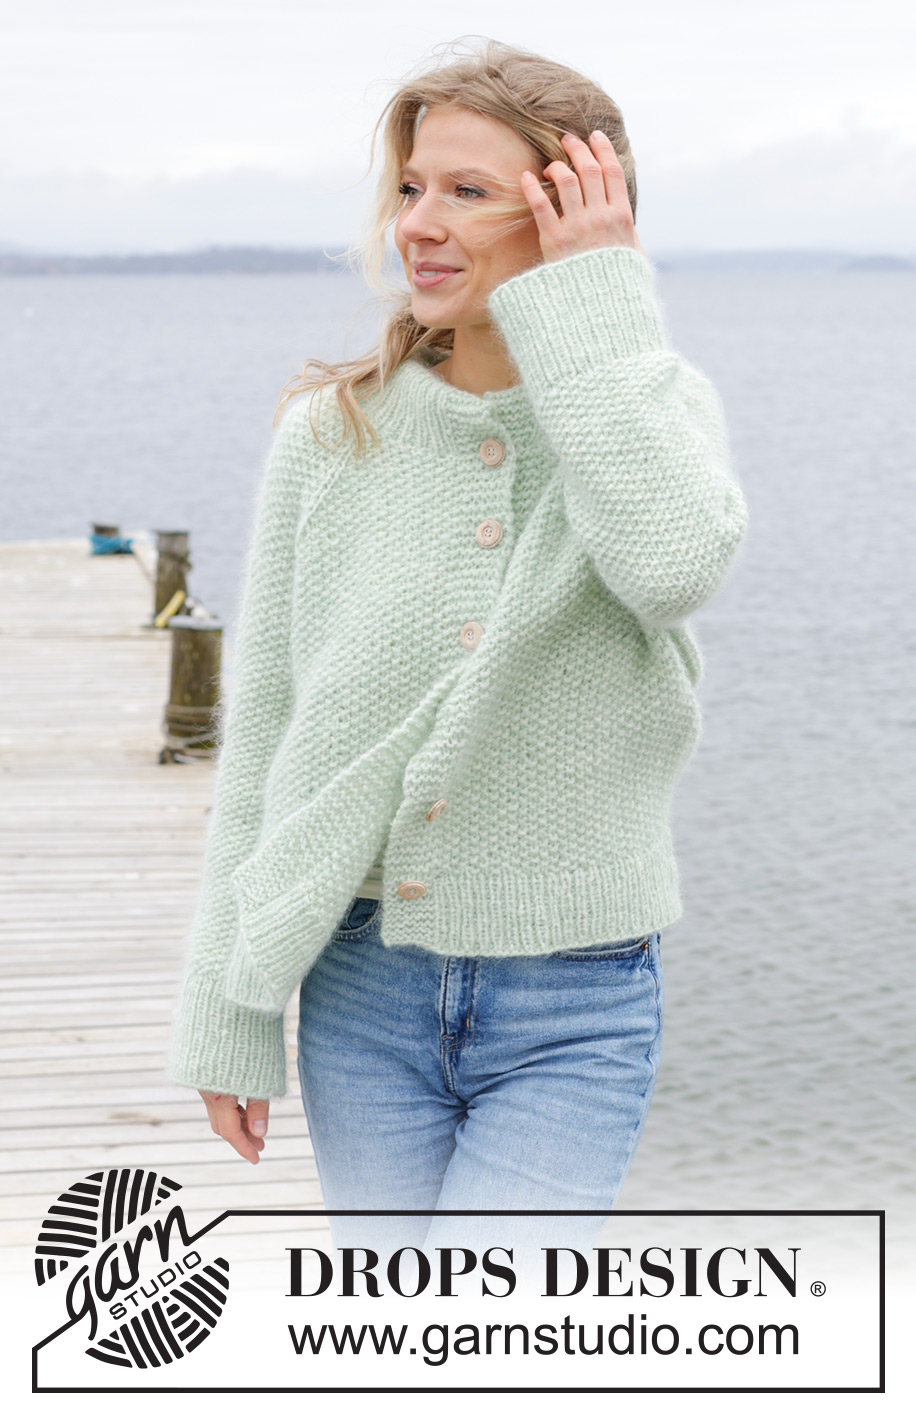
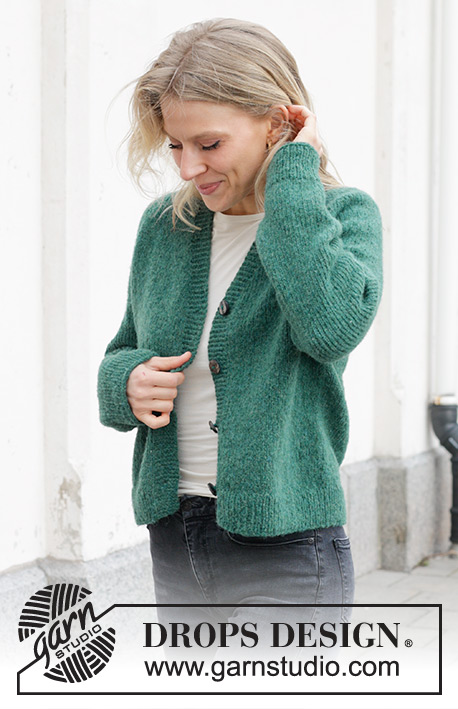
Green Whisper Cardigan#greenwhispercardigan |
|||||||
 |
 |
||||||
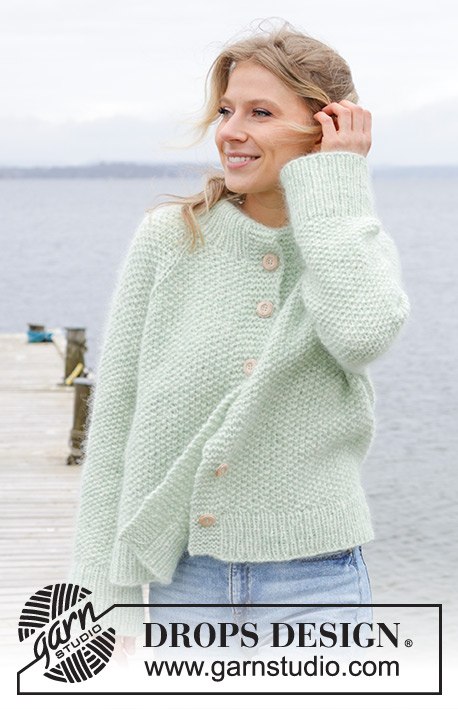
Knitted jacket in DROPS Air and DROPS Kid-Silk. The piece is worked top down with moss stitch, double neck, raglan and split in the sides. Sizes S - XXXL.
DROPS 243-4 |
|||||||
|
------------------------------------------------------- EXPLANATIONS FOR THE PATTERN: ------------------------------------------------------- GARTER STITCH (worked back and forth): Knit all rows. 1 ridge = knit 2 rows. PATTERN: See diagram A.1. The diagram shows all rows in the pattern from the right side. RAGLAN: All increases are worked from the right side! Increase 1 stitch before/after the 4 marker-stitches – hereafter known as raglan-stitches. The raglan-stitches are knitted from the right side and purled from the wrong side. Increase 1 stitch by making 1 yarn over which is worked twisted on the next row as described below. The new stitches are worked into A.1. From the wrong side: BEFORE raglan-stitch: Purl the yarn over twisted if the last stitch before the yarn over was knitted, or knit the yarn over twisted if the last stitch before the yarn over should was purled, there should be no hole. AFTER raglan-stitch: Slip the yarn over knit-wise, place it back on the left needle the other way round (twisted), purl the yarn over if the next stitch is to be knitted or knit the yarn over if the next stitch is to be purled, there should be no hole. INCREASE TIP (evenly spaced): Increase 1 stitch by making 1 yarn over, which is worked twisted on the next row/round = no hole. DECREASE TIP (mid-under sleeve): Decrease 1 stitch alternately before and after the marker-stitch, by either knitting or purling 2 together depending on the previous/next stitch in A.1. BUTTONHOLES: Work buttonholes on the right band (when the garment is worn). Work from the right side when there are 4 stitches left on the row as follows: Make 1 yarn over, knit 2 together and knit 2. On the next row (wrong side), knit the yarn over to leave a hole. The first buttonhole is worked on the first row from the right side after the neckline. Then work the other 5-5-5-6-6-6 buttonholes with approx. 8-8½-9-7½-8-8 cm = 3⅛"-3¼"-3½"-2⅞"-3⅛"-3⅛" between each one. ------------------------------------------------------- START THE PIECE HERE: ------------------------------------------------------- JACKET – SHORT OVERVIEW OF THE PIECE. The neck is worked back and forth with circular needle, from mid front and top down. A neckline is worked with short rows, the yoke continued before being divided for body and sleeves. The body is continued back and forth with circular needle then divide piece for splits in each side and work each piece separately until finished measurements. The sleeves are worked in the round with double pointed/circular needles needles. The neck is folded double and sewn down to finish. DOUBLE NECK: Cast on 69-73-75-79-81-87 stitches with circular needle size 7 MM = US 10.75, 1 strand DROPS Air and 2 strands DROPS Kid-Silk (3 strands). Change to circular needle size 5.5 MM = US 9 and purl 1 row from the wrong side. Work the next row as follows from the right side: 1 GARTER STITCH – read description above, * knit 1, purl 1 *, work from *-* until there are 2 stitches left, knit 1 and 1 garter stitch. Continue this rib back and forth for 5-5-5-6-6-6 cm = 2"-2"-2"-2⅜"-2⅜"-2⅜". At the end of the next 2 rows, cast on 6 band stitches = 81-85-87-91-93-99 stitches. Continue the rib with the 7 outermost stitches on each side in garter stitch (bands). Work until the neck measures 10-10-10-12-12-12 cm = 4"-4"-4"-4¾"-4¾"-4¾" and the next row is from the right side. Insert 4 markers without working the stitches. NOTE: In size S, M, L and XXL each marker is placed in a purl stitch, seen from the right side; in size XL and XXXL each marker is placed in a knit stitch, seen frrom the right side – the stitches with a marker are now called raglan-stitches The raglan stitches are now knitted from the right side and purled from the wrong side. Count 14-14-16-17-16-19 stitches (front piece), insert marker-1 in the next stitch, count 17-17-15-17-19-17 stitches (sleeve), insert marker-2 in the next stitch, count 15-19-21-19-19-23 stitches (back piece), insert marker-3 in the next stitch, count 17-17-15-17-19-17 stitches (sleeve), insert marker-4 in the next stitch. There are 14-14-16-17-16-19 stitches left after the last marker (front piece). Knit 1 row from the right side and decrease 4-8-2-0-4-0 stitches evenly as follows: Work past marker-1, decrease 2-2-0-0-2-0 stitches evenly between markers 1 and 2 (do not decrease the raglan-stitches), decrease 0-4-2-0-0-0 stitches evenly between markers 2 and 3, decrease 2-2-0-0-2-0 stitches evenly between markers 3 and 4, knit to end of row = 77-77-85-91-89-99 stitches. There are 15-15-15-17-17-17 stitches between markers 1 and 2 and markers 3 and 4 (sleeves) and 15-15-19-19-19-23 stitches between markers 2 and 3 (back piece). NECKLINE: Change to circular needle size 7 MM = US 10.75. Now work a neckline with short rows AT THE SAME TIME increase for raglan as described below. REMEMBER THE KNITTING GAUGE! ROW 1 (wrong side): Work 7 band stitches in garter stitch, work A.1, remembering to knit the 4 raglan-stitches from the right side and purl them from the wrong side. Work to 2 stitches past raglan-stitch 1 i (i.e., front left of neck when the garment is worn), turn, tighten the strand. ROW 2 (right side): Work A.1 and increase for RAGLAN on each side of all 4 raglan-stitches – read description above, work to 2 stitches past raglan-stitch 4 (i.e., front right of neck = 8 stitches increased), turn, tighten the strand. ROW 3 (wrong side): Work A.1 to 2 stitches past the previous turn by marker 1, turn, tighten the strand. ROW 4 (right side): Work A.1 and increase for raglan on each side of all 4 raglan-stitches, work to 2 stitches past the previous turn by marker 4 (= 8 increased stitches), turn, tighten the strand. ROW 5 (wrong side): Work A.1 to 2 stitches past the previous turn by marker 1, turn, tighten the strand. ROW 6 (right side): Work A.1 and increase for raglan on each side of all 4 raglan-stitches, work to 2 stitches past the previous turn by marker 4 (= 8 stitches increased), turn, tighten the strand. ROW 7 (wrong side). Work A.1 to the end of the row (the raglan-stitches are purled from the wrong side and the bands worked in garter stitch). The short rows are finished and you have increase 3 times for raglan on each side of all 4 raglan-stitches = 101-101-109-115-113-123 stitches. Work now the yoke as described below, from mid-front. Remember the BUTTONHOLES on the right band – read description above. YOKE: Continue A.1 with 7 band stitches in garter stitch on each side and the raglan-stitches knitted from the right side/purled from the wrong side. Continue to increase for raglan as follows: Increase every 2nd row (each row from the right side) but every 2nd increase is only on the front/back pieces, i.e., increase on the front/back pieces every 2nd row, increase on the sleeves every 4th row (increase alternately 4 and 8 stitches). Increase like this 12-14-18-18-20-20 times on the front/back pieces and 6-7-9-9-10-10 times on the sleeves = 173-185-217-223-233-243 stitches. The increases on the sleeves are finished. Continue to increase on the front/back pieces 4-4-0-1-2-3 more times = 189-201-217-227-241-255 stitches. All increases are now finished. Continue working without further increases until the yoke measures 19-21-22-22-25-26 cm = 7½"-8¼"-8¾"-8¾"-9¾"-10¼", measured after the neck mid-back. Divide for the body and sleeves as follows: Work the first 34-36-38-40-42-46 stitches as before (front piece), place the next 33-35-39-41-43-43 stitches on 1 thread for the sleeve, cast on 7-7-7-9-11-13 stitches (in side under sleeve), work 55-59-63-65-71-77 stitches (back piece), place the next 33-35-39-41-43-43 stitches on 1 thread for the sleeve, cast on 7-7-7-9-11-13 stitches (in side under sleeve), work the last 34-36-38-40-42-46 stitches (front piece). The body and sleeves are finished separately. The piece is now measured from here! BODY: = 137-145-153-163-177-195 stitches. Insert 1 marker in the middle of the 7-7-7-9-11-13 stitches cast on under each sleeve. Allow them to follow your work onwards; they are used when working the split in each side. Continue A.1 over all stitches with 7 band stitches in garter stitch on each side. When the body measures 21-21-22-23-22-23 cm = 8¼"-8¼"-8¾"-9"-8¾"-9" from the division, divide at both markers and finish each piece separately. The marker-stitches belong to each front piece. LEFT FRONT PIECE: = 38-40-42-44-48-52 stitches. Knit 1 row from the right side and increase 9-9-9-11-11-13 stitches evenly spaced – read INCREASE TIP (do not increase over the band) = 47-49-51-55-59-65 stitches. Change to circular needle size 5.5 MM = US 9 and work as follows from the wrong side (from the side): 1 garter stitch, * purl 1, knit 1 *, work from *-* until there are 8 stitches left, purl 1 and 7 band stitches in garter stitch. Continue this rib for 8 cm = 3⅛". Bind off. You can use Italian bind off – see video under Tips and Help on our web page. The jacket measures approx. 54-56-58-60-62-64 cm = 21¼"-22"-22¾"-23⅝"-24⅜"-25¼" from the shoulder. RIGHT FRONT PIECE: = 38-40-42-44-48-52 stitches. Knit 1 row from the right side and increase 9-9-9-11-11-13 stitches evenly spaced (do not increase over the band) = 47-49-51-55-59-65 stitches. Change to circular needle size 5.5 MM = US 9 and work as follows from the wrong side (from mid-front): 7 band stitches in garter stitch * purl 1, knit 1 *, work from *-* until there are 2 stitches left, purl 1 and 1 garter stitch. Continue this rib for 8 cm = 3⅛". Bind off in the same way as on the left front piece. BACK PIECE: = 61-65-69-75-81-91 stitches. Knit 1 row from the right side and increase 18-20-20-20-24-24 stitches evenly spaced = 79-85-89-95-105-115 stitches. Change to circular needle size 5.5 MM = US 9. Work as follows from the wrong side: 1 garter stitch, * purl 1, knit 1 *, work from *-* until there are 2 stitches left, purl 1 and 1 garter stitch. Continue this rib for 8 cm = 3⅛". Bind off in the same way as on the front pieces. SLEEVES: Place the 33-35-39-41-43-43 stitches from the thread on the one side of the piece on short circular needle/double pointed needles size 7 MM = US 10.75 and knit up 1 stitch in each of the 7-7-7-9-11-13 stitches cast on under the sleeve = 40-42-46-50-54-56 stitches. Insert a marker in the middle of the new stitches under the sleeve. Start at the marker and continue A.1 in the round. When the sleeve measures 4-4-4-3-3-3 cm = 1½"-1½"-1½"-1⅛"-1⅛"-1⅛" from division, decrease 1 stitch before the marker – read DECREASE TIP. When the sleeve measures 12-12-8-6½-5-5 cm = 4¾"-4¾"-3⅛"-2½"-2"-2" from division, decrease 1 stitch after the marker – remember DECREASE TIP. Continue to decrease like this (alternately before and after the marker) every 8-8-4-3-2-2 cm = 3⅛"-3⅛"-1½"-1⅛"-¾"-¾" a total of 4-4-8-10-14-14 times (2-2-4-5-7-7 times before and 2-2-4-5-7-7 times after the marker) = 36-38-38-40-40-42 stitches. Continue working until the sleeve measures 37-35-35-36-34-32 cm = 14½"-13¾"-13¾"-14¼"-13⅜"-12½" from the division. Knit 1 round and increase 14-14-16-16-18-18 stitches evenly spaced = 50-52-54-56-58-60 stitches. Change to double pointed needles size 5.5 MM = US 9 and work rib (knit 1, purl 1) for 10 cm = 4". Bind off in the same way as on the body. The sleeve measures approx. 47-45-45-46-44-42 cm = 18½"-17¾"-17¾"-18"-17¼"-16½" from the division. Work the other sleeve in the same way. ASSEMBLY: Fold the neck double to the inside and sew down. To avoid the neck being tight and folding outwards, it is important that the seam is elastic. Sew the openings mid-front on the bands, with small stitches. Sew the buttons onto the left band. |
|||||||
Diagram explanations |
|||||||
|
|||||||

|
|||||||
Have you finished this pattern?Tag your pictures with #dropspattern #greenwhispercardigan or submit them to the #dropsfan gallery. Do you need help with this pattern?You'll find 34 tutorial videos, a Comments/Questions area and more by visiting the pattern on garnstudio.com. © 1982-2025 DROPS Design A/S. We reserve all rights. This document, including all its sub-sections, has copyrights. Read more about what you can do with our patterns at the bottom of each pattern on our site. |
|||||||


With over 40 years in knitting and crochet design, DROPS Design offers one of the most extensive collections of free patterns on the internet - translated to 17 languages. As of today we count 314 catalogs and 11822 patterns - 11812 of which are translated into English (US/in).
We work hard to bring you the best knitting and crochet have to offer, inspiration and advice as well as great quality yarns at incredible prices! Would you like to use our patterns for other than personal use? You can read what you are allowed to do in the Copyright text at the bottom of all our patterns. Happy crafting!
Post a comment to pattern DROPS 243-4
We would love to hear what you have to say about this pattern!
If you want to leave a question, please make sure you select the correct category in the form below, to speed up the answering process. Required fields are marked *.