
Popular categories
Looking for a yarn?


Comments / Questions (18)
![]() Csikósné Monika wrote:
Csikósné Monika wrote:
Kedves Drops!Nem értem a * jelölésnél leírt kötésmódot!Kérek szépen segitséget!Mi az pl. hogy kezdőszél vetkező szeme?Köszönöm!Németül is probáltam de úgy sem értem.
03.03.2018 - 19:02DROPS Design answered:
Kedves Monika, itt a szegély szélét a lyuksornál félbe hajtjuk, és a kezdőszél szemeit egyenként összekötjük a kötőtűn levő szemekkel - varrás helyett így rögzítjük a dupla szélt. kezdőszél következő szemét kötjük össze a kötőtűn lévő következő szemmel. Sikeres kézimunkázást!
04.03.2018 - 18:45
![]() Hannah Engebjerg wrote:
Hannah Engebjerg wrote:
Er det rigtigt forstået at der ikke skal strikkes hulrække i mønster A1 og A3 i starten af mønstret, men hulrække i A2 som jo ligger imellem A1 og A3?
01.03.2018 - 21:53DROPS Design answered:
Hej Hannah, ja det stemmer, her strikker du kun retstrik (riller). God fornøjelse!
06.03.2018 - 16:03
![]() Brigitte Fitzel wrote:
Brigitte Fitzel wrote:
Sehr schönes Modell leider kann ich die Anleitung nicht finden. Es wird lediglich ein Foto zur Verfügung gestellt. Für eine Info lieben Dank im voraus Gruß Brigitte Fitzel
09.02.2018 - 14:08DROPS Design answered:
Liebe Frau Fitzel, die Anleitung kommt noch! Kommen Sie mal wieder vorbei.
09.02.2018 - 17:44
![]() Annica Olsson wrote:
Annica Olsson wrote:
Varför kan man inte se mönstret till denna fina jumper?
09.02.2018 - 11:13
![]() Annica Olsson wrote:
Annica Olsson wrote:
Sååå gullig midsommarnattsdröm ☺
09.02.2018 - 11:12
![]() Cissi wrote:
Cissi wrote:
Lite 50-tal. Jag gillar!!!
16.01.2018 - 11:13
![]() Nadine wrote:
Nadine wrote:
Trop mignon, les couleurs, l'effet dentelle, j'ai hâte de le réaliser !
12.12.2017 - 11:38
![]() Lea Cadie wrote:
Lea Cadie wrote:
Adorable et simple
11.12.2017 - 21:15
|
|||||||||||||||||||||||||||||||
Adele#adelesweater |
|||||||||||||||||||||||||||||||
 |
 |
||||||||||||||||||||||||||||||
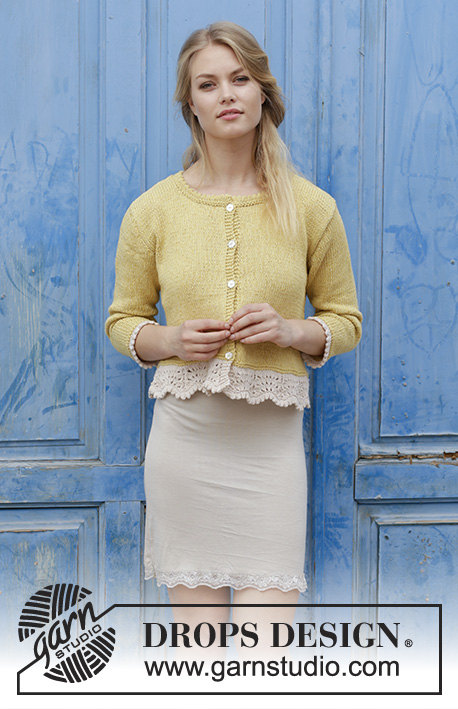
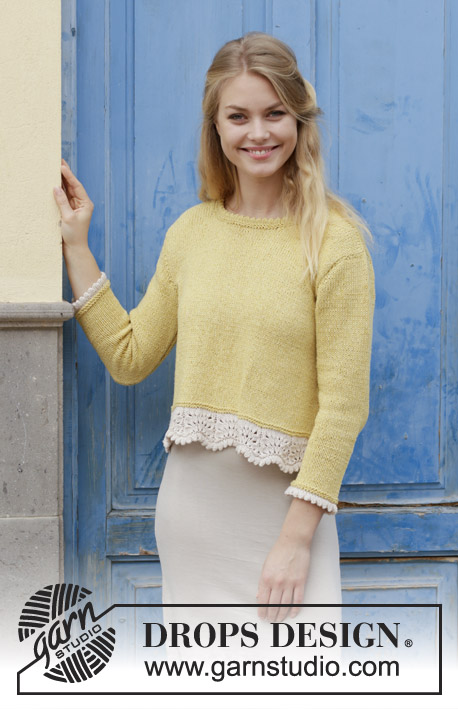
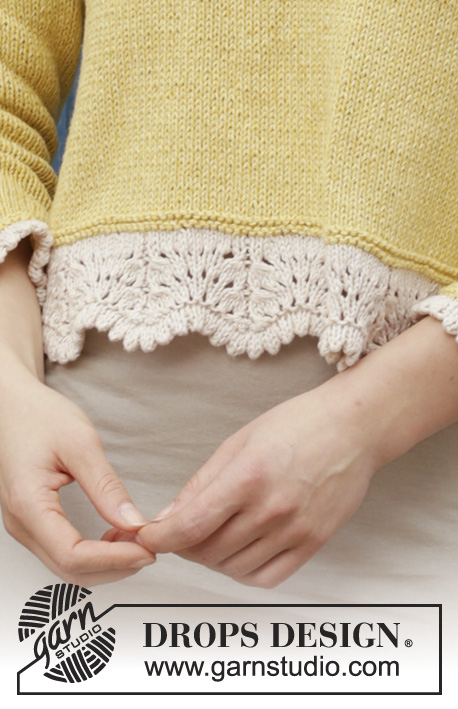
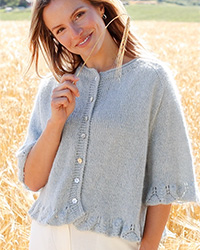
Knitted jumper with edge in wave pattern and vent in the sides. Size: S - XXXL Piece is knitted in DROPS Belle.
DROPS 187-14 |
|||||||||||||||||||||||||||||||
|
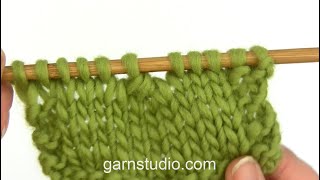
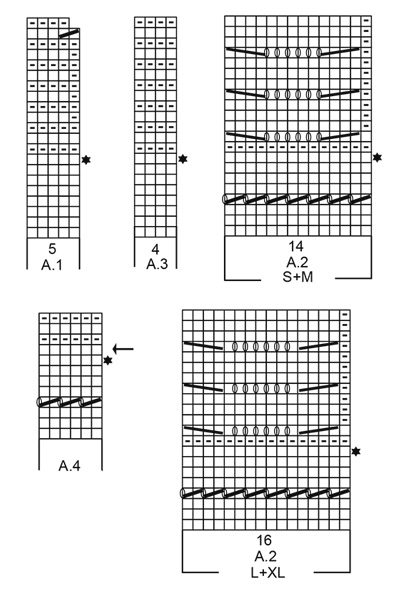
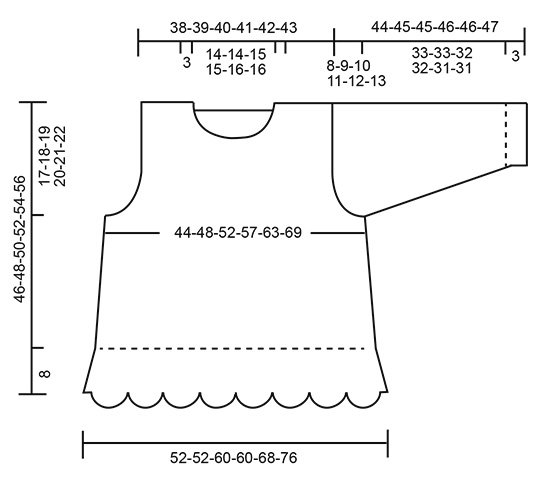
INFORMATION FOR PATTERN: GARTER STITCH (worked in the round): 1 ridge = 2 rounds. Knit 1 round and purl 1 round. GARTER STITCH (back and forth): 1 ridge = knit 2 rows. PATTERN: See diagrams A.1 to A.4. Choose diagram for your size. Diagrams show all rows in pattern seen from the right side. NOTE! First row in diagrams is worked from wrong side! DECREASE TIP-1: To calculate how to decrease evenly, use the total number of stitches on row (e.g. 122 stitches) and divide stitches by number of decreases to be done (e.g. 20) = 6.1. In this example knit approx. every 5th and 6th stitch together. DECREASE TIP-2: All decreases are done from the right side. Decrease as follows after 1 edge stitch in garter stitch: Slip 1 stitch knitwise, knit 1, pass slipped stitch over stitch worked. Decrease as follows before 1 edge stitch in garter stitch: Work until 3 stitches remain, knit 2 together, 1 edge stitch in garter stitch. INCREASE TIP: All increases are done from right side. Increase 1 stitch inside 1 edge stitch in garter stitch in each side by making a yarn over. On next row purl yarn overs twisted to avoid holes. Then work the new stitches in stocking stitch. ---------------------------------------------------------- JUMPER: Worked back and forth on circular needle, bottom up. Work first an edge in wave pattern with light beige. Then switch to dandelion and work 2 ridges before continuing in stocking stitch. Work sleeves back and forth on circular needle. BACK PIECE: Cast on 121-121-137-137-153-169 stitches with light beige on circular needle size 4 mm. Work first row from wrong side as follows: A.1 (= 5 stitches), A.2 – choose diagram for your size (= 8 repetition of 14-14-16-16-18-20 stitches), A.3 (= 4 stitches). On the last 2 rows in A.1-A.3 cast on 1 new stitch at the end of row (marks vent) – NOTE: decrease 1 stitch on next to last row in A.1 = 122-122-138-138-154-170 stitches. When A.1 to A.3 have been worked, switch to dandelion. Knit 1 row while decreasing 20-12-18-8-12-16 stitches evenly - read DECREASE TIP-1 = 102-110-120-130-142-154 stitches. Knit 1 row from wrong side, knit 1 row from right side and knit 1 row from wrong side. Insert a marker here. NOW MEASURE PIECE FROM HERE! REMEMBER THE KNITTING TENSION! Now work in stocking stitch with 1 edge stitch in GARTER STITCH - see explanation above, in each side, AT THE SAME TIME when piece measures 0-1-2-3-4-5 cm decrease 1 stitch in each side – read DECREASE TIP-2. Decrease like this approx. every 4 cm 4 times in total = 94-102-112-122-134-146 stitches. When piece measures 21-22-23-24-25-26 cm, cast off stitches in each side for armholes as follows: Cast off 3 stitches 1-2-2-3-4-5 times, 2 stitches 1-1-2-3-4-5 times and 1 stitch 1-1-3-2-2-2 times = 82-84-86-88-90-92 stitches. Continue in stocking stitch with 1 edge stitch in garter stitch in each side. When piece measures 35-37-39-41-43-45 cm, cast off the middle 40-40-42-42-44-44 stitches for neck and finish each shoulder separately. Then cast off 1 stitch on next row from neck =20-21-21-22-22-23 stitches for shoulder. Continue until piece measures 38-40-42-44-46-48 cm (46-48-50-52-54-56 cm in total from shoulder and down). Cast off. Make sure that the cast-off is not too tight! Work the other shoulder the same way. FRONT PIECE: Cast on and work as on back piece until piece measures 30-32-33-35-36-38 cm from marker thread. Now slip the middle 22-22-24-24-24-24 stitches on 1 stitch holder for neck and finish each shoulder separately. Then cast off for neck at beginning of every row from neck as follows: Cast off 2 stitches 4 times and 1 stitch 2-2-2-2-3-3 times = 20-21-21-22-22-23 stitches for shoulder. Continue until piece measures 38-40-42-44-46-48 cm (46-48-50-52-54-56 cm in total from shoulder and down). Adjust towards back piece. Cast off. Make sure that the cast-off edge is not too tight. Work the other shoulder the same way. SLEEVE: Worked back and forth on circular needle, bottom up. Cast on 44-46-48-50-52-54 stitches on circular needle size 4 mm with light beige. Work pattern as follows: 1 edge stitch in garter stitch, A.4 - NOTE: first row in diagram is from wrong side and is purled from wrong side, 1 edge stitch in garter stitch. On row after working together with cast-on edge (= row with arrow in diagram) switch to dandelion. Insert a marker thread here. NOW MEASURE PIECE FROM HERE! Now work in stocking stitch with 1 edge stitch in garter stitch in each side. When piece measures 8-5-5-4-4-3 cm, increase 1 stitch in each side – read INCREASE TIP! Increase like this every 6th row 11-12-7-6-0-0 times and every 4th row 0-0-7-9-17-18 times = 66-70-76-80-86-90 stitches. When sleeve measures 33-33-32-32-31-31 cm (shorter measurements in the larger sizes because of longer sleeve cap and wider shoulders), cast off for sleeve cap at beginning of every row in each side as follows: Cast off 4 stitch 1 time, 3 stitches 1 time, 2 stitches until sleeve measures 40-41-41-42-42-43 cm, cast off 3 stitches 1 time and cast off the remaining stitches. Sleeve measures approx. 44-45-45-46-46-47 cm including edge at the bottom of sleeve. Work another sleeve. ASSEMBLY: Sew shoulders with grafting/kitchener stitches inside cast-off edge. Sew sleeves in body. Sew seam under sleeves and continue down along the side until stitch cast on for vent (= 8 cm for vent). Sew inside 1 edge stitch in garter stitch in each side. Repeat in the other side. NECK EDGE: Begin from right side and knit up 100-100-106-106-112-112 stitches (including stitches from stitch holder at the front) with dandelion on circular needle size 4 mm. Work 2 ridges in GARTER STITCH in the round - see explanation above. Then work as follows: Knit 1 round. Then work A.4 in the round until 7th round in diagram has been worked. Knit 1 round. Cast off by knitting but for every 4th stitch make 1 yarn over. Cast off yarn over as stitch. NOTE! Avoid a tight cast-off edge, the folding edge will tip outwards when assembled if too tight. Fold at eyelet row in A.4 so that hem is on the inside of garment. Sew cast-off edge in the top ridge. Make sure that to avoid a tight seam. |
|||||||||||||||||||||||||||||||
Diagram explanations |
|||||||||||||||||||||||||||||||
|
|||||||||||||||||||||||||||||||
 |
|||||||||||||||||||||||||||||||
 |
|||||||||||||||||||||||||||||||
 |
|||||||||||||||||||||||||||||||
Have you finished this pattern?Tag your pictures with #dropspattern #adelesweater or submit them to the #dropsfan gallery. Do you need help with this pattern?You'll find 37 tutorial videos, a Comments/Questions area and more by visiting the pattern on garnstudio.com. © 1982-2026 DROPS Design A/S. We reserve all rights. This document, including all its sub-sections, has copyrights. Read more about what you can do with our patterns at the bottom of each pattern on our site. |
|||||||||||||||||||||||||||||||

With over 40 years in knitting and crochet design, DROPS Design offers one of the most extensive collections of free patterns on the internet - translated to 17 languages. As of today we count 324 catalogues and 12166 patterns translated into English (UK/cm). 12166
We work hard to bring you the best knitting and crochet have to offer, inspiration and advice as well as great quality yarns at incredible prices! Would you like to use our patterns for other than personal use? You can read what you are allowed to do in the Copyright text at the bottom of all our patterns. Happy crafting!
Post a comment to pattern DROPS 187-14
We would love to hear what you have to say about this pattern!
If you want to leave a question, please make sure you select the correct category in the form below, to speed up the answering process. Required fields are marked *.