
Popular categories
Looking for a yarn?


Comments / Questions (53)
![]() Eléonore wrote:
Eléonore wrote:
Hello, what size is the model wearing please? Thank you!
15.03.2026 - 04:15DROPS Design answered:
Dear Eléonore, our models wear most of the time either a S or a M; you will find help here how to find the appropriate size. Happy knitting!
16.03.2026 - 09:50
![]() Odile RICCI wrote:
Odile RICCI wrote:
Bonsoir je fais l échantillon pour ce debardeur avec Drop Air: avec aiguilles n°5 , n° 4 en jersey j’ai 9cm. Avec n°3,5 j\'ai 8cm. Alors qu’il est bien indiqué de prendre des aiguilles plus fines. Alors, j\'ai pris n° 6 et j\'arrive à 10cm, mais c’est très ( trop)lâche. Alors comment faire ? Je vous remercie. Odile Ricci. J\'ai reçu la laine jeudi et je voudrais commencer au plus tôt. Merci beaucoup
07.03.2026 - 18:24DROPS Design answered:
Bonjour Mme Ricci, l'échantillon se tricote ici en jersey avec les aiguilles 5. C'est la tension de base de DROPS Air, vous pouvez tenter de bloquer votre échantillon tricoté avec une autre tension plus petite pour voir si cela vous permet d'obtenir les mesures et la texture souhaitée - mais pour avoir les bonnes mesures finales, vous devez avoir l'échantillon indiqué - plus d'infos ici. Bon tricot!
09.03.2026 - 08:39
![]() Krystal wrote:
Krystal wrote:
Hi there, I’m looking to make this vest in the size Small, but I don’t see anywhere that indicates how much wool is needed for this project, can you point me to the right place? Thank you.
10.02.2026 - 17:15DROPS Design answered:
Hi Krystal, At the top of the page, just below Sizes, you will find the yarn type and amounts needed for each size. Regards, Drops Team.
11.02.2026 - 06:56
![]() Puyzillou wrote:
Puyzillou wrote:
Bonjour peut être vous a t on déjà posé la question. je souhaite realiser ce modèle avec des aiguilles droites, mais les explications pour les diminutions avec marqueurs sont compliquées pour moi, je ne sais pas les adapter au tricot classique. merci d'avance cordialement
24.11.2025 - 14:02DROPS Design answered:
Bonjour Mme Puyzillou, vous trouverez ici quelques indices et astuces pour adapter un modèle sur aiguilles droites. Bon tricot!
24.11.2025 - 14:46
![]() Carola Reuß wrote:
Carola Reuß wrote:
Hallo, ich habe den Pullunder gestrickt und bin mit der Anleitung gut zurechtgekommen. Habe mich an die Anleitung der Länge cm gehalten. Nun finde ich den Pullunder viel zu kurz und ich habe jetzt noch 1 Knäul Wolle übrig. Sehr schade. Für mich war die Anleitung absolut verständlich, einiges musste ich allerdings mehrmals lesen, um alles zu verstehen.
17.11.2025 - 19:56
![]() Sylvie wrote:
Sylvie wrote:
Bonjour. Je ne comprends pas la partie BIEN CONSERVER.... et le début du DEVANT. J'ai 82 points (164:2) admettons au 100e rang juste avant BIEN CONSERVER LA MEME TENSION..... pourriez-vous m'expliquer rang par rang ce que je dois faire SVP. ET .... donc combien dois-je avoir de points une fois les diminutions des emmanchures faites Merci beaucoup
14.10.2025 - 16:19DROPS Design answered:
Bonjour Sylvie, tricotez le rang juste avant les emmanchures jusqu'à ce qu'il reste 3 mailles avant le début du tour (29 cm de hauteur totale), rabattez les 6 m suivantes (les 3 m de la fin du tour + les 3 m du début du tour suivant), tricotez jusqu'à ce qu'il reste 3 m avant le marqueur suivant (76 m) et rabattez les 6 m suivantes (3 m avant + 3 m après le marqueur), et tricotez les 76 dernières mailles. Vous terminez maintenant chaque partie séparément, en allers et retours. Bon tricot!
15.10.2025 - 09:05
![]() Marie wrote:
Marie wrote:
Bonjour, je ne suis pas sure de comprendre ceci : « Tricoter en jersey, en commençant sur l'envers, et rabattre pour l'encolure au début de chaque rang sur l'endroit: 1 fois 2 mailles et 2 fois 1 maille = 17 mailles. » C’est à dire que je commence par un rang envers normal, ensuite un rang endroit avec rabat de 2 mailles puis un rang envers classique. Enfin, deux fois : un rang endroit avec rabat de 1 maille, puis le rang envers classique. Puis jersey classique ?
07.10.2025 - 15:00DROPS Design answered:
Bonjour Marie, on rabat les mailles de l'encolure devant sur l'endroit, ainsi, le 1er rang de l'épaule droite se tricote sur l'envers, puis, au rang suivant sur l'endroit = à partir de l'encolures vous rabattez 2 mailles, vous terminez le rang, vous tricotez le rang suivant sur l'envers, et, au début du rang suivant sur l'endroit vous rabattez 1 maille. Pour l'autre épaule, vous rabattrez les mailles en début de rang sur l'envers = côté encolure. Bon tricot!
07.10.2025 - 16:53
![]() Sab wrote:
Sab wrote:
Je ne comprends pas quand les cotes sont tricotées les diminutions en début de rang faites ensuite nous tricotons en rond le devant et le dos? Donc les 146mailles sont pour le dos et le devant? Je ne comprends pas votre technique de montage ensuite. Merci de me venir en aide.
30.09.2025 - 10:37DROPS Design answered:
Bonjour Sab, vous tricotez le début du pull en rond, jusqu'aux emmanchures: vous montez (en taille S?) 156 mailles que vous tricotez en côtes, puis vous diminuez 8 mailles tout le tour = il reste 148 mailles soit 74 mailles pour le devant et 74 mailles pour le dos. Vous tricotez en rond jusqu'à ce que l'ouvrage mesure 28 cm puis vous allez rabattre les mailles des emmanchures puis terminer le devant et le dos séparément. Bon tricot!
30.09.2025 - 17:34
![]() Sylvie wrote:
Sylvie wrote:
Désolée, j'avais mal compris. On ne diminuée qu'une seule fois 8 mailles sur un seul rang. C'est mon premier pull en jersey je panique un peu. Désolée.
26.09.2025 - 16:56DROPS Design answered:
Aucun souci, bonne continuation!
26.09.2025 - 17:07
![]() Sylvie wrote:
Sylvie wrote:
Suite à mapremière question. Ok j'ai fait premier rang avec les diminutions, pour les diminutions je les fais sur les rangs suivants où tous les combien de rangs SVP Merci.
26.09.2025 - 15:36DROPS Design answered:
Bonjour Sylvie, après les côtes, vous diminuez 8 mailles au 1er tour et tricotez les mailles restantes jusqu'à la hauteur indiquée (28 à 33 cm). Vous rabattrez ensuite les mailles des emmanchures et vous terminerez le devant et le dos en allers et retours, séparément. Bon tricot!
26.09.2025 - 17:06
|
|
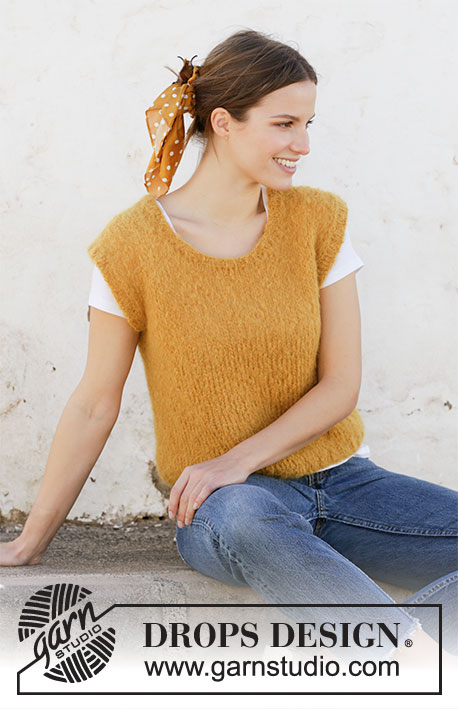
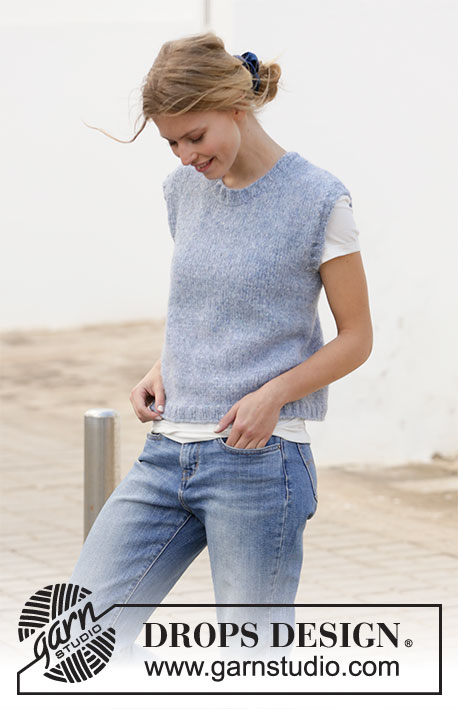
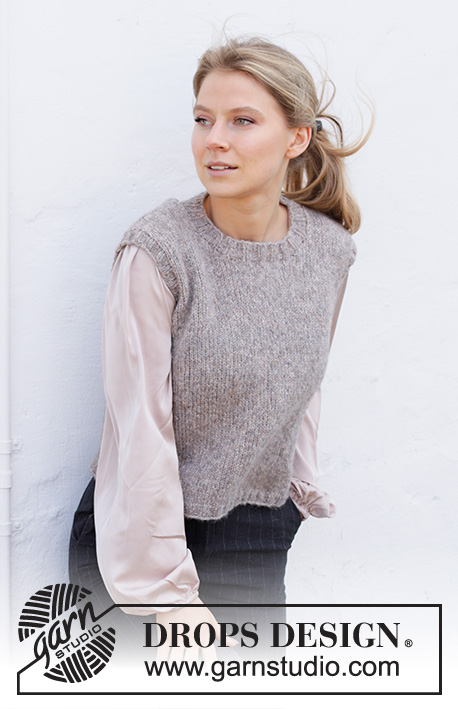
New Girl#newgirlvest |
|
 |
 |
Knitted vest in DROPS Air. The piece is worked with ribbed edges and a round neck. Sizes S - XXXL.
DROPS 215-39 |
|
|
------------------------------------------------------- EXPLANATIONS FOR THE PATTERN: ------------------------------------------------------- DECREASE TIP (evenly spaced): To work out how to decrease evenly, count the total number of stitches on needle (e.g. 174 stitches) and divide by number of decreases to be made (e.g. 10) = 17.4. In this example decrease by knitting approx. each 16th and 17th stitch together. ------------------------------------------------------- START THE PIECE HERE: ------------------------------------------------------- VEST – SHORT OVERVIEW OF THE PIECE: The piece is worked in the round with circular needle bottom up, as far as the armholes. Then the front and back pieces are finished separately back and forth. The neck and sleeve edges are worked in the round to finish. BODY: Cast on 156-172-184-200-220-240 stitches with circular needle size 4 mm = US 6 and Air. Knit 1 round then work rib (knit 2 / purl 2) for 3 cm = 1⅛". Change to circular needle size 5 mm = US 8. Work stockinette stitch and decrease 8 stitches evenly spaced on the first round = 148-164-176-192-212-232 stitches – read DECREASE TIP in explanations above. Insert 1 marker at the beginning of the round and 1 marker after the next 74-82-88-96-106-116 stitches. Allow the markers to follow your work onwards; they will be used when binding off for the armholes. Work stockinette stitch in the round until the piece measures 28-29-30-31-32-33 cm = 11"-11⅜"-11¾"-12¼"-12½"-13" from the cast-on edge. REMEMBER THE KNITTING GAUGE! On the next round bind off for the armholes, starting 3-3-3-4-4-4 stitches before the first marker. Bind off 6-6-6-8-8-8 stitches (the marker sits in the middle of these stitches), work as before until there are 3-3-3-4-4-4 stitches left before the next marker, bind off the next 6-6-6-8-8-8 stitches (the marker sits in the middle of these stitches) and work to end of round. The front and back pieces are now worked back and forth separately. FRONT PIECE: = 68-76-82-88-98-108 stitches. Work stockinette stitch back and forth and bind off for the armholes at the beginning of each row as follows: Bind off 2 stitches 1 time and 1 stitch 2-5-6-7-10-14 times = 60-62-66-70-74-76 stitches. Continue working until the piece measures 40-42-44-46-48-50 cm = 15¾"-16½"-17¼"-18"-19"-19¾" (there is approx. 8 cm = 3⅛" to finished length). On the next row from the right side bind off for the neck as follows: Work the first 21-21-22-24-25-26 stitches, bind off the next 18-20-22-22-24-24 stitches and work the remaining 21-21-22-24-25-26 stitches. The shoulders are now finished separately; do not cut the strand – the right shoulder is continued from here. FRONT RIGHT SHOULDER: = 21-21-22-24-25-26 stitches. Work stockinette stitch, starting from the wrong side, and bind off stitches for the neck at the beginning of each row from the right side as follows: Bind off 2 stitches 1 time and 1 stitch 2 times = 17-17-18-20-21-22 stitches. Continue until the piece measures 48-50-52-54-56-58 cm = 19"-19¾"-20½"-21¼"-22"-22¾" from the cast-on edge. Bind off and cut the strand. FRONT LEFT SHOULDER: = 21-21-22-24-25-26 stitches. Work stockinette stitch, starting from the right side and bind off stitches for the neck at the beginning of each row from the wrong side as follows: Bind off 2 stitches 1 time and 1 stitch 2 times = 17-17-18-20-21-22 stitches. Continue until the piece measures 48-50-52-54-56-58 cm = 19"-19¾"-20½"-21¼"-22"-22¾" from the cast-on edge; adjust to match the right shoulder. Bind off and cut the strand. BACK PIECE: = 68-76-82-88-98-108 stitches. Work stockinette stitch back and forth and bind off for the armholes at the beginning of each row as follows: Bind off 2 stitches 1 time and 1 stitch 2-5-6-7-10-14 times = 60-62-66-70-74-76 stitches. Continue working until the piece measures 46-48-50-52-54-56 cm = 18"-19"-19¾"-20½"-21¼"-22" (there is approx. 2 cm = ¾" to finished length). On the next row from the right side bind off for the neck as follows: Work the first 18-18-19-21-22-23 stitches, bind off the next 24-26-28-28-30-30 stitches and work the remaining 18-18-19-21-22-23 stitches. The shoulders are now finished separately; do not cut the strand – the left shoulder is continued from here. BACK LEFT SHOULDER: = 18-18-19-21-22-23 stitches. Work stockinette stitch starting from the wrong side and bind off 1 stitch at the beginning of the next row from the right side = 17-17-18-20-21-22 stitches. Continue working until the piece measures 48-50-52-54-56-58 cm = 19"-19¾"-20½"-21¼"-22"-22¾" from the cast-on edge; adjust to match the front piece. Bind off and cut the strand. BACK RIGHT SHOULDER: = 18-18-19-21-22-23 stitches. Work stockinette stitch starting from the right side and bind off 1 stitch at the beginning of the next row from the wrong side = 17-17-18-20-21-22 stitches. Continue working until the piece measures 48-50-52-54-56-58 cm = 19"-19¾"-20½"-21¼"-22"-22¾" from the cast-on edge; adjust to match the left shoulder. Bind off and cut the strand. ASSEMBLY: Sew the shoulder seams. NECK: Start from the right side by one of the shoulder seams. Using a short circular needle size 4 mm = US 6 knit up 76 to 92 stitches, inside 1 stitch around the whole neck (the number of stitches must be divisible by 4). Work rib in the round (knit 2 / purl 2) for 2 cm = ¾". Bind off with knit over knit and purl over purl. EDGE AROUND ARMHOLE: Start from the right side where the piece was divided for the armholes. Using a short circular needle size 4 mm = US 6 knit up 84 to 124 stitches around the whole armhole (the number of stitches must be divisible by 4). Work rib in the round (knit 2 / purl 2) for 2 cm = ¾". Bind off with knit over knit and purl over purl. Work an edge around the other armhole in the same way. |
|
 |
|
Have you finished this pattern?Tag your pictures with #dropspattern #newgirlvest or submit them to the #dropsfan gallery. Do you need help with this pattern?You'll find 19 tutorial videos, a Comments/Questions area and more by visiting the pattern on garnstudio.com. © 1982-2026 DROPS Design A/S. We reserve all rights. This document, including all its sub-sections, has copyrights. Read more about what you can do with our patterns at the bottom of each pattern on our site. |
|


With over 40 years in knitting and crochet design, DROPS Design offers one of the most extensive collections of free patterns on the internet - translated to 17 languages. As of today we count 324 catalogs and 12290 patterns - 12280 of which are translated into English (US/in).
We work hard to bring you the best knitting and crochet have to offer, inspiration and advice as well as great quality yarns at incredible prices! Would you like to use our patterns for other than personal use? You can read what you are allowed to do in the Copyright text at the bottom of all our patterns. Happy crafting!
Post a comment to pattern DROPS 215-39
We would love to hear what you have to say about this pattern!
If you want to leave a question, please make sure you select the correct category in the form below, to speed up the answering process. Required fields are marked *.