DROPS Air
DROPS Air
65% Alpaca, 28% Polyamide, 7% Wool
from 6.45 $ /50g
Get the yarn to make this pattern from 25.80$.

The yarn cost is calculated from the pattern’s smallest size and the yarn’s cheapest product type. Looking for an even better price? You might find it on the DROPS Deals!

DROPS SS24

New Girl

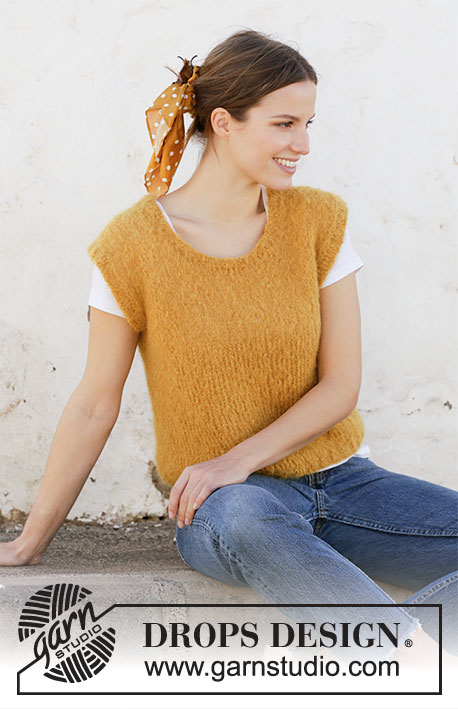
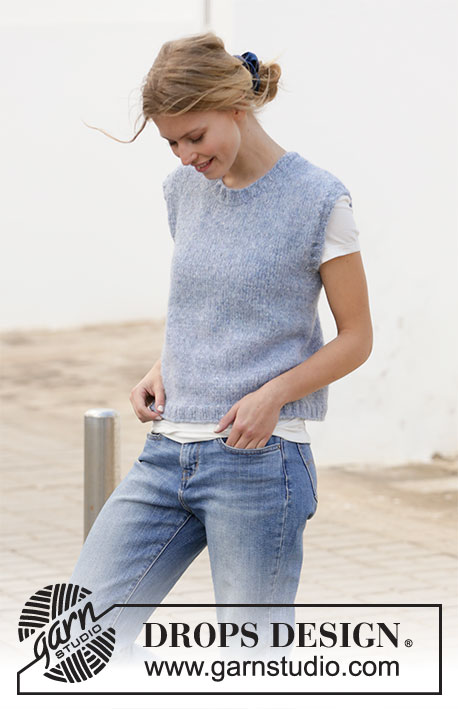
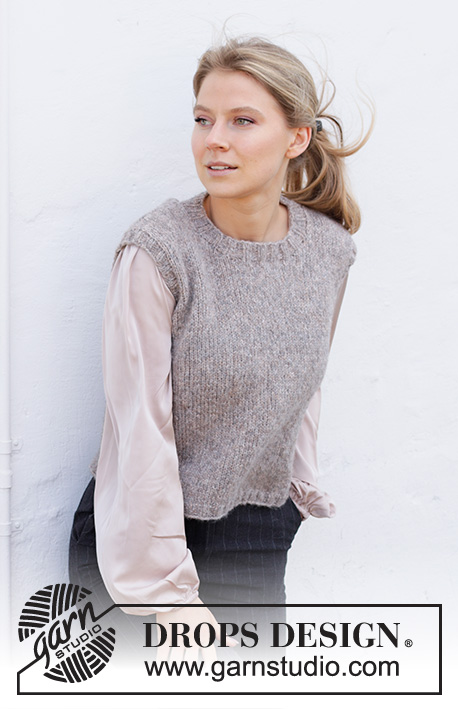
Knitted vest in DROPS Air. The piece is worked with ribbed edges and a round neck. Sizes S - XXXL.

DROPS 215-39
DROPS Design: Pattern no ai-280
Yarn group C or A + A
-------------------------------------------------------

SIZES:
S - M - L - XL - XXL – XXXL

Finished measurements:
Chest measurements: 88-94-104-112-124-136 cm = 34⅝"-37"-41"-44"-48¾"-53½"
Full length: 48-50-52-54-56-58 cm = 19"-19¾"-20½"-21¼"-22"-22¾"

All measurements in charts are in cm.

MATERIALS:
DROPS AIR from Garnstudio (belongs to yarn group C)
200-200-200-250-250-300 g color 26, beige

KNITTING GAUGE:
17 stitches in width and 22 rows in height with stockinette stitch = 10 x 10 cm = 4" x 4".

NEEDLES:
DROPS CIRCULAR NEEDLE SIZE 5 MM = US 8: Length 60 cm = 24" or 80 cm = 32" for stockinette stitch.
DROPS CIRCULAR NEEDLE SIZE 4 MM = US 7: Length 40 cm = 16" and 80 cm = 32" for rib.
Needle size is only a guide. If you get too many stitches on 10 cm = 4", change to a larger needle size. If you get too few stitches on 10 cm = 4", change to a smaller needle size.

-------------------------------------------------------

Alternative Yarn – See how to change yarns here
Yarn Groups A to F – Use the same pattern and change the yarn here
Yarn usage using an alternative yarn – Use our yarn converter here

-------------------------------------------------------

DROPS Air
DROPS Air
65% Alpaca, 28% Polyamide, 7% Wool
from 6.45 $ /50g
Get the yarn to make this pattern from 25.80$.

The yarn cost is calculated from the pattern’s smallest size and the yarn’s cheapest product type. Looking for an even better price? You might find it on the DROPS Deals!

Pattern instructions

NOTE: This pattern is written in American English. All measurements in charts are in cm. For conversion from inches to cm - click here. There are different terms for crocheting in American and British English. If this pattern includes crochet, click for "crochet terms" here. For this pattern in British English, please click here.
-------------------------------------------------------

EXPLANATIONS FOR THE PATTERN:

-------------------------------------------------------

DECREASE TIP (evenly spaced):
To work out how to decrease evenly, count the total number of stitches on needle (e.g. 174 stitches) and divide by number of decreases to be made (e.g. 10) = 17.4.
In this example decrease by knitting approx. each 16th and 17th stitch together.

-------------------------------------------------------

START THE PIECE HERE:

-------------------------------------------------------

VEST – SHORT OVERVIEW OF THE PIECE:
The piece is worked in the round with circular needle bottom up, as far as the armholes. Then the front and back pieces are finished separately back and forth. The neck and sleeve edges are worked in the round to finish.

BODY:
Cast on 156-172-184-200-220-240 stitches with circular needle size 4 mm = US 6 and Air. Knit 1 round then work rib (knit 2 / purl 2) for 3 cm = 1⅛". Change to circular needle size 5 mm = US 8. Work stockinette stitch and decrease 8 stitches evenly spaced on the first round = 148-164-176-192-212-232 stitches – read DECREASE TIP in explanations above. Insert 1 marker at the beginning of the round and 1 marker after the next 74-82-88-96-106-116 stitches. Allow the markers to follow your work onwards; they will be used when binding off for the armholes.

Work stockinette stitch in the round until the piece measures 28-29-30-31-32-33 cm = 11"-11⅜"-11¾"-12¼"-12½"-13" from the cast-on edge.
REMEMBER THE KNITTING GAUGE! On the next round bind off for the armholes, starting 3-3-3-4-4-4 stitches before the first marker. Bind off 6-6-6-8-8-8 stitches (the marker sits in the middle of these stitches), work as before until there are 3-3-3-4-4-4 stitches left before the next marker, bind off the next 6-6-6-8-8-8 stitches (the marker sits in the middle of these stitches) and work to end of round. The front and back pieces are now worked back and forth separately.

FRONT PIECE:
= 68-76-82-88-98-108 stitches.
Work stockinette stitch back and forth and bind off for the armholes at the beginning of each row as follows: Bind off 2 stitches 1 time and 1 stitch 2-5-6-7-10-14 times = 60-62-66-70-74-76 stitches. Continue working until the piece measures 40-42-44-46-48-50 cm = 15¾"-16½"-17¼"-18"-19"-19¾" (there is approx. 8 cm = 3⅛" to finished length). On the next row from the right side bind off for the neck as follows: Work the first 21-21-22-24-25-26 stitches, bind off the next 18-20-22-22-24-24 stitches and work the remaining 21-21-22-24-25-26 stitches. The shoulders are now finished separately; do not cut the strand – the right shoulder is continued from here.

FRONT RIGHT SHOULDER:
= 21-21-22-24-25-26 stitches.
Work stockinette stitch, starting from the wrong side, and bind off stitches for the neck at the beginning of each row from the right side as follows: Bind off 2 stitches 1 time and 1 stitch 2 times = 17-17-18-20-21-22 stitches. Continue until the piece measures 48-50-52-54-56-58 cm = 19"-19¾"-20½"-21¼"-22"-22¾" from the cast-on edge. Bind off and cut the strand.

FRONT LEFT SHOULDER:
= 21-21-22-24-25-26 stitches.
Work stockinette stitch, starting from the right side and bind off stitches for the neck at the beginning of each row from the wrong side as follows: Bind off 2 stitches 1 time and 1 stitch 2 times = 17-17-18-20-21-22 stitches. Continue until the piece measures 48-50-52-54-56-58 cm = 19"-19¾"-20½"-21¼"-22"-22¾" from the cast-on edge; adjust to match the right shoulder. Bind off and cut the strand.

BACK PIECE:
= 68-76-82-88-98-108 stitches.
Work stockinette stitch back and forth and bind off for the armholes at the beginning of each row as follows: Bind off 2 stitches 1 time and 1 stitch 2-5-6-7-10-14 times = 60-62-66-70-74-76 stitches. Continue working until the piece measures 46-48-50-52-54-56 cm = 18"-19"-19¾"-20½"-21¼"-22" (there is approx. 2 cm = ¾" to finished length). On the next row from the right side bind off for the neck as follows: Work the first 18-18-19-21-22-23 stitches, bind off the next 24-26-28-28-30-30 stitches and work the remaining 18-18-19-21-22-23 stitches. The shoulders are now finished separately; do not cut the strand – the left shoulder is continued from here.

BACK LEFT SHOULDER:
= 18-18-19-21-22-23 stitches.
Work stockinette stitch starting from the wrong side and bind off 1 stitch at the beginning of the next row from the right side = 17-17-18-20-21-22 stitches. Continue working until the piece measures 48-50-52-54-56-58 cm = 19"-19¾"-20½"-21¼"-22"-22¾" from the cast-on edge; adjust to match the front piece. Bind off and cut the strand.

BACK RIGHT SHOULDER:
= 18-18-19-21-22-23 stitches.
Work stockinette stitch starting from the right side and bind off 1 stitch at the beginning of the next row from the wrong side = 17-17-18-20-21-22 stitches. Continue working until the piece measures 48-50-52-54-56-58 cm = 19"-19¾"-20½"-21¼"-22"-22¾" from the cast-on edge; adjust to match the left shoulder. Bind off and cut the strand.

ASSEMBLY:
Sew the shoulder seams.

NECK:
Start from the right side by one of the shoulder seams. Using a short circular needle size 4 mm = US 6 knit up 76 to 92 stitches, inside 1 stitch around the whole neck (the number of stitches must be divisible by 4). Work rib in the round (knit 2 / purl 2) for 2 cm = ¾". Bind off with knit over knit and purl over purl.

EDGE AROUND ARMHOLE:
Start from the right side where the piece was divided for the armholes. Using a short circular needle size 4 mm = US 6 knit up 84 to 124 stitches around the whole armhole (the number of stitches must be divisible by 4). Work rib in the round (knit 2 / purl 2) for 2 cm = ¾". Bind off with knit over knit and purl over purl.

Work an edge around the other armhole in the same way.

Diagram

All measurements in charts are in cm.

diagram measurements
Do you have a question? See a list of frequently asked questions (FAQ)

Knitting tension is what determines the final measurements of your work, and is usually measured per 10 x 10 cm. It is provided like so: number of stitches in width x number of rows in height - eg: 19 stitches x 26 rows = 10 x 10 cm.

The knitting tension is very individual; some people knit/crochet loosely while others work tightly. You adjust the knitting tension with the needle size, which is why the suggested needle size only serve as a guide! You need to adjust this (up or down) to ensure that YOUR knitting tension matches the knitting tension provided in the pattern. If you work with a different knitting tension than provided you will have a different yarn consumption, and your work will have different measurements than what the pattern suggests.

The knitting tension also determines which yarns can replace each other. As long as you achieve the same knitting tension you can replace one yarn with another.

See DROPS lesson: How to measure your tension/gauge

See DROPS video: How to make a gauge tension swatch

The required amount of yarn is provided in grams, eg: 450 g. To calculate how many balls you’ll need you first need to know how many grams are in 1 ball (25g, 50g or 100g). This information is available if you click on the individual yarn quality on our pages. Divide the amount required with the amount of each ball. For example, if each ball is 50g (the most common amount), the calculation will be as follows: 450 / 50 = 9 balls.

The important thing when changing from one yarn to another is that the knitting/crochet tension remains the same. This is so that the measurements of the finished piece will be the same as on the sketch provided. It is easier to achieve the same knitting tension using yarns from the same yarn group. It is also possible to work with multiple strands of a thinner yarn to achieve the knitting tension of a thicker one. Please try our yarn converter. We recommend you to always work a test swatch.

Please NOTE: when changing yarn the garment might have a different look and feel to the garment in the photo, due to individual properties and qualities of each yarn.

See DROPS lesson: Can I use a different yarn than the one mentioned in the pattern?

All our yarns are categorised into yarn groups (from A to F) according to thickness and knitting tension – group A contains the thinnest yarns and group F the thickest. This makes it easier for you to find alternative yarns to our patterns, should you wish to switch yarn. All yarns within the same group have a similar knitting tension and can easily replace each other. However, different yarn qualities have different structures and properties which will give the finished work a unique look and feel.

Click here for an overview of the yarns in each yarn group

At the top of all our patterns you’ll find a link to our yarn converter, which is a helpful tool should you wish to use a different yarn than suggested. By filling in the yarn quality you wish to replace, the amount (in your size) and number of strands, the converter will present good alternative yarns with the same knitting tension. Additionally it will tell you how much you’ll require in the new qualities and whether you’ll need to work with multiple strands. Most skeins are 50g (some are 25g or 100g).

If the pattern is worked with multiple colours, every colour will have to be converted separately. Similarly, if the pattern is worked with several strands of different yarns (for example 1 strand Alpaca and 1 strand Kid-Silk) you will have to find alternatives for each, individually.

Click here to see our yarn converter

Since different yarns have different qualities and textures we have chosen to keep the original yarn in our patterns. However, you can easily find options among our available qualities by using our yarn converter, or simply pick a yarn from the same yarn group.

It is possible that some retailers still have discontinued yarns in stock, or that someone has a few skeins at home that they would like to find patterns for.

The yarn converter will provide both alternative yarn as well as required amount in the new quality.

If you think it's hard to decide what size to make, it can be a good idea to measure a garment you own already and like the size of. Then you can pick the size by comparing those measures with the ones available in the pattern's size chart.

You'll find the size chart at the bottom of the pattern.

See DROPS lesson: How to read size chart

The needle size provided in the pattern serves only as a guide, the important thing is to follow the knitting tension. And since knitting tension is very individual, you will have to adjust the needle size to ensure that YOUR tension is the same as in the pattern – maybe you’ll have to adjust 1, or even 2 needle sizes, up or down to achieve the correct tension. For this, we recommend that you work test swatches.

Should you work with a different knitting tension than the one provided, the measurements of the finished garment might deviate from the measurement sketch.

See DROPS lesson: How to measure your tension/gauge

See DROPS video: How to make a gauge tension swatch

Working a garment top-down provides more flexibility and room for personal adjustment. For example it is easier to try the garment on while working, as well as making adjustments to length of yoke and shoulder caps.

The instructions are carefully explaining every step, in the correct order. Diagrams are adjusted to the knitting direction and are worked as usual.

The diagram depicts all rows/rounds, and every stitch seen from the right side. It is read from bottom to top, from right to left. 1 square = 1 stitch.

When working back and forth, every other row is worked from the right side and every other row is worked from the wrong side. When working from the wrong side, the diagram will have to be worked reversed: from left to right, knit stitches are purled, purl stitches are knit etc.

When working in the round every round is worked from the right side and the diagram are worked from right to left on all rounds.

See DROPS lesson: How to read knitting diagrams

The diagram depicts all rows/rounds, and every stitch seen from the right side. It is worked from bottom to top, from right to left.

When working back and forth every other row is worked from the right side: from right to left and every other row is worked from the wrong side: from left to right.

When working in the round, every row in the diagram are worked from the right side, from right to left.

When working a circular diagram you start in the middle and work your way outwards, counter clockwise, row by row.

The rows usually start with a given number of chain stitches (equivalent to the height of the following stitch), this will either be depicted in the diagram or explained in the pattern.

See DROPS lesson: How to read crochet diagrams

Instructions for working several diagrams after each other on the same row/round, will often be written like so: “work A.1, A.2, A.3 a total of 0-0-2-3-4 times". This means you work A.1 once, then A.2 is worked once, and A.3 is repeated (in width) the number of times provided for your size – in this case like so: S = 0 times, M = 0 times, L=2 times, XL= 3 times and XXL = 4 times.

The diagrams are worked as usual: begin with the first row in A.1, then work the first row in A.2 etc.

See DROPS lesson: How to read knitting diagrams

See DROPS lesson: How to read crochet diagrams

The total width of the garment (from wrist-to-wrist) will be larger in the larger sizes, despite the actual sleeves being shorter. The larger sizes have longer sleeve caps and wider shoulders, so there will be a good fit in all sizes.

The measurement sketch/schematic drawing provides information regarding the full length of the garment. If it’s a jumper or a jacket the length is measured from the highest point on the shoulder (usually closest to the neckline), and straight down to the bottom of the garment. It is NOT measured from the tip of shoulder. Similarly, the length of yoke is measured from the highest point on the shoulder and down to where yoke is split into body and sleeves.

See DROPS lesson: How to read a schematic drawing

Diagrams are often repeated on the round or in height. 1 repeat is the diagram the way it appears in the pattern. If it says to work 5 repeats of A.1 in the round, then you work A.1 a total of 5 times after/next to each other in the round. If it says to work 2 repeats of A.1 vertically/in height you work the entire diagram once, then begin again at the start and work the entire diagram one more time.

Chain stitches are slightly narrower than other stitches and to avoid working the cast-on edge too tight, we simply chain more stitches to begin with. The stitch count will be adjusted on the following row to fit the pattern and measurement sketch.

The rib edge is more elastic and will contract slightly compared to, for example, stocking stitch. By increasing before the rib edge, you avoid a visible difference in width between the rib edge and the rest of the body.

It’s very easy to cast off too tightly, and by making yarn overs while casting off (and simultaneously casting these off) you avoid a too tight cast off edge.

See DROPS video: How to bind off with yarn overs (yo)

To achieve an even increase (or decrease) you can increase on, for example: every 3rd and 4th row alternately, like so: work 2 rows and increase on the 3rd row, work 3 rows and increase on the 4th. Repeat this until the increase is complete.

See DROPS lesson: Increase or decrease 1 st on every 3rd and 4th row alternately

Should you prefer to work in the round instead of back and forth, you may of course adjust the pattern. You’ll need to add steeks mid-front (usually 5 stitches), and follow the instructions. When you would normally turn and work from the wrong side, simply work across the steek and continue in the round. At the end you’ll cut the piece open, pick up stitches to work bands, and cover the cut edges.

See DROPS video: How to knit steeks and cut open

Should you prefer to work back and forth instead of in the round, you may of course adjust the pattern so you work the pieces separately and then assemble them at the end. Divide the stitches for the body in 2, add 1 edge stitch in each side (for sewing) and work the front and back pieces separately.

See DROPS lesson: Can I adapt a pattern for circular needles into straight needles?

Pattern repeats can vary slightly in the different sizes, in order to get the correct proportions. If you’re not working the exact same size as the garment in the photo, yours might deviate slightly. This has been carefully developed and adjusted so that the complete impression of the garment is the same in all sizes.

Make sure to follow instructions and diagrams for your size!

If you have found a pattern you like which is available in women’s size it’s not very difficult to convert it to men’s size. The biggest difference will be the length of sleeves and body. Start working on the women size that you think would fit across the chest. The additional length will be worked right before you cast off for the armhole/sleeve cap. If the pattern is worked top-down you can add the length right after the armhole or before the first decrease on sleeve.

Regarding additional yarn amount, this will depend on how much length you add, but it is better with a skein too many than too few.

All yarns will have excess fibres (from production) that might come off as lint or shedding. Brushed yarns (ie hairier yarns) have more of these loose, excess fibres, causing more shedding.

Shedding also depends on what is worn under or over the garment, and whether this pulls at the yarn fibres. It’s therefore not possible to guarantee that there will be no shedding

Below are some tips on how to get the best result when working with hairier yarns:

1. When the garment is finished (before you wash it) shake it vigorously so the looser hairs come off. NOTE: do NOT use a lint roller, brush or any method that pulls at the yarn.

2. Place the garment in a plastic bag and put it in your freezer - the temperature will cause the fibres to become less attached to each other, and excess fibres will come off easier.

3. Leave in the freezer for a few hours before taking it out and shaking it again.

4. Wash the garment according to the instructions on the yarn label.

Pilling is a natural process that happens to even the most exclusive of fibers. It's a natural sign of wear and tear that is hard to avoid, and that is most visible in high friction areas of your garment like a sweater's arms and cuffs.

You can make your garment look as new by removing the pilling, using a fabric comb or a pill/lint remover.

Still can't find the answer you need? Then scroll down and leave your question so one of our experts can try to help you. This will be done normally within 5 to 10 working days.
In the meantime, you can read the questions and answers that others have left to this pattern or join the DROPS Workshop on Facebook to get help from fellow knitters/crocheters!

You might also like...

Post a comment to pattern DROPS 215-39

We would love to hear what you have to say about this pattern!

If you want to leave a question, please make sure you select the correct category in the form below, to speed up the answering process. Required fields are marked *.

Comments / Questions (32)

country flag Monika wrote:

Hej, hvis jeg gerne vil have dybere ærmegab, hvad kan jeg så gøre? Mvh Monika :)

09.06.2021 - 14:33

country flag Kaja wrote:

Stemmer det at bakstykket skal strikkes lengre?

08.05.2021 - 15:26

DROPS Design answered:

Hej Kaja, for og bagstykke er lige lange :)

10.05.2021 - 08:59

country flag Annabel wrote:

Als je markeerdraad in het begin staat, hoe kan je dan afkanten en dezelfde hoogte houden? De laatste 3 steken voor de markeerdraad aan het begin zijn dan toch niet even hoog gebreid ?

30.03.2021 - 13:07

DROPS Design answered:

Dag Annabel,

Klopt, de laatste drie steken voor de markeerdraad, wanneer je afkant voor het armsgat zijn 1 naald minder in de hoogte, maar over zo'n lengte zal dat echt niet opvallen.

03.04.2021 - 11:22

country flag Peggy wrote:

Do I need to change needles when I get to the armhole section. Pattern says knit back and forth from knitting round. Thank you

19.03.2021 - 18:19

DROPS Design answered:

Dear Peggy, unless your personal knitting style is one that results in wastly different gauge knitted on teh round or knitted back and forth, you don't need to change needle sizes. If your gauge is different, they, yes, it is better to do so. Happy Knitting!

20.03.2021 - 07:05

country flag Lis Majken Rosenberg wrote:

Str small: hvis man strikker cm 28 til ærmegab og cm 20 til indtagning af hals og derefter de sidste cm 8 til arbejdet er slut bliver arbejdet cm 56 og det skal kun være cm 48 i følge opskrift- har I ikke skrevet forkert?

01.03.2021 - 16:37

DROPS Design answered:

Hej, Du strikker 28 cm lukker af til ærmegab, fortsætter til arbejdet måler 40 cm (8cm tilbage) og lukker af til hals. Ærmegabet er ialt 20 cm - 28+20=48 cm. God fornøjelse!

04.03.2021 - 12:27

country flag Carina Emilsson wrote:

Varför ska man inte ta av garnet när man börja avmaskningen ?

19.02.2021 - 12:49

DROPS Design answered:

Hej Carina, jeg forstår ikke helt hvad du mener? Hvilket stykke i opskriften er du på? Hvorfor vil du ta av garnet når du begynder afmaskningen? ... Skriv gerne lidt mere, så skal vi prøve at give dig et svar :)

19.02.2021 - 13:36

country flag Vibeke Scheuer wrote:

Kan vesten strikkes i drops brushed alpaca silk? Pinde?

03.02.2021 - 18:21

DROPS Design answered:

Hej Vibeke, ja! Brug garnomregneren her i opskriften. Vælg DROPS Air, vælg garnforbrug i din størrelse, vælg 1 tråd så får du garnforbruget op i DROPS Brushed Alpaca Silk. Du skal bruge den pind hvor du rammer strikkefastheden i opskriften. God fornøjelse!

04.02.2021 - 14:27

country flag Jane wrote:

Lurer på hvor mange nøster garn man kan beregne på størrelse S?

21.01.2021 - 20:33

DROPS Design answered:

Hei Jane, Drops Air er i 50 g nøster. Derfor trenger du 4 nøster til størrelse S. God fornøyelse!

22.01.2021 - 08:01

country flag Karin Adel Nielsen wrote:

Kan jeg bruge en kid silk sammen med Air til denne vest?

14.01.2021 - 07:50

DROPS Design answered:

Hej Karin, det kan du godt, men den vil blive lidt kompakt... Eller så følger du DROPS 212-17 hvor strikkefastheden passer bedre til de to tråde. Husk at overholde strikkefastheden i opskriften for at få målene som du finder i måleskitsen nederst i opskriften. God fornøjelse!

14.01.2021 - 10:08

country flag Sara wrote:

Hej - hvis man gerne vil have den længere, vil man så kunne gøre dette?

06.01.2021 - 13:17

DROPS Design answered:

Hej Sara, ja da strikker du det ekstra inden du lukker af til ærmegab. God fornøjelse!

07.01.2021 - 16:06