
Popular categories
Looking for a yarn?


Comments / Questions (27)
![]() Ans Van wrote:
Ans Van wrote:
Snap de meerderingen niet goed na de col graag in het nederlands
04.02.2026 - 19:15
![]() Ans wrote:
Ans wrote:
Snap de meerdering niet goed na de col
04.02.2026 - 19:11
![]() Isabelle wrote:
Isabelle wrote:
Quand dois-je passer au schéma A2? Ce n'est pas très clair
25.12.2025 - 16:06DROPS Design answered:
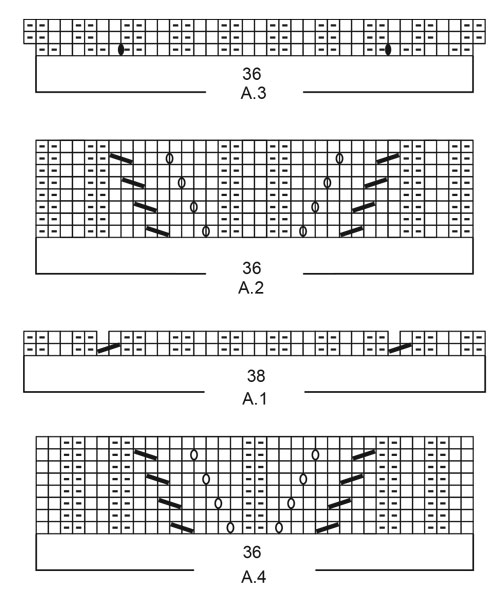
Bonjour Isabelle, lorsque vous avez tricoté 1 fois le diagramme A.1 en hauteur, vous tricotez A.2 sur les mailles de A.1 (et tricotez les autres mailles comme avant). Dans A.1 vous avez diminué 2 mailles au 1er rang = il reste 36 mailles au 2ème rang; au rang suivant, vous tricotez A.2 sur ces 36 mailles. Bon tricot!
02.01.2026 - 12:12
![]() Anne Marie wrote:
Anne Marie wrote:
J ai réalisé le modèle Leaf Diversion en taille L-XL les explications indiqué 3 pelotes de DROPS NORD et 2 pelotes de DROPS KID-SILK pour le pull uniquement et je n en ai pas eu assez il faut 3 pelotes de chaque Sinon modele bien expliqué
19.10.2024 - 22:43
![]() Cristina wrote:
Cristina wrote:
Si ho lavorato il campione risultano 70 cm di giro collo
01.02.2024 - 12:23DROPS Design answered:
Buongiorno Cristina, al momento non ci sono correzioni sul numero di maglie del collo. Come può vedere dalla foto non è un modello a collo stretto. Buon lavoro!
03.02.2024 - 10:22
![]() Cristina wrote:
Cristina wrote:
Buongiorno, ho messo 136 maglie per il collo ma mi resta grandissimo grazie
31.01.2024 - 10:35DROPS Design answered:
Buonasera Cristina, ha lavorato il campione prima di iniziare? Buon lavoro!
31.01.2024 - 18:54
![]() Eija Niemi wrote:
Eija Niemi wrote:
Hei! Onko todella niin, että lisäykset kuuluu tehdä ennen 1. ja 3. merkkiä. Olen nyt tehnyt ensimmäiset 8 lisäystä ja minusta alkaa näyttää siltä, että lisäykset kuuluisi tehdä 1. ja 3. merkin jälkeen. Ja tietenkin vastaavasti ennen 2. ja 4. merkkiä. Tällä tavalla lisättyjen 8n silmukan joustinosuus tulee A2-osuuden jatkoksi. Terveisin Eija N.
06.10.2023 - 10:04DROPS Design answered:
Hei, tarkistin ohjeen ja lisäykset pitää tehdä ennen 1. ja 3. merkkiä sekä 2. ja 4. merkin jälkeen.
18.10.2023 - 17:03
![]() Li wrote:
Li wrote:
När man ska öka FÖRE första markören. Betyder det att man ska göra ökningen i slutet på första varvet då? Dvs sista maskan på varvet.
06.02.2022 - 19:17DROPS Design answered:
Hej Li, ja det stemmer, du øger kun på ryg og forstykket (ikke på skuldrerne) før 1.mærketråd sidst på varvet :)
09.02.2022 - 09:57
![]() Emma wrote:
Emma wrote:
”…sedan stickas de ökade maskorna från de nästa 8 varven i mönster så här: 2 avigmaskor, 2 rätmaskor, 2 avigmaskor, 2 rätmaskor.” Ska detta ske lika för varje ökning oavsett om det är vid höger eller vänster arm? Eller ska det göras spegelvänt för ena sidan?
17.01.2022 - 22:17DROPS Design answered:
Hei Emma. Det blir like for hver økning. Om du ser på et nærbilde, ser du økning 11 og 12 er vrang masker, både på høyre og venstre siden. Samme med 13. og 14. økning (rett masker), 15. og 16. økning (vrang masker) og 17. og 18. økning (rett masker). mvh DROPS Design
18.01.2022 - 13:35
![]() Jag wrote:
Jag wrote:
Jag förstår inte detta: Öka så på varje varv totalt 18-20-22 gånger. De ökade maskorna från de första 10-12-14 varven stickas i slätstickning, sedan stickas de ökade maskorna från de nästa 8 varven i mönster så här: 2 avigmaskor, 2 rätmaskor, 2 avigmaskor, 2 rätmaskor. Är det efter att alla 18-20-22 ökningarna är gjorda som man stickar slätstickning över första maskorna och sen mönster, eller är det för varje varv och ny maska under tiden man ökar som det gäller?
12.01.2022 - 22:33
|
|||||||||||||||||||
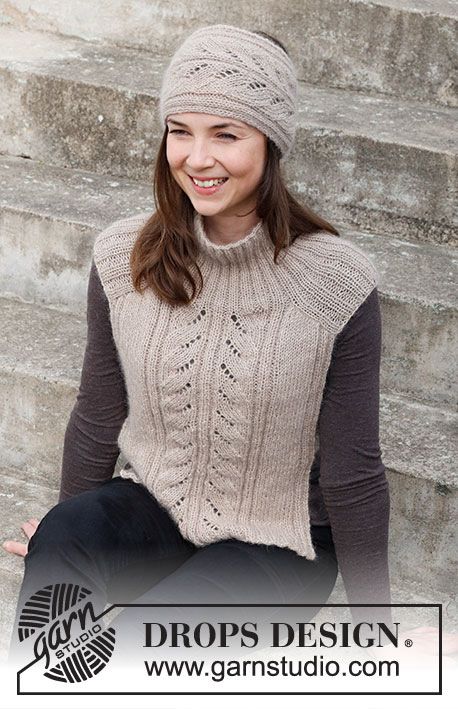
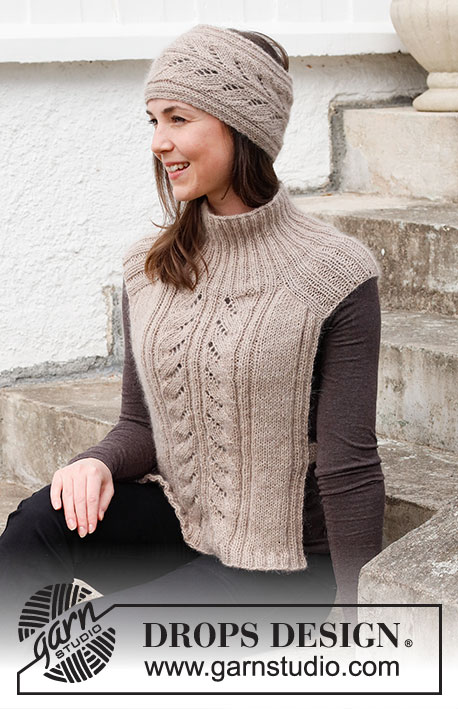
Leaf Diversion#leafdiversionset |
|||||||||||||||||||
 |
 |
||||||||||||||||||
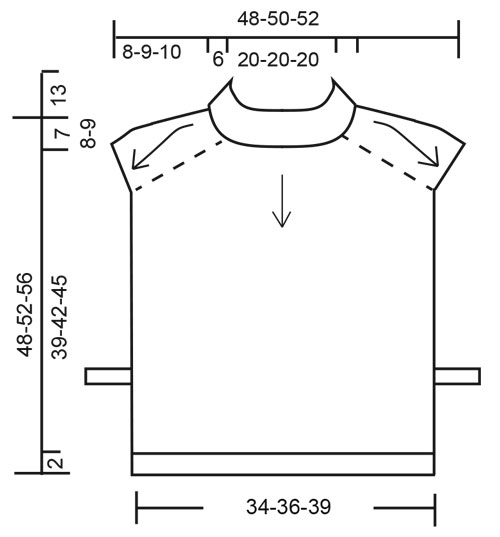
Knitted vest and head band in DROPS Nord and DROPS Kid-Silk. Piece is knitted top down with increase for saddle shoulder and lace pattern. Size: S - XXXL
DROPS 218-23 |
|||||||||||||||||||
|
------------------------------------------------------- EXPLANATION FOR THE PATTERN: ------------------------------------------------------- GARTER STITCH (back and forth): Knit all rows. 1 ridge vertically = knit 2 rows. PATTERN: Vest: See diagrams A.1 to A.3. Head band: See diagram A.4. Diagrams show all rows in pattern seen from the right side. INCREASE TIP-1 (applies to saddle shoulder increase): BEFORE MARKER: The new stitch will be twisted, leaning towards the right. Use left needle to pick up strand between 2 stitches from the round below, pick up strand from behind and knit stitch in front loop. AFTER MARKER: The new stitch will be twisted, leaning towards the left. Use left needle to pick up strand between 2 stitches from the round below, pick up strand from the front and knit stitch in back loop. INCREASE TIP-2 (evenly): To calculate how to increase evenly, count the stitches to be increased (e.g. 10 stitches) and divide this number by stitches of increases to be done (e.g. 4) = 2.5. In this example increase by making 1 yarn over after alternately every other and 3rd stitch. On next row work yarn overs twisted to avoid holes. ------------------------------------------------------- START THE PIECE HERE: ------------------------------------------------------- VEST - SHORT OVERVIEW OF THE PIECE: Piece is worked top down, and worked in the round until shoulder increases are done. Then work front and back piece back and forth separately. VEST: Cast on 128-136-144 stitches on circular needle size 4 mm = US 6 with 1 strand Nord and 1 strand Kid-Silk (= 2 strands). Knit 1 round. Then work rib (= knit 2/purl 2) in the round for 13 cm = 5⅛". Switch to circular needle size 5 mm = US 8. Now work as follows: Insert 1st marker at beginning of round (= before 2 knit stitches), work rib as before over the first 26-30-34 stitches, insert 2nd marker here, work A.1 over the next 38-38-38 stitches (= 2 stitches decreased), insert 3rd marker here, work rib as before over the next 26-30-34 stitches, insert 4th marker here, work A.1 over the last 38-38-38 stitches (= 2 stitches decreased) = 124-132-140 stitches. REMEMBER THE KNITTING GAUGE! SADDLE SHOULDER INCREASE: Now work last round in A.1 and work rib as before over the 26-30-34 stitches on each shoulder. AT THE SAME TIME on first round increase 4 stitches on round: Increase BEFORE 1st and 3rd marker, and AFTER 2nd and 4th marker – read INCREASE TIP-1. Increases are only on front piece and back piece and number of shoulder stitches remains the same. Increase like this every round 18-20-22 times in total. Work the increased stitches from the first 10-12-14 rounds in stockinette stitch, then work the increased stitches from the next 8 rounds in pattern as follows: Purl 2, knit 2, purl 2, knit 2. When A.1 is finished vertically, work A.2 over A.1 and rib as before over the 26-30-34 stitches on each shoulder. When all increases are done, there are 196-212-228 stitches on round, continue with pattern as before. The next time the 1st, 3rd, 5th or 7th round in A.2 is worked; work as follows: Bind off with knit over knit and purl over purl over the first 26-30-34 stitches, work pattern as before over the next 72-76-80 stitches before slipping them on 1 stitch holder (= front piece), bind off with knit over knit and purl over purl over the next 26-30-34 stitches, work pattern as before over the last 72-76-80 stitches (= back piece). BACK PIECE: Continue back and forth with pattern as before over the 72-76-80 stitches. I.e. Work A.2 over the middle 36-36-36 stitches and work knit over knit and purl over purl over the remaining stitches. When piece measures 39-42-45 cm = 15¼"-16½"-17¾" from transition between A.1 in the neck and A.2 – adjust to finish after a whole repetition vertically, work next row from right side as follows: Work as before over the first 8-8-8 stitches, knit the next 10-12-14 stitches while increasing 4-2-4 stitches evenly – read INCREASE TIP-2, work A.3 over A.2 (= 2 stitches increased), knit the next 10-12-14 stitches while increasing 4-2-4 stitches evenly, work the last 8-8-8 stitches as before = 82-82-90 stitches. Work 1 row in pattern (work yarn overs twisted to avoid holes). Switch to circular needle size 4 mm = US 6. Now work rib from right side as follows: Work (knit 2/purl 2) over the first 20-20-24 stitches, knit 2, continue with knit over knit and purl over purl over the next 38-38-38 stitches, work (knit 2/purl 2) over the next 20-20-24 stitches, knit 2. Continue back and forth like this until rib has been worked for 2 cm = ¾". Bind off stitches with knit over knit and purl over purl. FRONT PIECE: Work as on back piece. ASSEMBLY: Knit a band with buttonhole in each side as follows: Cast on 7 stitches on circular needle size 4 mm = US 6 with 1 strand Nord and 1 strand Kid-Silk (= 2 strands). Work in garter stitch back and forth. When 4 ridges have been worked, decrease for buttonhole follows: Knit 2, knit 2 together (= 1 stitch decreased), make 1 yarn over, knit 3. On next row knit yarn over. continue back and forth in garter stitch until band measures approx. 16 = 6¼" to 28 cm = 11" – or desired length (ribbon can be worked longer after button is attached, to make it easier to work until correct length). Fasten button on right side of back piece, approx. 14 cm = 5½" up from bottom edge and between 5th and 6th stitch from edge. Then try the vest on and adjust length of band by working to desired length. Fasten the other end of band on on the inside of front piece approx. 14 cm = 5½" (i.e. in a row) with button. Repeat in the other side. ------------------------------------------------------- HEAD BAND: Work head band back and forth on circular needle. HEAD BAND: Cast on 36 stitches on circular needle size 4.5 mm = US 7 with 1 strand Nord + 1 strand Kid-Silk (= 2 strands). Work pattern A.4 back and forth. Tighten the yarn a little at the beginning of every row to avoid a loose edge stitch. REMEMBER THE KNITTING GAUGE! Work like this until piece measures 49 cm = 19¼" or desired length - adjust to finish after a whole repetition vertically. Bind off stitches with knit over knit and purl over purl. Cut the yarn but leave some yarn for assembly. Sew seam with grafting/kitchener stitches inside cast-on and bind-off edge. |
|||||||||||||||||||
Diagram explanations |
|||||||||||||||||||
|
|||||||||||||||||||
 |
|||||||||||||||||||
 |
|||||||||||||||||||
Have you finished this pattern?Tag your pictures with #dropspattern #leafdiversionset or submit them to the #dropsfan gallery. Do you need help with this pattern?You'll find 22 tutorial videos, a Comments/Questions area and more by visiting the pattern on garnstudio.com. © 1982-2026 DROPS Design A/S. We reserve all rights. This document, including all its sub-sections, has copyrights. Read more about what you can do with our patterns at the bottom of each pattern on our site. |
|||||||||||||||||||


With over 40 years in knitting and crochet design, DROPS Design offers one of the most extensive collections of free patterns on the internet - translated to 17 languages. As of today we count 324 catalogs and 12290 patterns - 12280 of which are translated into English (US/in).
We work hard to bring you the best knitting and crochet have to offer, inspiration and advice as well as great quality yarns at incredible prices! Would you like to use our patterns for other than personal use? You can read what you are allowed to do in the Copyright text at the bottom of all our patterns. Happy crafting!
Post a comment to pattern DROPS 218-23
We would love to hear what you have to say about this pattern!
If you want to leave a question, please make sure you select the correct category in the form below, to speed up the answering process. Required fields are marked *.