
Popular categories
Looking for a yarn?


Comments / Questions (20)
![]() Pamela wrote:
Pamela wrote:
Can I knit this with straight needles instead of circular needles?
05.06.2025 - 19:45DROPS Design answered:
Dear Pamela, you will find some tips to adapt a pattern for straight needles here. Happy knitting!
06.06.2025 - 08:06
![]() Renette wrote:
Renette wrote:
Guten Tag, Wie funktionieren die Zunahmen bei der Halsblende genau? Ich stricke ja aus einer Masche zwei heraus, sind diese sofort im Rippenmuster heraus zu stricken oder erst in der Runde danach anzupassen? Geht diese Zunahme auch, wenn ich statt rechts/links, rechts verschränkt/links stricke? Mir gefällt es so besser. Vielen Dank!
31.10.2023 - 23:23DROPS Design answered:
Liebe Renette, die Zunahmen werden im Rippenmuster gestrickt, so die 1. Masche am Anfang jeder Reihe stricken Sie 2 Mal und dann die neuen Maschen stricken Sie im Rippenmuster. Viel Spaß beim stricken!
03.11.2023 - 07:16
![]() Rita Jeronimo wrote:
Rita Jeronimo wrote:
I´m on the armhole edge stage but cannot figure out how to flap and pin each sholder so to form an armhole that looks like the one depicted on the photo. Is there a video tutorial or a step by step image representation on how to do it? Thank you very much for your help and for sharing this very pretty pattern!
30.09.2023 - 12:15DROPS Design answered:
Dear Mrs Jeronimo, lay the front shoulder over the shoulder on back piece - just as in the picture, get helped with measurements if necessary, then pin shoulders together (front to back) so that you can then pick up in both layers, making sure the shoulders will be both the same and nicely done. Then you just have to pick up stitches, first in only one layer, then in both layers then again in just one layer. Happy knitting!
02.10.2023 - 09:04
![]() Andrea wrote:
Andrea wrote:
Wie kann man aus 16 Maschen 22 Maschen bei dem schulterlappen heraus stricken bei der Größe 86. Bitte um Antwort
19.01.2023 - 11:50DROPS Design answered:
Liebe Andrea, fassen Sie 1 Masche in jeder Masche vom Schulter + extra Maschen regelmäßig verteilt dazwischen auf - so wird die Kante nicht zu eng. Viel Spaß beim stricken!
19.01.2023 - 18:38
![]() Bella wrote:
Bella wrote:
Es ist das erste Mal das ich stricke und ich habe eine Frage zu den Schultern: ich habe die linke Schulter nach Anleitung gestrickt. Am Ende habe ich noch eine Masche auf der Nadel. Was mache ich nun? Den Faden durchziehen und abschneiden? Eine Nadel in der letzten Masche lassen? Aber dann habe ich ja keinen Faden um die Rechte Schulter zu stricken. Vielen Dank für die Antwort.
22.08.2022 - 12:33
![]() Bella wrote:
Bella wrote:
Es ist das erste Mal das ich stricke und ich habe eine Frage zu den Schultern: ich habe die linke Schulter nach Anleitung gestrickt. Am Ende habe ich noch eine Masche auf der Nadel. Was mache ich nun? Den Faden durchziehen und abschneiden? Eine Nadel in der letzten Masche lassen? Aber dann habe ich ja keinen Faden um die Rechte Schulter zu stricken. Vielen Dank für die Antwort.
22.08.2022 - 12:19DROPS Design answered:
Liebe Bella, den Faden ziehen Sie durch diese letzte Masche und schneiden Sie ab. Dann stricken Sie die Maschen vom rechten Schulter. Viel Spaß beim stricken!
22.08.2022 - 12:37
![]() Marianne Torp wrote:
Marianne Torp wrote:
Tegning af skuldersøm /overlap er misvisende. Det er tegnet omvendt? Ikke som foto.
15.02.2022 - 16:38
![]() Kristina wrote:
Kristina wrote:
There is a translation error in Hungarian. At the beginning of the BODY part: after knitting the rib to reach 3cm, switch needles to 2,5 and to INCREASE 12 (for 6/9m size) however the English says the opposite, to DECREASE 12. My Grandma knitted it twice then asked me to find the error 🙈
16.11.2021 - 18:30
![]() Else Gade Gyldenkærne wrote:
Else Gade Gyldenkærne wrote:
Jeg spurgte tidligere om anvisning på, hvordan man skal sy skulderspidserne fast, og fik at vide, at de ikke skal sys men strikkes. Men der STÅR altså sy i den danske opskrift.
26.10.2021 - 21:15
![]() Else Gade Gyldenkærne wrote:
Else Gade Gyldenkærne wrote:
Jeg savner mere specifikke anvisninger om halsaflukning (sæt midterste masker på tråd). Strikker man først de første skuldermasker (og sætter dem hvor?), strikker man også de midterste, inden man sætter dem på tråd, så man nu har garnet klar til at strikke sidste skulder? Og er "venstre skulder" på bagstykke mon til venstre set forfra eller set bagfra?
26.10.2021 - 21:12DROPS Design answered:
Hej Else, det betyder ikke noget hvilken skulder du strikker færdig først. Strik frem til halsmaskerne, inden du vender arbejdet for at strikke skulderen færdig, så sætter du halsmaskerne på tråden. Når du har gjort det strikker du den første skulder færdig og tager ind i den side som vender mod halsen. God fornøjelse!
28.10.2021 - 13:22
|
|||||||
Baby Pockets#babypocketsvest |
|||||||
 |
 |
||||||
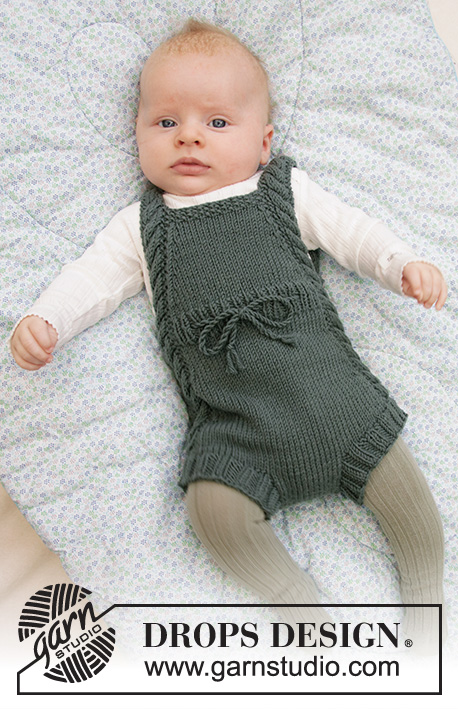
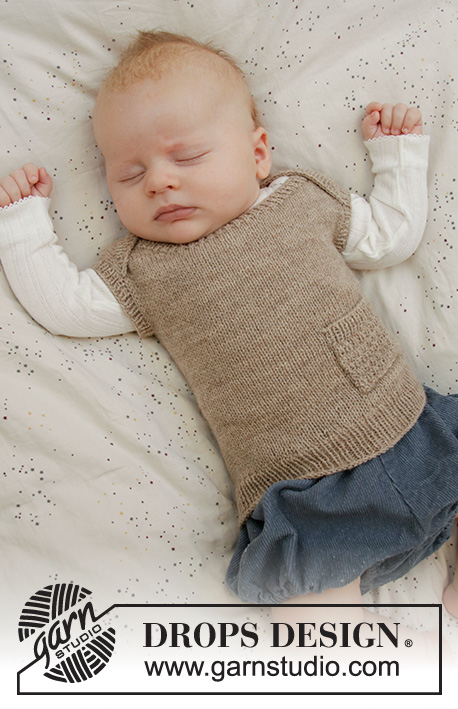
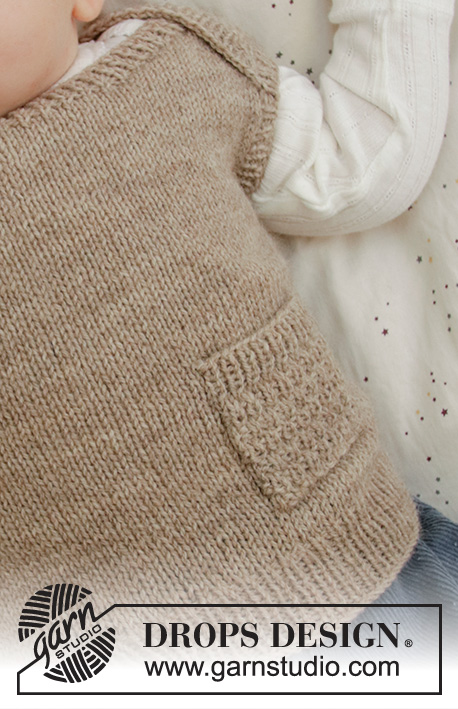
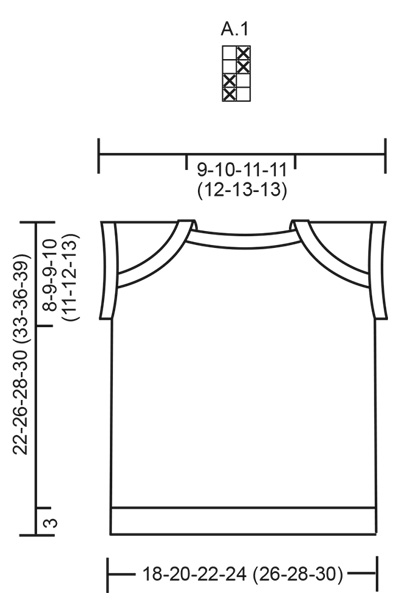
Knitted vest for babies in DROPS Flora. Sizes 0 – 6 years.
DROPS Baby 33-22 |
|||||||
|
------------------------------------------------------- EXPLANATIONS FOR THE PATTERN: ------------------------------------------------------- PATTERN: See diagram A.1. DECREASE TIP (evenly spaced): To work out how to decrease evenly, count the total number of stitches on needle (e.g. 100 stitches) and divide by the number of decreases to be made (e.g. 8) = 12.5. In this example decrease by knitting alternately each 11th and 12th stitch and each 12th and 13th stitch together. ------------------------------------------------------- START THE PIECE HERE: ------------------------------------------------------- VEST – SHORT OVERVIEW OF THE PIECE: The piece is worked in the round with circular needle as far as the armholes, then the front and back pieces are continued separately back and forth. An edge is worked around each armhole. Finally a pocket is worked and sewn onto the front piece. BODY: Cast on 100-114-128-136 (150-158-172) stitches with circular needle size 2 mm = US 0 and Flora. Knit 1 round. Then work rib (= knit 1 / purl 1) for 3 cm = 1⅛". Change to circular needle size 2.5 mm = US 1,5 and knit 1 round where you decrease 8-10-12-12 (14-14-16) stitches evenly spaced - read DECREASE TIP = 92-104-116-124 (136-144-156) stitches. Continue with stockinette stitch. When the piece measures 14-17-19-20 (22-24-26) cm = 5½"-6¾"-7½"-8" (8¾"-9½"-10¼"), bind off 2 stitches for each armhole as follows: Bind off the first stitch on the round, work the next 44-50-56-60 (66-70-76) stitches, bind off 2 stitches, work the next 44-50-56-60 (66-70-76) stitches, bind off the last stitch on the round. Front and back pieces are now finished separately. BACK PIECE: = 44-50-56-60 (66-70-76) stitches. Continue working back and forth until the piece measures 18-21-23-24 (26-29-31) cm = 7"-8¼"-9"-9½" (10¼"-11⅜"-12¼"), insert 1 marker in each side. These mark where the shoulder flaps from the front piece will be attached (see ARMHOLE EDGE). Continue with stockinette stitch until the piece measures 20-24-25-27 (30-32-35) cm = 8"-9½"-9¾"-10⅝" (11¾"-12½"-13¾"). Place the middle 24-26-28-28 (32-34-34) stitches on a thread = 10-12-14-16 (17-18-21) stitches left on each shoulder. LEFT SHOULDER: Continue with stockinette stitch, AT THE SAME TIME decrease 1 stitch every 2nd row (= each row from the right side) towards the neck. Decrease by knitting 2 stitches together, 10-12-14-16 (17-18-21) times; now all stitches have now been bind off. RIGHT SHOULDER: Work as for the left shoulder. NECK: Using circular needle size 2 mm = US 0 and working from the right side, knit up 14-18-20-22 (24-26-30) stitches along the side where stitches were decreased on the left shoulder, place the 24-26-28-28 (32-34-34) stitches from the thread back onto the needle, knit up 14-18-20-22 (24-26-30) stitches along the side where stitches were decreased on the right shoulder = 52-62-68-72 (80-86-94) stitches. Work 4 rows of rib, knit 1 / purl 1 (first row = wrong side). AT THE SAME TIME on each row work 2 stitches in the first stitch; the new stitches are worked into the rib as you go = 56-66-72-76 (84-90-98) stitches. Bind off with knit over knit and purl over purl. FRONT PIECE: Cast on and work as for the back piece. ARMHOLE EDGE: Lay the shoulder flaps from the back piece over the shoulder flaps from the front piece. Pin the tips of the shoulder flaps from the back piece to the edges of the front piece, where the markers are. Pin the tips of the shoulder flaps from the front piece to the edges of the back pieces, where the markers are. Knit up approx. 50 to 80 stitches with double pointed needles size 2 mm = US 0 around the armhole; make sure you knit through both layers where the shoulder flaps overlap. Work 4 rounds of rib, knit 1 / purl 1, then bind off with knit over knit and purl over purl. Work around the other armhole in the same way. POCKET: The piece is worked back and forth with circular needle. Cast on 16-16-18-18 (20-20-20) stitches with circular needle size 2.5 mm = US 1,5. Work A.1 over all stitches. Continue until the piece measures 4-4-4-4 (5-5-5) cm = 1½"-1½"-1½"-1½" (2"-2"-2"), change to circular needle size 2 mm = US 0. Work 4 rows rib, knit 1 / purl 1, over all stitches, then bind off with knit over knit and purl over purl. Sew the pocket to the vest – see photo. |
|||||||
Diagram explanations |
|||||||
|
|||||||
 |
|||||||
Have you finished this pattern?Tag your pictures with #dropspattern #babypocketsvest or submit them to the #dropsfan gallery. Do you need help with this pattern?You'll find 21 tutorial videos, a Comments/Questions area and more by visiting the pattern on garnstudio.com. © 1982-2026 DROPS Design A/S. We reserve all rights. This document, including all its sub-sections, has copyrights. Read more about what you can do with our patterns at the bottom of each pattern on our site. |
|||||||


With over 40 years in knitting and crochet design, DROPS Design offers one of the most extensive collections of free patterns on the internet - translated to 17 languages. As of today we count 324 catalogs and 12290 patterns - 12280 of which are translated into English (US/in).
We work hard to bring you the best knitting and crochet have to offer, inspiration and advice as well as great quality yarns at incredible prices! Would you like to use our patterns for other than personal use? You can read what you are allowed to do in the Copyright text at the bottom of all our patterns. Happy crafting!
Post a comment to pattern DROPS Baby 33-22
We would love to hear what you have to say about this pattern!
If you want to leave a question, please make sure you select the correct category in the form below, to speed up the answering process. Required fields are marked *.